30.12.2019
| (Votes: 3, Rating: 4.67) |
Issues discussed in the material:
- How to install a clutch disc: step-by-step instructions
- Which side is the right way to place the clutch disc?
- How to install the clutch disc correctly: the opinion of motorists
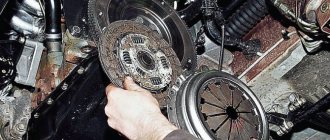
As you know, a manual transmission is characterized by fairly high reliability and unpretentiousness. As a rule, even for a careful driver who knows how to drive a manual transmission, the clutch lasts on average 100–120 thousand km. In the future, the release bearing fails, and problems with the clutch disc and basket may arise. If the car is used actively and aggressively, then the clutch can be scorched and damaged much earlier. And a reasonable question arises: how to install the clutch disc?
Replacing the clutch itself is not an extremely complicated procedure, but it does require certain skills and tools. Also, during the installation process, some owners do not know how to install the clutch correctly. Next, we will look at the nuance of how to install the clutch disc when replacing it.
Lada 2106 › Logbook › Clutch 2110 classic.
The clutch asked for replacement when assembling the car after body work, but I still decided to delay this matter a little because...
the budget is not rubber, and at that moment we bought a lot of things that were missing in terms of bodywork and components. Putting the first one into gear was always difficult and was ignored by me, I believed that “that” day would come and I would change the clutch. Also, sometimes the rear one crunched, but it didn’t bother me too much. After six months of the appearance of a whistle coming from under the engine compartment, a crunching sound appeared. It was none other than a squeezer, a little later it crunched and rattled. And I kept blowing on the new pump. Well, as a result of all this, while driving on the highway at a speed of about 100 km/h, when engaging 4th gear, it crunched quite nicely. This was the starting point for purchasing a clutch. The choice is not to say that it is small, but still there is nothing to choose from: 1. Clutch kit 2106 Finwhale CK101 - idk, what a company. Based on the description on the manufacturer’s website, we can conclude that the company is serious. But for some reason it smells like chicken meat. Pay attention to the model in the description and to the kit: 2. The second number will be the clutch kit 2106 HOLA S 201. With this it would seem that everything is clear. Regular factory ketai. But the clutch basket deserves close attention. To put it mildly, she is the twin brother of the first candidate for transmitting torque from the Zhuchka’s engine to her own wheels. The kit also hints at this to us. People speak of him: “As luck would have it.” Russian maybe, I overcame it and began to search further.
3. VIS clutch. Nothing to say. Regular factory clutch. It goes on average 30t. km. then the problems begin. In general, this suited me, but I wanted something more, although rather interesting.
4. Clutch kit 2106 FSO. This is a product of a Polish company, which in turn produces all sorts of spare parts. for non-our cars. And then there’s the humane price and the thought that maybe it’s still good weight? I also grew these thoughts away.
5,6,7 Clutch kits Beginning, trial, Road map, AT, to be honest, I didn’t even consider them. I really don’t want to practice removing and installing the gearbox at speed.
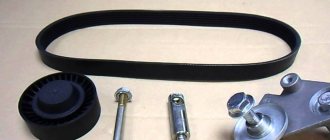
Scrolling through the RuNet forums, I came across a sketch about installing a clutch from a VAZ-2110 on a classic flywheel. The basket has the same mounting dimensions as the original 2101, only it is made without spiders. The driven disk also corresponds to the size of the original disk 2106. The only thing left to do is the clutch release. It requires the participation of our right and left hands. I won’t describe everything, but I will say one thing: for the correct operation of the 2110 clutch on classic Lada cars, a symbiosis of the release bearing is required. We take the complete clutch bearing 2110 and disassemble it into 3 parts. We are only interested in the bearing itself. The original classic one also needs to be disassembled and only the back part with the bracket should be used. To pair these 2 parts, you need to order a kind of adapter from a turner. It is worth paying attention to the fact that the fit dimensions of the bearing and the rear part must be made by the turner within a tolerance of 0.01 mm. Here's a drawing I found on the Internet:
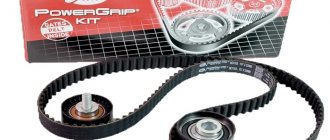
Next, I ordered the 2110 VIS clutch kit.
There's only a little left. 4 days of waiting for the clutch kit and adapter. Not a nail or a rod!
Let's summarize
If the check shows that the free play is normal, but you doubt your competence in adjusting the unit, contact a service station. Incorrect settings can cause rapid clutch failure. If you want to complete the work yourself, you can find the necessary information on the vehicle manufacturer’s website or in its service book. It is important to complete the work in a timely manner so as not to get into an unpleasant situation on the road. Monitor the service life of clutch parts; for example, the service life of the driven disc is 100 thousand kilometers. But, if a motorist has an aggressive driving style, it can decrease by 2-3 times. How to replace a VAZ 21099 clutch, watch this video:
Which side should the clutch disc be placed towards the engine? Which is correct?
Which side should the clutch disc be placed towards the engine? Which is correct?
I have my own sad experience of incorrectly installing the flywheel disc, when I assembled everything and at the first start there was no clutch at all, and even grinding sounds were heard. I had to remove the box again and change the disk side. Technically, this is what happened:
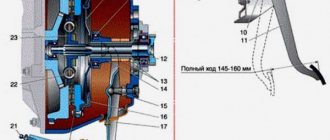
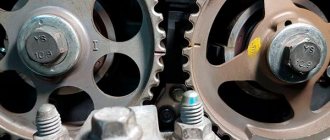
The disc hub rested against the flywheel support bearing, and the damper springs rested against the flywheel mounting bolts. Because of this, a gap of several millimeters has formed between the disc and the flywheel (that’s right - the working part of the clutch disc should fit snugly against the working surface of the flywheel)
The basket pressed on the disk from the reverse side, which led to the disk being pinched between the basket and the flywheel. Even when the clutch was depressed, the release bearing did not do its job, and the clutch disc remained clamped, but torque was transmitted from the engine through the clamped hub and the damper spring housing.
Replacement
So, having purchased a new clutch disc, we proceed to install it. To reduce the complexity a little, we will make the replacement without removing the box. We carry out work on an overpass or hatch.
Starting with labor feats, we will carry out the preparatory stage:
Now we move directly to the main stage of our work. replacing the clutch disc:
READ How to set the distributor on a VAZ 2107
Further installation is carried out in the reverse order, not forgetting to adjust the free play of the clutch pedal afterwards.
With the help of simple manipulations, you can make the replacement yourself and save on visiting a service station. The main thing is not to miss the moment when the disk fails. No nails, no sticks!
see also
How to check the clutch
- 36 0 57k
Clutch faults
- 21 2 35k
Which side should I put the clutch disc on?
- 0 3 37k
Extraneous sound when starting VAZ 2110
- 0 3 4k
Clutch release bearing: principle of operation, symptoms of malfunction
- 181 0 138k
Are there signs of clutch wear on your 2110? Hence? You need to purchase a new set and make repairs, or rather replace the clutch on the VAZ Top Ten.
Without a garage with a pit, you can make do with improvised means. To change clutches on a VAZ 2110 you will need : a set of keys, a jack and wooden stumps. And for proper alignment of the clutch disc, you will also need a guide, which is also a simulator of the gearbox input shaft.
Clutch replacement will be needed when the wear of the petals reaches more than 0.8 mm or an increased stroke of the clutch pedal appears - this indicates wear of the drive disk , possibly, spring settlement. The driven disk is mounted on the splines of the gearbox input shaft and is changed in case of runout, uneven wear, scuffing, cracks, and also if the linings from the rivets are 0.2 mm apart.
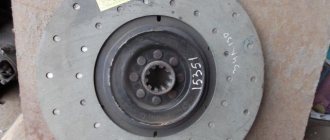
The driven clutch discs of the VAZ 2110 and VAZ 2112 have the same dimensions (200x140), but slightly different characteristics of the springs - pressure and damper. 2112 discs have a pair of springs (out of six) that are smaller and placed closer to the center; they transmit 12% more torque thanks to a boosted compression spring. The “twelfth” discs can also be distinguished by the hole in the slot of the petals.
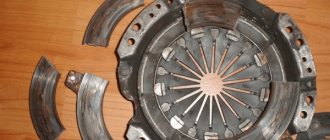
Removing the basket
To dismantle and install the clutch kit, you need to have a small piece of pipe on hand, or better yet, a part of the gearbox input shaft or a special guide bushing. With its help, it is necessary to install the basket clearly in the center of the flywheel so that the hole in it and the driven disk coincide as much as possible. But first, unscrew all the bolts securing the basket, and it is advisable to do this crosswise. Then carefully remove it and inspect the flywheel, especially its crown - there should not be excessive wear on it. If there is one, then you will have to knock down the crown, heat it and install it with the reverse side. If such a procedure was carried out, it is advisable to install a new flywheel crown. Otherwise, the starter will no longer cling to the flywheel teeth, and starting the engine will be problematic.
What kind of clutch should I put on a VAZ 2110 and when should I change it?
Original number 21100-1601000-00, average price about 2615 rubles.
- KRAFT KT098553 — 2894 rub.
- LUK 620305100 — 3050 rub.
- Trialli FR751 — 2235 rub.
The frequency of replacement depends on your driving style. On average, factory ones last about 50 thousand km, so car owners often replace them with imported ones, since they last more than 100 thousand km.
When replacing the clutch on a VAZ 2110, the following questions may arise:
Loosen the wheel bolts, jack up the car and place the sawhorses.
Remove the left wheel and unscrew the two bolts securing the lower ball joint.
We remove the “negative” terminal from the battery, remove the connector from the mass air flow sensor, loosen the clamp securing the corrugation to the mass air flow sensor, and remove the air filter housing from the car.
Remove the clutch cable from the clutch fork. Loosen the two nuts securing the cable to the bracket on the gearbox (hereinafter referred to as “Gearbox”).
- Unscrew the bolt securing the MZ to the gearbox housing.
- Unscrew the first gearbox mounting bolt.
You will need a good wrench with a 19 mm head and possibly a pipe wrench. There is another gearbox mounting bolt nearby.
You must remember to loosen this nut.
Communities › VAZ: Repair and Modification › Blog › INSTRUCTIONS FOR REPLACING THE CLUTCH (VAZ 2114)
SOME RULES: those who don’t like anything, are dissatisfied and want to take a shit, then GO THROUGH THE WOODS)))) posted for those who want, are going to change the clutch themselves. I hope the information is useful
I haven’t written for a long time, but it’s big right away!)
in general, what can I say... I bought a clutch. I decided to change it. In the book everything is written that everything is simple... well, I went for a drive, and everywhere everyone had notes like “I went to a hundred to change the clutch.” But because the clutch died, and the pre-session budget does not allow give 2.5 k to the service to change the clutch, and in general I want to change it myself! I went at 5 am to change the SoKoL2013 with a friend... well, we thought we’d get it done by 12 noon, so that we could then drive to the track in Glinkovo near Sergiev Posad to break in the new one clutch)) but that was not the case. I encountered many difficulties due to the fact that among us there were no car mechanics or specialists in this matter, but only a book... SO THE DETAILS. INSTRUCTIONS
what you will definitely need:1.
guide for clutch VAZ 2114 (photo 1) (required! without it, the box will never fall back into place)
2.
a powerful 30 socket (to unscrew the hub) or a hub puller
3.
a stronger wrench (to rip off the hub nut)
4.
set heads with all sorts of extensions and cardan shafts (it was much simpler and more convenient)
5.
a jack and two wheels (or bricks)
6.
a powerful 8-point head to unscrew the basket (it was firmly seated on mine)
7.
a 17-point wrench for adjusting the clutch (yes and in general, keys can come in handy)
n
a garage with a bunch of nuts, screws, washers (you never know;) ), straight arms, a friend with straight arms (better than two), a pit, and so on little things...)
don’t be lazy and take a lot of jars or a suitcase with compartments and put all the nuts, bolts, washers from each part in different cells
stage 1.
we tear off two hub nuts on both sides of the front with a 30mm socket and a powerful wrench (under the plastic cap on the brake disc) (if you first jacked up the car, then have a friend get in the car and press the brakes or set it to speed 1), loosen the wheel. Jack up the car , we throw two wheels and a board under it (this height was enough for us, and the jack was all screwed out), take out the jack, it will come in handy, and it’s dangerous to do it on a jack, remove the wheel.
stage 2.
remove the battery and air filter (required) and immediately below it there will be a clutch cable and disconnect it from the release rod, fall into the hole and unscrew the protection (crankcase and engine, which is on the side of the box) and two engine supports: rear and left. Next, unscrew the bolts and the nuts that connect the box and the engine together. They are all big there (I won’t say how many of them there are, because I don’t remember... I visually found and unscrewed 5-7 pieces: from below, from above 2 or 3, the ignition module mounting bolt (this is also will hold), then from the hole we find a rod that holds the box to the internal combustion engine (such a tube), we dodge, install an extension cord and remove it too (ONLY where it is attached to the box) in general, we unscrew all the bolts, nuts, studs that we like and come across eyes)))) just look there and you can see everything that holds it. Now the box is held only by the drive rods that go to the wheels.
stage 3.
we unscrew the stabilizer, which is on the side of the box and everything that holds it, and the molt holds it (two rubber cushions like that, connected and the holes point in different directions) and something else... you will see what and how. Our task is to take it out the rod and grenade from the hub (in short, remove the rod from the wheel) it can be easily removed. Put it down, unscrew it and take out the rocker switch (it’s next to the rear support there), check if anything is holding our box by placing 1-2 boards under the box in the hole to put it down.
Which side is the clutch disc placed on?
Which side should I put the disc on, the convex side towards the basket or the flywheel?
- Extraneous sound when starting VAZ 2110 - 3 answers
- Is it possible to install a clutch driven disc on a 2110 without a mandrel? – 2 answers
- Clutch housing VAZ 2110 – 2 answers
- What is the best clutch to install on a VAZ-2110? – 2 answers
- VAZ 2110 does not drive and starts poorly - 2 answers
...And convex to the flywheel.
Here's a drawing and a photo, you can see which side it's on and where to put it.
If you are interested in the removal and installation process, watch the video
Every car owner sooner or later thinks about independently repairing his “swallow”. Let’s face it, this process not only saves money, but also brings incomparable pleasure. However, not all motorists have the necessary skills - each situation requires a special approach and relevant knowledge. In the age of the Internet, finding detailed and step-by-step instructions is a piece of cake. Today we will tell you how to install the clutch disc with the correct side, and avoid making common mistakes.
The clutch is necessary for the vehicle to start smoothly, without overloading the remaining parts of the power unit: the engine and gearbox. In this case, the main goal is achieved - the power unit and gearbox units function for a long time, in accordance with the norm.
As a rule, the disc is replaced simultaneously with the replacement of the entire clutch basket (due to wear and tear of the parts, it is more cost-effective to carry out a comprehensive replacement than to change the parts individually). You can carry out the whole complex of work in two ways: with dismantling the transmission, or without it (this method is much simpler). In order to change the disk you will definitely need an inspection hole or a lift.
You can select a clutch disc on the VagMag website for most foreign cars, as well as new ZAZ cars.
Next, VagMag specialists will provide you with step-by-step instructions, and we recommend that you follow them. Because Incorrect manipulations can lead to additional problems in the mechanism of your car, and to the need to repeat all repair work again, but in the correct sequence.
Installation of new spare parts, disk alignment
The new disk is installed in the same way as the old one, and is clamped by the basket, only before screwing the basket all the way, the driven disk must be centered, otherwise the input shaft of the box will not fit into it. The easiest way to center it is with a special mandrel, but if you can’t get one, you can do everything by touch. We screw the basket onto all the bolts, having previously pushed the driven disk under it, but we do not screw it all the way, but so that the disk moves under it. We need to align it in the center, this can be done by touch by sticking your finger into the middle hole, by touch we align everything in the center and only after that we tighten the bolts. We check whether everything is in the center, if so, then tighten the bolts, first locking the flywheel. The clutch is in place. If it is not positioned in the center, then if you put the box on, it won’t fit. Well, then we put the box on, if it doesn’t want to sit down, you can shake it, twist the drive so that the input shaft rotates and takes the desired position, everything should jump up quite easily. After that, we fasten everything that was unscrewed, see if there are any extra parts left on the sides, if there are any, then we screw them where necessary.
How to remove the clutch
- Using special wedges, we stop the car.
- We release the cardan drive from the gearbox and working cylinder.
- We turn off the limit switches of the reverse sensors.
- We unscrew the nuts securing the gearbox supports, using a wrench covering the fastener on all sides. We remove the gearbox from the engine to the maximum permissible distance.
- After all the manipulations, the gearbox should be strengthened with additional support, because it will literally hang on the exhaust pipe.
- We remove the flywheel and unscrew all the clutch basket mounting bolts. It will be easier for you to reach the bolts if you rotate the crankshaft from time to time.
- Remove the clutch disc by first sliding the clutch basket. Then we dismantle the basket itself, moving it towards the engine. We dismantle the clutch fork and release bearing.
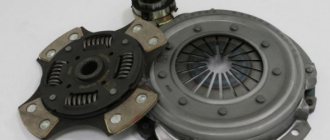
Clutch disc design and purpose
The clutch disc ensures smooth movement of the vehicle, which is achieved by slipping the continuously rotating drive disc. Which is attached to the crankshaft in relation to the driven disk, and is connected to the transmission using a spline. The side of the casing is equipped with three rectangular recesses, spaced evenly. The hubs of the driven disk fit closely into the recesses. Thanks to this design, a torque is applied to the disc, and when the clutch is activated, it moves relative to the axle.
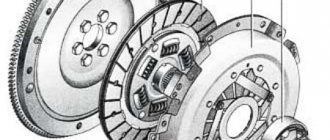
In the space between the clutch housing and the driven disc element, springs are located in pairs (9 pairs in total). In order to protect the spring from overheating (when the car slips), special asbestos friction linings are installed. The entire clutch assembly consists of:
- flywheel;
- clutch driven disc;
- clutch baskets (pressure plate);
- release bearing with clutch