Reasons for failure
There are many reasons for bearing failure, but there are several main reasons, which are discussed below.
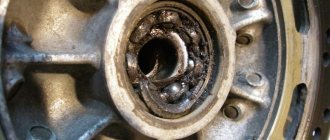
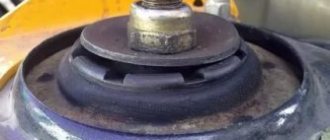
Wear
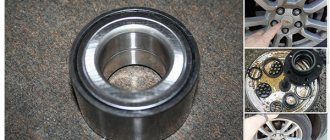
On the left are old bearings, on the right are new bearings.
Wear is a typical cause of bearing failure, since the number of revolutions of the generator rotor is huge over the Nth period of time. Consequently, the lubricant in bearings under the influence of high temperatures loses its properties and the bearing ceases to receive the required slip coefficient, which causes heating and increased clearances in the ball part of the bearing.
Belt tension
Excessive tension on the alternator belt greatly affects the life of its bearings. It is necessary to tension the belt correctly, observing all norms. The generator belt should bend under the influence of 10 kg. by 5-7 mm.
When is it necessary to change?
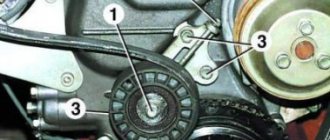
If a car generator begins to creak and howl during operation, this is the main sign that the bearings urgently need to be replaced . Howling, as a rule, occurs due to the lack of lubrication in the separators of these parts. Alternatively, the bearing cage may simply fail due to wear or fatigue stress. There is one nuance here that should definitely be mentioned. Sometimes on a VAZ 2110, what is heard from the generator area is not a howl, but a thin, barely audible creak, which the car owner can mistake for the creak of a failed bearing. But most often it’s the pump creaking or the sound coming from the pulley on the timing belt. To understand that it is the generator bearing that is creaking, you should remove the belt. If the sound does not disappear, then the problem is in the bearings.
Diagnostics
If noises and hums appear in the operation of the engine, it is necessary to check and find the culprit of the noise. Most often it is the generator, but in order to exclude other culprits it is necessary to diagnose it.
It is not difficult to independently check the condition of the bearings; this only requires compliance with the points described below.
- Remove the generator belt from the crankshaft and generator pulleys
- We start the engine and listen
- If the noises, whistles, vibrations have disappeared and the internal combustion engine is working properly and smoothly, then the culprit is definitely the generator bearings.
- You can also grab the generator pulley and shake it up and down; there should be no play. Turn the rotor manually, there should be no whistles or squeaks, the rotor should rotate smoothly and softly.
Replacing the generator bearing on VAZ-2110, 2111, 2112
The main malfunctions of the generator include wear of the brushes, rotor commutator, failure of the voltage regulator and diode bridge, but most often its bearings fail.
A bearing malfunction manifests itself as noise, howling and excessive play on its axis. If you put off replacing a damaged bearing, this can lead to its wedge or destruction and, as a result, failure of the generator. In some cases, with such damage, the generator cannot be restored, so you should not delay repairs.
Cost of parts
The front bearing 303 costs about 100 rubles, the rear bearing 202 about 80 rubles. When purchasing, you should check that the bearing rotates freely without any jamming; there should also not be excessive play between its races; the play should be insignificant.
Before installing new bearings, it is recommended to open their seals and check the presence and quantity of grease, adding if necessary.
Replacing bearings
To remove the generator on a VAZ 2110 car, you must perform the following operations:
- disconnect the positive terminal of the battery;
- release the belt tensioning mechanism and remove the belt, to do this, unscrew the fixing nut 13 and unscrew the bolt 10 of the tensioner mechanism;
- disconnect the generator wires;
- Unscrew the lower mount of the generator, remove the bolt and remove it from the car.
- Now that the generator has been removed, you can begin disassembling it. First you need to remove the pulley, for which you unscrew its nut by 24. This can be done either using an impact wrench, or by holding the pulley in a vice and wrapping it with two or three old belts.
- Unscrew the pulley nut and pull it off the generator axle. To do this, you will need a two- or three-legged puller of a suitable size, which can be purchased at any automotive market.
- After the pulley is removed, you can disassemble the generator housing, having first removed the voltage regulator with brush holder, diode rectifier and capacitor, which are hidden under a plastic cover.
- To disassemble the generator housing, you need to unscrew the 4 screws that hold its halves together. Usually the screws become stuck during the life of the generator, so it is recommended to fill them with some kind of liquid like WD-40 before disassembling.
- After unscrewing the screws, remove the front cover of the generator, which contains the front 303 bearing. At the factory, when installing the bearing, the generator housing cover will be rolled to securely fasten it, so you will need to select a mandrel according to the diameter of the bearing seat, on which to rest the housing cover and knock it out or press it out from the back side.
- Having selected a mandrel according to the diameter of the outer race of the bearing, hammer it into place.
- If the bearing has been replaced several times and its seat in the cover is broken, it must be replaced. The new cover is sold with the bearing already installed.
- If it is necessary to replace the rear bearing, then continue disassembling the generator by removing the stator with windings from the generator, then using your fingers to push out the plastic support of the rear bearing and remove it from the generator rotor. After removing the support, access to the rear bearing will open. To remove it, you will need the same puller as for the generator pulley. Having pulled off the old bearing, press in a new one using a mandrel of the diameter of the inner race of the bearing.
ATTENTION! In this case, hitting the outer race of the bearing is prohibited! This significantly reduces its service life. Clamping the rotor in a vice by the axis is prohibited! Scratches on it will interfere with the assembly of the generator. - If the bearing is installed without the help of a hydraulic press, the rotor must be supported with its axle on a wooden surface, preferably having first screwed a nut onto the pulley mounting thread to prevent damage.
- After pressing on the new bearing, reassemble the generator in the reverse order and install it on the car, connect the wiring, and then tension the belt. Before installing the old belt, check its condition and replace it if necessary.
The belt is tensioned according to the following algorithm:
- with the fixing nut on 13 of the generator belt tension mechanism loosened, tighten the tensioner bolt with a 10 wrench until the belt, when pressed with a force of 10 kgf, sags by 10-15 cm;
- Tighten the generator fixing nut.
ATTENTION! Retightening the alternator belt is unacceptable! This threatens rapid failure of its bearings and severe wear of the belt and pulleys (crankshaft and generator).
At this operation, the process of replacing the generator bearings can be considered complete.
To summarize, it should be emphasized that you should not delay replacing bearings. In addition to the unpleasant sound, untimely replacement of bearings can lead to their destruction, wedge and, as a result, failure of the generator.
In some cases, the generator cannot be repaired, and a new one costs much more than the bearings and the time spent replacing them. New bearings solve the problem of generator noise and significantly extend its service life.
Size and catalog numbers
These parameters of the ball bearing are necessary for purchase, since without these numbers it is very difficult to buy the right part suitable for your car.
The dimensions of the bearings varied depending on the year of manufacture of the car, so the selection of a bearing can be carried out based on the year of manufacture. auto.
Cars manufactured before 2001 with carburetor engines they have bearings of type 6302 front and 6202 rear.
Cars produced after 2001 with injection engines, have bearings type 6303 front and 6203 rear.
Catalog numbers (articles) and external dimensions
| Bearing, no. | vendor code | Dimensions, mm |
| 6303 | 180302 | 17*47*14 |
| 6203 | 80203 | 17*40*12 |
| 6302 | 180303 | 15*42*13 |
| 6202 | 80202 | 15*35*11 |
Disassembly, replacement
Having prepared everything you need, you can begin work. The sequence of actions is as follows:
- We put the VAZ-2110 in the garage or on the site. Disconnect the negative terminal from the battery. Disconnect all wiring from the generator.
- We unscrew the fixing nut and the adjusting screw, push the generator completely towards the motor and remove its belt. Unscrew the bolts securing the adjusting bar and remove it.
- We climb under the car. We remove the front part of the crankcase protection from the car, unscrew the nut of the lower mounting of the generator, remove the bolt and pull out the generator.
All subsequent work is performed on the removed generator. - Unscrew the pulley mounting nut. There are several ways to do this. The first of them is if a hole for a hexagon is made in the rotor shaft. Use a hexagon to hold the shaft, and use a spanner to unscrew the nut.
If this method fails to loosen the pulley fastening, we use the second method. It comes down to fixing the rotor with a screwdriver. We install it in the slots made in the rotor through the ventilation holes.
Having fixed the rotor, unscrew the nut with a wrench. If we couldn’t unscrew it this way, we’ll give up trying for now and move on to further work. - Removes the protective cover mounted on the rear of the generator. To do this, pull back the three latches and carefully remove the case.
- In order not to damage the generator elements installed in the rear part (brushes, regulator, diode bridge, capacitor) during further work, it is better to remove them by unscrewing their mounting bolts.
- Remove the back cover. It is attached to the front with 4 bolts. In some models, the bolt heads are made for an 8 socket wrench, in others - for a Phillips screwdriver.
First fill these bolts with WD-40, since they often turn sour. We also mark the position of the back cover to the front with a marker. You can do this in advance.
After unscrewing the bolts with a screwdriver, carefully press the back cover and remove it. In this case, the rear bearing should remain on the shaft. - If it was not possible to remove the pulley before, after dismantling the back cover, this can be done by holding the rotor in a vice. If the pulley was removed earlier, knock out the rotor from the front cover. To do this, screw a nut onto the shaft thread, holding the front cover of the generator, hit the shaft with the nut on a wooden stand - the rotor should come out of the front bearing. Unscrew the nut and completely remove the rotor.
- We knock out the bearing from the front cover. To do this, we use a suitable piece of pipe or a 27 socket from a set of keys.
Or using a pipe with a suitable diameter.
If you immediately purchased a cap with a bearing, it will be much easier. - We lubricate the new bearing and drive it into the seat using the old one. The old bearing is used as a guide and is struck with a hammer until the new element is completely seated.
After this, we flare the edges of the cover to fix the bearing in it. - Remove the rear bearing from the shaft. To do this we use a puller.
If this is not the case, you can use a regular large open-end wrench. We place one jaw of the wrench under the bearing, the rotor will play the role of a stop. We use the key as a lever, striking it lightly with a hammer. The key must be moved in a circle so that when removed it does not become distorted. - Having removed or knocked down the rear bearing, we install a new one in its place. We fill it to its location using a pipe attachment or a socket wrench. It is important that when landing, the diameter of the tube or key is equal to the diameter of the inner race of the bearing.
- Before assembly, we once again thoroughly lubricate the new bearings.
Replacement
To replace it, you will need to remove the generator from the car and some plumbing tools. It would also be a good idea to have a generator bearing puller. Having all the necessary tools, you can handle the job with basic mechanical knowledge.
Puller
The puller greatly facilitates bearing replacement work, saving time, effort and nerves. This device is a faithful assistant not only when working with a generator, but also with other car parts.
It consists of claws and a thrust bolt. There are a large number of different pullers, they are: two-jaw and three-jaw. In our case, when working with a VAZ 2110 generator, it is best to use a two-jaw one; it is the most compact and convenient to dismantle the bearing.
Its cost varies from 200 to 1000 rubles, depending on the quality of the part.
Necessary tool
The tools you will need to complete the work are presented below:
- Ratchet;
- 13mm, 10mm key;
- 21mm head;
- 8 mm hexagon;
- Gas key;
- Powerful screwdriver “+”;
- Hammer;
- Puller;
- Punch;
- WD-40 (lubricant)
- Rags;
- Marker;
Stages of work
1. Disconnect the negative terminal from the battery. We unscrew the wires on the generator with a 10mm wrench and remove the generator excitation chip.
2. We remove the generator from the car. To do this, unscrew the generator belt tension bolt and remove the belt, unscrew the generator from the mounts and remove it from the car. Be careful not to lose the rubber bushing and washers when removing the lower mounting bolt.
3. Let's start disassembling. Remove the plastic cover of the diode bridge by bending the three latches. Unscrew the two screws securing the brushes to the body and disconnect the connector from the brushes. We mark the alignment of the covers with a marker so that in the future we can assemble everything correctly.
4. Using a screwdriver, unscrew the screws of the ends of the generator winding from the diode bridge and bend them. Unscrew the screw securing the capacitor and separate the diode bridge from the generator.
5. We unscrew the generator pulley with a 21 mm socket, holding it with a gas wrench and holding the rotor shaft with an 8 mm hexagon. We take out the generator pulley and thrust washer.
6. Unscrew the 4 bolts of the cover and remove it along with the stator winding.
7. We take out the back cover by pressing the manifold with our fingers and pull the cover towards ourselves, remove the plastic bearing bushing.
8. Remove the bearings using a puller.
We assemble the generator in the reverse order.
Parts Specifications
To purchase new parts, you need to know which bearings are specifically installed in your unit in order to avoid mistakes. The VAZ-2110 generator has 2 supporting elements: front and rear. Their markings vary depending on the year of manufacture:
- in units produced in recent years, the rear part is marked 6203, the front - 6303;
- in older versions the number is slightly different - 6202 and 6302, respectively.
The bearing cages are sealed on both sides with plastic caps, which can be removed to add lubricant if necessary. The overall and internal dimensions of the rotating parts are the same for any marking; their exact values are indicated in the table.
| Bearing size | width, mm | by outer diameter, mm | by internal diameter, mm | Catalog number |
| Front | 14 | 47 | 17 | 180202 |
| Rear | 11 | 35 | 15 | 24940220 |
As a lubricating filler for cages, you can use thick lubricant “Litol-24” or another intended for rolling bearings. It is easy to identify the manufacturer by the additional symbols on the labeling.
The most popular parts of Russian production are from the following enterprises:
- Samara plant, marking - SPZ-4;
- Vologda plant - 23GPZ;
- Saratov plant - 3GPP.
Also, quite often, motorists install 2110 generator bearings from the Koyo, Kraft and LSA brands.
It is strictly not recommended to install elements without inscriptions and markings, manufactured in an unknown location, most often in China.
You may run into trouble with such parts quite soon due to the poor quality of the products.
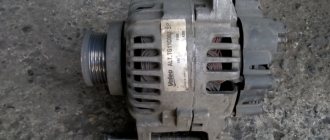
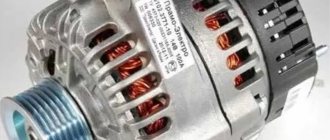
GENERATOR MODEL ON VAZ 2114 CAR
If on early VAZ 2108-09-099 models a generator of the 37.3701 series was installed, then on the VAZ 2110-2115 the brand 94.3701 began to be used. Generators of this series have significant power - the rated current (maximum output current) of such units can be 80A, 90A, 105A, and even 120A (manufacturer StartVolt). The price of the device starts somewhere from 3,500 rubles and can reach 5,000 rubles or more. The price depends on the manufacturer, the technical characteristics of the generator, the region of sale and the seller himself. Other main characteristics are:
- Rated rotation speed;
- efficiency;
- Rated voltage;
- The frequency at which self-excitation occurs.
Generator 94.3701 is an electrical machine that generates alternating current; direct current is obtained through a rectifier (diode bridge) located at the output of the electrical circuit of the machine. Type 94.3701 is used on VAZ passenger cars with an electronic engine control system (ECM), the units are capable of operating at temperatures from – 40º to + 45ºC, permissible humidity 90%. Products are sold both on the domestic market and exported to countries with different climatic conditions.
Generator set model 94.3701
Replacing bearings yourself
If the generator is repaired on its own, the main problems become:
- how to remove the front bearing of a generator - it is often rolled into the front cover housing, pressing in a new product becomes more difficult, since part of the housing is destroyed during dismantling;
- Removing the rear bearing - you need a puller with suitable dimensions.
Dismantling the generator
On some cars, the generator can be removed through the hood, on others, for example, VAZ 2112, you will need an overpass, pit or lift. The dismantling sequence is as follows:
- disconnecting the “–” terminal from the battery;
- loosening the tensioner nut;
- dismantling the alternator belt;
- disconnecting the terminals of the on-board system from the dismantled unit;
- removing engine protection;
- unscrewing the two mounting bolts from below;
- removing the generator from below.
Dismantling the generator step by step
After this, the repair continues on a table or in a vice. At this stage, the dimensions of the front and rear bearings of the auto generator are still unknown to the user if there is no manual.
Complete disassembly
Since the generator bearing can be checked for runout only after complete disassembly, it is necessary to follow the following sequence of actions:
- marking - using a marker, paint or colored nail polish to mark the relative positions of the casing, front cover and body;
Marking the relative position of body elements
- dismantling the pulley - the rotor is carefully blocked with a screwdriver from turning, the pulley is turned away with a key;
Pulley removal
- removing the casing - it is usually fixed with latches that need to be unscrewed with a screwdriver to remove the specified part;
Removing the casing
- dismantling the front cover - use a screwdriver to unscrew the screws.
Removing the Front Cover
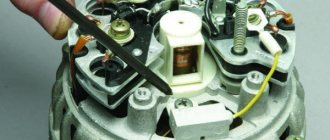
Under the casing there is a voltage regulator, a diode bridge, brush clamps, and a capacitor. Before replacing the bearing, you should check the wear of the brushes, the performance of the diode bridge and the voltage relay in order to increase the next overhaul period.
Before replacing standard consumables, it is necessary to check the bearings:
- rear - use your fingers to turn the outer race, which should not emit any extraneous sounds when rotating and have no play;
- front - here, on the contrary, the inner race is rotated and the play is controlled when the bearing is rocked inside the seat with your fingers.
Manufacturers unanimously recommend replacing the front cover along with the bearing, especially if it is rolled inside the seat. In practice, to reduce the repair budget, the cover is left for further use, since it costs 150–300 rubles.
Front bearing
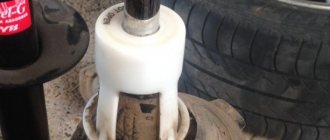
If the results of the previous test require replacement of the alternator front bearing, the old standard product is removed from the front cover:
- the bearing can be knocked out inside by placing the cover on the bricks with the outer side up;
- or secure the lid in a vice;
- or use a special puller.
Removing the front bearing
In the presence of rolling, this fixing element is broken irrevocably.
Broken rolling
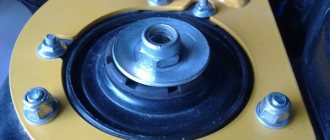
After the owner has removed the worn-out consumable, a new bearing is mounted inside the front cover:
- the lid is turned over with the inside facing up;
- the seating surface is treated with sealant;
- a sleeve of suitable diameter is installed on the outer race;
- With light blows, drive the bearing into the seat until it stops;
- lubricate the balls between the races or fill the grease into special holes.
Rear bearing
The rear generator bearing is replaced as follows:
- dismantling with your own hands - the jaws of the puller grip the outer race, and by rotating the central screw the bearing is pulled out of its seat;
- installation - the standard product is mounted on the shaft, a sleeve of a suitable diameter is installed on the inner race, after which its surface is tapped with a hammer.
Removing the rear bearing
Rear bearing installation