Check Features
You need to know how to check the operation of the generator on a car correctly, otherwise you may encounter the fact that a working part will be completely damaged. By following just a few simple rules, you can avoid unexpected breakdowns.
- Checking should be done using a multimeter.
- When diagnosing the condition of the valves, the current should have a voltage of no higher than 12 V.
- If it is necessary to replace the wiring, you need to select wires with an identical cross-section to the original ones.
- Before you start checking the generator, you need to make sure that all fasteners are connected correctly and that the belt tension is correct (read more about the generator belt tension roller). If necessary, the connections are brought to a working condition, and the belt is tightened or loosened.
The main condition under which it is possible to check a generator at home is to maintain its working condition. If the device is disassembled or has received damage that prevents it from functioning, then diagnostics will not allow us to determine the suitability of the device for further operation.
You may also be interested in our specialist’s article on how to remove a generator on a VAZ-2114.
There is a list of actions that absolutely cannot be performed during verification:
performance testing should not be performed using a short circuit or in other words “spark”; connect terminals of different configurations to each other, as well as connect terminal 30 or B+ to ground; diagnostics and operation of the generator should not begin without connecting consumers
It is especially important to observe this point when the battery is disconnected;
How to test a generator for performance at home
There are two main verification methods. One of them, although very old, allows us to reliably understand the performance of the device. The second works more subtly and is able to respond to minor system flaws. Using the second method, you can identify the slightest deviations in the operation of each element.
How to check a generator on a car without removing it and without having the necessary tools
There is an ancient way to identify a generator malfunction. It is very simple, but the result can only consist of two points:
- works properly;
- there are malfunctions.
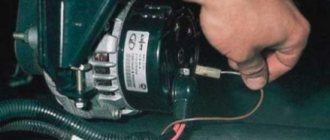
Since anyone can check a car generator at home using this method, its popularity is fully justified. You need to start the engine and turn on the low beam. You need to remove the negative terminal from the working engine. If the headlights are on evenly and the engine is not out of sync, then the generator is working properly. If the internal combustion engine operates uncertainly or the brightness of the headlights changes, it is necessary to perform a more in-depth diagnosis, since the device is in a faulty state.
How to test a generator with a multimeter
Measuring with a special device will reveal even a small failure. There are a number of indicators that are considered optimal for all types of machines. The battery without load has a voltage in the range of 12.5 - 12.7 V. Since a load is placed on the battery when the engine starts, the normal readings are 13.8 - 14.8 V. After receiving the maximum load, the voltage reading should drop to 13 ,8. If this does not happen or the voltage drops even lower, then the generator will need to be checked.
Since not all car enthusiasts can ring the generator correctly, if a malfunction is identified, but if it is not possible to carry out diagnostics yourself, it is better to contact a service center. Experienced technicians will be able to suggest the reasons for the breakdown and explain why it was not possible to carry out the research on their own.
Dismantling
To disassemble, remove and repair or replace the generator, you will need to do the following.
- Drive onto an inspection hole or overpass to have access to the bottom and engine compartment.
- Remove the battery, otherwise it will not allow you to get to the nut that holds the generator you are looking for.
- Next, the same nut and adjustment bar are removed. Here you will need a 17 mm wrench. Use an extension cord. This will make the task easier; you will have to apply less force to unscrew the fastener.
- In the engine compartment, remove the shield that performs dirt protection functions.
- Now the drive belt is removed and the wires are disconnected.
- Be sure to remove the protective cap and use a 10mm wrench to unscrew the nut that holds the tip and positive cable of your battery.
- There is another nut on the fixing bracket, which will also have to be unscrewed.
- That's it, you can remove the generator. Just remember to pull out the long bolt first.
- When removing, keep an eye on the buffer sleeve. It won't be good if you lose it.
Dismantling work
This completes the procedure for removing the generator. You can proceed with partial repairs or complete replacement of the unit.
Belt
Often, the solution to a poorly functioning alternator is simply adjusting the belt.
Belt
- For the device to work effectively, it is necessary to ensure normal deflection of the belt;
- The deflection size should be 6-10 millimeters with a force of 98 N or 10 kgf;
- To adjust or replace the belt, you need to move the generator slightly to the side, towards the cylinder block;
- By rotating the adjusting bolt, you can adjust the belt tension.
If this measure does not help, you will have to pay attention to the voltage regulator and brushes.
Brushes and regulator
It is not recommended to repair the generator brushes, as well as the voltage regulator if they are worn out.
Experienced specialists advise purchasing a complete unit that includes both elements. Replacement is completed in a matter of minutes.
Brushes
But we will definitely tell you how you can change the brushes on your car’s generator with your own hands.
- Disconnect the negative terminal from the battery and remove the battery.
- Remove the generator following the instructions above.
- You can replace the brushes without removing the generator, but this causes certain difficulties. It is much easier to remove the unit.
- Remove the cover, which is the protective casing of the generator.
- The wires and the generator itself are disconnected from the brushes. To do this, simply unscrew a couple of bolts.
- On the right side of the dismantled device there is a nut that can be unscrewed by 13 millimeters with a spanner.
- Now lift the voltage regulator lever, which will allow you to get to the brushes.
- Using new brushes, install them in place of the old ones and reassemble the assembly in reverse order.
When reassembling, proceed as carefully as possible so as not to damage the repaired generator with your own hands.
Quite often, the cause of failure is not the generator itself, but its relay.
There may be several reasons for replacing the relay.
Cause
Peculiarities
The most common reason. This is due to the fact that when the brushes wear out, the contact with the relay disappears, because the generator does not receive enough power, and the operation begins to fail
A breakdown appears in the circuit
As a result, the voltage in the system increases and the device fails.
Wires break
The contact loses its original adhesion quality
Broken fasteners or housing
It’s better not to let the situation come to this, otherwise a short circuit will occur, and then it’s not far from all the devices failing
If there are signs of a malfunctioning generator relay, be sure to replace it immediately.
Relay test
Many people, out of inexperience or ignorance, believe that when the battery cannot hold a charge, the culprit is solely the alternator. But in practice, the relay regulator is often the cause. To check it, you need to perform several operations:
- Raise the hood of your car.
- Start the engine and engage second, or even better, third gear.
- Remove the negative terminal from your battery. This way you will be able to avoid a short circuit.
- If the engine continues to run after disconnecting the terminal, the relay has failed.
- If the car turns off, then the problem should be looked for in the regulator itself.
Three level relay
Many experts advise installing three-level relays on the VAZ 2110.
The regulator-relay is installed on board the car, and the panel and generator brushes are installed directly into the generator.
Three levels of regulation allow the battery to remain charged for a long time, plus its service life is significantly extended.
These three levels are as follows:
- Minimum. Required to ensure vehicle operation even in conditions of elevated, extreme temperatures. The engine will not stall while driving in hot areas and will be able to withstand the load on covered slopes. This level is relevant for the summer season;
- Norm. The second level, which ensures normal operation under standard conditions without increased loads;
- Maximum. Allows you to confidently operate the car in subzero temperatures and makes it possible to start the engine with a discharged battery.
Purchasing such a relay regulator will ensure reliable operation of the battery and the entire vehicle. Therefore, you should not refuse such an acquisition.
How to disassemble a generator
First, make two marks on the metal covers. This will help you later assemble the unit without problems.
- Press out the metal latches and remove the plastic cover.
- Use a Phillips screwdriver to unscrew the voltage regulator mounting screws.
- Unscrew the M10 nut. Then use a screwdriver to remove the screw and remove the capacitor.
- To remove the pulley, clamp the generator housing in a vice. Put a 21 socket on the nut, and through the hole in the head put a 8 hexagon on it. Only after you unscrew the nut can you remove the washer and pulley.
- Remove the four mounting screws to disassemble the generator into two parts.
- From the back of the housing, unscrew the screws securing the stator wire and diode bridge.
- Remove the diode bridge and the oscillator winding.
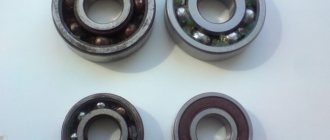
- Press the rotor out of the cover with your fingers along with the bearing.
- Carefully remove the bearing bushing.
- Take a puller and remove the bearing.
Disassembling the generator itself is much more difficult than removing the entire assembly from the car. To carry out repairs, you will need to diagnose the components of this unit.
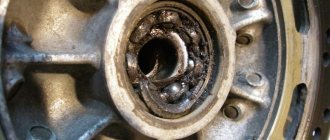
First of all, pay attention to the brushes; they need to be changed if this element is visible from the holder by no more than 5 millimeters. If the bearings rotate tightly, then they are the defective element (a hum may be heard during operation)
The breakdown of the starter and rotor windings can be checked with an ohmmeter; the same device determines the performance of the capacitor. If nicks, scratches or burrs appear on the slip rings, they must be carefully sanded to a shine with fine sandpaper.
Regulator check
After this, you need to check the operation of the voltage regulator:
- Connect a 12V control lamp to the brushes.
- Connect the wires + to the terminal, - to the ground of the brush holder with a voltage of 12V, the light is on.
- Using a rheostat, increase the voltage to 16 V, the light bulb continues to light.
This means that the brush holder along with the voltage regulator are out of order. They are subject to replacement. Before installing a new brush holder, check the protrusions of the brushes; they should be at a distance of more than 5 mm from the brush holder body. The capacitor is checked immediately (see Changing the capacitor (VAZ 2110 generator)).
Note: but in order not to waste time on subsequent repair work, it is better to immediately install a new capacitor.
How to replace alternator brushes on a VAZ 2110-VAZ 2112?
Note! The brushes can be replaced in two ways, which one you choose is up to you, the first method is to remove the generator from the car and replace the brushes (Convenient, but takes more time), the second method is to simply disconnect the minus terminal from the battery (How to remove the terminal , read in paragraph 1 of the article: “Replacing the battery on a car”) and in doing all the work on the installed generator on the car (It’s not very convenient but it won’t be difficult to remove the brushes, if you do everything correctly, you’ll save a little time, if you use tools there won’t be any short ones suitable for this, then it doesn’t even make sense to undertake such work, it’s better to do everything on a removed generator, and read about how to remove the generator in the article: “Replacing the generator in a car”)!
1. To change the brushes, first press out the three latches on the sides of the generator that secure the cover to it and then disconnect this cover from the generator (see small photo), now you have access to the voltage regulator, it has two screws that it is secured (indicated by blue arrows), you unscrew these screws and then, by pulling the regulator, disconnect it and thereby remove it completely from the generator.
Note! When you have removed the regulator, you can change it entirely with brushes, or if you do not have such an opportunity (it is not sold anywhere or you simply don’t have money for a regulator), then you can find the brushes separately and replace only them, they are soldered to the regulator are attached (or rather, their wires are soldered to the terminals of the regulator), so in this case, take a soldering iron and unsolder the wires coming from the brushes and then remove them from the regulator and new ones in the same way, install them by soldering in the same places, for more details, see the video that is posted below, but there is no sound in it, but in principle everything is perfectly clear from the video!
2. A few words about checking the brushes: as soon as you remove the regulator, look at the brushes themselves, which should be in good condition and have a length of at least 5 mm (see photo 1), if they are smaller, then either change them separately, or Replace the entire regulator so that you definitely don’t have any problems with it in the future, you can also check the regulator itself as follows, connect a 12-volt test lamp as shown in diagram 2 (that is, to the brushes) and apply the same voltage 12 Volts (the battery can supply it, that is, run some thin wires from it) “+” to the terminal, and “-” to ground, and the lamp should light up and do the same thing, but just apply the current not at 12 V, but at 15-16 V and if the lamp goes out, then everything is fine with the regulator and it does not need to be replaced.
Additional video clip: You can see in more detail and clearly the process of replacing the voltage regulator with a new one in the video located just below:
What kind of crap parts do Russia make here, in general, I bought a new generator and after two weeks the brushes burned out, at least that’s what they told me, I had to remove the generator and go return it under warranty, in the end they didn’t accept it, but at least the brushes were new for that They changed it, installed it again, drove it to 100 and said everything was working, before that the battery died in less than a week and I couldn’t even imagine that the new generator was to blame!
Replacing VAZ 2112 generator brushes and regulator relay with capacitor
If the battery of your VAZ2112 car is periodically discharged, the headlights are dim, while the engine is running, the battery discharge lamp is lit or blinking on the dashboard, all this indicates a malfunction of the generator. There can be many reasons, but you shouldn’t rush to change the entire generator, or rush to a service station where you’ll pay good money for a crap repair (this happens quite often). Most often, the reason lies in a small regulator relay block with brushes and a capacitor. Replacing the brushes of a VAZ 2112 generator usually solves problems for a long time and seriously, it is not expensive, takes minimal time, and anyone can do it with their own hands (you don’t even need to remove the generator from the car for this!). Brushes serve to transmit electrical contact from the generator rotor to its outputs and then to the battery and other parts of the machine’s electrical circuit. Good contact and stable transmission of voltage from the generator, stable charging of the battery and the brightness of the headlights when the engine is running depend on their condition.
Generator brushes, generator brush sizes according to standards
The designers developed the required resource for this part. At the moment, it is approximately fifty thousand kilometers. Some compare this distance to four years of vehicle operation.
In addition, there are certain standards regulating the permissible size of these brushes during operation. Generator brushes are prone to wear because during operation they have constant friction with the commutator and decrease in size. To ensure that they are constantly in contact, springs are provided to ensure their tight contact, even if they are worn out. However, over time, their length is limited, and the springs can no longer provide tight contact.
To diagnose whether the brush needs to be replaced, you should visually assess its length. As a rule, it is considered normal when the brush protrudes from the socket by five millimeters or more. If this parameter is too low, the brush needs to be replaced.
Replacing the VAZ-2110 generator brushes: how to do it without removing the generator
The generator in the car design is responsible for supplying voltage to all components of the on-board network. It is a fairly reliable unit, but it requires maintenance from time to time to prevent serious breakdowns. One of the stages of service work is replacing brushes.
These stator elements, made of durable graphite, supply current to the rotating rotor of a car generator. Constant friction gradually wears out the brushes. It is not difficult to identify it - you will definitely notice the appearance of problems in the car's electrical supply system.
Dismantling the generator with the auxiliary belt
We will talk about removing a generator with a “long” belt. Do everything the same as in step 1 (see above). Then loosen the top screw on the generator housing.
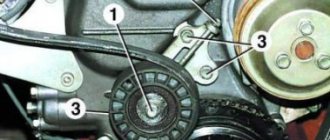
Where is the tension roller located?
Move the generator towards the engine. Loosen the belt tension by unscrewing the screw on the roller by 1-2 turns (see photo).
Before unscrewing the screw, remember what position the roller was in. A “flat” tuning key will help.
Special wrench for tension rollers
The belt must be removed from the pulleys. Then unscrew the fasteners (two screws) and completely remove the generator.
All generator mounting elements
The nuts must be held with a “13” wrench.
During installation, the tension roller is set to its original position. If the belt is not replaced, this option will be correct.
see also
Battery charging lamp is on
Whistle on a cold engine
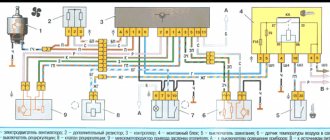
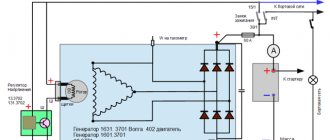
Car generator circuit
Generator malfunctions - signs, diagnostics, causes, testing
- 785 12 627k
Tensioning the VAZ 2110 alternator belt
Current to power conversion calculator
Convert how many amperes a kW has online. Calculator for converting current amperes to power watts
Brushes are the part of the generator that most often requires replacement, and therefore all manufacturers design generators so that no difficulties arise during the replacement process. Those who are familiar with the principle of operation of the generator know that voltage is supplied to the armature through the brushes , which not only starts the generator into operation, but also regulates its output power. The regulation itself occurs due to a special device, a relay regulator, which can be implemented directly on the brush holder, or installed separately (on earlier models).
Fortunately, brushes are not in short supply, and their price is quite reasonable. If repairs are not carried out in a timely manner, there is a possibility that you will soon need to purchase a new generator, and this is a completely different expense.
In order not to get into an unpleasant situation on the road, followed by calling a tow truck, it is better to have a spare set of spare parts.
Replacing brushes
Replacing generator brushes on a VAZ 2110
To replace the generator brushes you will need:
Removing the generator
- Place the car in a garage with an inspection hole.
- Place wheel chocks under the rear wheels.
- Raise the hood.
Replacing generator brushes VAZ 2110
- Disconnect the negative cable from the battery terminal.
- Raise the front of the car with a jack and install standard support devices.
- Unscrew the bolts securing the crankcase protection and remove it.
- Loosen the nuts at the top and bottom of the generator mounting points.
- Unscrew the adjustment bolt as far as possible.
- Remove the alternator belt.
- Carefully remove the terminal from output D.
Replacing generator brushes on a VAZ 2110
- Remove the rubber protection cover.
- Unscrew the nut securing the electrical plug.
- Disconnect the electrical wire plug from the contact bolt - output B. Unscrew the nuts at the top and bottom of the generator mounts and remove them.
- Remove the generator tension bar.
- Remove the spacer bushing.
- Hold the generator lightly.
- Remove the mounting bolt.
- Remove the generator (see VAZ 2110 generator repair: we do everything ourselves).
Disassembling the brush installation site
- Use a coarse brush to clean the entire surface of the generator.
- Blow air through the surface of the generator housing from the compressor.
Replacing brushes on a VAZ 2110 generator
Replacing brushes in a VAZ 2110 generator
Carry out work on disassembling the generator on a clean table or workbench. To do this, cover it with clean paper or cloth. Necessary:
Place the generator on it, pulley down. Carefully, using a flathead screwdriver, unclip the three springy metal holders. Remove the plastic cover from the back of the housing. Unscrew the brush holder fastening screws with a Phillips screwdriver. Take it out with caution.
Replacing brushes on a VAZ 2110 generator
- Be careful not to damage the brushes.
- Remove the electrical wire terminal from it.
- Unscrew the nut from the contact bolt.
- Remove the spring washer.
- Remove the second washer.
- Disconnect the capacitor wire from the contact bolt.
- Unscrew the screw securing the capacitor and remove it.
How is the replacement performed?
You will need a Phillips screwdriver. On a VAZ 2112, replacement of alternator brushes is carried out in the following order:
- Disconnect the battery terminal wires
- Then we disconnect the block with the wiring from terminal “D” of the electric generator and the wiring from the bolt (terminal “B+”)
- Push back the three latches and remove the plastic protective cover.
- Using a screwdriver, unscrew the two screws securing the brush holder (arrows point to them in the photo below)
Using a screwdriver, unscrew the screws securing the brush holder
- Carefully remove the brush holder to keep the brushes intact, and disconnect the block with wiring from it
- Then remove the fastening nut from the contact bolt
- We take out the spring washer
- Remove the spacer washer, then disconnect the capacitor wire tip from the contact bolt
- Unscrew the screw securing the capacitor and remove it
Removing the capacitor from the electric generator
That's all, the removal process did not take much time, the cost of repairs, buying a new unit is a pittance, is it worth overpaying and going to a service station?
Generator repair for VAZ 2110
To carry out repairs, the generator must be completely disassembled.
If it is necessary to replace the conductors of the VAZ 2110 generator, the car owner should select only those cables that correspond to the length and cross-section.
Belt adjustment
To adjust the belt, follow these steps:
- Use a wrench to loosen the tightening of the nuts on the lower and upper fastenings of the generator device.
- To perform tension, the assembly is moved away from the internal combustion engine cylinder block; for this, the adjusting screw is turned clockwise. To loosen the strap, the bolt is turned in the opposite direction, only the generator device moves towards the BC. The approximate play between the threaded surface for the adjustment bolt and the black frame should be about 1.3-2 cm.
- Using a key, the crankshaft of the power unit is turned by the screw that secures the pulley two turns. Scrolling is done clockwise. Then the strap is re-diagnosed. If necessary, it is adjusted.
- Upon completion of the work, the nuts securing the assembly are tightened.
The channel “In Sandro’s Garage” showed in detail the process of adjusting the tension of the drive belt on “ten” generators.
Repair of brushes and regulator
The brush assembly repair procedure looks like this:
Using a construction brush, the outer surface of the generator unit is cleaned. If there is a compressor, the housing is purged. If it is not available, a vacuum cleaner may be used. Further steps to disassemble the device are performed on a workbench or clean table
The generator unit is installed on the working surface with the shaft down. Using a flat-head screwdriver, carefully release the three spring-loaded metal clips. The plastic cover located on the back of the device body is removed. Using a Phillips-blade screwdriver, unscrew the bolts securing the brush holder
This element is carefully dismantled. When performing the task, you must be careful not to damage the brush assembly. The central terminal of the electrical circuit is disconnected from the mechanism. The nut is unscrewed from the screw of the contact elements. The spring part is removed. The second washer is being dismantled. The conductor connected to the capacitor device is disconnected from the contact screws. Then the screw that secures the part is unscrewed. The capacitor element is dismantled. Before installing a new brush mechanism, it is necessary to diagnose the main elements of the device. The brushes should be located 0.5 cm from the body of the holder itself. When performing a task, it is recommended to immediately check the capacitor device.
To repair the control device, do the following:
- Three spring elements are disconnected. The protective cover located on the diode bridge is dismantled.
- The two bolts that secure the control device are unscrewed. To complete the task you will need a Phillips head screwdriver.
- The block with the conductor is disconnected from the output of the regulatory device. The part is dismantled and replaced with a new one. Assembly is carried out in reverse order.
The MegaMeyhem channel talked about the procedure for repairing and replacing the regulatory device on domestic “ten” generators.
Generator assembly
When assembling, you must select the correct position for installing the capacitor, otherwise it will not be possible to install the brush holder:
- The capacitor is screwed exactly along a certain protrusion in the generator cover.
- Reassemble in reverse order.
- It is necessary to demonstrate the accuracy of installation and the order preceding disassembly.
- Assemble the generator.
Note: before connecting the electrical terminals, it is necessary to clean them with fine sandpaper to remove any oxidation that has formed. Oxidation occurs from temperature changes and the formation of humidity in the environment.
- There is no place to install it.
- Tighten the nuts.
- Install the adjustment bolt.
- Put on the drive belt.
- Adjust the belt tension.
Note: this work is mandatory.
Since weak tension significantly deteriorates battery charging, this leads to early failure. If the belt is overtightened, this causes early destruction of the generator bearings. According to technical parameters, the belt deflection, when applying a force of 10 kgf, in the middle should bend by 10-15 mm. This check is carried out with a metal ruler, a corner 30 cm long. So:
- Place the corner on two pulleys - the crankshaft, the generator.
- Select the middle of the distance.
- Apply increased pressure on the end of the ruler.
- Measure the resulting deflection.
- If it meets the standards, then the tension was done correctly.
How to remove the generator on a VAZ-2110 with 8 and 16 valves
The generator is responsible for supplying electricity to the vehicle's engine. On the VAZ-2110 this unit is located in front of the engine, which makes it easier to access. Removing the unit and disassembling it is not difficult even for an inexperienced car enthusiast. Let's look at the main breakdowns that motorists encounter.
Generator operating principle
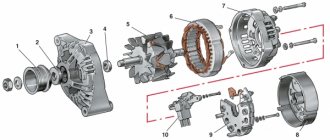
This unit consists of several parts:
- frame;
- rotor;
- stator;
- rectifier bridge;
- relay-regulator;
- pulley.
Thanks to the generator, the torque from the power plant is converted into electrical energy. During rotation, the rotor creates a magnetic flux, which is regulated by a relay, and the pulley carries out a belt drive. The rotor moves with the help of bearings, and when they work well, the shaft moves easily.
Another purpose of the relay regulator is to limit the output voltage in the range from 13.6 to 14.7 V. The voltage is transmitted through the commutator rings to the brushes, and the rectifier bridge is responsible for ensuring that energy is transferred in one direction.
What types of breakdowns are common?
Most often, the generator for 8 and 16 valve VAZ-2110s fails as a result of moisture and dirt. Another reason is the wear of the components of this assembly, namely the brushes. Most often, the malfunction manifests itself as follows:
- the generator does not produce electricity;
- output current is either too high or low voltage;
- During engine operation, extraneous sounds are heard, most often a squeak or squeal.
The operation of the generator is checked using special stands or a digital voltmeter. If extraneous sounds are heard in the engine compartment area, then first of all you need to check the timing belt tension. Most often this is the reason, but after checking, remove the belt from the pulley and start the engine. The absence of noise is a reason to check the performance of the generator more carefully.
How to properly remove the generator on a VAZ-2110
If you have a power unit with 8 valves, then it is best to work from above. In the sixteen-valve version, the generator must be removed from below. To do this, first unscrew the pan. Before work, prepare several different keys. You can remove this assembly quickly if you follow the following instructions:
- De-energize the vehicle's on-board system - to do this, simply remove the negative terminal from the battery.
- Find the M10 nut on the positive stud of the autogenerator and unscrew it.
- There are wires connected to the generator on the back of the device, which must be disconnected before the next stage of disassembly.
- Using a 13mm wrench, loosen the upper and lower nuts.
- Unscrew the tension bolt with a 10mm wrench to loosen the belt tension and remove it.
- Then completely remove both nuts (upper and lower) and remove the tension bar.
- Carefully rotate the generator at a right angle and remove it from the engine compartment.
If you want to repair this unit, you should thoroughly wipe it with a rag to remove all dirt.
How to disassemble a generator
First, make two marks on the metal covers. This will help you later assemble the unit without problems.
- Press out the metal latches and remove the plastic cover.
- Use a Phillips screwdriver to unscrew the voltage regulator mounting screws.
- Unscrew the M10 nut. Then use a screwdriver to remove the screw and remove the capacitor.
- To remove the pulley, clamp the generator housing in a vice. Put a 21 socket on the nut, and through the hole in the head put a 8 hexagon on it. Only after you unscrew the nut can you remove the washer and pulley.
- Remove the four mounting screws to disassemble the generator into two parts.
- From the back of the housing, unscrew the screws securing the stator wire and diode bridge.
- Remove the diode bridge and the oscillator winding.
- Press the rotor out of the cover with your fingers along with the bearing.
- Carefully remove the bearing bushing.
- Take a puller and remove the bearing.
Disassembling the generator itself is much more difficult than removing the entire assembly from the car. To carry out repairs, you will need to diagnose the components of this unit.
First of all, pay attention to the brushes; they need to be changed if this element is visible from the holder by no more than 5 millimeters. If the bearings rotate tightly, then they are the defective element (a hum may be heard during operation)
The breakdown of the starter and rotor windings can be checked with an ohmmeter; the same device determines the performance of the capacitor. If nicks, scratches or burrs appear on the slip rings, they must be carefully sanded to a shine with fine sandpaper.
Fault diagnosis
Now that we have the brush holder with the regulator and the capacitor in our hands, replacing the generator brushes on the VAZ 2112 is carried out together with the brush holder and the relay regulator, but we need to make sure that the cause of the malfunction lies here, so we begin to look for the fault. So:
- It is necessary to clean the contact on the brush holder with sandpaper, they are marked in the photo below; poor contact in this place can also cause poor operation of the electric generator
Clean the contact highlighted in red
- We check the serviceability of the relay - voltage regulator, to do this we connect a 12 Volt light bulb to the brushes
- We apply a voltage of 12 Volts, “+” goes to the terminal, and “–” goes to the ground of the brush holder
- The indicator light should light up
We connect the light bulb to the brushes and apply 12 volts to the contacts of the relay-regulator
- Next, we apply a higher voltage: 15–16 Volts - the light should go out
- When the light is on or does not light up in both cases, this means that the regulator is faulty and needs to be replaced along with the brush holder
- We check the ease of movement of the brushes in the brush holder body and the height of their protrusion
- If they protrude from the body by less than 5 millimeters, replacement is needed; the brushes of the VAZ 2112 generator are changed along with the relay - voltage regulator and brush holder
Required brush height
- If you find chips and cracks on the brushes, then replace the generator brushes on the VAZ 2112
- To change the brushes alone, we pull out the holder from the relay housing - voltage regulator, to do this we press on terminal “B”
- Before installing the voltage regulator with new brushes in place, blow the installation socket on the generator from dust and wipe off oil
This completes the replacement of brushes on the generator for the VAZ 2112; we move on to the last small but important part - the capacitor (see Changing the capacitor (VAZ generator)).
Tip: When there is already wear on the slip rings of the electric generator, it is recommended to slightly grind down the contact corners on the brushes, so that the new brushes will fit more easily into the grooves of the worn slip rings
Capacitor functions and testing
If you have never dealt with capacitors, these instructions will help you:
- The capacitor is designed to protect all electronic equipment of the car from voltage pulses (jumps) appearing in the ignition system; it also reduces radio interference
- If the capacitor is damaged or its fastening on the electric generator is loosened (contact with the housing worsens), it sharply increases the interference of the radio receiver when the engine is running
- We connect the probes of our tester to the terminals of the capacitor
- It should show infinity before connecting
- Resistance decreases only at the moment of connection, and then must return to infinity again
- This means the capacitor is working properly
- Otherwise, the capacitor must be replaced
Attention: The K73-58-4 capacitor is installed on the VAZ2112 electric generator. The marking is located on the side of the case. To avoid problems, it is not recommended to install a different type of capacitor.
- We screw the capacitor back, pay attention that it is important to accurately orient the capacitor relative to the special mounting protrusion located on the cover of the electric generator, otherwise the brush holder will not fall into place
- We connect the connector back to the brush holder (the bend of the output wire faces up), screw it back, and the brushes must fall onto the slip rings
- Snap the plastic cover, insert and screw the wires back
- If there is a spring washer on the “+” bolt under the nut, it must be removed; dirt and moisture often accumulate under it, which often leads to oxidation and deterioration of contacts
- We put the terminals on the battery
Replacing the generator: removal and installation
Often, many VAZ 2110-2112 car owners are in too much of a hurry at the first generator malfunction and prefer to replace it with a new one, instead of simply finding out the cause of the breakdown and eliminating it. In this case, we will not consider repairing this device, but will only look at the procedure that must be performed to remove and install the unit.
So, to dismantle it without problems, we will need a tool such as:
- Socket heads for 10 and 13
- Ratchet handles or cranks
Before starting repairs, be sure to disconnect the car’s battery by removing the negative terminal. Otherwise, you risk getting a short circuit when disconnecting the positive wires of the generator.
Especially for this post, I decided to make a video instruction to explain everything clearly and clearly.
If you have any questions about the video review, you can ask them on my YouTube channel. Below will be presented everything in the usual format.
Photo report on repairs
I would like to warn you right away that in this example of my VAZ 2110, the generator is slightly clamped by the mounting bracket, since it broke off during the accident, so I cannot show you the removal procedure in all its details. But still, the main points will be shown quite clearly in the photo.
Unscrew the tensioner nut, which is shown by the arrow below:
After this, move the generator back (towards the car interior) and remove the belt from the pulleys. Now you can disconnect all power wires. One “bundle” is secured with a stud and nut, and another plug is simply fixed with a connector:
Then you can unscrew the lower nut securing the generator, first crawl under the car and remove the engine protection (if installed):
Usually the bolt fits tightly, so it can be knocked out carefully and without excessive force with the handle of a hammer:
Then from the reverse side we try to remove this very bolt to the end:
Next, unscrew the tensioner nut from top to bottom and you can carefully move the VAZ 2110 generator to the side in order to remove it later:
If you are replacing the complete device, install it in the reverse order.
But please note that the generator model, if possible, should be the same as the one installed by the factory. That is, first of all, look at the applicability specifically to your car, and then at the current rating in Amperes. As for the price of generators for VAZ 2110-2112, it may vary depending on the type and manufacturer
But if you take the KZATE model, which in most cases is installed by the factory, then the cost can be about 3,500 rubles. Although, Chinese options can be obtained at almost half the price. True, you should not chase low cost, since the service life of these parts can be quite short
As for the price of generators for VAZ 2110-2112, it may vary depending on the type and manufacturer. But if you take the KZATE model, which in most cases is installed by the factory, then the cost can be about 3,500 rubles. Although, Chinese options can be obtained at almost half the price. True, you should not chase low cost, since the service life of these parts can be quite short.
Source: autoprivat.ru
Signs of a generator malfunction
The generator on the VAZ 2110 has an average resource of about 80-100 thousand km, after which failures in its operation are possible. There can be many reasons for breakdowns: generator bearings, brushes, windings, etc.
As a result of malfunctions, a weak current is supplied to the on-board network. In this case, it is important to pay attention to the following signs:
- a battery icon appears on the dashboard (indicating that the battery is not charging);
- when the lights are turned on, the headlights burn dimly or the light pulsates (unstable voltage);
- turning on additional equipment causes the dashboard backlight to dim;
- the load on the on-board network leads to the heater fan working weakly, etc.
Ultimately, the lack of spark at the spark plugs will cause the engine to stall. In such a situation, it is necessary to remove the generator, since after dismantling the device, you can disassemble the generator, check it, repair it (for example, replace the brushes) or completely replace it with a new or working device.
Correct indicators
When checking with a multimeter (it has a special function for measuring volts). When the car engine is started, a volt is connected to the battery - the meter should show approximate readings of 13-14.5 W, but if they are less, it is possible that the battery is almost discharged or the whole issue is a faulty generator. In such a situation, you can try to gas the car and to do this you need to hold your foot on the gas pedal and then remove it from the pedal; if during this the current supply increases, it means the battery is discharged. But if after 1 check nothing has changed, then the procedure should be repeated. If the current readings are less than 12 W, then after a short time the battery will be completely discharged and a new attempt to start the car will fail.
Lada 2110 Blue Bird › Logbook › Replacing generator brushes 2110
In mid-2013, JSCB Tyumen was purchased to replace the deceased one. The indicator was green, there was enough battery charge. The on-board network voltage showed a stable 13.8V. At the beginning of September 2015, I began to notice a constant red battery indicator. I recharged it 2 times to green, a week later again to red. It's a shame! I checked the voltage of the on-board network. The measurement showed 13.3V. Taking into account the constantly burning fogs as DRLs, the battery was put on a strict diet of undercharging. I started looking for the reason. I thought maybe the contacts or ground were loose. Because The voltage drop is only 0.5V. I pulled up the masses wherever I could find them. I climbed into the generator. I unscrewed the “+” wires, cleaned them with sandpaper, and screwed them back. The situation has not changed. I threw additional mass from the generator to the battery. Did not help. I took off the generator cover, cleaned the slip rings (since I got to it).
There was only one reason left: the voltage regulator. I went to the store and bought Energomash:
Voltage regulator 611.3702-01 assembled with control panel /Energomash/ Manufacturer number: 611.3702-01 Applicability: VAZ 2110, 2111, 2112 Technical characteristics: Rated voltage, V 14.25 Rated current, A 5 Weight, no more than, g 40 Overall dimensions, mm 65x60x30 Opening the box we see:
and a warranty card. Arriving at the garage I started replacing it. 1. Removed the key from the ignition; 2. Disconnected the ground cable from the battery; 3. Disconnected pin “D” (common pin of additional diodes); 4. Unscrewed the “+” wires from the generator; 5. I removed the cover, it is held on by 3 latches. I washed it so it was clean and beautiful; 6. Unscrewed the relay regulator (on 2 bolts)
Work order
Before starting work, you must read the instructions in full on how to fix the problem. This will allow you to act confidently. You need to understand that the reason for the loss of functionality of the generator may be not only the failure of the brushes, but also the belt or relay regulator. It is possible that the entire generator set is worn out. Therefore, during repairs, you need to check the condition of all elements. First you need to prepare the car for work: remove the terminal from the battery to eliminate problems, and disconnect the plus from the generator.
Now you can start the main work:
- Unscrew the alternator belt mounting bolt.
- Move the unit towards the engine and remove the belt.
- Disconnect the tensioner bar, plug, and terminals.
- We remove the engine.
- Now you need to make the brush assembly accessible for work; to do this, you need to open the protective casing. It is secured with three latches.
- After unscrewing the two bolts, disconnect the wires.
- There is a nut on the right that also needs to be unscrewed.
- Now you need to raise the voltage regulator.
We remove the brushes of the VAZ 2114, 2113 or 2115 generator and check them. It often happens that they are completely over.Be sure to check the stem at anchor. It is located at the point of contact between the shaft and brushes. If it is large, it needs to be sanded.
- Now you need to thoroughly clean the location of the brush assembly, clean the contacts, and check the reliability of the springs.
- Installation of new parts.
- Reassemble in reverse order.
Compare old and new brush lengths.
Also watch the video of replacing the VAZ 2114 generator brushes without removing the generator:
You can also proceed in the following order:
- We de-energize the battery by disconnecting the negative terminal.
- Disconnect the contacts.
- We unscrew the two fasteners located on the brush holder body.
- We remove the node.
- Inspect the structure for defects.
- Measuring the protruding part of the brushes.
- Installing new components.
- Installation of the unit in reverse order.
This option is relevant if you are absolutely sure that the brushes are the cause of the generator malfunction. After the work has been correctly completed, the following message appears on the dashboard.