When choosing a car, buyers often take into account the quality of the roads on which they will drive. The popularity of models such as the VAZ 2114 is due to the fact that they are better adapted to domestic road realities, and therefore allow them to “conquer” the roads of our country with lower repair and maintenance costs.
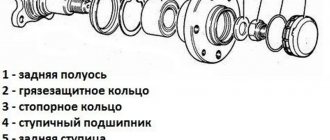
Support
It is always important to remember such a concept as depreciation. Jumping over bumps, hitting potholes, the car will bounce if the shock absorbers and suspension cannot work properly and dampen vibrations. In a suspension, every node and every detail plays an important role. And the support bearing on the VAZ 2114 is certainly no exception.
What is this?
It is not uncommon for owners of the domestic “fourteenth” VAZ model to notice that a knock . The reason for its appearance is failed support bearings.
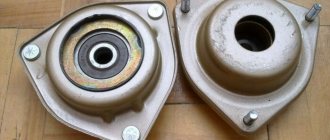
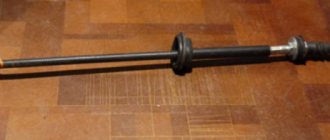
Support rod brand SS20
But you don’t need to start replacing right away. The first priority is to check the condition of the support. And only then take appropriate actions.
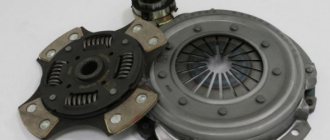
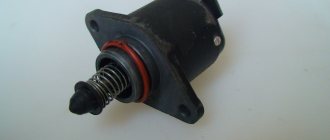
The support bearing is an element of the shock absorber strut located in the front suspension structure. Its job is to maintain the mobility of the connection between the body and the shock absorber of your car. If the bearing turns out to be faulty, mobility is impaired and a knocking noise occurs, which is difficult not to notice. Especially when it comes to bad roads.
ESSENTIAL TOOL
A high-quality replacement of support bearings on a VAZ 2114 with your own hands requires a minimum set of tools to perform these tasks:
- Standard set of open-end and ring wrenches size 12-24;
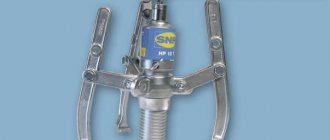
- Steering rod puller;
- Standard auto jack;
- Coupler for shock absorber springs;
- A “19” wrench is used to remove the strut rod nut.
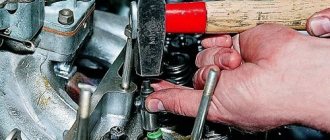
Unscrewing the nut
Kinds
In analysis
There are several types of supports:
- A bearing with an integrated inner or outer ring. No clamping flanges are required for its installation. There are corresponding holes for installation;
- With detachable outer ring;
- With detachable inner ring;
- Finishing and cutting structure, the characteristic feature of which is its strong rigidity.
Article on the topic: Racks on the VAZ 2110
The name of the support bearing speaks for itself. This is something like a strut support on the front shock absorber, which is located in the area where it connects to the body. This arrangement indicates the axial loads that the support must withstand.
Front arm
Replace the silent blocks on the front suspension arm of a VAZ 2114 with your own hands. To do this, try to strictly adhere to the instructions we offer.
- Place the car on the inspection hole.
- Remove the engine protection, if equipped.
- Unscrew the bolt nuts from the front arms.
- Using a 17 key, remove the fasteners of the front stabilizer strut, which secures it with the lever.
- Knock out the bolt.
- Loosen the wheel bolts, jack up the car and remove the wheels.
- Use a 24mm wrench to remove the brace nut. To avoid having to exert enormous force, first clean the fastener with a wire brush and treat it with WD40. This should help completely unscrew this nut.
- Then remove the two ball joint bolts from the steering knuckle to remove the arm.
- Problems often arise with this nut. It is rarely possible to remove it easily. A good way out of the situation is to remove the lever with a crab and a stretcher. To do this, slightly loosen the extension nut near the crab and remove the three bolts securing the crab and the body. Now remove the entire assembly and, in a more comfortable position, begin to unscrew the problematic nut. The most extreme method is heating or using a chisel.
- You managed to remove the lever. First of all, replace the silent block of the extension. Dismantling the old element is carried out using the most ordinary chisel. Be sure to clean the lugs and take a new suitable silent block.
- It's up to the vice. The silent blocks are pressed one by one into your lever. It is usually not possible to seat the element completely, so the lever should be placed on a flat floor or a sturdy table. The silent block must be installed using a hammer. A few accurate and fairly strong blows should be enough.
- Using the method without using a vice is very risky. Such measures are resorted to either by self-confident specialists or by those who do not mind experimenting with their car.
- Now we change it on the front lever. The first priority is to get rid of the old silent block. If it was completely broken, you just need to remove the bushing and remove the remaining rubber elements of the silent block from the eyes.
- If this method is not relevant, the silent tape will have to be pressed out. You already have a puller.
- The new element is pre-treated with water diluted with any soap, dish gel or simple liquid soap.
- Use the press-in tool to place the new part in its rightful place.
- The fastening bolts should be tightened gradually. The silent block can be twisted at the same time, so try to hold it with a screwdriver.
- Alas, the process of replacing silent blocks on the front lever is much more complicated than in the case of a stretcher.
Diagnostics
To diagnose the current condition of the support element, you need to perform a couple of simple steps.
- Open the hood and place your palm on the element, that is, the bearing. In this case, your assistant should rock the car. If a knocking sound is heard, then it should be changed immediately.
- Disassemble the structure to clearly see that the element is faulty and needs to be replaced. It is important to note that the approximate service life of the support bearing on a VAZ 2114 is 40 thousand kilometers. This is the recommended mileage after which the element must be replaced, regardless of its current condition.
A faulty support can lead to quite tragic consequences, such as wheel alignment disorder, increased risk when driving at high speeds, and increased wear of shock absorber struts.
If you do not pay attention in time and do not take appropriate action to eliminate the breakdown, you risk completely destroying the suspension of your car. It is not uncommon for a hole to form in the hood from the pillar. As you understand, such problems entail significant financial losses.
Replacing the support bearing VAZ 2114
Once you are completely convinced that the bearing is faulty, it must be replaced.
Replacement is carried out in several ways:
- When removing the disc.
- Without removing the disc.
Changing the support:
- The car must be raised using a jack and, having first unfastened it, remove the wheel.
- Remove the cover from the nut on the hub.
- We loosen the hub.
- The steering end is removed from the rack using a hammer and a pry bar.
- Unfasten the ball and unscrew the bolts.
- We remove the brake caliper, before doing this we disconnect the fasteners and detach the brake hose.
- There is no need to completely unscrew the rod nut, just loosen it.
- The springs tighten.
- The bearing mounts are disconnected, the stand with the disk and support is removed and must be replaced.
- Install the stand in the reverse order.
Please note that if you need to replace the nut with a new one, it must be fully tightened. When following this recommendation, you need to act as carefully as possible so as not to tear off the nuts, because this problem occurs quite often.
Do-it-yourself repair work does not cause any difficulties; for this reason, the model of domestic cars is quite popular among motorists.
The support bearing is an absolutely ordinary part in a car, it doesn’t stand out in any way, but when the first malfunction occurs, it immediately informs the car owner by producing noise signals, be it a knock, a click during a maneuver or when there are defects in the road surface. The solution to this problem is to carry out the necessary diagnostics and detect the causes of the noise emitted, and then completely replace the support or rack.
Replacement
You made the right decision by replacing the support. An inspection was carried out, and it showed that there was no way without replacement.
To work you will need a certain set of tools:
- Balloon wrench;
- A pair of spring ties;
- Pliers;
- 19, 13 and 9 mm wrenches;
- Jack;
- Puller for steering tips;
- If you don't have a puller, then take a small pry bar and a hammer.
We recommend using a puller, as it ensures simpler and more accurate work.
Dismantling works
Everything is ready, so you can proceed directly to the repair work.
- Choose a level area for the car. A regular garage should be enough.
- Raise the front of the car on the side where you plan to replace the first bearing. For this you will need a jack. Then remove the wheel.
- Using pliers, the fastening nut of the steering tips is uncoiled and then removed using a 19 mm wrench.
- The finger is pressed out using a puller. If you couldn’t find the puller, then carefully tap the finger from below with a hammer, prying it up with a pry bar from below. Make sure that the thread on the finger is not damaged. Otherwise you will have to change it too. This is why a puller is the best solution.
- Again, use a 19 mm wrench to unscrew the nuts on the bottom of the steering knuckle strut. There are two of them. Sometimes they get stuck and become rusty. Use WD40 to loosen it.
- We move to the engine compartment, where you will find three mounting nuts that hold the upper support to the body. They are dismantled with a key number 13.
- Unload the support by tightening the spring with two ties.
- Remove the central mounting nut that holds the support to the post. You will need two keys - 22 and 9.
- Remove the support and disassemble the assembly.
- Remove the bearing and then install a new one in its place.
- Carry out the assembly procedure in reverse order.
- By analogy, replace the support on the side of the second front wheel. The procedure there is no different from the one performed above.
https://youtube.com/watch?v=FBInI8fehZ4
After completing the replacement, drive out onto a flat section of the road and drive a little. Then you need to ride on an uneven surface.
If everything is fine, there are no extraneous noises or knocks, all that remains is to go to a service station, where they will adjust the position of the wheel angle.
Loading …