How a puller makes life easier for a car owner
Using this tool, you can dismantle bearings, bushings, pulleys, flanges and other components, remove or fix rings and gears, and repair chassis elements. It greatly facilitates the process of maintenance and repair of various parts of the vehicle. Using the right puller, you can quickly and easily replace a damaged element without the risk of damaging the machine elements connected to it. In addition, the tool can be used to work with hard-to-reach parts of the car, in a convenient position.
Products can have different designs, but the most common is the following - several gripping arms, which are shaped like hooks, and a threaded rod between them. Thanks to this structure, you can easily grab the required element and press the bearing out of it.
Tools are divided into two groups.
- Hydraulic. When they operate, hydraulic traction is used; removal and landing are performed in semi-automatic mode. The main part of such a puller is a hydraulic nut, the internal cavity of which presses on a special piston. This, in turn, transfers the force to the desired part. The hydraulic model is in demand among owners of trucks and other large vehicles - with its help you can easily remove the most massive internal parts.
This is what a hydraulic bearing puller looks like
- Mechanical. They operate from human muscular strength and are in demand for mounting/dismounting wheel bearings. There are two-jaw, three-jaw and internal ones. Two-grip ones are the simplest. They are used where maximum process control is needed. Three-jaw machines are equipped with three paws and are used for working with the front hub and generator. Internal options are useful for removing ball and needle roller bearings; in addition, they can be used to dismantle various brass couplings.
Bearing pullers can come in different sizes, but the most popular are universal ones. Their parameters can be adjusted manually, adjusting them to any diameter.
You can make different tools with your own hands, but it is best to make a universal three-jawed version - it is convenient to use.
Diagram of a two-jaw puller
Making a bearing puller
A very cool and useful thing.
Bearing puller. A pipe, an iron plate, a large washer, a bolt, and a nut will come in handy. First, mark on the pipe the size that needs to be cut. Weld a washer to the resulting segment. Place the nut evenly on the hole and weld it. Let's clean the uneven areas with a grinder. Measure out 1.5 centimeters and make a cut. On the other hand it's the same. Cut two small pieces from the plate. They will be inserted into two slots. The result is a puller.
How does this tool work? We put it on the bearing. We go behind him for two records. Rotate the bolt. It rests on the shaft and pulls the bearing off it. Using this device, you can easily remove it from the generator and electric motor. The outer diameter of the part should not exceed the inner size of the pipe.
In the store, such tools are not cheap. So I decided to do it myself. I took a metal strip 30 mm wide and 4 mm thick. I cut it into strips. Cooked it. Plates. Hooks to grip the bearing. Two cuts are made with a grinder. Two nuts are inserted and welded. I took the worm from an old Soviet clamp. Hardened steel. To make the tool universal, I made 4 holes on each side. Can be installed at any width. If necessary, the paws are pulled out and turned over to the other side. You can pull out the bearing.
It took 2 hours to make the tool.
Making a universal three-gripper with your own hands
To make a universal three-jaw puller designed for working with bearings ranging in size from 202 to 308, you will need:
- sheet metal (10 mm wide);
- round metal with a diameter of 30 mm.
If you plan to remove large bearings, take sheet metal 15 mm wide and round timber 30 mm in diameter.
- The first stage of production is sketching. Calculate the length of the legs - it should be 200 mm. Sketch the sheet metal according to the drawing and cut out the tabs with a gas cutter that runs on propane and oxygen.
- Sand the workpiece with heavy sandpaper. The dimensions of all paws should be approximately the same, but absolutely perfect parameters are not required - a difference of approximately 1 mm is allowed. When this part of the work is completed, you need to drill two holes in the top of each tab - these will be used to expand the tool. The diameter of the holes must correspond to the diameter of the 8 or 10 bolts. If you plan to work with large bearings, drill 3 holes for 12 or 14.
- Making the core. It is made of round metal with a diameter of 30 mm and a length of 35 mm (50 and 45 mm if it is necessary to work with massive bearings). We take the workpiece and drill a hole in it for a 16 mm thread (30 if necessary in a larger product), cut the thread with a fine pitch. We apply marks on the sides every 120 degrees, to which we then weld the paw holders. The distance between them should be equal to the width of the foot. Now you need to drill holes in the holders. They should be positioned at a certain distance from the center so that the foot can grip the large bearing.
This is what the parts of the future puller should look like
- The final part of the work is making the screw. For a standard puller you will need a screw 350 mm long with a thread length of 280 mm, for a large one - 500 mm with a thread of 420 mm. We process the workpieces on a lathe and cut the threads. We leave the upper part without threads - there you need to drill through holes located perpendicular to one another, having a slight offset in height.
DIY puller
To make the simplest filter puller with your own hands, you will need a steel hexagon of size 19 or 17 - with the appropriate key. Cut a piece approximately 150 mm long from the hexagon rod (you need to measure it for your filter).
Then make a cut along the hexagon 55-60 mm long and 5-6 mm wide. It should pass through opposite corners of the section and run parallel to the side edges of the rod. After this, sand the workpiece, removing sharp edges and burrs.
Belt puller
Taking an old but undamaged car seat belt, cut a piece of it to the required length, depending on the diameter of the installed filter. The longer the belt section, the more versatile the puller will be. In general, a piece of 500–550 mm is sufficient.
Insert the belt into the slot in the workpiece, align and center it. Then, on the hexagon opposite the belt, mark 3 holes (at equal distances) for drilling. Remove the belt from the cut. Drill through holes with a diameter of 5.5 mm, and expand them on one side to 6.5 mm.
In holes with a diameter of 5.5 mm, use a tap to cut an M6 thread.
Melt the ends of the belt with a lighter so that they do not unravel, fold them together and thread them into the cut of the hexagonal blank opposite the holes. There should be a loop. The ends of the belt opposite it should protrude from the slot by about 10 mm. Take a nail, or better yet, a steel rod with a diameter of 6 mm, heat it up and push it one by one through the 3 openings of the hexagon, burning holes in the tape.
Chain puller
To make your own chain puller, you will need a piece of half-inch or inch pipe with uncorroded, undamaged walls and threads on one end. The length of the piece must be no less than the height of the filter.
Select a suitable pipe plug so that it screws onto the thread. Additionally, you will need a bicycle chain.
Drill a 9 mm diameter hole in the center of the plug. Use a triangular file to give it a square shape. Carry out processing until the dimensions of the hole are suitable for the ratchet wrench.
The end of the key should fit into the resulting opening of the plug quite tightly, with almost no play.
Belt puller
Ribbons are slightly inferior in characteristics to belts, but have a similar shape. To make a tape end puller, cut a groove in the hexagon, bolt, or end head, and drill 2 through holes for the screws.
Place the edges of the tape and secure with screws or rivets.
The bevel drill adapter has a groove in it, but the hardened metal is difficult to drill holes to secure the belt with screws. You can sew a ring from this material, pass one edge through the holes and insert an improvised fastener made of a nail or wire on the other side.
This will not change the principle of operation of the key, however, at the moment of selecting free play, this locking element will need to be held until the tape is fully tensioned.
A simple way to make a homemade removal device
This option is easier to implement, but the product will not be as convenient. You will need the following tools and materials:
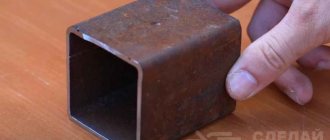
- Cut a piece of pipe with the required parameters.
We cut off part of the pipe. Mark all the necessary elements on a metal sheet, outline the pipe and the bearing.
We mark out the future parts. We cut out the parts with a grinder and grind them to meet the exact parameters.
Cut out parts Drill holes for the bolt in the obtained washers.
Drilling holes for bolts - That's it, the remover is ready!
Ready puller
How to make a two-jaw wheel bearing puller: video
Making a bearing puller with your own hands is not at all difficult - you don’t need either expensive materials or specific skills. Using the instructions, you will easily cope with the task and get a useful tool for car repair.
Hello! My name is Dmitry, I am a journalist by training. I specialize in automotive topics - I started my career in an online store of automotive components, and I myself am a car enthusiast. (5 votes, average: 3.6 out of 5)
DIY bearing puller
Do-it-yourself bearing puller
During repairs, there are often situations when some necessary tool is not “at hand”. In this case, there are three ways out of the situation: buy this tool, borrow it from friends, or make it yourself. All 3 methods have a right to exist and are used from time to time. For example, in my story, I urgently needed a puller to remove a bearing from the rotor of an electric motor of a Samsung vacuum cleaner. In this article we will look at how you can get out of this situation.
The background is this: the vacuum cleaner engine suddenly began to work with extraneous noise. Having disassembled the housing and examined it, it became clear that the upper rotor bearing had collapsed. It is not possible to remove it without a special puller without damaging the rotor, so attempts were made to find a puller from friends, but they were unsuccessful. I considered it a waste of money to buy this tool in a store because it was a one-time job. In the future, this is how it turned out - making a simple puller with your own hands turned out to be very easy. It took 20 minutes of time and a minimum of details. The only condition is the presence of a welding machine and the ability to use it at least a little.
So, in order. There is a motor rotor with bearings, one of which needs to be replaced.
To remove the bearing from the shaft, you need to place some kind of stop under it. Moreover, this stop must be of a certain strength and minimum thickness, since the distance between the bearing and the armature is several millimeters. An ordinary metal washer was suitable for this. So that it can be placed under the bearing, we will make a cutout in it. To do this, hold the washer in a vice and use a grinder to cut out a quarter of its circumference.
We check on the rotor - it fits.
Now let's think about what to make the puller body from. A piece of profile pipe was found in the barn. Let's cut off a 5-centimeter part from it. In order for the puller to be placed under the bearing, it is necessary to cut through one wall of the pipe, and the width of the cut should be greater than the diameter of the bearing. We clamp the pipe in a vice and cut out a strip with a grinder.
Next, we place the pipe on the end, place the prepared washer on it and weld it with electric welding. The connection must be strong so that the washer does not fall off during operation.
We turn the puller body over, installing it with the washer facing down. You need to weld a nut on top into which the bolt will be screwed in order to press out the bearing. The diameter of the nut is smaller than the size of the pipe, so you need to install some kind of support under it. Anything will do: a washer, any plate, a cut pipe wall. In my case, there was no washer of a suitable diameter, so I placed 2 nails under a washer of a smaller diameter and welded them to the puller body. I placed a nut on top and welded everything thoroughly. The bearing puller is ready.
All that remains is to install the puller on the rotor, secure it in a vice, screw the bolt into the nut and, tightening the bolt with a wrench, press out the bearing. The rotor shaft into which the bolt rests has a thread cut. To avoid damaging it, before removing it, you need to screw the nut onto it, and then push the bolt into the nut.
It only took me 20 minutes to make the puller, and in a couple of minutes the bearing was removed from the rotor.
Finally, I’ll show you how to quickly and easily press a new bearing onto a shaft. To do this you will need a vice, a piece of pipe and a washer.
We install the bearing on the shaft, then press the washer against it, then a piece of pipe and clamp this structure in a vice.
When the vice is compressed, the pipe presses on the washer, which presses on the bearing. Under the action of compression force, the part is pressed onto the rotor shaft. The main thing here is to install the structure level, make sure that the rotor shaft fits into the hole of the washer and pipe, and does not rest against their walls, and not bend the rotor with excessive force.
This is how quickly you can make a bearing puller with your own hands, using a minimum of materials, almost free of charge. The design is simple, reliable, and most importantly, it works. The disadvantage of this device is that this puller can only be used for small bearings. For larger ones, it is necessary to make a more powerful design.
Reliable simple do-it-yourself bearing puller
In this instruction you will learn how to make a simple, powerful puller that will always help you out in a difficult situation. To assemble it you will need a piece of thick-walled pipe and a thick steel plate. If you wish, you can make yourself several pieces of these pullers for products of various sizes. Let's consider in order how to make such a device.
Materials and tools used by the author: List of materials:
- thick-walled pipe; - thick steel plate; - bolt and nut (larger); - a metal rod (a handle is made from it); - dye.
List of tools:
— welding; — grinder (cutting disc, metal brush, and grinding disc); — a drill with large bits or a drilling machine; - lathe, cutting machine (optional).
Puller manufacturing process:
Step one. Preparing the main part
The main part of the puller is a piece of thick-walled steel pipe; it acts as a frame. If the pipe is not strong enough and the loads are large. It can easily bend. The thickness of the pipe walls must be at least 3 mm.
We cut off the required piece from the pipe; the author uses a cutting machine for this, but everything can be done with a grinder. Now comes the hard part, you need to cut a window in the pipe. This can be done using a grinder; it takes a long time, but is quite doable.
Step two. We make the upper and lower supports
For the upper support, the author decided to use the thickest sheet steel possible. Cut out a circle of the required diameter. The author uses a grinder for work, first we cut out the “polygon”, and then using a grinding wheel we bring it to perfection.
Cut out the other circle in the same way. Here the author used slightly thinner steel, but it’s better not to risk this, since the loads on both supports are approximately the same.
Finally, you need to finalize the supports. You need to drill a hole in the top support for the bolt. First we drill a small hole with a drill, and then drill it out to the desired diameter. The author used a lathe for these purposes.
As for the lower support, we also drill a hole in the center; its diameter should be slightly larger than the diameter of the axles from which you are thinking of removing the bearings. Then cut out a triangle shape for this hole. The supports are ready, let's move on!
Having welded the supports, you now need to secure the nut. We wrap the bolt in it and insert it into the hole. We weld the nut well, but try not to overheat, as the metal may become soft. The author attaches the nut from above, but I would recommend fastening it from the inside, so it will rest on the support, and the tensile weld may not be very reliable.
Finally, all you have to do is secure the handle; for this, the author used a threaded rod. Using a handle will make it convenient to remove bearings that are not too rigid. Otherwise, you can always use a wrench.
Well, let's check it out? As a test, the author tried to remove the bearings from the drill armature and so on. Now everything is done easily and at the same time it is guaranteed that you will not damage the product. In addition to bearings, this device can also remove various bushings and other similar parts. If the axle turns out to be too thin, you can come up with a spacer for the bearing to be removed that will rest against the base of the puller. Well, or you can make a separate puller for small parts, it’s easy to assemble.
Before removing, it is recommended to lubricate the axle with oil or WD-40, this will make things go faster. That's all, good luck and take care of yourself! Source
Receive a selection of new homemade products by email. No spam, only useful ideas!
*By filling out the form you agree to the processing of personal data
Do-it-yourself universal wheel bearing remover
Systematic movement on uneven road surfaces leads to premature failure of the vehicle's chassis. The main reason is the quality of the road surface, which is far from perfect in the CIS countries.
First of all, those parts of the chassis that are directly responsible for vibration damping and stabilization take the blows. In each car these are: the front strut block, the hub mechanism. If with the front strut everything is quite simple and clear, then with the hub block, not quite. Given the complexity of the design, it is recommended that repair work be carried out at certified service stations, where they use a special wheel bearing puller to remove it from its seat. Let's look at what this tool is and how to use it below.
What is a universal wheel bearing puller and its types?
Wheel bearing pullers are specially designed to assist craftsmen during dismantling work, since it is impossible to remove the support bearing with “bare hands”. Depending on the technical characteristics, pullers come in different sizes and are divided into criteria:
- universal;
- two-grip;
- three-grip.
A two-grip device is manufactured by forging to a specific size or for universal use without reference to size. Due to the monolithic design, pullers made to a specific size are much more practical and durable than universal ones. The puller for removing a universal type wheel bearing a priori has a slight play, which complicates the dismantling process.
Three-jaw devices have the highest strength and reliability. Structures of this type are used for dismantling supports of construction and special equipment.
DIY wheel bearing puller
To carry out repair work at home, some craftsmen use simple, homemade designs. However, it is always compatible with all sizes of journal bearings. Only with those whose diameter does not exceed seven centimeters.
So, how to make a puller for wheel bearings. To do this, you will need a bolt 90 - 100 mm long, no more, two metal washers, a fastening nut, a metal spacer. Moreover, the diameter of the spacer must be such that it fits into the hole for fitting the support bearing with minimal clearance. Thus, after dismantling the wheel, it will be necessary to assemble the above puller and begin to tighten the fastening, as a result, part of the support bearing will be on the outside. Then it's a matter of technique.
A homemade wheel bearing puller is applicable for both the front and rear sections of the chassis system of a domestic car. For foreign brands it is better to use the factory version of the equipment.
Algorithm for pressing out and replacing the support bearing yourself
Preparatory stage: a set of automotive tools, new spare parts, a mobile jack, a wooden block.
Initially, the rotating mechanism is dismantled and the hub is pressed out. If there is a retaining ring, it must first be removed. Next, the support bearing is pressed out of the steering knuckle itself. After complete dismantling, it is necessary to carry out visual diagnostics, remove the remains of old lubricant, metal shavings, and other waste products.
If there are no defects, then a thin layer of lubricant is applied to the cavity of the seat. For domestic cars, it is enough to use Litol-24M type lubricant; for foreign brands, any graphite-based lubricant.
The new support bearing is pressed into place in a vice. This must be done extremely carefully, since even the slightest misalignment can deform the seat. The assembly process follows in reverse order. At the end of the procedure, it is imperative to balance the wheels, since a new part is installed.
The car is ready for further use. The length of the period directly depends on the quality of spare parts, assembly, and professionalism of the craftsman. The main role is given to the style and manner of controlling the technical equipment.
How to make a wheel bearing puller with your own hands?
- 1 Do-it-yourself universal wheel bearing puller - Metalworker's Guide
- 2 How to make a bearing puller with your own hands
- 3 Front wheel hub bearing puller for VAZ 2108-2109 (review, price, photo, video) 3.1 Types of wheel bearing pullers
- 3.2 How to work with the puller
Replacing a wheel bearing is a routine job that all car enthusiasts can do. In this publication we will look at how to replace the front and rear wheel bearings with your own hands.
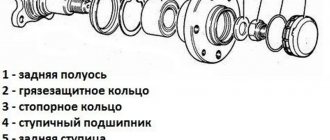
Hub unit
You cannot change a wheel bearing without understanding this component of the chassis.
The front axle hub assembly is also called the steering knuckle, since it transmits the desired direction of movement to the wheels through the steering rods. The latter, in turn, are required to rotate.
The role of the wheel bearing is in the articulation of the steering knuckle and the hub to which the wheel is directly attached.
There are many types of bearings (tapered, spherical, roller, radial ball, etc.), but this is not of fundamental importance for replacement.
Novice DIY repair enthusiasts will be interested in learning how this part works. The product consists of an outer ring, a rolling body, a cage and an inner ring. For lubrication, the insides are filled with grease.
The essence of the work is to transmit rotation through rolling bodies. In this case, the outer and inner cages are not connected to each other. In our case, the inner race is articulated with the hub, and the outer race with the steering knuckle.
Inside the hub there are teeth that serve to engage the hub with the drive shaft. It is these splines that allow torque to be transmitted from the gearbox to the wheels of the car.
It’s worth noting right away that replacing the wheel bearing is possible in two ways:
Universal puller
- canonical, which is the only option if you want the part to go happily ever after;
- artisanal. In this case, the service life of the new spare part depends entirely on your skill.
The first method involves the use of specialized tools: a hub and bearing puller, tools for pressing and pressing. You can build such a mechanism with your own hands. A hydraulic bottle jack can be used to force the bearing in and out.
To successfully press out, you need a mandrel whose diameter will be larger than the outer diameter of the hub. One edge of the mandrel will rest against the steering knuckle, and the second against the plane pushed by the jack. Another attachment will be used for extrusion.
Its diameter should correspond to the outer diameter of the bearing or be 1-2 mm smaller.
Another type of design involves using the threaded joint between the bolt and nut as a force to push out the bearing. The principle of selecting attachments is the same as for the previous puller.
The second replacement method involves using various attachments and a hammer. They knock out and then drive the wheel hub and bearing back in.
Using the Daewoo LANOS as an example, let's look at how to replace the front wheel bearing.
- Install wheel chocks.
- Remove the retainer and “tear off” the hub nut.
- Raise the car, securing the position using a log or other type of support.
- Unscrew the brake caliper and remove the pads. The caliper itself can be secured with a rope. Be careful not to damage the brake hose. Remove the brake disc.
- Unscrew the stabilizer link, steering linkage and ball joint.
- Using a ball joint remover, remove the end and ball from their seats.
- Unscrew the bolts securing the shock absorber strut under the hood of the car.
- Pull the steering knuckle off the drive shaft splines.
- Remove the brake disc protection. Move the stand to a convenient place for working.
- Install the puller and separate the hub from the steering knuckle.
- Using special curved pliers, squeeze the corkscrew ring. While holding it compressed, pry it out using a flathead screwdriver. Remove the second one in the same way.
- Now, on the reverse side, install an extension that will press out the bearing. Remove it from the front wheel steering knuckle.
Press-fitting
Whether replacing the front wheel bearing will be successful depends entirely on proper installation. Before pressing, be sure to clear the surface of dirt and clean the grooves of the retaining rings.
The edges of the seat in the steering knuckle can be wiped with sandpaper. Be sure to lubricate the bearing itself and the cavity inside the “fist”. Of course, the first step is to install a new retaining ring.
Place the hub strictly in the center of the mounting hole. You can try to fill it a little with light blows of your hand.
Otherwise, replacing the front wheel bearing will be in vain. Soon a hum or play will appear again.
When you feel that the bearing has stopped, you can stop. Install the second retaining ring. Press the hub into the steering knuckle. We can say that the bearing replacement was successful.
What to do if part of the bearing remains on the hub
Oddly enough, but often replacing bearings does not happen without incidents. When pressing out the hub, the inner race of the front hub may remain in its seat.
The best solution in this case is to tighten the clip using a special puller.
Unfortunately, its cost is quite high, so only service stations can afford such a tool.
Folk craftsmen recognize two ways out of this situation:
- file the remains with a grinder and then cut them with a chisel;
- knock off the clip using a chisel.
Both of these methods are dangerous because there is a risk of damaging the front bearing seat on the hub. If you use the second method, be careful not to damage the mating plane.
If you cut through the landing site, it is better to replace the part immediately. Experience shows that new bearings on such hubs “run” very little.
We recommend trying to use a hub puller. And only in case of “dead” sticking of the clip should resort to emergency measures.
Rear axle
The principle of pressing out and pressing in the rear wheel bearing is no different from the work done on the front axle.
Working without a puller
If you are changing the front wheel ball bearing using a makeshift method, pay attention to the following tips:
- a socket head of a suitable diameter can be used as a clip for pressing out;
- The old bearing can be used as a press-fit race.
The clip should be struck with even force. You need to hit on opposite sides or evenly moving in one direction. The main thing is that there are no distortions.
Universal wheel bearing puller
The transmission transmits torque from the car's engine (the heart of the car) through shafts to the drive wheels (legs) of the car. In this case, the wheels are not tightly attached to the shafts, as you have seen when replacing wheels, but through a hub. A hub is such a unit - an intermediary between the car shaft and the wheel.
The role of this unit during movement cannot be underestimated.
It does not simply duplicate the rotation of the shaft, but creates a connection of all components into a single overall structure, including brakes and steering.
Failure of the hub unit together with the bearing located there can lead to sudden braking, the steering wheel jamming in the middle of the road, which can lead to an accident.
Location of the hub in the car
The unit is subjected to constant loads, such as braking and increasing speed, turns, bumps, and heating during operation to high temperatures.
Therefore, great attention should be paid to it.
And if extraneous noise appears while driving, or a knocking sound is heard when turning, you need to urgently check the wheel bearing before a major breakdown occurs.
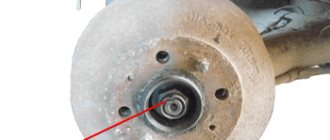
Wheel hub, its appearance
Changing the bearing is not at all difficult; it is located inside the hub and, as a rule, covered with a metal casing.
How to make a bearing puller with your own hands
How can you tell if a wheel bearing has failed? By the sound! The main symptom is a hum that gets worse during acceleration. If it occurs only occasionally, it means the bearing has just started to fail.
A constant suspicious sound as the load increases means that this part of the car requires immediate replacement. In any case, to carry out repairs you will need a bearing puller.
You can buy it or make it yourself.
Universal wheel bearing puller
I think any car enthusiast (especially the owner of domestic cars) has faced the need to replace wheel bearings. Having heard an unpleasant hum, we come to the conclusion that it is necessary to replace the unit, but what is the best thing to do? Of course, you can go to any car service center and order this service there, but we don’t always have the time and money for this, and besides, for many, repairing a car with your own hands is a great pleasure. Therefore, the question arises, how to replace a wheel bearing with your own hands ? We have two options. The first is to buy a special wheel bearing puller and use it when replacing. For almost all car models there are special devices designed for removing and pressing in the wheel bearing. For example, a universal set looks like this:
Universal removal and pressing kit
And the three-grip universal device is like this:
Universal three-jaw puller
If the necessary puller is not sold in your city, or you think that there is no point in buying such a device for one-time work, then there is a second option, namely, making a universal wheel bearing puller with your own hands.
You can take the instructions below as a basis and change the size of the parts depending on the size of the wheel bearing of your car.
So what do we need?
- Steel pipe. It is necessary that the inner diameter of the pipe exceeds the diameter of the bearing
- Metal plate more than 5 mm thick
- Angle grinder (“grinder”)
- Stud with nut. Instead of a stud, you can use a bolt with a “long” thread.
- Nuts of the right size
- Cut a piece of pipe of the required diameter and width
1. Cut a piece of pipe of the required size
2. Mark the necessary parts on a sheet of metal. We outline the pipe and bearing
2. Mark the sheet of metal
3. Using a grinder, cut out the necessary parts and grind them to the required size
3. Cut and grind the washers
4. Drill holes for the bolt in the resulting washers
4. Drill holes in the washers
5. Do-it-yourself ready-made puller
5. The universal puller is ready
Of course, there are also disadvantages to this method. You need to spend time searching for the material, as well as making the puller itself, but in return you get a universal tool that you can use many times in the future. In addition, you will get great pleasure from the fact that you made this device with your own hands. You can also use this method. A universal puller can be made using traverses, two screws, grips, a stop screw, a handle and two support pins . These parts must be made of 45 or 40X steel, and also hardened to 32-42 HRC3, to increase the strength of the units.
Instead of a handle, use any wrench. Please note that it must be more than 10mm in diameter and approximately 160mm long. By changing the dimensions of the parts and slightly modifying the units, it is possible to obtain a device for pressing units that cannot be grabbed by the outer diameter.
Whichever method you choose, our team wishes you success and will answer any questions you may have in the comments!
Universal wheel bearing puller
CV joint puller
A universal puller is a kind of working metal tool that is used to remove and replace wheel bearings. Due to the fact that this puller is universal, it is perfect for servicing many cars, such as:
As well as a large number of other cars from various manufacturers. This is the main difference between a universal puller and others designed for a specific brand of machine.
Manufacturing Features
The manufacturer offers only high-quality bearing pullers made of good material. Production is carried out in accordance with ISO 9001 standard technologies. A mandatory procedure is for the parts of the tool to undergo heat treatment. As a result of this procedure, the wear resistance of the puller increases several times. To combat corrosion of metal parts, a special chemical coating of mandrels and rings is used. Such a complex manufacturing procedure is the key to long service life and proper operation of the device. Moreover, manufacturers offer a wide range of models for different types of cars.
Features of the universal puller
- Among the special characteristics are, first of all, versatility. By purchasing one set of pullers, a car enthusiast gets the opportunity to use it to repair different cars. This characteristic will be especially appreciated by professional craftsmen working in services.
- A universal wheel bearing puller helps in a large number of diverse jobs. It is involved in the installation and dismantling of similar parts, replacing several tools at once.
- The puller is purchased as a kit. There is also a puller screw and a drive handle. In other words, the tool is completely ready for use and you won’t have to buy anything else.
- The removable supports are quite easy to install. To do this, they are installed in the required position for removing the hub. In this case, the circumference of the bolt fastening is no more than 190.2 mm.
Application area
Such a tool for car maintenance will be indispensable, both for personal use and in a car service center. In the latter option, it is simply necessary, as it helps to cope with a large volume of work much faster and with better quality. In this case, labor costs will be minimal.
Using this tool makes it possible to perform many types of car repair and installation work.
With its help, you can remove axle shafts, brake drums, hubs and many other similar parts in a short time. In addition, the pressed brake drums are dismantled.
The cost of such a device is slightly higher than other similar devices aimed at a specific car. However, its scope of application is so wide that it easily compensates for the price.
How to use a wheel bearing puller
We continue to put the machine in order.
Today we are replacing the front wheel bearings, since the right one is already humming, and the left one is not humming, but is playing.
SKF VKBA3455 bearings were purchased - 2 pcs.
In addition, replacement requires a special tool - a bearing puller.
A two-legged puller is also highly desirable, but if you really want to, you can do without it.
For convenience, we remove the entire rack, it does not take much time, I already wrote in detail not so long ago.
Next you need to remove the hub from the steering knuckle. You can knock it out with a hammer, but I am not a supporter of such methods. Therefore, we take a two-legged puller, a 30mm head and an unnecessary bolt of suitable diameter
and put together the following structure:
I used a brake caliper bracket as a stop for one of the legs. On cars with less powerful engines, there are different knuckles, and the calipers do not have a separate bracket, so you will have to come up with something similar.
We tighten the puller and the hub gradually creeps out. In this case, half of the inner race of the bearing remains on it.
It can also be removed using brute force, for example, cutting it off with a grinder, or hammering something like a screwdriver between the cage and the hub, but we will again take a more correct route - we will use a puller. Especially for this case, I got smaller claws and sharpened them with a file so that the hooks would be sharp and would not tear off the clip when trying to remove it.
We assemble the structure with the puller again
First, I placed a chisel under the puller screw. When the holder reached the upper edge of the hub, I replaced the chisel with a head with a bolt
As a result, this ring can be easily removed
Now you need to remove the bearing itself from the steering knuckle. Remove the retaining ring
And we assemble the bearing puller
A small washer and a glass on the outside of the fist are used. When the puller bolt is tightened, the bearing is squeezed into the glass and an empty fist remains
We clean the bearing seat and the groove of the retaining ring.
Now you need to press the new bearing into the fist.
Apply a little lubricant to it and assemble the puller. Now a large washer is used, since the force must be applied to the outer race of the bearing
We tighten the puller and the bearing sits in place
Install a new retaining ring from the bearing kit
All that remains is to press the hub into the new bearing; here again you need a puller.
We use a small washer, since here the force must be applied to the inner race
The result is a strut assembly with a new bearing
We put the strut in place, in this case you need to use a new hub nut from the bearing kit, repeat the operation on the other side and go home to rest))
Systematic movement on uneven road surfaces leads to premature failure of the vehicle's chassis. The main reason is the quality of the road surface, which is far from perfect in the CIS countries.
First of all, those parts of the chassis that are directly responsible for vibration damping and stabilization take the blows. In each car these are: the front strut block, the hub mechanism. If with the front strut everything is quite simple and clear, then with the hub block, not quite. Given the complexity of the design, it is recommended that repair work be carried out at certified service stations, where they use a special wheel bearing puller to remove it from its seat. Let's look at what this tool is and how to use it below.
Universal wheel bearing puller
The transmission transmits torque from the car's engine (the heart of the car) through shafts to the drive wheels (legs) of the car.
In this case, the wheels are not tightly attached to the shafts, as you have seen when replacing wheels, but through a hub. A hub is such a unit - an intermediary between the car shaft and the wheel. The role of this unit during movement cannot be underestimated. It does not simply duplicate the rotation of the shaft, but creates a connection of all components into a single overall structure, including brakes and steering. Failure of the hub unit together with the bearing located there can lead to sudden braking, the steering wheel jamming in the middle of the road, which can lead to an accident.
Location of the hub in the car
The unit is subjected to constant loads, such as braking and increasing speed, turns, bumps, and heating during operation to high temperatures. Therefore, great attention should be paid to it. And if extraneous noise appears while driving, or a knocking sound is heard when turning, you need to urgently check the wheel bearing before a major breakdown occurs.
Wheel hub, its appearance
Changing the bearing is not at all difficult; it is located inside the hub and, as a rule, covered with a metal casing.
Replacing wheel bearings
You can change the wheel bearing yourself, even in the garage. All you need is a tool kit, a new bearing and new hub nuts.
Sometimes, when disassembling the unit, it turns out that the hub bearing is in good condition and only needs to be lubricated.
This can be seen with an open bearing. If a sealed type bearing is installed, the fact that it has little or no lubrication can be determined by oil leaks from the bearing.
In their “dry” form, bearings are subject to high heat or high friction between the rolling elements. In this case, deformations occur inside the bearing, the balls stop rotating and the wheel “jams.” Therefore, you need to monitor the condition of the bearing, which is a very important part for the entire car.
If everything is ready to replace the bearing, on the side of the wheel with which we will work, we put a jack, with which we remove the wheel, we install stops under the other wheels, and for insurance, you can install an additional stop under the body.
Then remove the hub casing by unscrewing the hub nut. Access to the bearing is open.
Remove the dirt protection ring using round pliers. Then we screw pre-prepared bolts with a diameter of 12 and a pitch of 1.25 by 130 mm into the hub.
We screw them all the way through so that they appear slightly on the reverse side, about 1.5 mm. Then, with one precise blow applied to the screw heads, we press out the hub.
Next, to separate the bearing, use a flathead screwdriver or use a universal wheel bearing puller.
Separating the bearing using a flat-head screwdriver
You need to work carefully with a screwdriver or a clip so as not to leave a nick or burr on the hub. If this happens, you need to try to clean everything up.
It is much more convenient to work with a universal puller; it spares parts as much as possible from damage.
Separating the bearing from the hub race using a universal puller
After replacing the bearing or cleaning and lubricating it, we press it back into the steering knuckle using the same puller.
To avoid damage, you can use the old bearing as a spacer.
The fact is that any misalignment or damage can lead to a further emergency, so correct pressing of the bearing, and then installing the hub and checking the play are very important.
Tapered roller bearings must have play according to their design; diagonal ball bearings must not have play.
Therefore, the quality of bearing installation is of great importance.
When reassembling it, it is necessary to change the hub nut, since the thread is broken when unscrewing it. Or at least swap them with the right and left wheels.
Which is the best universal wheel bearing puller to buy?
The machine has 4 wheels, which means that you need to remove and put on the bearings on four wheels. This time.
It happens that a bearing works out its 80,000 km without problems, and you just need to add oil to the bearing, but sometimes, according to the law of meanness, you come across a low-quality bearing, or it was installed askew, or the pothole on the road was too deep and you will have to replace it sooner than after 80 000 km.
Constantly going to a car repair shop is really expensive. Therefore, you can’t do without a universal puller in the garage.
You can make such a tool yourself, but if you have an expensive car, of course, you shouldn’t risk making a homemade tool from scrap materials.
There are various types of bearing pullers available on the market. These include three-fingered and two-fingered mechanical and hydraulic pullers, and there are sets of multifunctional pullers.
It must be said that there are rarely truly universal tools; often such pullers require servicing certain car models.
Selecting Puller Models That Really Work
But some puller models are really more or less universal. For example, we can recommend the three-legged JTC 4067, with which you can remove bearings ranging in size from 40 to 130 mm. The cost of this universal wheel bearing puller starts from 9,000 rubles. But you can buy it cheaper, with a smaller range of diameters; it will cost from 1000 rubles.
Universal puller JTC 4067 for wheel bearings
According to reviews, JTC 4067 does an excellent job and does not damage either the race or the bearing.
A set of tjg pullers also works well, also made in Taiwan, like the previous version. There are sets and there are individual elements. The reviews on the kits are very impressive.
Puller set TJG M4557
The price for such a universal wheel bearing puller also starts from 10,000 rubles.
If you have a workshop that repairs cars of various models, you can also offer hydraulic tools, for example MASTAK 104.
This is a more serious tool, with a force of up to 30 tons, can work with a maximum diameter of 550 mm, and the price for such a universal wheel bearing puller starts from 130,000 rubles.
For domestic cars, such pullers are much cheaper, and you can make them yourself. For example, Kraton puller models made in China can be purchased at a price of 1000 rubles.
JTC 46 22 works with diameters from 30 to 90 mm, it has 2 paws, but judging by the reviews, it gets the job done. And its price is relatively small, 1,700 rubles.
The reviews on them are normal, they do the job.
Taiwan universal puller T73916
But what kind of puller can really be considered universal is the T73916, also made in Taiwan. It is very simple, but very easy to use.
It is good to use for pressing out bearings in the front hub in all-wheel drive vehicles.
To buy such a universal wheel bearing puller of this model, the price will be from 1800 rubles excluding delivery costs.
By the way, Taiwanese craftsmen have been very successful in producing inexpensive, but high-quality tools for various types of repairs.
There are also such options.
Press-in puller for wheel bearings
With its help you can also carry out pressing, which is important.
Puller model without claws
This puller can be used for VAZ cars and foreign cars of the brands Mercedes, Peugeot, Renault, Audi and others.
The price for such a universal wheel bearing puller is 2,670 rubles.
As we have seen, there are many models and types of tools. The choice is yours. All tools come with instructions; these tools receive positive reviews.
What is a universal wheel bearing puller and its types?
Wheel bearing pullers are specially designed to assist craftsmen during dismantling work, since it is impossible to remove the support bearing with “bare hands”. Depending on the technical characteristics, pullers come in different sizes and are divided into criteria:
- universal;
- two-grip;
- three-grip.
A two-grip device is manufactured by forging to a specific size or for universal use without reference to size. Due to the monolithic design, pullers made to a specific size are much more practical and durable than universal ones. The puller for removing a universal type wheel bearing a priori has a slight play, which complicates the dismantling process.
Three-jaw devices have the highest strength and reliability. Structures of this type are used for dismantling supports of construction and special equipment.
Wheel bearing puller or how to dismantle it?
So, let's move on to the main question of our article, how to change the wheel bearing. It must be dismantled before replacement. It is done as follows: first we block the wheel, unscrew the wheel mounting bolts and put them aside. Next, we lift the car on a jack and fix it. Carefully remove the brake parts, and most importantly, do not disconnect the flexible hose. Now remove the brake disc and protective cover, if your car model has one.
Next, disconnect the axle shaft nut, then you need to disconnect the tie rod end, the lower arm and then the gear stabilizer. Now you should remove the hub very carefully: swing your fist, and also carefully watch the axle shaft, it should not jump out of the gearbox .
Next, remove the sealing and retaining rings, as well as other fixing parts that are available on your car model. Using a wheel bearing puller, remove the inner race from the hub and reinstall the bearing race with the other side.
DIY wheel bearing puller
To carry out repair work at home, some craftsmen use simple, homemade designs. However, it is always compatible with all sizes of journal bearings. Only with those whose diameter does not exceed seven centimeters.
So, how to make a puller for wheel bearings. To do this, you will need a bolt no more than 90–100 mm long, two metal washers, a fastening nut, and a metal spacer. Moreover, the diameter of the spacer must be such that it fits into the hole for fitting the support bearing with minimal clearance. Thus, after dismantling the wheel, it will be necessary to assemble the above puller and begin to tighten the fastening, as a result, part of the support bearing will be on the outside. Then it's a matter of technique.
A homemade wheel bearing puller is applicable for both the front and rear sections of the chassis system of a domestic car. For foreign brands it is better to use the factory version of the equipment.
Why does our car need a wheel bearing?
This element provides free rotation or rolling, depending on the part that it fixes. It also has a second function that it performs, which is reliable load absorption and stable transmission to other elements. If we consider this bearing, it is most often used in the construction of cars and trucks.
Both the front and rear wheel bearings can withstand enormous loads and are therefore highly durable. High pressure is exerted on them when braking or when accelerating while driving. The operating principle of this part is very simple: it ensures smooth rotation of the wheel around its axis. The rear and front bearings perform the same function, but the structure of the parts themselves differs from each other.
Algorithm for pressing out and replacing the support bearing yourself
Preparatory stage: a set of automotive tools, new spare parts, a mobile jack, a wooden block.
Initially, the rotating mechanism is dismantled and the hub is pressed out. If there is a retaining ring, it must first be removed. Next, the support bearing is pressed out of the steering knuckle itself. After complete dismantling, it is necessary to carry out visual diagnostics, remove the remains of old lubricant, metal shavings, and other waste products.
If there are no defects, then a thin layer of lubricant is applied to the cavity of the seat. For domestic cars, it is enough to use Litol-24M type lubricant; for foreign brands, any graphite-based lubricant.
The new support bearing is pressed into place in a vice. This must be done extremely carefully, since even the slightest misalignment can deform the seat. The assembly process follows in reverse order. At the end of the procedure, it is imperative to balance the wheels, since a new part is installed.
The car is ready for further use. The length of the period directly depends on the quality of spare parts, assembly, and professionalism of the craftsman. The main role is given to the style and manner of controlling the technical equipment.
- ✅ Contents of the article:
- 1. Types of puller
- 1.1 Selecting a puller for removing and pressing bearings
- 2. Overview of wheel bearing pullers
- 2.1 Cup Force 9T0311
- 2.2 Three-jaw KS TOOLS 630.3002
- 2.3 Two-jaw Kukko K-2030
- 2.4 Hydraulic puller
- 3. Review of pullers for VAZ and LADA
- 4. Recommendations for choosing a tool
- 5. Making a puller with your own hands
- 5.1. Three-jaw tool - manufacturing instructions
- 5.2 Do-it-yourself cup puller
- 5.3 Self-production of two gripping removal tools
- 5.4 Instructions for removable traverse
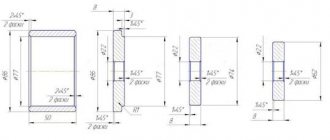
- 5.5 Drawings for self-production
- 6. Operating principle of cup puller
- 7. How to work with a three-jaw puller
- 8. Operating procedure on a hydraulic press
- 9. Using a bench vise instead of a puller
- 10. Impact method instead of a puller
- 11. Conclusions and additional useful materials
A wheel bearing puller is a specialized tool designed for pressing and pressing parts into vehicle hub units.
Since the bearings are installed on the seating surfaces with interference, pressing or pressing them requires a lot of force to be applied to a limited area of the unit. Conclusion - for this operation you need a reliable and also universal tool.
A wide range of size ranges for hub units correspond to various types of wheel bearing pullers (HBP). Choosing the right puller for replacing bearings is not easy. You will learn what parameters to follow by reading the article. We will also touch on the topic of making the device yourself and how to operate the tool.
How to properly press in a wheel bearing
At 145 thousand km, such a hum began that all passengers began to unmistakably determine that it was the front wheel hub making noise. But about which, right or left, opinions are divided. Unfortunately, hanging the wheels was not determined. When turning right, the noise disappeared, so one might think that the right bearing stopped humming as it unloaded. Based on this theory, it was decided to change the right one (before the replacement, I drove another 5,000 km, wishing the bearing a speedy death, but it still did not fall apart). Looking ahead, I will say that this decision was wrong, although not useless (the wear of the bearing raceways was already clearly visible). After replacing the right one the hum remained. I had to buy another bearing. After replacing the left one the noise disappeared. An autopsy showed that the noise disappeared when turning right, since the pitting was in the upper part of the outer raceway of the left bearing (and if there was wear on the inner raceway at the top, it would not make noise in the left turn). Conclusion: If hanging the wheels does not determine the specific culprit, then: 1. We change any! (budget option, maybe you can guess), 2. We change both. (especially if the mileage is more than 140,000 km).
So the actual replacement.
If you have hands, more free time than free money, and (or) no desire for car service specialists to study and break repairs for your money, you want to drive after replacement not only to the garage, you want to ruin PSA (since they stopped sell C5) you can replace it yourself. Remove the steering knuckle.
I recently shared with subscribers about refining a homemade hydraulic press
. And also about how it was used to press out and press in the Ford hub. There were questions from subscribers and just guests about how to properly press the hub without damaging the bearing. I'm telling you. There are three options for pressing the hub into the fist:
Method 1
: The simplest one is to bluntly press the hub into your fist with a press. In this case, all the hydraulic pressure from the inner race of the bearing passes through the balls to the outer race. In this case, 99% of cases end in damage to the balls and cages and the hub will begin to rustle after 2-3 thousand km. This is usually done by those who press out the hub in this way.