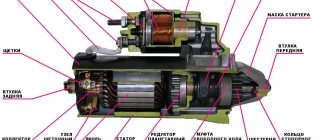
Repair of VAZ 2101, 2106, 2107 hub
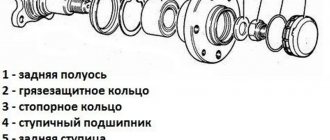
Maintenance-free front hubs on VAZ 2107 (bushing drawing)
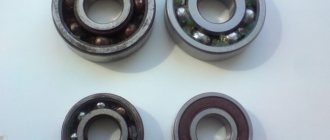
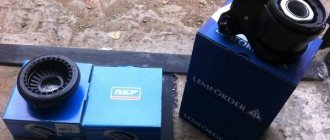
This time we will talk about maintenance-free front hub bearings. Having changed 3 bearings over the winter (sometimes they didn’t last, sometimes they overtightened them, sometimes they fell apart during maintenance), I got tired of all this, surfing the Internet and DRIVE came across articles about maintenance-free bearings on the front. There are several options: 1. Buy a ready-made kit. There are people who sharpen hubs and axles for them. 2. hub with axle from Izh od (also suitable) - I couldn’t find it 3. Rear hub from 08 VAZ + bearing also rear and + adapter sleeve - that’s what you need and in terms of cost.
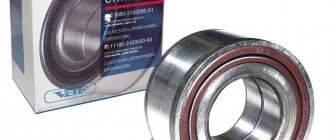
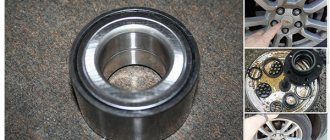
hub with bearing
Since I didn't look carefully at the bearings? and bought an extra stopper, but they were in the box. Next, we will need classic wheel nuts, 08 ones will not fit, and the ring that presses the bearing is also classic.
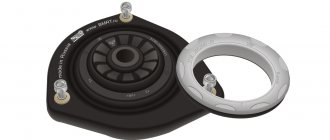
all assembled + bushings
made the bushings according to the drawings
1
2
3,1
The first time I did it according to the first one, I’ll say right away it was in vain, the size 22 was not the topic and during installation the bushing swelled while I was inserting it. but more on that later.
here is my modified drawing
So we collect all this and happily go to the garage (well, that’s how it was for me), we begin to take everything apart
Having unscrewed the nut and the caliper, I had the first problem: I bent the brake disc (I don’t know how, but I did, I realized this when I was putting everything back together after the second problem), so I knocked over the old hub with the dead bearings, we start assembling it and now it’s not a problem, there’s an error in size, no Well, it’s okay and you can knock it out, and in the end I put everything back in the car in the garage and we’re waiting for it to be re-sharpened...
this is how it was inflated due to the wrong size, after measuring the axle, I changed the dimensions
Finally, they machined the bushings for me, and I, happy, flew to the garage to finish it... Since everything was put back in place temporarily, we disassemble everything: we remove the caliper, peel off the brake disc, knock off the hub (I’ll tell you right away that everything came off quickly on the left side, but on the right I had to suffer.) When everything was removed and wiped clean of fuel oil and grease, we put it back together.
I figured it wasn't bad
We put the bushing on the axle, now everything is easy to install
now with the hub
Install the second part of the bushing
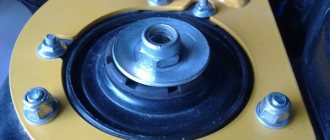
Well, a washer with a nut (the nut and washer are original - classic)
Now everything needs to be tightened. I pulled it with a ratchet and then, using a piece of a meter-long pipe, tightened it with force. I don't have a torque wrench, and I don't need one yet.
I almost forgot about the disks
I bought these on occasion for only 1500 for 2, and they look better, and are not much more expensive than the original 600 rubles pieces. I assembled the left side - let's move on to the right. There was a little dance with a tambourine, a vdshka, a sledgehammer, and everything flew off (of course, I removed the caliper). In general, the hub, together with the disk, flew off.
We assemble it, tighten it in the same way, and test drive... Result: it steers better, rolls better, less noise. I really don’t know what’s causing it, maybe I just haven’t driven for a long time, the controls are somehow better. These are my impressions.
this is what the front looks like now
Replacing front wheel bearings VAZ 2101-07
Problem: less than 2 years later, the bearing on one wheel began to hum, and on the second there was a slight crunching sound when braking. I will try to explain in detail but briefly and in pictures what and how. First, remove the wheel.
Removing the hub cap
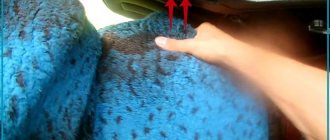
We unscrew the caliper, not forgetting to bend the fixing plates of the bolts highlighted in yellow (and, by the way, be prepared to replace them - they often break).
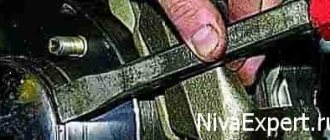
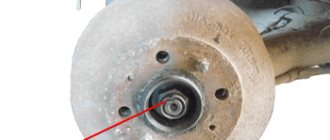
And remove the hub assembly. It came off without any problems, but sometimes it gets stuck. It is better to knock it out through a block. In this photo, the working surface of the shaft is highlighted in yellow where the oil seal actually sits. I had a decent amount of wear in this place, as a result of which the oil seal quickly failed and water got inside during the season as a result and the bearing did not pass for a long time. By the way, this is also noticeable in the lubricant - it is brownish in color (the presence of rust).
The axis is relative, the road is 700 - 800 rubles. Therefore, I take a new oil seal, remove the spring and cut it about a centimeter from the side where it is widely highlighted in yellow in the photo. I screw the spring into the spring and put it on the oil seal. I think with such an oil seal it will be enough for a longer mileage.
We pry out the old oil seal with a large screwdriver or wrench, remove the spacer ring and pull out the inner race.
And using a mandrel or an unnecessary shaft, we knock out the outer race on one side and the other.
We clean out the old grease and use the old clip to drive in a new one. We only knock out the old one back.
We install the inner race and spacer washer and carefully hammer in the oil seal.
And fill it with lubricant. The ABC says Litol 24 Front wheel bearings 0.4 l Front wheel hub cap 0.25 l. We naturally wipe off the old grease from the axle and put on the hub, install the washer and tighten the nut with a little force.
We fasten the caliper without forgetting to bend the locking plates. We put the cap on lightly to prevent debris from getting in and screw the wheel on. Since the nut is tightened with little effort, we turn the wheel 90 degrees in one direction or the other so that the rollers find their place. Then loosen the nut until the wheel spins freely. We lower the car to the ground and, shaking the wheel, see if there is any play, i.e. We are trying to catch the moment so that the wheel rotates relatively freely and there is no play in the bearing. And we tighten the nut so that it does not unscrew.
We hammer in the cap and tighten the wheel completely. After a short break-in, we check again for the presence of play and, if necessary, make adjustments. In one bearing there were shells on the rollers, on the other, on the outer race, there was a scratch on the mirror, apparently some piece of metal had gotten into it. shavings. And the fastening of the hood pillar also broke, so we had to improvise. I cut out a metal plate, drilled holes and screwed it on.
I screwed the nuts from below in such a simple way.
Video about replacing wheel bearings for a VAZ classic
https://www.drive2.ru/l/6919354/, https://www.drive2.ru/l/7087225/, https://www.drive2.ru/l/4993033/
Ball joints VAZ 2101, 2106, 2107
Reinforced ball joints for VAZ 2106 - description Increasing the castor of the VAZ 2107 by moving the ball
Instructions for replacing the wheel bearing on a VAZ-2107 with your own hands
Removal
Put the car on the handbrake. Place a shoe under the wheel to prevent the machine from rolling away. Loosen the front wheel nuts.
Raise the car and place a support under the body. Remove the wheel. Unscrew the caliper mounting bolts located on the inside and remove the caliper. To avoid damaging the brake hose, it is better to tie up the caliper.
Using a screwdriver, pry up and remove the hub cap. Unscrew the hub nut. After removing the nut and washer, pull out the outer separator. Pull the brake disc towards you and remove it together with the hub. After unscrewing the two guide pins, remove the brake disc from the hub.
Using a screwdriver, pull out the oil seal and separator, and then the spacer ring. Now you need to knock out the clips. Using a mandrel of the required diameter or a drift, knock out both clips with a hammer.
Installation
Before assembly, wash all components with any grease-cleaning liquid. Remove the races from the new bearings and, holding them in a vice, press them into place through spacers (it is best to use the old race as a mandrel).
Lubricate the inner bearing cage and install it in place. Insert the spacer ring, press the oil seal through the spacer, being careful not to damage it. We put on and secure the brake disc with studs.
We install the unit in place. Having pre-lubricated, insert the outer bearing separator into place and, having installed the washer, tighten the nut until it stops. We put on the wheel. We turn it several times to ensure complete seating. Then slowly unscrew the nut until a small amount of play appears. Lock the nut in this position.
We clean the hub cap of old grease, fill it with new one and install it in place.
Having examined how the wheel bearing is replaced on a VAZ-2107, we can conclude that this repair is not so complicated. And if desired, almost every car enthusiast can do this.
Timely maintenance and the use of high-quality spare parts will extend the life of your car. It is important not to forget that the serviceability of the car’s front suspension is a guarantee of your safety.
1200 rub. for the photo report
We pay for photo reports on car repairs. Earnings from 10,000 rubles/month.
Write:
Replacing the wheel bearings of a VAZ 2107 with a special puller is quite quick and simple, so changing the bearing in the front hub will not be difficult even with your own hands. The author of the video demonstrates clearly how, using a tool and a hammer, he first knocked out the old one and then pressed new bearings, a ring and an oil seal into the front wheel hub with a hammer. If you need to replace the entire hub, the procedure is even simpler, since you only need to remove the brake caliper, brake disc and hub, and dismantle the hub.
Engine repair and tuning
| Changing the engine oil | 500 R |
| Engine repair | from 15,000 R |
| Engine repair, including transition from engineer. 8V to 16V (front drive) | from 20,000 R |
| Transition from carburetor to 8V injector (front-wheel drive, Classic) | RUR 20,000 |
| VAZ engine replacement | 8,000 R |
| Installing a 16V front-wheel drive engine in a Classic | RUR 25,000 |
| Replacing the front crankshaft oil seal (front-wheel drive) | RUB 3,500 |
| Replacing the front crankshaft oil seal (Classic, Niva) | RUR 3,000 |
| Replacing the rear crankshaft oil seal | RUB 3,700 |
| Replacing the oil pump (front-wheel drive) | 4,000 R |
| Replacing the engine oil sump (front-wheel drive) | RUR 2,500 |
| Replacing the engine oil sump (Classic, Niva) | RUR 3,000 |
| Replacing the cylinder head gasket | 5,000 R |
| Cylinder head repair: replacement of guide bushings and/or valves (front-wheel drive 8V, Classic, Niva) | 7,000 R |
| Cylinder head repair: replacement of guide bushings and/or valves (front-wheel drive 16V) | 8,000 R |
| Installation of a sports cylinder head with camshaft adjustment (front-wheel drive 8V, Classic, Niva) | 7,000 R |
| Installation of a sports cylinder head with camshaft adjustment (front-wheel drive 16V) | 8,000 R |
| Refinement of the client’s cylinder head (enlargement and polishing of intake and exhaust channels) | from 15,000 R |
| Installing a sports camshaft (front wheel drive 8V) | from 3,000 R |
| Installation of sports camshafts (front-wheel drive 16V) | from 5,000 R |
| Installation of a sports camshaft (Classic, Niva) | from 5,000 R |
| Adjusting valve clearances (front drive 8V) | 1,500 RUR |
| Adjusting valve clearances (Classic, Niva) | 1,000 R |
| Replacing hydraulic compensators (front-wheel drive 16V) | 5,000 R |
| Replacing hydraulic compensators (Niva) | 4,000 R |
| Installing a lightweight flywheel (front-wheel drive) | 4000 R |
| Installing a lightweight flywheel (Classic) | 4500 R |
| Installing a lightweight flywheel (Niva) | 5000 R |
| Replacing the timing belt and roller (front-wheel drive 8V) | RUR 2,500 |
| Replacing the timing belt and rollers (front-wheel drive 16V) | RUR 3,000 |
| Replacing the alternator belt | from 700 R |
| Replacing the water pump or gasket (front wheel drive 8V) | RUR 2,500 |
| Replacing the water pump or gasket (front wheel drive 16V) | RUB 3,500 |
| Replacing the water pump or gasket (Classic, Niva) | 1,500 RUR |
| Replacing the thermostat | 1,000 R |
| Replacing the cooling radiator and/or electric radiator cooling fan | 1,000 R |
| Replacement of all cooling system hoses | 1,500 RUR |
| Replacing the carburetor | 1,000 R |
| Replacing the throttle pipe | 800 R |
| Installation of a sports receiver (front-wheel drive 8V, Classic, Niva) | 4,000 R |
| Installing a sports receiver (front-wheel drive 16V) | from 3,000 R |
| Replacing the fuel pressure regulator (on the ramp) | 1,000 R |
| Replacing fuel injectors (front-wheel drive 8V, Classic, Niva) | 1,000 R |
| Replacing fuel injectors (front drive 16V) | 2,000 RUR |
| Replacing the electric fuel pump | 1,500 RUR |
| Replacing the fuel filter (injector) | 400 R |
| Installing a replacement cat collector (front-wheel drive 8V) | RUR 3,000 |
| Installing a replacement cat collector (front-wheel drive 16V) | RUR 2,500 |
| Replacing the exhaust system corrugation | from 1,000 R |
| Installation of a sports exhaust manifold 4-1 / 4-2-1 (front-wheel drive 8V, Classic, Niva) | from 3,500 R |
| Installation of sports exhaust manifold 4-1 / 4-2-1 (front wheel drive 16V) | from 3,000 R |
| Muffler replacement (without modifications) | 500 R |
| Replacing the resonator (without modifications) | 500 R |
| Installation of a direct-flow universal muffler (with welding) | from 1,500 R |
| Installation of a complete direct-flow exhaust system | from 5,000 R |
| Installing/replacing one engine mount | 1,000 R |
| Replacement of front, rear and side engine mounts (front-wheel drive) | RUR 2,500 |
| Starter replacement | 1,000 R |
| Generator replacement | 1,000 R |
| Installation of a 4-throttle intake (without modification of wiring and settings) | from 4,000 R |
| Installation of the “AutoTurbo” compressor /without changing the engine compression ratio and settings/ (front-wheel drive 8V) | from 8,000 R |
| Installation of the “AutoTurbo” compressor /without changing the engine compression ratio and settings/ (front-wheel drive 16V) | from 12,000 R |
| Installation of the “AutoTurbo” compressor /without changing the engine compression ratio and settings/ (Classic, Niva) | from 12,000 R |
| Turbocharged VAZ 16V engine from 250 hp. (all spare parts + labor + turnkey setup) | from 180,000 R |
| Chip tuning: adjustment of the engine control program | RUR 3,000 |
| Chip tuning: online configuration of the engine control program (MAF) | 8,000 R |
| Chip tuning: online configuration of the engine control program (DBP+DTV, turbo) | 10,000 R |
| Chip tuning: online configuration of the engine control program (E-Gas, atmospheric) | 14,000 R |
| Chip tuning: online configuration of the engine control program (E-Gas, turbo) | RUR 20,000 |
Replacing the wheel bearing of a VAZ 2107
The chassis of the VAZ 2107, like all classic models, is not distinguished by its design complexity, but at the same time it fully complies with the somewhat inflated endurance requirements that road surfaces impose on us. The 7 has a reliable and simple wishbone suspension, but it does not last forever, and can remind you of itself from time to time with tapping and creaking.
Content:
Signs of a worn out bearing
We immediately pay attention to the knocking of the suspension and play in the steering, and try to find and neutralize the tired part as soon as possible. The front wheel bearing behaves completely differently. As a result of wear and tear, it does not immediately show its fatigue, but gradually. When turning right, the left wheel bearing begins to hum, and when turning left, vice versa.
It is quite possible that the bearing adjustment nut has become loose, but then the hum should be accompanied by a knocking sound. This can be easily determined by checking the play on the front wheel. To do this, hang the car on a jack and grab the wheel by the lower part and the upper part with your hands, then rock it. If there is play, then it will be enough to tighten the adjusting nut with a torque of 2 kg/cm and tighten it with a blunt chisel. If the hum continues after this, it means the bearing has worn out and needs to be replaced.
Removing the front hub of a VAZ 2107
Before starting work, place the car on a level surface, secure the rear wheels with wheel chocks and tighten the handbrake. After this, we jack up the front wheel with a jack, but it is advisable to place a stand under the lower arm after we remove the wheel. We loosen the jack, the bulk of the car falls on the stand, and now the car is securely fixed.
- Using a blunt chisel or screwdriver, remove the hub protective cap.
- Remove the front brake caliper. To do this you will need to remove the brake pads. We unpin the pad pin, take it out, and then you can use a pry bar or a large screwdriver to press the pistons into the caliper. After this, you can remove the brake pads.
- The front brake caliper is attached to the axle with two bolts that need to be unscrewed. In order not to disconnect the caliper from the brake system, we hang it on a wire so that the brake hose is not stretched.
- Let's move on to the hub. Using a 27mm socket, unscrew the hub adjustment and fastening nut. To avoid any surprises, let us remind you that the right wheel has a left-hand thread, and the left one has a right-hand thread. It's hard to confuse. Having oriented towards the cardinal points, unscrew the nut.
- Remove the hub from the axle and place it on a horizontal surface.
Adjusting the wheel bearing on a VAZ 2107
If the bearing is slightly worn, you can tighten the adjusting nut and eliminate the play. To do this you will need a jack, a wrench, pliers, a hammer and a screwdriver.
You can correctly tighten the front wheel bearing of a VAZ 2107 as follows:
- lift the car with a jack, hanging the wheel;
- Use a screwdriver and hammer to remove the protective plug from the hub bearing;
- tighten the adjusting nut so that the wheel stops rotating by hand;
- gradually loosen the nut until the wheel rotates freely, but does not play;
- bend the side of the nut with a chisel or screwdriver so that it cannot unscrew spontaneously;
- put the protective plug in place;
- lower and remove the jack.
If play and noise cannot be eliminated in this way, the bearing must be replaced.
Installing new bearings
- We clamp it in a cleat. We take a new bearing race (ring) and push it into the housing. We use a flat board, a pry bar - any strong object with a flat surface.
- We install it exactly, relative to the plane of the hub, so that it does not become distorted and fits exactly into the seat. From above, with light blows of a hammer, drive the ring as deep as possible through the pry bar. We try to tap evenly so that it fits evenly into the groove, without distortion.
To recess it all the way, you can use an old ring, using it as a mandrel. At the same time, you need to place it relative to the new holder with a larger diameter to make it easier to pull out. In addition, there are special soft metal rings of different diameters designed for pressing bearings.
If the front wheel bearing of a VAZ 2107 is being replaced in the garage, but there is nothing similar at hand, then for complete pressing we use the tool that was used to remove the old races from the hub body. Also, carefully tapping along the entire perimeter of the ring, press it in until it stops.
- For the outer bearing race, just use a block of wood. We insert it accurately into the body so that it does not warp, place a piece of wood on top and tap it with a hammer until it is completely installed in the seat. There is no need to use the old bearing ring here.
- We generously lubricate the cages of new bearings with a special heat-resistant grease.
Litol-24 and solid oil are not suitable; they may not withstand high temperatures and become liquid and lose their lubricating properties. We apply the same lubricant to the inside of the hub housing. In the “Murzilka” for repairs they advise using Litol, but practice shows otherwise.
- We insert the inner bearing into the race. We close it with a cuff with a locking ring. We evenly tap it on top through the spacer so that it fits into its seat without distortion.
- We put the finished hub with the bearing on the steering knuckle axis and install the washer. We also apply lubricant before tightening the hub nut. After replacing the front wheel bearing, it is advisable to use new adjusting nuts, since the old ones will be difficult to lock.
- Install the brake disc on the hub. Don't forget about the spacer ring (washer). We insert the guide pins through it, lubricating them with nigrol or “graphite”. We tighten them, pressing the caliper into the brake disc.
We adjust the free play of the wheel bearing, we will discuss how to do this correctly in the article: Wheel bearing play - causes of occurrence and adjustment of the wheel bearing of the VAZ 2107. We counter the nut, along its outer edges we carefully press the metal with a chisel opposite the grooves of the steering knuckle axis.
- We collect grease into the protective cap and install it in place. We return the caliper with brake pads to the disc.
Video on how to change wheel bearings yourself:
Repair, bearing replacement, instructions with photos and videos
For a car to move, its wheels must spin normally. If problems begin with the rotation of the wheels, then the driver immediately has difficulties controlling the car, which can become a prerequisite for a tragedy. This applies to all cars, and the VAZ 2107 is no exception. An important element that ensures the correct rotation of the wheels of the “seven” is the hub. The driver can repair it without the help of others. Let's figure out how to do this.
Important points
- It is necessary to cut off the old bearing with a grinder very carefully so as not to touch the axle shaft itself. It is best to cut off only the outer ring of the bearing and the cage with a grinder. Only a few small cuts (not through ones) should be made on the inner ring. Then you can insert a chisel into these cuts and, with several careful and precise blows, split the inner ring of the bearing without touching the axle shaft. The inner ring of the bearing is cut off with a chisel
- The new bearing cannot be placed on the axle shaft without difficulty. In practice, it will have to be stuffed onto the axle. But under no circumstances should you use only a hammer for this, as there is a high risk of distortion and damage. The best method is to take a piece of pipe whose diameter is slightly larger than the diameter of the axle shaft, and use it to seat the part in place.
- Some car owners heat the bearings and place them on the axle shaft while they are hot. This really makes it easier to fit the new part, since all metals expand when heated. But it is strictly forbidden to install bearings using this method, since when this part is heated and then cooled in air, it may be annealed (in other words, heat treatment, which consists of heating the steel to temperatures below critical levels followed by a slow cooling). Annealing will reduce the hardness of the bearing by a couple of times and increase its ductility; as a result, its service life will be reduced significantly.
Replacing a bearing is a difficult task, but it can be done. The main thing here is to avoid damage to the axle shaft when cutting off the bearing and distortions when installing a new part. In addition, you should take into account the fragility of the bearing rings and use a hammer very carefully. Otherwise, the procedure is completely within the capabilities of even a novice car owner, who, having carried it out with his own hands, will be able to save a significant amount.
Copywriter with five years of experience. Rate this article: Share with friends!
Purpose of the VAZ 2107 wheel bearing
wheel bearing is a part that secures the wheel to the steering knuckle and also rotates the wheel itself. In a car, this element is constantly affected by temperature changes, influenced by the environment, impacts from uneven road surfaces, jerks of the brakes and steering control. If the bearing is in good condition, the wheel should spin without any play, while noise and low friction are allowed.
READ This Tesla Model S Shows a Powerful Tidal Wave Who; with boss
The wheel bearing secures the wheel to the steering knuckle
The part in question has a fairly large resource. But there are many reasons that sharply reduce its service life. These include:
- Poor quality of roads is one of the reasons for rapid failure of wheel bearings. This is explained by the fact that the element is located in the center of the wheel and takes strong loads during an impact when hitting a bulge. For some time, the bearing withstands such impacts, but is gradually destroyed.
- Exposure to a brutal environment. In the summer, moisture and road dust get inside the hub, and in the winter, chemical reagents get inside.
- Overheat. Wheel rotation is always associated with friction and an increase in temperature. With constant heating and cooling, which is especially typical in winter, bearing life is reduced.
Diagnostics - causes and symptoms of malfunction
The condition of a wheel bearing is assessed based on a number of factors. The main signs of a node malfunction include:
- noticeable wheel play;
- hum, rustle, crunch from a spinning wheel;
- the suspended axis rotates unevenly, there is wedging;
- excessive heating of the disk;
- increased noise when cornering.
The main reason for replacing a wheel bearing is due to normal wear and tear. The gap increases and eventually stops responding to adjustment.
How to check the wheel bearing of a VAZ-2107:
How to determine front wheel bearing wear:
vazoved
I drive a LADA VESTA CROSS, Moscow
Then there will simply be no one to pay the fines! This is a Korean tablet video recorder 15 in 1 for Android..
I forgot about fines and Yandex Navigator.
There is FULL HD shooting, radar detector and GPS with 32 satellites. I got it at a reasonable price for such great functionality: HERE
Other causes of failure:
- wheel impacts;
- technological violations during the previous replacement;
- entry of foreign particles into the separator cavity (dust, dirt, metal shavings);
- aggressive driving style.
If at least one malfunction is detected, it is necessary to replace the parts. Continued operation of the vehicle is dangerous.
Replacing the front wheel bearing
Work on replacing a wheel bearing begins with the preparation of tools and materials. You will need:
- set of socket wrenches;
- screwdriver;
- chisel;
- hammer;
- pliers;
- extension for knocking out the bearing race;
- new bearing, seal and lubricant;
- rags;
- kerosene.
How to remove
To dismantle the part, lift the front wheel using a jack. In a service station, work is carried out on a lift. When replacing a bearing, the following sequence of actions must be performed:
- Unscrew the fasteners and remove the wheel.
- Unscrew the fastening and dismantle the caliper.
To avoid damage to the brake hose after removing the caliper, the latter is carefully suspended and secured with wire.
How to put
After dismantling the wheel bearings and cleaning the hub itself, you can begin installing new parts. The work is performed in the following order:
- Press in the races of both bearings.
Video: how to replace the front wheel bearings of a VAZ 2107
What to lubricate
Litol-24 is used to lubricate wheel bearing separators. It is also used to apply a new oil seal to the working edge during installation.
Bearing nut tightening torque
The need to tighten the hub nut arises after replacing the bearings or during their adjustment. The nut is tightened using a torque wrench to a torque of 9.6 Nm, while the hub is turned several times to install the bearings in place. Then loosen the nut and tighten it again, but with a torque of 6.8 Nm, after which it is locked in this position.
Front wheel bearings for VAZ 2107 sizes.
The table shows the dimensions for the front hub bearings of a VAZ classic car.
| Installation location | Bearing type | Size, mm | Quantity |
| Front wheel hub (outer support) | Roller, conical, single row | 19,545,315,5 | 2 |
| Front wheel hub (inner support) | Roller, conical, single row | 2657,217,5 | 2 |
Repair of VAZ 2101, 2106, 2107 hub
Maintenance-free front hubs on VAZ 2107 (bushing drawing)
This time we will talk about maintenance-free front hub bearings. Having changed 3 bearings over the winter (sometimes they didn’t last, sometimes they overtightened them, sometimes they fell apart during maintenance), I got tired of all this, surfing the Internet and DRIVE came across articles about maintenance-free bearings on the front. There are several options: 1. Buy a ready-made kit. There are people who sharpen hubs and axles for them. 2. hub with axle from Izh od (also suitable) - I couldn’t find it 3. Rear hub from 08 VAZ + bearing also rear and + adapter sleeve - that’s what you need and in terms of cost.
hub with bearing
Since I didn't look carefully at the bearings? and bought an extra stopper, but they were in the box. Next, we will need classic wheel nuts, 08 ones will not fit, and the ring that presses the bearing is also classic.
all assembled + bushings
made the bushings according to the drawings
3,1
The first time I did it according to the first one, I’ll say right away it was in vain, the size 22 was not the topic and during installation the bushing swelled while I was inserting it. but more on that later.
here is my modified drawing
So we collect all this and happily go to the garage (well, that’s how it was for me), we begin to take everything apart
Having unscrewed the nut and the caliper, I had the first problem: I bent the brake disc (I don’t know how, but I did, I realized this when I was putting everything back together after the second problem), so I knocked over the old hub with the dead bearings, we start assembling it and now it’s not a problem, there’s an error in size, no Well, it’s okay and you can knock it out, and in the end I put everything back in the car in the garage and we’re waiting for it to be re-sharpened...
this is how it was inflated due to the wrong size, after measuring the axle, I changed the dimensions
Finally, they machined the bushings for me, and I, happy, flew to the garage to finish it... Since everything was put back in place temporarily, we disassemble everything: we remove the caliper, peel off the brake disc, knock off the hub (I’ll tell you right away that everything came off quickly on the left side, but on the right I had to suffer.) When everything was removed and wiped clean of fuel oil and grease, we put it back together.
I figured it wasn't bad
We put the bushing on the axle, now everything is easy to install
now with the hub
Install the second part of the bushing
Well, a washer with a nut (the nut and washer are original - classic)
Now everything needs to be tightened. I pulled it with a ratchet and then, using a piece of a meter-long pipe, tightened it with force. I don't have a torque wrench, and I don't need one yet.
I almost forgot about the disks
I bought these on occasion for only 1500 for 2, and they look better, and are not much more expensive than the original 600 rubles pieces. I assembled the left side - let's move on to the right. There was a little dance with a tambourine, a vdshka, a sledgehammer, and everything flew off (of course, I removed the caliper). In general, the hub, together with the disk, flew off.
We assemble it, tighten it in the same way, and test drive... Result: it steers better, rolls better, less noise. I really don’t know what’s causing it, maybe I just haven’t driven for a long time, the controls are somehow better. These are my impressions.
this is what the front looks like now
Replacing front wheel bearings VAZ 2101-07
Problem: less than 2 years later, the bearing on one wheel began to hum, and on the second there was a slight crunching sound when braking. I will try to explain in detail but briefly and in pictures what and how. First, remove the wheel.
Removing the hub cap
We unscrew the caliper, not forgetting to bend the fixing plates of the bolts highlighted in yellow (and, by the way, be prepared to replace them - they often break).
And remove the hub assembly. It came off without any problems, but sometimes it gets stuck. It is better to knock it out through a block. In this photo, the working surface of the shaft is highlighted in yellow where the oil seal actually sits. I had a decent amount of wear in this place, as a result of which the oil seal quickly failed and water got inside during the season as a result and the bearing did not pass for a long time. By the way, this is also noticeable in the lubricant - it is brownish in color (the presence of rust).
The axis is relative, the road is 700 - 800 rubles. Therefore, I take a new oil seal, remove the spring and cut it about a centimeter from the side where it is widely highlighted in yellow in the photo. I screw the spring into the spring and put it on the oil seal. I think with such an oil seal it will be enough for a longer mileage.
We pry out the old oil seal with a large screwdriver or wrench, remove the spacer ring and pull out the inner race.
And using a mandrel or an unnecessary shaft, we knock out the outer race on one side and the other.
We clean out the old grease and use the old clip to drive in a new one. We only knock out the old one back.
We install the inner race and spacer washer and carefully hammer in the oil seal.
And fill it with lubricant. The ABC says Litol 24 Front wheel bearings 0.4 l Front wheel hub cap 0.25 l. We naturally wipe off the old grease from the axle and put on the hub, install the washer and tighten the nut with a little force.
We fasten the caliper without forgetting to bend the locking plates. We put the cap on lightly to prevent debris from getting in and screw the wheel on. Since the nut is tightened with little effort, we turn the wheel 90 degrees in one direction or the other so that the rollers find their place. Then loosen the nut until the wheel spins freely. We lower the car to the ground and, shaking the wheel, see if there is any play, i.e. We are trying to catch the moment so that the wheel rotates relatively freely and there is no play in the bearing. And we tighten the nut so that it does not unscrew.
We hammer in the cap and tighten the wheel completely. After a short break-in, we check again for the presence of play and, if necessary, make adjustments. In one bearing there were shells on the rollers, on the other, on the outer race, there was a scratch on the mirror, apparently some piece of metal had gotten into it. shavings. And the fastening of the hood pillar also broke, so we had to improvise. I cut out a metal plate, drilled holes and screwed it on.
I screwed the nuts from below in such a simple way.
Video about replacing wheel bearings for a VAZ classic
https://www.drive2.ru/l/6919354/, https://www.drive2.ru/l/7087225/, https://www.drive2.ru/l/4993033/
Replacing balls
8. If the finger rotates, clamp the lever using a pry bar. 9. Unscrew the fastening of the ball joint to the upper
How to change the wheel bearing of a VAZ 2107
Replacing the wheel bearing 2107 begins with removing the decorative caps and the front wheel. Then straighten the locking plates and unscrew the brake caliper mounting bolts. Then you need to remove the caliper and move it to the side so that it does not pull back the brake fluid supply hose.
Next, you need to remove the hub cap, unscrew the adjusting nut and remove the washer. After this, you can dismantle the hub assembly (with brake disc, bearings, rings and seals). You can make a replacement, as in the video, without separating the hub from the disk, but if you unscrew the two nuts, it is more convenient to make the replacement, still separately from the disk (by removing the bearing directly from the hub). Then you need to press out the wheel bearing and use a repair kit. Or buy the entire hub assembly with bearing (it will be more expensive) and screw it to the disk without any hassle and put everything back together.