Which Priora front wheel bearing is better?
The wheel bearing is a small but quite important part of the car - one of those that directly affects the safety of the driver and passengers.
Therefore, you need to carefully monitor the bearings and periodically check their condition. If, when rocking a wheel that has been hung, play is felt, or noise appears during movement, it is better to replace the wheel bearing. However, if the play is increased, you can try to loosen the nut and check the tightening torque. If it is less than permissible, then you can tighten and lock the nut again. So the wheel bearing on the Priora will probably last for some time.
To press the bearing in, you just need to use the appropriately sized mandrels that are included in the kit. If you don’t have mandrels, you can use the rings of the old bearing.
The rear wheel bearing of the Priora is not a scarce part at all. Priora rear hubs are available for sale from a variety of manufacturers - both domestic and foreign. In any case, the price is relatively small. If you are in doubt whether the wheel bearing is suitable for Lada Priora cars, the dimensions are indicated on the product itself.
Replacing the rear wheel bearing on a Priora can be done at a car service center, or independently. Let's carefully consider the second option.
First, let's prepare everything you need. We will need a 30mm socket wrench, a thin chisel, pliers for removing the retaining rings and two pullers - a universal one and one for pressing out the bearing.
Remove the decorative cap and hub. This is done like this: first we unlock the hub nut. Then loosen the tightening of this nut and the wheel bolts. We engage first gear and install reliable stops under the wheels of the front axle. We lift the back part and install it on the stops. Remove the wheel, brake drum and brake pads. Finally unscrew the hub nut and remove the thrust washer.
Next, using the prepared puller, we press the hub from its axis, clamp it in a vice and remove the retaining ring.
We also use a puller to press the old bearing out of the hub. We clean it and press in a new bearing for the Priora front hub. Reinstall the previously removed retaining ring.
Using a suitable mandrel, press the hub onto the axle and install the brake drum and wheel in place. We lower the jack and finally tighten the hub nut (it’s better to buy a new one). Then we lock it and install the removed cap on the hub. Congratulations, you have replaced the wheel bearing on a Priora yourself.
While driving, an unpleasant cracking noise may be heard in the area of the front or rear wheel. It usually disappears when turning. This behavior of the chassis indicates that the wheel bearing requires replacement. A malfunction occurs in almost every car that has already experienced a lot of mileage. The condition of the front or rear wheel bearing is also affected by driving style. The replacement is quite simple, but the driver will have to remove the strut and then take the Priora to a wheel alignment.
Don't want extra costs? Then read how to replace a wheel bearing without dismantling the strut and subsequent “camber” .
Replacement
The work must be carried out using the necessary tools. There are two options for replacing the wheel bearing - with subsequent wheel geometry and without its need. The replacement is similar for all VAZ cars (front-wheel drive).
Tool you will need:
- Ratchet with head "7", "10", "13", "17", "19" or E30;
- A key for unscrewing the CV joint or a head at “30”;
- Powerful flat head screwdriver;
- Gas torch or wheel bearing puller;
- Hammer;
- Steering wheel end puller (may not be needed);
Replacement with subsequent wheel geometry
- You need to start by unscrewing the CV joint nut; the car should be installed on a horizontal plane with the steering wheel turned slightly to the side. Using a wrench, unscrew the grenade nut counterclockwise.
CV joint is a Constant Velocity Joint (not to be confused with lubrication). Colloquially it is called a "grenade". It got its name because of the presence of a large number of balls inside and its appearance similar to a combat grenade. There is also CV joint grease -3 and 4, used to lubricate this joint.
- We jack up the car and secure it so that it does not roll or fall off the jack. Remove the wheel;
- Separate the brake pads using a flat screwdriver;
- We unscrew the caliper from the steering knuckle and hang it by the wire (under no circumstances hang the caliper by the brake hose).
- We dismantle the brake disc by unscrewing the guides.
- Unscrew the two bolts securing the strut to the steering knuckle.
- Unscrew the bolts securing the ball joint.
- We remove the steering knuckle from the car.
- We take out the retaining rings on both sides of the fist.
- Next we need to knock out the old bearing; for this you can use a punch of the required diameter or use a puller.
- Then, once the bearing is removed, a new one must be installed. Pre-install one retaining ring and press in a new one on the opposite side.
- If you have a puller, then carefully press in the new bearing, avoiding distortion.
- If you don’t have a puller, you first need to put the new bearing in the freezer for a couple of hours.
Why in the freezer?
According to the laws of physics from the school curriculum, cold bodies contract, and hot bodies expand. Therefore, a cold bearing will have a smaller diameter than a hot one, making installation easier.
- Next, use a torch to heat the steering knuckle and carefully lower the bearing into it, tapping a little. IMPORTANT, avoid distortion; the bearing should run smoothly without snagging.
You can use an old bearing as a mandrel.
- After the bearing is pressed in, install the second retaining ring and assemble everything in the reverse order.
Replacement without wheel geometry
In order to carry out a replacement without the need for wheel geometry, it is necessary to completely dismantle the steering knuckle assembly with the strut.
- Without removing the wheels from the car, we need to loosen the CV joint nut (grenade) to “30”. To do this, unscrew the grenade nut counterclockwise with a wrench.
- We tuck the car, which is fixed, so that it does not roll or fall off the jack. We remove the wheel.
- Separate the brake pads using a flat-head screwdriver.
- We unscrew the caliper from the steering knuckle and hang it by the wire (do not hang the caliper by the brake hose).
- Remove the brake disc by unscrewing the two guide wheels.
- We unscrew the steering tip mount and remove it from the strut bipod using a puller.
- Unscrew the two ball mounting bolts.
- Unscrew the three bolts securing the strut support to the side member.
- We remove the strut along with the steering knuckle from the car.
The next step is to remove the bearing from the knuckle and install a new one.
- We remove the retaining rings on both sides from the steering knuckle.
- Next, you need to knock out the old bearing; for this you can use a punch with a diameter smaller than the diameter of the bearing or use a puller.
- After the old bearing is removed, a new one must be installed. Pre-install one retaining ring and press in a new bearing on the opposite side. To do this, if you have a puller, carefully press the bearing into place, avoiding distortion. If you don’t have a puller, then you first need to put the new bearing in the freezer for a couple of hours (so that its diameter decreases slightly).
- Next, use a torch to heat the steering knuckle and carefully lower the bearing into it, tapping a little. IMPORTANT: avoid distortion; the bearing must run smoothly without snagging.
An old unnecessary bearing can be used as a mandrel for installing a new one.
- After the bearing is pressed in, install the second retaining ring and assemble everything in the reverse order.
The wheel bearing replacement process is complete.
Preparing for work
This process is best carried out in the light if we are talking about the street. A bearing is a miniature component. It will be ideal if you drive Priora into the inspection hole. We will disassemble the front hub part, since this is more difficult than carrying out the same operation with the rear hub, especially without removing the strut. And now to the tools:
- Spanners for 17, 19.
- A bearing puller is the main tool, so without it you will have to dismantle the strut and perform a wheel alignment.
- The head is 30, it is desirable that it be equipped with a reliable wrench.
- The frame is usually a homemade tool, which is a cut of a pipe of a certain size. With its help we will knock out the hub.
- WD-40 lubricant.
Lada Priora, like other passenger models of this brand, is a front-wheel drive vehicle. There are many more parts in the front, hence the more complex process of removing the bearing. The rear support component of the hub is removed in the same way; you will need less time to do it, so the instructions describe the rear support bearing.
Priora hub design
These Priora parts are available both rear and front. Therefore, replacing the bearing bearing on them is somewhat different due to design features and differences. Therefore, it is first worth considering their differences before talking about replacing the rolling mechanism itself.
Front hub "Priors", device
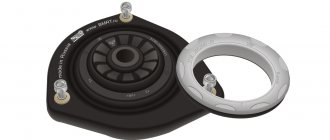
The front hub of the Priora, like on other cars, has an independent suspension. That is, it is not tightly fixed to the body, but has a certain freedom of movement being in the steering knuckle. In addition, the front wheels are driven and swivel. This is what causes certain differences in design. Although it is quite simple, replacing the bearing on it is a rather complex procedure. The front hubs of the Priora are metal discs with a neck, inserted into the steering knuckle with devices and devices designed both for their movable connection with the body and for the free movement of the wheel in the direction of rotation. In addition, the drive shaft from the gearbox enters the center of the hub. Therefore, slots are cut inside it. A lever system and a shock absorber strut make this connection. And the ball joints of the steering mechanism control the steering knuckle, into which the hub is pressed.
Replacing the bearing on the front strut of a Priora
To carry out this operation you will need the following tools and devices:
- hammer;
- mandrels;
- screwdriver (large);
- retaining ring remover;
- core;
- chisel;
- two-jaw bearing puller;
- head at "30"
- wrench set to “17” (socket);
- pliers.
The most convenient way to replace a wheel bearing on a Priora is to use a lift. As a last resort, you can jack up the front part and hang the wheel.
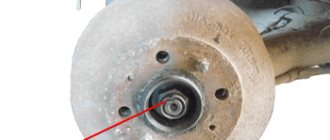
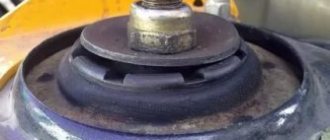
First of all, having removed the decorative plug, remove the cap of the hub fastening nut. Under the nut there is a special locking washer, the edge of which is bent over the nut. Using a thin chisel, loosen the nut and loosen it a little.
Now the Priora can be lifted and the wheel completely removed. Using a 17 key, loosen the fastening of the steering knuckle to the strut. Unscrew the ball joint mountings a couple of turns. Completely remove the hub mounting nut. Remove the caliper and brake disc one by one. Completely remove the mounting bolts and remove the steering knuckle and hub.
Removing the old bearing
Using a special drift, knock the hub out of the fist. Often the inner race remains on the hub journal. It needs to be removed with a puller. Pull out the retaining rings on both sides of the bearing. Now it can be pressed out either with a special diameter drift or with a new bearing.
After inserting the new one, secure it with retaining rings. Apply lubricant generously and reassemble the Priora in reverse order. Replace the second bearing in the same way.
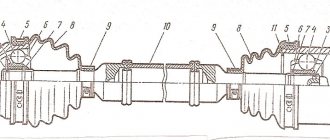
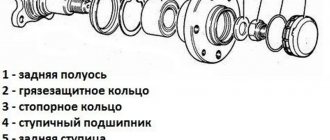
Rear hub "Priors", device
Unlike the front, the rear hub of the Priora is mounted on a fixed shaft attached to the supporting beam. And this beam is attached to the body by a system of levers and shock absorber struts. Its design is much simpler, however, as practice shows, removing and replacing the Priora wheel bearing at the rear is often much more difficult than at the front.
Working with rear bearings
So, for this job you will need a slightly smaller set of tools:
- thin chisel;
- hammer;
- head at “30”;
- pliers for removing retaining rings;
- pressing puller for rollers;
- universal three-jaw puller;
- metal brush for removing rust.
Remove the plugs in exactly the same way, unscrew the fastening nut at “30” and loosen it. Lift or jack up the Priora. Remove the wheel completely. Tapping gently with a hammer, remove the brake drum. It is advisable to remove the brake pads to avoid damage.
Completely unscrew the fastening nut. Using a three-jaw puller, remove the hub with the roller from the shaft. Sometimes it may happen that here, too, the inner race remains on the shaft. Well, in this case, again, a two-jaw puller is in hand. But again, it is advisable to pre-treat with anticorrosive. After the required part is removed, just like on the front steering knuckle, remove the retaining rings for replacement. Well, now, slowly, using a special puller (available for sale), press out the old bearing or outer race, if the inner race remains on the shaft. Wipe the hub and shaft thoroughly. Press in the new bearing and secure it with retaining rings. Before replacing the hub, thoroughly brush the brake pad seats while you can. Having seated the hub, put the washer and nut in place, not forgetting to secure the cotter pin. Apply CV joint grease generously.
Be sure to brush the brake drum, and after installing the pads, reassemble everything in the reverse order.
Bearing replacement
- The process begins with flaring the hub nut, after which you can pull off the fastener. We will have to disassemble almost the entire hub, so each fastener that needs to be unscrewed should be lubricated with WD-40;
What are the best bearings to install on Priora?
You have already figured out how the replacement takes place without dismantling the rack. But some owners of Lada Priora have a question: what is better to choose - a standard part or an alternative one. The most important thing is that it is a ball component; roller ones are not as durable. If there is no option for Lada Priora in the store, then it is better to take a part for Kalina. Some motorists recommend buying cheaper bearings for the “ten”, but it is better to look for more modern options.
Video on replacing the wheel bearing on a Priora is below.
- ✅ Contents of the article:
- 1. Checking the front wheel bearing on a Priora
- 2. Design of the unit and methods for replacing the wheel bearing
- 3. Instructions for removing the old ball bearing
- 4. Pressing in a new part, assembly and installation of the unit
- 5. How to choose a replacement bearing: price, number, dimensions
- 6. Tips, tricks and useful repair videos
The front wheel bearing on the Priora VAZ 2170, as on other VAZ cars, often fails, especially when the mileage exceeds 80,000 km. First there is noise from the wheel, which can increase during acceleration. Vibration also often occurs, wheel play increases, and in some cases the noise turns into a grinding sound - all these signs mean that the front wheel bearing of the Lada Priora requires immediate replacement. If you delay repairs, the consequences can lead to wheel jamming, which leads to unsafe situations on the road.
Priora wheel bearing dimensions
They sentenced me to 3 wheel bearings, 2 front and 1 rear. I started googling the Internet to find the best option; I really didn’t want to install the original LADA. I needed the best possible ones, so I decided to try FAG.
Some information about FAG:
The concern's production facilities have the most extensive geography: the USA, Great Britain, the Czech Republic, China, Brazil, Korea and other countries. The company is the official supplier of auto components for Mercedes, VW, Volvo, Nissan, Honda and other automakers. At the end of 2001, a large German bearing manufacturer, the INA group, bought more than 90 percent of the company's shares. Once united, the new company Schaeffler KG became the second largest in the world.
About the bearings themselves:
Front - Fag manufacturer number: 713 6140 30
Installed on cars: SKODA: Favorit Felicia VOLKSWAGEN: Caddy pickup. Bearing dimensions: outerØ [mm] 68 innerØ [mm] 35 Width (mm) 37 The kit includes: Bearing + Retaining ring + hub nut. Produced at a plant in India (You can see it in the photographs) It is a substitute for the original VAG number: 6U0 498 003 Average price per piece: 1250 rubles
Rear – Fag Manufacturer Number: 545312A
Installed on cars: FIAT: MILLE CLIP, UNO. Bearing dimensions: outerØ [mm] 60 innerØ [mm] 30 Width (mm) 37 Includes: Bearing only. Produced at a plant in Germany (You can see it in the photographs) It is a substitute for the original Fiat/Alfa/Lancia number: 7 171 4455 Average price per piece: 500 rubles
Interesting point:
While I was studying catalogs I came across a kit for the front axle! Its original number: FAG 713804510. (I managed to buy it for 1800 rubles)
The difference is that this kit simply packs 2 bearings. Now it is more expensive than buying them separately, but whoever looks for will always find)))
And in conclusion:
Everything worked as if it were original, the car became much quieter, the hum disappeared. Well, only time will tell how long they will last.
Price for work:
Front: The hubs were removed and taken to a service station 350*2=700 rubles Rear: 400 rubles Total: 1100 rubles
The replacement cost
Bearing set 1800 rubles + rear 450 rubles + labor 1100 = 3350 rubles
Thank you
karmanych for removing the hubs and Sanych14 for taking them to the service station.
P/S
I wanted to take photos of the bearings from the garage, but I didn’t have time to take them. These are the only photos left.
The main part of the VAZ-2170 hub, like any other brand of car, is the bearing. Caring for it, timely maintenance and replacement is a necessary part of proper car maintenance. After all, disruptions in the operation of this rolling mechanism not only reduce ride comfort, but also increase the risk of getting into a traffic accident. If its functions are impaired, the car's handling deteriorates, and this is quite risky.
How to diagnose the front wheel bearing on a Priora and the causes of failure
At the beginning of the article, signs of a malfunction were already mentioned, if they occur in the VAZ 2170, it is necessary to check the hub assembly. To diagnose a breakdown, it is enough to do several operations:
- Raise the car with a jack;
- Check the play of the suspended wheel with your hands;
- Rotate the wheel and listen for noise;
- Watch several videos on the principle of diagnosing the front wheel bearing of a Priora.
Faulty wheel bearing:
An example of the operation of a failed wheel bearing:
How to check the ball bearing of a wheel hub:
Wheel bearing diagnostics:
Why does the front wheel bearing of a VAZ 2170 (Priora) fail:
- Expiration of service life;
- Incorrect operation of the suspension, aggressive driving style, road quality;
- Poor quality ball bearing (defect, counterfeit, manufacturing defect);
- Depressurization (dust, moisture, dirt);
- Malfunction of adjacent components (brake disc imbalance, etc.);
- Road accidents, collisions with deep potholes in the asphalt or holes.
Dimensions and types of bearings for the rear and front hubs of the Priora
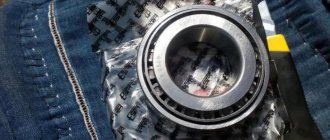
From the above, you can understand that the front bearings are larger than the rear ones. After all, on the front hub it is put on its neck and pressed into the steering knuckle. But at the rear, on the contrary, the bearing is installed inside the hub itself, and the inner race fits onto the axle’s supporting shaft. Therefore, replacing them with each other is impossible. These rolling parts are made in the form of double-row ball bearings. Both of them, the rear and the front, are closed, with internal lubrication.
The best parts of this type are rollers manufactured at the Vologda plant. However, there are imported analogues that can also be installed on Priora hubs - these are SKF VKBA 1306 and FAG 713 6910 10. According to reviews from car enthusiasts, this is a completely adequate replacement.
The video shows the process of replacing the front wheel bearing of a Priora:
VA, and if it’s not a secret, why push out the hub, if religion/beliefs/writing your own doesn’t allow you to use a sledgehammer, and there’s no press?
[Message modified by user 09/17/2010 22:41]
I read it and was a little upset. but I hope that we will live in Kalina for a long time. I'll go to the inspection and ask the technician about the size.
Yes, Priora has a lot of other things, I would say - almost EVERYTHING! Is it worth creating topics about this?
[Message modified by user 09/18/2010 12:12]
How to replace the front wheel bearing on a Lada Priora (VAZ 2170) with your own hands
The front wheel bearing on the Priora VAZ 2170, as on other VAZ cars, often fails, especially when the mileage exceeds 80,000 km. First there is noise from the wheel, which can increase during acceleration.
Vibration also often occurs, wheel play increases, and in some cases the noise turns into a grinding sound - all these signs mean that the front wheel bearing of the Lada Priora requires immediate replacement. If you delay repairs, the consequences can lead to wheel jamming, which leads to unsafe situations on the road.
This article will tell in detail about the principles of replacing wheel ball bearings (hereinafter referred to as SP) on cars of the VAZ family, in particular on the Lada Priora. The instructions are accompanied by many photos and videos. The material also provides information on how to choose a front wheel bearing for a Priora by number, size, price, and manufacturer.
After reading the article, you will understand that replacing the front wheel bearing is done with your own hands without special skills, experience, or special tools, and the price for repair work of this type in a car repair shop is very high.
When does the front wheel bearing of a VAZ 2170 become unusable?
The front wheel bearing should typically last up to 80,000 km.
However, due to various unfavorable conditions, it needs to be replaced earlier.
What are these conditions:
— the quality of our domestic roads;
— vehicle overload exceeding the norms specified in the technical passport;
— moisture, dust and sand entering directly into the bearing;
— installation of a defective part from the manufacturer, or during the next repair;
— unfavorable atmospheric conditions. Driving in winter on roads sprinkled with salt. In summer, on rural roads in the presence of holes, potholes and mud;
— aggressive driving. Fast acceleration of the car and instant braking. This is especially harmful when turning.
How can you determine that a bearing has failed?
How to diagnose the front wheel bearing on a Priora and the causes of failure
At the beginning of the article, signs of a malfunction were already mentioned, if they occur in the VAZ 2170, it is necessary to check the hub assembly. To diagnose a breakdown, it is enough to do several operations:
- Raise the car with a jack;
- Check the play of the suspended wheel with your hands;
- Rotate the wheel and listen for noise;
- Watch several videos on the principle of diagnosing the front wheel bearing of a Priora.
Faulty wheel bearing:
An example of the operation of a failed wheel bearing:
How to check the ball bearing of a wheel hub:
Wheel bearing diagnostics:
vazoved
I drive a LADA VESTA CROSS, Moscow
Then there will simply be no one to pay the fines! This is a Korean 7 in 1 car tablet video recorder for Android..
I forgot about fines and Yandex Navigator.
There is FULL HD shooting, radar detector and GPS with 32 satellites. I got it at a reasonable price for just a few thousand HERE
Why does the front wheel bearing of a VAZ 2170 (Priora) fail:
- Expiration of service life;
- Incorrect operation of the suspension, aggressive driving style, road quality;
- Poor quality ball bearing (defect, counterfeit, manufacturing defect);
- Depressurization (dust, moisture, dirt);
- Malfunction of adjacent components (brake disc imbalance, etc.);
- Road accidents, collisions with deep potholes in the asphalt or holes.
What front wheel bearing is in Priora: dimensions, number, prices, characteristics
Before you begin the repair, you need to know which front wheel bearing is on the Priora, as well as which one is better in terms of price, reviews, quality, and manufacturer. The designers at the manufacturing plant included in the design an angular contact double-row sealed ball bearing with lubricant inside (LITOL-24).
According to reviews and statements from VAZ owners, the best option would be original products from VBF or foreign manufacturers: SKF, SNR, SWAG, FAG.
The dimensions of the front wheel bearing, as well as the catalog numbers of recommended manufacturers, are presented in the tables in a similar article on replacing the wheel bearing in a Lada Granta car; look for detailed information there.
Replacing the front wheel bearing on a Priora
To replace the front wheel bearing with your own hands and in garage conditions, motorists are more often inclined to use a method that does not require further wheel alignment, as well as specialized pullers.
Auto repair shop specialists recommend changing the SP using non-impact methods, using a press or a puller, so the instructions outline two methods - with and without a puller.
To replace the front wheel bearing you will need:
- set of keys, sockets;
- round nose pliers;
- hammer, vice;
- screwdriver;
- jack;
- torque wrench;
- cup and three-jaw puller (if possible).
The best wheel bearings
When a wheel (wheel) bearing breaks, it must be replaced. This detail, small in size, is very important; it ensures freedom of rotation of the hub mechanisms. Continuing to use a broken one is dangerous: it will jam, and then a major accident cannot be avoided. The range offered at car markets is quite wide. To decide which wheel bearing is better, it is useful to study its characteristics and the features of bearings offered by different companies. Of course, your choice will be influenced by what exactly you want: to qualitatively repair your favorite car, sparing no expense, or simply to make inexpensive repairs and put the car up for sale.
Structure and types of bearings
There are three types:
The separator in the bearing keeps the rotating parts at the same distance, evenly distributes the load, ensuring quiet and unhindered rotation. The most durable, reliable separators made of metal are also made of polymer.
Bearings are divided into open and closed, the latter being preferable as they are protected from dirt getting inside.
Is it worth buying the original?
It is often advised to buy original bearings. An original is a part selected by a car manufacturer for sale on markets. These are the parts that are delivered to conveyors. When buying an original bearing, you will be absolutely sure that it will suit you. But there are several questions that need to be addressed here.
The original or a fake?
The original bearings are all the same and if you examine it carefully you will find the engraving. It is located on the edge of the upper or lower part. It should contain several information:
- manufacturer (logo);
- Country of Origin;
- designation digital or alphanumeric details, sizes;
- Additional information is possible;
- The kit must include a hub nut (usually disposable), there may be pins or bolts, seals.
- SKF brand
- Full bearing designation
- Manufacturer country
- Production date code
- Deviation of the average outer diameter ∆Dm [µm] and the position of the maximum eccentricity of the outer ring
- Deviation of the average bore diameter ∆dm [µm] and position of the maximum eccentricity of the inner ring
- Marking of thrust end, stamping
- Serial number (for bearing sets only)
- "V" marking (matched bearing sets only)
If the country of origin is not indicated, it is not an original, but a fake.
Is it worth paying extra for the original?
As a rule, you will find completely similar bearings from different companies on the market. So is it worth paying more for the original if other companies produce the same parts? If you decide to pay attention to any company, then choose well-known, popular manufacturers that supply parts to conveyors. Some people prefer Japanese companies, others prefer European products, for example, they trust only German quality. Our rating of the best manufacturers will help you determine which wheel bearing company is better and who to give preference to. Even if these companies offer products made in China, they will be high-quality products that meet all the requirements. Pay attention not to the country of origin, but rather to the supplier’s brand.
Lada Priora Hatchback Pisdets › Logbook › Fag in my hubs!
They sentenced me to 3 wheel bearings, 2 front and 1 rear. I started googling the Internet to find the best option; I really didn’t want to install the original LADA. I needed the best possible ones, so I decided to try FAG.
Some information about FAG:
The concern's production facilities have the most extensive geography: the USA, Great Britain, the Czech Republic, China, Brazil, Korea and other countries. The company is the official supplier of auto components for Mercedes, VW, Volvo, Nissan, Honda and other automakers. At the end of 2001, a large German bearing manufacturer, the INA group, bought more than 90 percent of the company's shares. Once united, the new company Schaeffler KG became the second largest in the world.
About the bearings themselves:
Front - Fag manufacturer number: 713 6140 30
Installed on cars: SKODA: Favorit Felicia VOLKSWAGEN: Caddy pickup. Bearing dimensions: outerØ [mm] 68 innerØ [mm] 35 Width (mm) 37 The kit includes: Bearing + Retaining ring + hub nut. Produced at a plant in India (You can see it in the photographs) It is a substitute for the original VAG number: 6U0 498 003 Average price per piece: 1250 rubles
Rear – Fag Manufacturer Number: 545312A
Installed on cars: FIAT: MILLE CLIP, UNO. Bearing dimensions: outerØ [mm] 60 innerØ [mm] 30 Width (mm) 37 Includes: Bearing only. Produced at a plant in Germany (You can see it in the photographs) It is a substitute for the original Fiat/Alfa/Lancia number: 7 171 4455 Average price per piece: 500 rubles
Interesting point:
While I was studying catalogs I came across a kit for the front axle! Its original number: FAG 713804510. (I managed to buy it for 1800 rubles)
The difference is that this kit simply packs 2 bearings. Now it is more expensive than buying them separately, but whoever looks for will always find)))
And in conclusion:
Everything worked as if it were original, the car became much quieter, the hum disappeared. Well, only time will tell how long they will last.
Price for work:
Front: The hubs were removed and taken to a service station 350*2=700 rubles Rear: 400 rubles Total: 1100 rubles
The replacement cost
Bearing set 1800 rubles + rear 450 rubles + labor 1100 = 3350 rubles
Thank you
karmanych for removing the hubs and Sanych14 for taking them to the service station.
P/S
I wanted to take photos of the bearings from the garage, but I didn’t have time to take them. These are the only photos left.
List of suppliers
- SNR is the largest French supplier in Europe and rightfully ranks first in product quality;
- SKF is the second-ranked supplier of bearing products, known in the markets for 100 years;
- NSK is also the second largest manufacturer of wheel bearings in the world from Japan;
- FAG is a manufacturer from Germany, absorbed by the INA concern, with high quality products;
- NTN is Japan's largest manufacturer;
- Kouo is the third largest manufacturer in Japan and is part of the Toyota concern;
- Timken is a manufacturer from the USA, the largest in the production of tapered bearings, the quality of which is exceptional.
These companies own many factories around the world, producing products of similar quality that meet the most stringent requirements.
If you need bearings for agricultural machinery, then it is better to pay attention to FKL, a Russian company located in Voronezh. Parts from this company have been supplied to all European countries for 50 years, are known for their high quality, and have no analogues in the world.
Packaging companies
These companies do not produce the parts themselves, but pack them in branded boxes, and often the parts are of low quality.
- Ruville is a packager that interacts with product leaders and small firms;
- Optimal is a company from Poland that packages parts from Eastern Europe and China, often of poor quality;
- Corteco, QH, NK, Coparts - pack the cheapest parts, even fakes;
- CX is a packer of Chinese parts with low quality.
It is better not to buy products offered by these companies, even if they are much cheaper. The quality will be low, the parts will not last long.
Bearings for cars of the Russian automobile industry
The domestic auto industry, which produces passenger cars, still uses old types of bearings in production - single-row roller bearings. Only AvtoVAZ switched to two-row closed hub type HUB-1. HUB-1 means there are no flanges on the body for mounting to the hub. Therefore, owners of Russian car brands have a question about which wheel bearings are better. The most common vehicles on Russian roads today are VAZ 2110, GAZelle, and UAZ Hunter. Of course, you can purchase original parts, but they are often twice as expensive as similar ones from other factories. Let's look at the example of these particular brands of companies that produce the necessary parts.
Bearings for VAZ 2110
For the modern line of VAZ passenger cars (except Niva 4x4, Chevy Niva), three standard sizes of wheel bearings are produced:
- 256907 - for front-wheel drive VAZ 2108-2112;
- 256707 - on Granta, Kalina;
All these models belong to HUB-1, double-row, ball, closed, angular contact. Lada Granta and Kalina differ only in height.
Traditional suppliers of bearings for cars from Togliatti are 5 factories:
- CJSC "LADA Image" - manufactures and sells original Lada wheel bearings through secondary markets;
- Saratov plant - produces parts under the SPZ brand;
- Volzhsky Plant - uses the Volzhsky Standard brand;
- Vologda plant - sells products under the VBF brand;
The price-quality ratio of these factories is optimal. The cheapest products are those from the Samara plant (less than 200 rubles), other companies on average sell parts costing 230-275 rubles.
Replacing the front wheel hub bearing
There are two ways to replace a bearing. The first is by removing the steering knuckle assembly, the second is without removing it from the car. The work is shown on the right wheel bearing. The left wheel hub bearing is replaced in the same way. We remove the wheel.
Using a screwdriver, remove the protective cap from the hub. We install the wheel and tighten the two bolts that secure it. We lower the car onto its wheels.
Use a bevel to straighten the dented collar of the hub bearing nut in two places. Apply the parking brake, engage first gear and place shoes under the wheels.
Use a 30mm socket to loosen the hub bearing nut. The nut is tightened with a large torque, so the head and driver must be strong enough to transmit the necessary force. We hang up the front part of the car (namely both front wheels, because otherwise the anti-roll bar interferes with dismantling, pushing the suspension elements up). We remove the wheel. Unscrew the hub bearing nut completely...
...and remove the puck. Remove the front wheel brake disc (see “Removing the front wheel brake disc”). Disconnect the right wheel drive from the hub (see “Removing the front wheel drives”). In order not to disturb the wheel alignment angles, you can replace the bearing without removing the steering knuckle. To do this, connect the ball joint to the knuckle...
...and compress the hub by striking it through a soft metal drift. You can also compress the hub using the front wheel brake disc.
We pass M12 × 1.25 mm bolts about 130 mm long through two diametrically opposite holes in the disk and screw them into the holes of the hub to a depth equal to its thickness. By sharply hitting the bolt heads with a disk, we compress the hub. Then use a cup puller to press the bearing out of the knuckle, as shown below. If it was not possible to remove the hub in this way, remove the steering knuckle. To do this, unscrew the nuts of the bolts securing the shock absorber strut to the steering knuckle, remove the bolts (see “Removing the shock absorber strut and disassembling it”) and remove the steering knuckle.
We install the steering knuckle on the jaws of the vice and press the hub out of the knuckle through a mandrel or head of a suitable diameter, applying force to the end of the hub.
We remove the hub from the fist. In this case, the outer part of the inner ring of the bearing remains on the hub.
Remove the mud ring from the hub.
We insert a blunt chisel between the ends of the inner ring of the bearing and the hub and, striking the chisel with a hammer, move the inner ring.
Use a puller to compress the inner ring of the bearing.
Using circlip pliers, remove the circlip.
Use a cup puller to press the bearing out of the steering knuckle...
...and take it out with the puller.
Remove the bearing from the puller. Clean and lubricate the inner surface of the steering knuckle. Using a needle file, we clean out the nicks from the chisel on the hub. We press the new bearing into the steering knuckle, applying force to the outer ring of the bearing. We install a retaining ring in the groove of the steering knuckle socket. When pressing the hub, we use the puller washer to rest on the inner ring of the bearing. We carry out further assembly in the reverse order, tighten the bearing nut to the prescribed torque (see “Appendices”) and be sure to lock it by jamming the collar. If the bearing was replaced with the steering knuckle removed, then it is necessary to check and adjust the wheel alignment angles at a service station.
How to remove the front wheel bearing on a Priora
Removing the front wheel bearing of a VAZ 2170 and further replacement begins with placing the car on a flat surface, as well as ensuring sufficient illumination of the repair work site.
It should be noted that in order to tighten the hub nut, as well as the wheel bolts, you will first need to loosen them without jacking up the car.
- Next we remove the brake caliper. First, unscrew the nuts on both sides to remove the housing itself.
- Now we remove the pads. Then unscrew the rear bolts with a 17mm wrench to remove the caliper from the disc.
- Unscrew the hub nut, then remove the brake disc.
- Now you need to press the hub off the drive shaft. Below is a method using a three-claw removable device.
- Next, unscrew the fastening nut to dismantle the casing.
Another method is to screw the bolts into the technological holes of the hub. As a result of tightening, the bolts rest against the casing, thereby compressing the part.
- We unscrew the two nuts on the ball joint and use a 17mm wrench.
- Then we unscrew the two bolted connections that secure the pivot pin to the rack.
- Having disconnected the steering knuckle, we proceed to removing the ball bearing.
- We clamp the assembly in a vice so that the hub is at the bottom. Now we take the mandrel (in this case the head is 32 mm). By hitting the small bearing ring with a hammer, we knock out the hub through the frame, on which the inner race will remain.
- Remove the retaining ring using round pliers. Now you should press the outer race out of the steering knuckle. The photo shows a method using mandrels with a vice. The force from compressing the vice must be transferred to the outer race.
- Other methods: use a cup puller or tap with a chisel and hammer through a mandrel.
- Let's go back to the hub. At the hub, on the pressed-in old ring, we make a notch with a grinder.
- Then we knock down or split the clip with a chisel.
New Lada: LADA Priora sedan – Technical characteristics – Official LADA website