Strict environmental control forces automakers to do everything possible to comply with Euro standards that control the composition and structure of exhaust. The vast majority of modern models are equipped with a lambda probe (alternative names - oxygen controller, oxygen sensor, O2 sensor). Its purpose is to control the exhaust content by analyzing the oxygen content in it. Owners of cars that are not equipped with such an exhaust control system (usually outdated or very budget) are lucky in this regard. In any case, some of the problems associated with exhaust system malfunctions disappear for them.
Meanwhile, such malfunctions do happen, and not so rarely. Violation of the normal operation of the lambda probe leads to problems with the exchange of information between the oxygen sensor and the ECU, which perceives this as a serious malfunction, signaling this by the “Check Engine” indicator lighting up. You can get around this situation without replacing the oxygen controller with a working one (the cost of which is quite high) by using the so-called lambda probe decoy. This will allow the on-board controller to switch from emergency to normal mode.
Problems with motor operation
After 100-150 thousand kilometers, many drivers are faced with increased fuel consumption, a drop in engine power and deterioration in dynamic characteristics. Along with this, the instrument panel will be “decorated” with all sorts of errors. If the catalyst has not been replaced or removed before, the problem should be looked for there. Inside the filter there are thin ceramic honeycombs that melt and thereby prevent the normal passage of gases. As a result, cylinder purging deteriorates, and fuel consumption increases (by an average of 10-15 percent).
Please note that these problems may occur earlier. Why do honeycombs melt? The reason is increased oil consumption. If it is thrown into the combustion chamber, the exhaust will be filled with soot. It gets clogged at the catalyst inlet. Due to elevated temperatures, soot begins to smolder, causing the honeycomb to melt. If everything is in order with oil consumption (no more than one liter is consumed per 10 thousand kilometers), the cells may become clogged due to low-quality fuel.
What benefits does this provide?
The main advantage is that gases from the cylinders will freely flow out. The remaining elements of the system (resonator, manifold, muffler) have a hollow pipe. Even with high oil consumption, soot will freely escape into the atmosphere. The service life of the flame arrester is more than 10 years. It requires no maintenance. Engine power will return to factory settings. As for fuel consumption, this is a separate issue.
Why is a flame arrester better?
We previously described the procedure for removing the catalyst. This is the most economical option. But you can gut the old catalyst only if it is completely intact. If the element begins to rust, it is better to replace it with a new flame arrester. Yes, the catalyst has several walls. But no one can guarantee how long it will last and whether the wall will rust ahead of schedule.
Let's sum it up!
Summarizing what was written above, we can conclude that: the need to install the blende and remove the catalyst is possible only after a complete diagnosis of the vehicle’s exhaust system and commentary from a specialist. All necessary manipulations and details are agreed directly with you and selected based on your personal preferences and budget. We do not recommend that you use the services of unqualified craftsmen, as this can lead to dire consequences for your car and wallet in the future. To find out about problems in the exhaust system of your car, we invite you to a free computer diagnostic at our specialized car service center “Lech Exhaust”. Detailed computer diagnostics are carried out by qualified exhaust specialists who use special equipment, including an endoscope. For all our work you receive a guarantee and a warranty certificate from the manufacturer for the installed parts. The exhaust system elements that you can purchase from our car service center are certified and of high quality, which will have a positive effect on the service life of your car’s engine.
Catalyst decoys - photos, videos, Instagram
Also, you can read Replacing the exhaust system resonator
Mechanical snag of the lambda probe
Any automobile catalyst is a muffler can containing metal or ceramic honeycombs coated with a precious metal (gold, platinum, etc.). Thanks to the oxidation reaction, the exhaust gases passing through such a device are cleaned of harmful impurities, and the level of exhaust toxicity is reduced.
The catalytic converter (CN) operates at high temperatures, so its resource is relatively short. The service life of the part is further reduced when low-quality fuel is used - the honeycombs become clogged with carbon deposits resulting from incomplete combustion of the fuel mixture. Buying a new exhaust system is quite expensive, and since it has to be changed quite often, many car owners try to get rid of this element of the exhaust system by installing a flame arrester or stinger.
Simply removing the CN has a side effect: on cars with Euro-4 and higher engines, the oxygen sensor installed behind the catalyst detects that the exhaust toxicity standard is exceeded, as a result of which the Check Engine lamp lights up on the instrument panel. There are three ways to get rid of the error:
- install an additional mechanical spacer;
- make changes to the electrical circuit of the oxygen sensor;
- reprogram the engine control unit.
A mechanical blende is a metal sleeve of a certain length, with a small diameter hole inside. Also in the inside of this device is ceramic chips with a catalytic coating. In essence, the bushing is a mini-catalyst, but here only those exhaust gases that enter the oxygen sensor are purified. It should be noted that there are also simple fakes, made in the form of an ordinary sleeve with a hole, inside which there are no elements. Any turner can make a basic spacer; in this case, it is not necessary to buy a factory product. Advantages of such devices:
- inexpensive price (on average from 400 to 1000 rubles);
- ease of installation;
- reliable and simple design.
However, mechanical blende also has its drawbacks - on some car models it is not possible to install the device (there is not enough space due to design features), the device does not always give the desired effect (the error does not completely disappear). It should also be noted that on cars with Euro-5 engines, the electronic system cannot be fooled with the help of an additional spacer; the Check Engine here still continues to light up.
How to make a mechanical corrector for the exhaust system?
To implement a mechanical blende for the catalyst with your own hands, it is recommended to use blanks made of heat-resistant steel or bronze. This way the parts will not be deformed due to high temperature. There are two designs, but both options require a lathe or the help of an experienced turner.
First option
It is a sleeve 40-100 mm long. On one side, a standard sensor is screwed in, and on the other, the circulation of gases is limited by a small diameter hole. The essence of the “device” is that the composition of the exhaust mixture is averaged, because the lambda probe is removed from the gas stream itself and, accordingly, catches fewer toxic substances. Due to this, it is possible to deceive the ECU.
A typical drawing with spacer dimensions can be changed in terms of dimensions, it depends on the model and brand of the car. The optimal inlet diameter remains unchanged - 1.5-2 mm. In some cases, the length of the bushing may not allow it to be installed in its original place. As a result, you have to weld the mount elsewhere in the exhaust pipe.
Second option
- Exhaust gases enter the bushing body through a small diameter hole.
- In the volume of the spacer, excess CH and CO are subject to oxidation by oxygen, as a result of which the concentration of harmful substances decreases.
- The ongoing processes change the shape of the sinusoid, and the electronic system believes that the catalytic converter is operating normally.
A do-it-yourself catalyst blende made according to the above diagram has advantages similar to the previous option. Here the standard probe will be raised by 32 mm, although this is less than 40-100 mm.
Features of spacer installation
The installation procedure is not difficult, and begins with placing the car on an overpass or lift. Further actions occur according to the following scheme:
- Disconnect the negative terminal of the battery.
- Unscrew the controller.
- Screw the bushing onto the probe.
- Screw the upgraded unit into place.
- Connect the battery.
After the first start, the Check Engine light should go off. The motor will now operate normally.
avtoexperts.ru
In the previous article, we already talked about why lambda probe decoys are needed, what they are and how they work. Outside the scope of that article, the question remained of how to make these decoys with your own hands. It is simple and accessible to many car owners. What's the point of making decoys yourself if ready-made ones are sold? There are at least two reasons.
Mechanical snag of the lambda probe
1. Finished products will be more expensive in any case. If in the case of mechanical decoys the difference in cost may not be very large, then with electronic decoys it is significant.
2. It is not always possible to quickly find the desired decoy on sale. When a working car is urgently needed, sometimes it’s faster to make a fake one yourself.
As we already know, there are two types of decoys, so we will analyze an independent option for making both.
Manufacturing of mechanical blende
As you remember from the last article, the basis of this type of deception is a metal sleeve. The optimal material for manufacturing is bronze, because it is the one that best withstands temperature influences. To make a bushing yourself, you need a lathe and experience working with it, but you can always find a turner who will make the required workpiece according to the drawing for a minimal fee. This is the drawing.
Drawing of a trompe l'oeil
Actually, in the simplest cases this will be enough, but it would be optimal to fill the hollow part of the bushing with ceramic chips, which are not a problem to find. A homemade deception is installed in the same way as a purchased one - we unscrew the oxygen sensor, install a bushing in its place, and screw the sensor itself into it.
Installed snag
The need to look for a turner and contact him somewhat reduces the attractiveness of making a mechanical blende yourself, and the difference in cost will not be that big, but this option also has a right to exist if for some reason you are not satisfied with the electronic blende.
Self-made lambda decoy
Making electronic decoy
It would seem that an electronic “device” that simulates the operation of a lambda should be very complex, but in fact it is a very simple and primitive circuit that, nevertheless, works. To make it, you will need a car wiring diagram, a soldering iron, a knife, rosin, a 1 µF non-polar capacitor and a 1 mOhm or 150-200 kOhm resistor. It is usually recommended to use a 1 mOhm resistor, but on some cars the signal simulation is not very accurate, the “check” is extinguished, but the fuel mixture is not very correct, and the consumption is high. Then you will need to experiment a little with resistors.
Electronic decoy circuit
Next, let's look at the process point by point.
1. You need to figure out in the wiring diagram of your car how many and what wires go to the lambda probe. There are from two to four wires, depending on the presence of additional heating. Most often, four-contact sensors are found; of these four contacts, two are responsible for heating; we do not need them, but we need a signal contact and ground. Almost all diagrams on the Internet indicate the color of the wires, but on your car it may not match, so you need to find the signal wire and ground according to the diagram.
Electronic snag
2. Next, we arm ourselves with a knife and a soldering iron. You need to solder a resistor into the signal wire, and a capacitor between the signal wire and ground on the ECU side. Naturally, all connections must be insulated. In principle, after these manipulations everything should work.
Electric lambda decoy. Photo — drive2
3. The third step is optional, but highly desirable, because it can extend the life of the circuit. Additional elements and wires can be placed in a small plastic box or container and filled with epoxy.
Another option for deception
Even such a primitive scheme works great, and the cost of its production is meager. Buying an electronic emulator will be much more expensive. Yes, they usually use more advanced circuits, sometimes with microprocessors, but the difference in cost can be tenfold. There is an incentive to take up the soldering iron yourself.
In general, it is the electronic version that seems to us the most reasonable for self-production, the nuances can only be in the selection of the resistor, but they are inexpensive, soldering one to another in the circuit is also not a great difficulty, so you can experiment. The result will be a fully working “gadget” for pennies.
Making a lambda probe with your own hands: instructions
Today there are several options for making a lambda probe blende with your own hands. The easiest option is to install a mechanical bushing. Those who are familiar with electronics can make a simple electronic circuit. The third available option is flashing the controller. Any of the above options will solve the problem; which one to use depends on the skills of the car owner. It is worth noting that special devices are sold today and if you are not confident in your abilities, it is better to buy a device or contact a professional. This will help avoid many problems with the car.
Mechanical snag
The first, and easiest way, is to install a metal sleeve between the lambda probe and the exhaust pipe. To manufacture a part, you will need skills in working on a processing lathe. In addition, you need to prepare a metal blank, preferably made of bronze or heat-resistant steel, a screwdriver and a set of keys.
If you do not have the skills to work with a lathe according to a drawing, then it is better to entrust this task to a familiar specialist
It is important to comply with all dimensions and proportions indicated in the drawing. The internal cavities of the plug must be filled with ceramic chips with a catalytic coating
After manufacturing, an equally important stage begins: it is necessary to install the plug. To do this, follow these steps.
- Lift the vehicle onto the overpass.
- Disconnect the negative terminal from the battery.
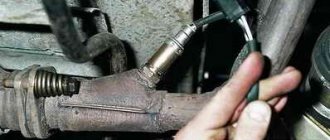
- Unscrew the upper probe; it is located between the catalyst and the exhaust manifold.
- We screw the probe onto the manufactured bushing.
- We install the sensor in its original position and connect the terminal back.
Once the battery starts, the sensor on the control panel will stop giving an error, and the car will work like a clock. This type of decoy is suitable for all cars in which the sensor is screwed into the body.
Electronic variant
If desired, you can adjust the signals that the probe sends to the controller. To do this, use a lambda probe decoy circuit; you can make it yourself, provided you have minimal knowledge in electronics.
Such decoys are connected to wires directed to the sensor. The installation location on different cars is different - it is either the central tunnel between the seats, or even the engine compartment.
Here is a list of materials that will be needed when making a lambda probe decoy with your own hands.
- Soldering iron with fine tip.
- Capacitor, non-polar 1 µF Y5V, +/- 20%.
- Resistor 1 Mohm, C1-4 imp, 0.25 W.
- Rosin, electrical tape and a knife.
In order for the assembled circuit to maintain the strength of the structure and simply not break, it is better to place it in a plastic container and fill it with epoxy.
To mount the blende, you need to disconnect the negative terminal from the on-board battery. Cut the wire leading from the sensor to the connector. Connect the blue wire through a resistor. Solder the capacitor between the white and blue wires. Insulate exposed connections.
If you do not have even the slightest experience working with electrical circuits, it is better not to take on this activity. Today, car markets have a sufficient number of ready-made solutions with simple installation.
Reflashing the controller
Another option to solve the problem is to reflash the control unit. This approach allows you to block the processing of data from the second oxygen sensor. After flashing, all existing lambda probes are removed from the car and are no longer used.
It is worth noting that this is a rather risky step. It is better to entrust the work to a professional, as there is a chance of completely destroying all on-board electronics. It is often impossible to restore factory settings after such manipulations.
You should also be careful when purchasing ready-made firmware on the Internet.
In any case, the software must be developed by a specialist who can easily disable data processing at the system level.
These are all options for decoying a lambda probe; you can do each of them with your own hands, but it is important to really understand the issue. Each intervention can lead to unpleasant consequences: malfunction of the engine, failure of the on-board computer, damage to electrical wiring and much more.
Be extremely careful or still entrust the matter to a professional.
Do-it-yourself electronic catalyst blende and emulator circuit
A real electronic emulator is a microprocessor device consisting of a single-chip microcircuit. The principle of its operation is based on the formation of an output signal, which in shape corresponds to the information in the working neutralizer. This option is difficult to do on your own, so you should immediately consider a simpler method. To implement it you need to prepare:
- Electric soldering iron.
- Solder and rosin.
- Knife and side cutters.
- Resistance 200 Kom, power 0.25 W.
- The capacitor is non-polar with a capacity of 4.7 microfarads.
The principle of operation of the system is to average the readings of the oxygen sensor, which is installed after the converter. The method of connecting emulator components is simple and universal. All elements are connected directly to the vehicle’s on-board network conductors. Before connecting the electronic decoy to the catalyst with your own hands, you should disconnect the battery to eliminate the possibility of a short circuit. After the implementation of the project, the car demonstrates good dynamics. However, the effect of over-enrichment of the combustible mixture may occur, which causes the deposition of a layer of soot in the exhaust manifold. In addition, on some models error P0133 appears, indicating a low response rate of the lambda probe.
Why do you need a catalyst?
I already have an article - what is it, I won’t repeat it. You need to understand that a catalyst (and scientifically, a catalytic converter) is needed only to clean the car's exhaust from harmful emissions and make them less harmful.
In simple words, it purifies harmful gases (while glowing almost “red hot”) and “almost” harmless CO2 and N2, O2 emerge from harmful CO, CH and other compounds. This way we save the environment at least a little.
Its structure is quite simple - it is a thickened pipe, which inside has something like a honeycomb, only long and hollow. They are usually made of ceramic elements coated with noble metals (usually platinum group metals are used - iridium, rhodium, palladium).
In order for gases to transform from toxic to less harmful, the temperature of the catalyst must be about 750 degrees Celsius, otherwise the chemical reaction will not occur. The gases that come out of a car engine have a temperature of approximately 500 - 550 degrees Celsius (which is not enough), when they pass through the catalyst, a chemical reaction occurs with the release of heat, thus heating just the right amount (750 - 900 degrees).
How to independently determine the malfunction of the lambda probe?
- Open the engine compartment, find the catalyst and probe. Inspect its surface. If it is covered with soot or a light coating, this indicates poor performance of the fuel system. In this case, the part must be completely replaced with diagnostics of important components of the vehicle.
- If the part is clean, check the accuracy of the oxygen sensor readings. Start the car with a gradual increase in speed up to 2500/min and lower it to 200. In operating condition, the sensor readings should fluctuate between 0.8-0.9 W. The absence of any response or incorrect data is evidence of a malfunction of the probe.
Reliable information about a malfunction of the catalyst or lambda probe can only be provided by diagnostics in a specialized center.
In order to save on the purchase of new equipment, we will consider the main options for emulators to make and install lambda snag yourself. Today there are a great many Internet resources that reflect emulator schemes. Car enthusiasts will only need knowledge and patience.
A few tips to extend the life of your catalyst
But we should not forget that the use of such devices has a significant impact on the ecological state of the planet. Therefore, if malfunctions occur, it is better to install not an emulator on your car, but a new catalyst or lambda probe. Cheating should be a temporary solution.
Better yet, try to prevent catalyst malfunctions. To help your catalytic converter last longer, use the following tips.
- Fill the tank only with high-quality fuel.
- Do not use unknown or untested fuel additives.
- Try not to get into deep puddles - sudden cooling of a heated catalyst will inevitably lead to its destruction.
- Avoid mechanical damage to the catalyst housing. Driving into a deep hole at speed can also destroy its working elements.
- Perform regular maintenance.
Problem
To prevent a car from spoiling the environment with its exhaust gases, an environmental standard was invented that regulates the content of harmful substances in the exhaust system. It has been operating in many European countries since 1988 (“Euro 0”). It is updated periodically, and outdated requirements are replaced with new ones. Euro-6 is currently in effect.
These requirements have forced car manufacturers to integrate additional devices, one of which is a catalyst. Its task is to reduce the amount of nitrogen and carbon in exhaust gases. In most cases, this is achieved by changing the chemical composition. In this case, a lambda probe must be present. You can make the catalyst blende yourself, the scheme is very simple.
Since a faulty catalyst is very expensive, one effective method was invented that can solve the problem to some extent at minimal cost.
Do you need an oxygen sensor emulator?
- The ECU puts the engine into emergency mode when the engine operates according to the specified fuel maps without taking into account the readings of the oxygen sensors.
- The “Check Engine” indicator lights up on the dashboard and an enriched fuel mixture enters the cylinders.
- Soot on the spark plugs increases, the power of the internal combustion engine decreases and the oil becomes contaminated.
- Increased fuel consumption entails extra financial costs.
Almost all automakers recommend replacing a faulty converter. But not every car owner will do this, because the price of some copies, for example, for VAZ, reaches 60,000 rubles. It is also worth adding the cost of installing the device. Therefore, many car enthusiasts are interested in what a do-it-yourself catalyst blende is and the scheme for its implementation.
The essence of the emulator's operation is to change the real sensor readings, after which the ECU switches to normal operation. In this case, the neutralizer itself can be cut out or replaced with a flame arrester. The procedure for installing a simulator is no more complicated than increasing the ground clearance of a Renault Duster.
Another method of attachment. Reed stalk
You can also use the core of the stem to catch carp using reeds. Reeds of absolutely any age are suitable here. One stem will be enough. Preparing for the nozzle is also quite simple. The length of the bait will depend on the size of the hook shank. By the way, do not rush to tie the fishing line onto the hook; it is easier to put such a nozzle on the other way around - not through the sting. There is no need to clean the core from the shell - it’s easier to do it, almost at the very end. The length of the cut pieces should be slightly less than the length of the shank of the hook, so that the eye or blade protrudes with a margin of 2-3 mm. Now you can carefully clean the cylinders. Remove only the top hard layer, so that the core is not bare. Next, pass it through the sting and tie on the fishing line.
The good thing about catching carp with such a bait is that the core has a particularly bright and specific taste. It holds perfectly on the hook if done correctly.
Types of decoys
There is no way to ignore the breakdown of the LZ. If the DC does not work correctly or is completely turned off, the functioning of the engine is disrupted and it goes into emergency mode. To prevent this from happening, you need to install a decoy - homemade or purchased. Experienced motorists prefer to make the decoy with their own hands.
Decoys are commercially available, but they are more expensive than homemade ones. This is especially true for electronic ones - mechanical ones are cheaper. It happens that the necessary spare part is difficult to find, in which case you also have to make it yourself.
Mechanical
They are often called "spinners". Materials of manufacture: bronze and steel. The inside of the “spacer” is filled with powdered ceramics with a special catalytic coating. Because of the bushing, the gases are quickly burned, causing a difference in the pulses of the 1st and 2nd sensors.
If a motorist knows how to use a lathe, he can turn the bushing himself; if not, order a turner. For a small fee, he will carve the part according to the drawing. The bushing is ready for use, but it is better to fill it with ceramic powder. It's not difficult to find.
To make a bushing you will need:
- workpiece;
- screwdriver;
- spanners.
Homemade and purchased mechanical blende (MO) are installed in the same way:
- Place the car on the overpass.
- Disconnect the negative terminal on the battery.
- Unscrew the DC and replace it with a bushing.
- Screw the sensor into the bushing.
The need for the services of a turner reduces the attractiveness of creating a homemade machine tool. If the motorist does not have turning skills and access to a machine, the difference in cost is insignificant.
On a note!
Usually the MO is placed on the first DC, which is closer to the collector: it is more sensitive.
As soon as the DK snag is installed, the “Check Engine” error will disappear. If this does not happen, you will have to look for another way to solve the problem.
Electrical
The second way to eliminate the problem with DC is to create an electronic decoy (ED) according to a special scheme. Since the LZ sends signals to the controller, the EO connected to the wires running from the sensor to the connector allows the sensitivity of the system to be leveled. In this case, despite the faulty motor, the motor will continue to operate correctly.
The installation location of the EO is determined by the car model. For example, its installation location may be the engine compartment, a dashboard, or the space between the seats.
EO is a microprocessor in one chip. It analyzes the processes occurring in the catalyst. And having received and processed information from the first DC, it transforms them into the indicators of the second DC and sends the signal necessary for the correct operation of the engine to the car’s ECU.
To install the EO yourself you will need:
- LZ connection diagram;
- soldering iron with the smallest tip possible;
- solder;
- rosin;
- 1 µF capacitor, non-polar;
- 1 Mohm resistor;
- knife;
- insulating tape.
Before you begin installing the electrical circuit, you need to understand the number and color of wires going to the LZ. There are from 2 to 4 wires in a car. The quantity depends on the presence of additional heating.
Usually you come across sensors with 4 contacts. Of these, 2 are responsible for heating. They do not need to be touched during installation. For installation you will need 2 wires - ground and contact. Usually on the Internet the color of the wires is indicated on the diagrams, but it may not match their color in any particular car. Therefore, you need to familiarize yourself with the individual circuit and find the necessary wires.
The procedure for installing blende on the LZ:
- Disconnect the negative terminal on the battery.
- Solder a resistor into the signal wire. To do this, cut it with a knife and place a resistance in the gap using a soldering iron.
- Find the ground and signal wire and solder a capacitor between them.
- Insulate all connections obtained. If everything is done correctly, the system should work.
To prolong the operation of an electronic circuit implemented independently into the control system, it is recommended to place it in a small plastic container or any other suitable sized box. Fill the diagram with epoxy resin on top.
This simple scheme, despite the intricacy of automotive systems, works great. Moreover, the costs of its creation are minimal compared to purchasing an electronic emulator. The latter use the most modern circuits, often with microprocessors; the cost of purchasing them will be 10 times higher than with the independent production of electronic blende (EO).
EO is the simplest and most effective solution to the problem. Problems can only arise with the selection of resistance. But even if it doesn’t fit, you can change it by soldering in a new one. True, this must be done before the circuit is filled with epoxy resin.
Asking price in the store and at the service station
The trick is positioned as a cheap alternative to flashing it for EURO 2. Indeed, they ask for at least 15,000 rubles to change the ECU software. Even the most expensive standalone emulator with installation costs a maximum of 8-10 thousand rubles. At the same time, the factory engine control program is preserved, and hence the reliability of the system as a whole. If you take the best option, a fake with a minicatalyst, then the problem with the ECU can be completely solved for 1,000-2,000 rubles. And for owners of cars with low-sensitive sensors (EURO 3) it will cost even less: 500-1,000 rubles.
Varieties of hand-made trompe l'oeil
A decoy, also known as an emulator, is a device that does not determine the oxygen content in gases. It only serves to fool the car's electronic control unit.
Changed controller firmware
You can reflash it yourself by downloading the software and instructions on how to do it. It's better to give it to a specialist. In electronic mode, the oxygen sensor is turned off through a certain program. In fact, it should turn out that the ECU will receive only the most correct value from the catalyst and there will be no errors on the instrument panel.
Without a lambda probe, the engine operates in standard mode.
Mechanical dummy
This method is much simpler. There is no need to reflash the device program. The point is simple. You just need to insert a suitable sleeve between the probe and the sensor mounting location (the surface of the manifold pipe).
The bushing material must be bronze or steel, resistant to high temperatures. The bushing is a hollow cylinder.
To make your own blende, you will need a lathe and the ability to sharpen. Therefore, it is better to give it to some friend who works at the plant. This is usually how it is done.
Ready-made options are sold. The price of ready-made blende in the store is up to 1000 rubles for 2021. We find the location of the oxygen sensor, unscrew it, screw on a new one and that’s it.
Electronic snag
There is another option to deceive the ECU - an electronic version, a dummy lambda probe. It always conveys a good value of the oxygen content in the exhaust gases.
This trick is based on a programmable processor. This method of deceiving the on-board computer due to a breakdown of the oxygen sensor is used when the second lambda sensor, that is, the one located in the catalyst, has broken down.
The following materials and tools will be required:
- Resistor with a resistance of 1 Ohm.
- Soldering iron, tin, rosin.
- Non-polar capacitor with a capacity of 1 µF (micro Farad).
Typically, the second lambda probe of the electronic type has 2 black wires, white and blue.
How to install the oxygen sensor decoy:
- First of all, disconnect the ground from the battery.
- Disconnect the blue wire and install a resistor. No black wires are required.
- We connect a capacitor to the white and blue wires.
- You can install it anywhere. It can be between the seats, it can be under the hood, it can be in the place for the connector.
Do-it-yourself mechanical blende of an exhaust system catalyst
The table presented two types of “mechanics”. The scope of their application is different, the design and principle of operation are different.
Attention! When choosing/making a mechanical lambda probe with your own hands, evaluate the amount of space above the second oxygen sensor. If there is a deficiency, it is necessary to use a rotary sleeve.
Option No. 1: screwdriver with a small diameter hole
So-called “empty” mechanical emulators are suitable for a narrow series of cars with EURO 3. Tentatively, these are foreign cars produced before 2004 and domestic cars produced before 2011.
Principle of operation
The function of the bushing is to isolate the lambda from the direct flow of gases, which contains a lot of oxygen. Through the small hole, only a small part of it reaches the sensor, but enough for the sensor to respond to the ECU with a qualified signal.
How to do
The bushing is turned on a lathe according to the presented drawing. Take into account only the configuration and diameter of the hole connecting the sensor to the exhaust tract (1.5-2 mm). The remaining dimensions must be adjusted by removing the actual lengths of the lambda mounting on a particular car. For example, only the overall length can vary between 40-100 mm. The temperature at the place where the readings are recorded is about 300...400°C, so steel or brass will work as a material. The workpiece is a rod.
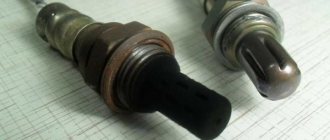
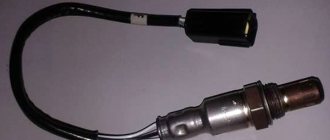
Automotive oxygen sensor
The ECU, after receiving information from the oxygen sensor, determines what concentration of the fuel-air mixture to supply in the following cycles. Thus, the computer regulates the balance in the operation of the internal combustion engine.
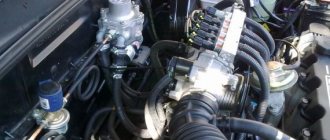
Where is the oxygen sensor located? Answer: The lambda probe is located in front of the catalyst on the exhaust pipe or on the manifold outlet pipe.
Principle of operation
The working element of the oxygen sensor is a galvanic cell, which consists of a solid ceramic electrolyte based on zirconium dioxide.
A galvanic cell has electrodes made of a sponge plate. Coated with doped sodium oxide.
One electrode of the device determines how much oxygen (O2) is contained in the exhaust gases, and the second - how much oxygen is in the environment. When the oxygen sensor heats up to +300 degrees and due to the difference in oxygen content, an output voltage appears.
Based on the voltage value, the on-board computer determines which mixture is supplied to the engine.
- A critical error message appears.
- The exhaust gases from the muffler will be expressed in a bright shade, maybe black smoke, maybe white. The normal color of exhaust gases is grey.
- The engine does not pull either uphill or in a straight line.
- Fuel consumption is higher than before.