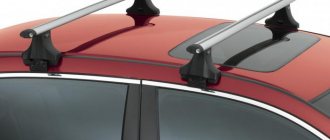
Attaching crossbars to roof rails with your own hands
Rails are a device on the roof of a car that gives it a unique appearance and improves its technical characteristics. Such accessories are used for installing additional luggage equipment. It can be:
But before installing the trunk, box, or specialized mounts, it is necessary to install additional cross members. They will be securely attached to the rails, and, accordingly, the transported equipment will be attached to them. These crossbars for the trunk can either be purchased at specialized auto stores or made independently. Next, we will describe several ways to make crossbars for roof rails with your own hands.
Design and installation
An industrial trunk for a Chevrolet Niva can be made of aluminum or steel. Aluminum is much lighter, but this is its only advantage. It is designed for less load. Its arcs and other elements are fastened with bolts. This means that when driving on a bumpy road, the fastenings may become loose, the entire structure may sag or even fall off, damaging the cargo and the vehicle.
The steel structure of the trunk on the Niva is welded, the arches are made of durable profile steel pipe. It can withstand heavy loads. In the event of a car rollover, it acts as a buffer, protecting the roof and interior of the car from damage. And its price is much lower. Therefore, car owners often choose steel construction.
This type of trunk is a frame in the shape of a rectangle with rounded corners or 4 connected arcs. The longitudinal arcs are interconnected by five metal pipes. A metal mesh is laid and secured on them, sometimes it is replaced by an aluminum sheet. This design is called a support platform.
6 supports are attached to the longitudinal arches, with which the platform is attached to the drainage gutters on the roof of the car. A restrictive edge is attached to the platform. The back part of the side is made 20 cm high, the front part is smaller. This is done to improve aerodynamic performance and ease of use.
The standard platform dimensions are 126x136 cm, but they may vary slightly among different manufacturers.
Detailed instructions and drawings are provided for assembly and installation. Therefore, one person can assemble and install the trunk on the Niva with his own hands.
It is inconvenient to load and unload the trunk directly from the ground, since it is located at a fairly high height. Therefore, it is convenient to use a stepladder or a ladder specially designed for this purpose.
The ladder to the Niva is attached to the place of the spare wheel, which is previously removed. Its shape follows the shape of the rear door, so the staircase does not spoil the appearance of the car or interfere with the opening of the door. But such a ladder can be used by a person weighing up to 85 kg.
Tools and materials for making roof crossbars
Making crossbars for roof rails with your own hands is not difficult. To make them, it is necessary to take into account the characteristics of each car, as well as the individual wishes of the car enthusiast. The main “advantage” of creating fastenings with your own hands is the price, since purchased crossbars will cost several times more.
Also, do not forget about the strength characteristics. When transporting cargo, the main thing is that it does not fall and create an emergency situation. Therefore, it is also not worth saving on the quality of materials for the manufacture of crossbars for the trunk. Today, the load transported on the roof of a car can range from 60 to 110 kg.
To create crossbars for roof rails we will need:
Typically, roof crossbars for installing a roof rack are two parallel straight lines that are fixed to the roof rails. During their manufacture, you need to take into account the shape of the roof, as well as its width. The material for them can be a metal profile made of light alloy materials, or a square pipe (metal thickness - up to 3 mm).
Cargo tie-down strap
The load is secured by:
Also, during installation and removal of crossbars, it is necessary to provide rubberized gaskets to prevent damage to the paintwork of the car body. Below we will look at several options for creating crossbars with your own hands.
How cost-effective is it to assemble a plywood roof box with your own hands?
Often the prices for branded roof boxes shock car owners so much that some decide to undertake grandiose experiments and try to make a box themselves. The most affordable material, more or less suitable for creating an imitation of a hard luggage box, is plywood. The fact that a homemade box is nothing more than an imitation is proven by any crash test. The test video clearly shows that the DIY roof box does not pass standard tests. A homemade plywood roof box literally shatters into pieces in emergency situations where the factory one has every chance of remaining intact.
Disadvantages of assembling a homemade plywood roof box
In addition to the very labor-intensive manufacturing process from creating a drawing to assembling the elements of homemade car roof boxes, there is also the problem of calculating the final weight. To assemble such a “Lego box” you will have to put quite a lot of fasteners on the connections. A set of hardware itself can weigh up to 3 kg. This is an additional load on the car, which is absent in polymer factory boxes.
The weight of painted plywood, stiffening ribs, adhesives and fasteners for stitching the elements of the trunk of the box, created with your own hands, eliminates any hint of aerodynamics. Even attempts to copy the shape and proportions of the original box will not help reduce and evenly distribute the weight of a homemade one. As a result, creating an aerodynamic car roof box with your own hands is as unrealistic as assembling a racing car in a garage.
Plywood, to put it mildly, does not have the properties of ABS plastic even after treatment with primers, car paints, yacht varnish, lamination and other attempts to protect a homemade roof box from external influences.
In addition to the difficulties of protecting from moisture, home-grown craftsmen want to make a roof box with their own hands that is at least a little similar to the factory samples. In the vast majority of cases, such a task is beyond the realm of reality and a makeshift trunk box does not turn out to look like the elegant boxes that professional engineers work on to develop.
You will have to make your own system for opening the roof box. At this point, the creative ideas of the “Kulibins” extend to the use of furniture fittings, removal of mechanisms from household appliances and other exotic techniques for equipping boxes. Of course, you cannot count on trouble-free operation of mechanisms that, in principle, are not designed for boxes.
automechta.com
Options for homemade roof crossbars
Option number 1 . Creating crossbars this way will be the easiest and won’t take much time. In this case we will need:
Manufacturing of roof rails. Option #1
Manufacturing process:
Manufacturing of roof rails. Option #1
This type of rack is recommended to be used only when transporting luggage, because due to its poor aerodynamic properties, it may create extraneous noise while driving.
Option number 2 . This option will not be as practical as the first, and will require violating the integrity of the car's roof rails. So, we need:
Manufacturing of roof rails. Option No. 2
The process of making crossbars with your own hands will be as follows:
Manufacturing of roof rails. Option No. 2
This process of making and installing crossbars is recommended for permanent use. After dismantling the crossbars, the appearance of the car greatly deteriorates due to drilled rails.
Option number 3 . This option will be more practical, since the materials used in it have more streamlined shapes. Therefore, when the car moves, practically no noise is created. But the maximum load capacity of these crossbars does not exceed 60 kg. By slightly enhancing the method presented below, it will be possible to load up to 90 kg. But this will require additional costs. To make the crossbars we will need:
DIY crossbars for roof rails
Content
What materials and tools are needed to make crossbars?
Attaching the trunk to the roof rails with your own hands, stages of work
Selecting material for the trunk cross support beams
Taking measurements to determine the length of the crossbars
Making crossbars for roof rails and installing a roof rack
Advantages and disadvantages of homemade crossbar designs
The luggage compartment volume in any car, even in a roomy station wagon or SUV, is always not enough. Especially when you are faced with the need to transport long or oversized cargo, such as a bicycle, camping equipment or construction materials. In this situation, roof rails installed on the roof can come in handy. But to transport goods in this way, you also need crossbars, which are not cheap. And considering that you will need them a couple of times a year, it is irrational to buy them, especially since making crossbars for roof rails with your own hands is not at all difficult.
To transport goods in this way, you also need crossbars, which are not cheap at all.
Luggage devices and their types
As a rule, roof racks are a structure consisting of two arched elements, fixed to the roof of the car with special stops and adapters (whales), which allow these supports to be adapted to the characteristics of various types of cars. This option is also suitable for Focus.
Currently, the following types of luggage accessories can be found on sale:
- installed on the roof rails of the car;
- mounted on a smooth roof that is not equipped with special places for fastening;
- installed on integrated roof rails that have no clearance between them and the roof).
- mounted on a roof of a similar type, but having special installation locations provided by the manufacturer. Note that almost all foreign cars today are produced equipped with special “hatches” on the roof;
In addition to the above division, devices for transporting luggage on the roof of a car can also be divided into:
- Universal, suitable for cars of various types and brands
- Original, intended for use on a specific model and brand of car.
You may not agree with this, but one thing is clear: a roof rack on a car is not only a convenient and ergonomic device that makes it more functional, but also an excellent way to emphasize the practicality and respectability of its owner.
https://youtube.com/watch?v=aarHn5-O6lI
What materials and tools are needed to make crossbars?
To make a roof rack with roof rails with your own hands, there are many ways, depending on your imagination and the availability of available material at hand (or the ability to buy it). All of them can be divided into two groups:
Considering that additional structures on the roof will to a certain extent affect the aerodynamic properties of the car, it is better to remove them when the transportation of goods using the roof rack is not expected.
If the crossbars are removed, the holes in the roof rails (even neat ones) will disrupt the aesthetics of the car’s exterior. Therefore, it is preferable to do without them.
To perform work on installing cross rails on the roof of a car, you will need the following materials and tools:
To make crossbars, we need a grinder
How to install
Railings are installed by professionals, but if it is not possible to entrust the installation of crossbars to specialists, then this operation can be performed independently. Before securing the crossbars, you will need to perform a number of preparatory operations:
- Carefully examine the roof of the car for the presence of fasteners for crossbars.
- Remove the protective plugs that are installed in the fastenings. The parts are pulled to the side (the direction is indicated on the plugs themselves), then pulled up.
- The freed holes are cleaned of dust and dirt, the walls are degreased, and a silicone-based sealant is applied to the entire surface area. Otherwise, moisture will enter through the remaining cracks directly into the car interior.
After completing the preparation, you can install the roof rails on the car:
- The attachment points of the crossbars, as well as the roof surface, are cleaned of dirt and degreased.
- The trim from the ceiling inside the cabin is removed.
- Holes are drilled in the body. Before performing this operation, you will need to decide whether longitudinal or transverse roof rails will be installed on the car. The location of the mounting hole must be indicated in advance.
- To avoid damaging the paint on the ceiling with hot shavings, cover unprotected areas with masking tape.
- After preparing the holes, cross members are installed, which are fastened with standard bolts.
In order to install the crossbars, you will need to make additional mounting holes. However, after dismantling the crossbars, holes will remain in the roof of the car.
Attaching the trunk to the roof rails with your own hands: stages of work
Before starting work on installing crossbars on the roof rails of a car, it is necessary to consider a fastening design that could ensure strong retention of the metal profile and prevent damage to the paintwork of the body. If you choose methods that exclude drilling holes in the roof rails, then the ideal option for attaching the cross members to them would be a bracket.
Yardstick
Selecting material for the trunk cross support beams
A pipe with a round, square or rectangular cross-section and a wall thickness of up to 3 mm can be suitable as a profile for the crossbars. This design should withstand weight up to 100–110 kg. It is not recommended to load a large mass on the roof of a car. Ideal for this purpose:
In any case, it is advisable to choose a beam of lighter weight so as not to increase the load on the car roof structure.
Taking measurements to determine the length of the crossbars
An important stage in the preparatory work for the manufacture of luggage crossbars for roof rails is taking measurements so that the cut profile does not turn out to be short or too long.
Trunk material
5 best car roof rack manufacturers
First of all, after you decide to make a trunk for your car yourself, you will need to choose the source material. As a rule, metal is considered the best option. However, in this case it is necessary to find a material that will have low weight, but at the same time have the highest strength.
These requirements fit perfectly:
- Aluminum;
- Profile tube;
- Stainless steel.
Aluminum is probably the most suitable option for several reasons. Firstly, it is very light. Secondly, it is resistant to external influences and is not susceptible to the negative effects of corrosion. Thirdly, it is very easy to work with it and form the necessary structures.
An alternative to aluminum is a profile tube with a thin wall. In most cases, domestically produced SUVs (UAZ Patriot, Lada Niva 4×4) are equipped with a roof rack made of this material. The cheapest option for a car is a stainless steel trunk. The sheets became very strong and at the same time flexible. However, a significant disadvantage of this type of material is its weight - it is much greater than that of a profile tube or aluminum.
Making crossbars for roof rails and installing a roof rack
Let's look at the procedure for installing crossbars on car roof rails using the example of using a furniture profile and U-shaped bolts, which are a bracket with threads cut at both ends. This method is applicable for any profile if its ends protrude beyond the outer edges of the rails.
Making crossbars with your own hands
To manufacture the transverse support beams of the roof rack and attach them to the roof rails, you must:
Such a mount can be quickly installed when the need arises to transport cargo on the roof of a car, and can also be easily and quickly dismantled. Instead of using U-bolts to attach the crossbars to the roof rails yourself, you can make a bracket from a metal strip and secure it with regular bolts.
DIY roof rails
In each individual case, the mounting options can be modified, making them more aesthetically pleasing and organically fitting into the exterior design. For example, a variant of crossbars whose ends do not extend beyond the outer edges of the rails will look good. In this case, you can simply make a bracket from a metal strip with a width equal to the width of the profile. Such a bracket, capturing the railing and crossbar from the end, will simultaneously provide reliable fastening of the profile and become a plug for its hole. To secure such a bracket, you can use furniture screws with a neat head.
Advantages and disadvantages of homemade crossbar designs
The manufacture of transverse support structures for roof rails has its advantages and disadvantages. Among the positive points we can note:
Possibility of quick installation of home-made structures when the need arises to transport oversized cargo
The main disadvantages of such crossbars are:
Having weighed all the pros and cons, we can state that making crossbars for roof rails with your own hands is a necessary measure that helps the car owner, in situations that arise quite rarely, transfer the required load, saving a certain amount for the family budget.
To transport specific cargo such as a bicycle, boat and other objects of irregular geometry, it is recommended to provide for their reliable fastening, possibly by installing additional hooks, limiters or clamps on the crossbars, using your imagination and ingenuity.
Source
Pros and cons of expedition racks
If you're still not sure whether you need a rack in a location like this, check out the pros and cons of this part. The positive aspects of the expedition rack are quite obvious:
- it allows you to transport more things;
- protects the roof and its paintwork from external damage from above;
- it becomes possible to transport large items;
- if securely fixed, the load will not fall;
- the transported items do not block the driver’s view;
- frees up space in the car;
- for some body designs it becomes possible to increase the volume of the interior due to the empty luggage compartment;
- you can install gas equipment in the vacated standard trunk;
- this detail is easy to make with your own hands
Unfortunately, such a trunk also has negative qualities:
- the weight of transported items is limited by the vehicle's carrying capacity;
- Fuel consumption increases by 2 liters per thousand kilometers when the trunk is empty;
- you will have to put in some physical effort when lifting the load to the height of the machine;
- if the trunk is overfilled or is poorly secured, you can lose some of your things;
- improperly secured structures rattle and interfere with the driver;
- the aerodynamics of the car is reduced, due to which the capabilities for acceleration and maneuvers are reduced;
- the car becomes less resistant to side winds;
- The height of the car increases, which means you should be more careful when driving through tunnels or under low arches.
The need to install an expeditionary trunk directly depends on the operating characteristics of the vehicle. If you travel often, like to ride bicycles with family and friends, or do gardening work, then such an element of the car will be indispensable for you. In all other cases, having such a trunk will also not be superfluous; besides, it can always be dismantled and left in the garage, and, if necessary, installed back.
Read more: Diagnostics and decoding of error codes on an Audi A4 (video)
The most common types of homemade roof racks are a car box and a welded structure consisting of aluminum or steel profiles.
The roof rack rack is a more functional design. The volume of the rack compartment on the roof of any VAZ model is two to three times greater than the volume of the car box on a Toyota SUV.
The advantages are obvious:
- the structure can be installed temporarily;
- ease of transportation of large items: pipes, bicycles, boards, etc.;
- car roof protection;
- increasing the volume of the cargo compartment by two to three times.
Flaws:
- reduction in vehicle aerodynamics;
- with a cargo weight on the roof of 50 kg or more, the stability of the car during side gusts of wind decreases by 10-20%;
- driving a car becomes more difficult.
DIY crossbars for roof rails
If your car has roof rails, then I think you need to make quick-release crossbars for them, since there are times when you urgently need to bring something that doesn’t fit in the trunk. You don’t have to ask or look for anyone to transfer the cargo, you just need to take the crossbars out of the trunk, screw them on in a couple of minutes, and that’s it.
So; for this we need a half-inch pipe and 4 fasteners from plumbing pipes.
We try on the pipes for your car, that is, how long to cut and cut them off. Then I plugged the ends of the pipes in a simple way, cutting them with a grinder and bending them, then did a little welding and sanded the whole thing down. Better yet, take, or rather select, some plastic plugs, then it will look even better.
Then I drilled holes and tapped them so that it would be dismountable just in case, or you could just weld it. Then we clean everything and paint it.
It is fastened and screwed onto the wings, installed and also removed in about 2 minutes, and into the trunk.
These are the original cross members for the car; if you buy them in a store, it will be expensive, but I made it for myself, as your heart desires, especially since it is not so difficult.
Thank you all for your attention and have a smooth road.
Source
How to secure an expedition rack
Attach this element to the drain or screw it to the roof. In the second case, you have to waterproof each hole yourself so that when it rains, water does not get into the interior.
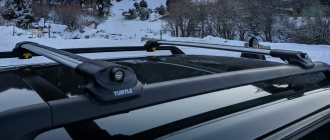
Attaching the expedition rack to the drainThe advantage of Niva cars is that you do not need to drill holes in the car. The structure is screwed to existing roof rails, which motorists often call rails. This means that the luggage compartment can be easily removed at any time.
Attaching the expeditionary rack to the roof rails
Bolts with a diameter of 8 millimeters are suitable for installation. The length of the bolt should be 70 mm. It is advisable to drill holes on the sides and place bushings inside them. Then weld on top. This will protect the metal parts from deformation while tightening the bolts.
Usually the Niva has two roof rails, and it turns out that you can secure the trunk at four points. But to transport heavy items, it is advisable to secure the basket at six points. Therefore, sometimes in a car with two roof rails, another additional one is installed. According to the rules, the trunk mounts are based on areas where the load is transferred to the body. That is, the structure should not put pressure on unsupported areas above windows or doors.
How to make your own trunk for car roof rails
The only condition for installing such a roof rack: the roof of the vehicle must be equipped with roof rails. They are installed by the manufacturer along the sides of the body and serve as a supporting element for the transverse rails.
Car owners often face a sudden task: transporting long items in a passenger car or crossover. Therefore, some quickly make a homemade trunk for the roof rails of a car directly from the means at hand.
Is it possible to make a homemade roof rack for a car?
The design of the crossbars for transporting cargo is quite simple. The only condition for installing such a roof rack: the roof of the vehicle must be equipped with roof rails. They are installed by the manufacturer along the sides of the body and serve as a supporting element for the transverse rails. You can install on them:
As a rule, homemade roof racks for car roof rails consist of 2 (rarely 3) transverse rails with brackets (crossbars). When making them, two features should be taken into account.
Stages of making a trunk
1. First, you need to decide on the size of the trunk. The width and length are dictated by the size of the car, but the height - this parameter should be chosen at your own discretion, the main thing is not to make it too high, otherwise it will be inconvenient to remove loads, especially bulky ones.
2. After the parameters, dimensions and requirements for the roof rack have been determined, it is necessary to cut the pipes to the required length. In general, crossbars are sold in sets of 2 pieces, it is better to take two sets, then the support will spread over 8 points, which will be “more pleasant” for the rails themselves. You shouldn’t cut everything at once, because the calculations are not always correct. Initially, we cut everything only for the lower platform, after which we weld it.
If you don’t have welding skills, then it’s better to practice welding some other iron
3. A metal table or 4 stands made of metal are ideal for welding. Particular attention should be paid to the plane of the entire base. Welded seams must be sanded immediately after cooling, because then the metal gets used to it, after which it becomes very difficult to do this. You also need to ensure that there are no burnouts, this will significantly reduce the strength of the structure.
4. After the bottom base is made, you need to make the top one. It must be made exactly the same in size: even a deviation of a couple of millimeters will be noticeable. Now all that remains is to connect these two structures with jumpers of the required length. There are two options here: to make everything “tight”, that is, using welds, or you can leave the upper base along with the jumpers removable, which will allow you to leave the car trunk on the roof rails in the form of a platform - sometimes the absence of sides can be very useful.
5. Now all that remains is to thoroughly sand the remaining seams and then paint the trunk. If it will be there permanently, then you can install selected reflectors or a backup brake light. You can also install a reverse fog light. Naturally, all this requires proper connection to the on-board network.
6. And the last question is how to secure the trunk. As sad as it may sound, it is not always possible to find two sets of crossbars at an affordable price. I must say, this is generally rare, so you can make them yourself. For each fastening you need two bolts with nuts, two tubes the diameter of the bolts. All this is welded and installed as in the photo. A do-it-yourself roof rack for roof rails should not harm the car, which means it is necessary to use rubber gaskets in the fastening areas.
How to make your own car roof rack
For skillful car owners who own a garage with a minimal set of tools, making a homemade roof rack for the car is not difficult. To work you will need:
Homemade roof rack on roof rails
The first version of the trunk is the simplest without welding, it is done like this:
The second option for a homemade car roof rack is more complex, as it will require welding work. Here you will need two types of profile pipe: 20x20 and 25x25. This is necessary so that one pipe fits into another. The manufacturing process looks like this:
Homemade deadbolt on a rail:
If you don’t have a profile pipe or time to make it, you can build a homemade trunk for the roof rails of a car from wooden blocks. Instead of fasteners, use pieces of electrical wiring (wire).
Wooden slats for roof rails
Such a homemade product is quite capable of being functional for some time.
How to choose
In order for the roof rails to look impressive on the roof and last a long time, it is necessary to take into account the nuances of choosing these parts:
- Elements are selected in accordance with the model of the car on which it is planned to install the additional trunk. When choosing, pay attention to the rail fastening; it must coincide with the standard installation holes. You can find out the compatibility of the car roof bar using the instructions included with the part.
- Before purchasing, you need to check the slats for strength. Poor-quality products, or parts that are made of insufficiently hard material, cannot withstand loads and quickly become unusable. Due to the breakdown of the roof rails, there is a risk of damage to the transported cargo, dents and scratches on the car. A broken part while the car is moving creates a threat to other road users. When choosing products, it is necessary to clarify the maximum permissible load level, the manufacturer and the material from which the part is made. Apply light pressure to the slats. If they give in, then it is better to refuse the purchase.
- When choosing roof rails, both external factors are taken into account: color and shape, as well as the dimensions of the parts.
It is not recommended to purchase used roof rails. Over time, they wear out and their service life is shortened.
Homemade roof rails for cars
A trunk may be needed on any car, from the UAZ Patriot to the VAZ OKA. But, some Patriot configurations are supplied without luggage rack equipment. And at OKE they are not intended at all by design. For an Ulyanovsk SUV you can buy standard roof rails, and for a VAZ subcompact car they use bars from Kalina. In the latter case, you will need to register changes in the body structure with the traffic police. Making roof rails yourself is quite difficult. It is better to entrust this to real professionals.
Source