Ford introduced the compact small midsize Focus model in 1998. The first generation of front-wheel drive budget city cars entered the market in three body styles: sedan, station wagon, and hatchback. Over twenty years of production, the Focus line has undergone seven updates, but the second generation pre-styling is most popular among CIS drivers. Most often, owners are interested in how to remove the door trim of a Ford Focus 2 in order to carry out tuning and update the interior. Let's look at this issue in more detail for all generations of cars.
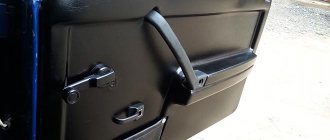
Why remove the trim from the doors of a Ford Focus
In addition to the tuning option, you will need to remove the driver's or passenger door trim in the following cases:
- Repair, reinstallation of central locking elements.
- Damage to the window lowering mechanism, window lifter, opening handle, lock cylinder.
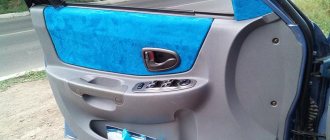
- The interior is equipped with speakers, acoustic columns, and control gadgets that fit into the door panel.
- Work related to sound insulation of the interior, laying vibration insulation, checking the internal pockets of the part for corrosion, anti-corrosion treatment.
A plastic door card is installed as standard on the first and second generation Focus. The material becomes brittle when exposed to low temperatures, so careless dismantling can break the panel.
It is recommended to carry out all work on reinstalling the cladding at an air temperature of at least plus 15 degrees.
Why do door trims need to be dismantled?
During the operation of the vehicle, car owners may be faced with the need to dismantle the door trim. Similar work is performed in the following cases:
- breakdown of power windows or central locking. Repairing such elements requires mandatory dismantling of the door trim: without this, it will be impossible to carry out the necessary work;
- installation of acoustic columns or any other gadgets placed in the side surfaces of the doors;
- procedures for noise and vibration insulation, installation of insulation or sealant.
During the cold season, the door trim is removed extremely carefully and carefully. When exposed to low temperatures, plastic becomes brittle, making it very easy to break or damage
The most vulnerable are small parts - latches, fasteners and clips. For this reason, it is advisable to carry out work on dismantling the casing either in the warm season, or indoors - a garage or box. In summer, it can be removed anywhere - the main thing is that it is protected from dust and wind.
Tools and Supplies
Complete dismantling of the door card takes up to 20 minutes. Disassembling the casing does not require special tools; a standard motorist kit is sufficient. For work you will need:
- Torx key 20-25;
- screwdrivers: with narrow and wide flat blades;
- head at 8;
- wooden wedge or plastic ruler.
Before any work related to reinstalling the casing, it is necessary to remove the negative terminal from the battery.
The trim is installed on plastic pistons; during the work, some clips will be broken, so it is recommended to purchase sets of fasteners for Ford in advance. The cost of an original set of 25 pistons is about 150 rubles.
Disassembly process
To understand how to disassemble the door of a Ford Focus 2, we need to determine what tools we need. There are very few of them, only four.
- flat screwdriver;
- head on "8";
- TORX T25 key;
- pliers.
The latter, by the way, will be needed for one single purpose - to pull the caps out of the metal, and they will 100% remain when the casing is removed. In general, the Ford Focus is a simple car and the process of disassembling the doors is unlikely to cause any particular difficulties, but, nevertheless, it is better to understand how everything is done step by step.
How to remove the trim
So, to disassemble the door of a Ford Focus, you need to do the following:
- Removing the protective mesh. To do this, you first need to lower the glass, pull the mesh towards you (it is attached to latches, so it will not be difficult). Now all that remains is to unscrew the fastening screw, which is done using the aforementioned TORX T25 wrench.
- Remove the sealant layer. It is extremely important to try not to damage the brackets or lose them.
- Removing the armrest. Carefully insert the above screwdriver into the slot of the armrest, lift it up and pull the lower part of the armrest towards you.
- Removing the casing. This is done using the same “8” head. You just need to unscrew the two bolts on which the sheathing layer is attached, and then simply disconnect all the connectors.
- Removing the handle trim. Using a screwdriver, you need to very carefully pick up the handle edging, after which you need to slowly pull it towards you and remove the edging. Once it comes out, you just have to pull it off the handle.
- The last step makes it possible to remove the casing as well. Just pull it towards you by the hole. When the corner comes off, you will hear the clicks of the pistons coming out of engagement. If this does not happen, the pistons can be pulled out with simple pliers.
About the differences in the process of removing the trim from Ford Focus 1, 2 and 3
Regardless of the year of manufacture, the dismantling algorithm does not change. Each generation of Focus has received an updated body. Depending on this, door cards have original shapes and are made of different materials. The cladding in the pre-restyling and restyling versions has different places for installing pistons and screws; there are differences in the shape of protective linings and plugs.
For all models, the shape of the clips and the material used to make them remain the same. The standard retainer has the shape of a double-sided pressure piston with a double skirt. The base of the clip is installed in the trim, and fixation cells are located on the door.
We remove the door card of the rear door on Focus 2 with a mechanical window lifter
Depending on the configuration, the second Focus can be equipped with either an electric or mechanical window lift . First, let's look at the door with a mechanical window lifter. We carry out the work in the following sequence:
- We find a piece of rigid wire 250-300 mm long and bend a hook at one end.
Take a hook and a flat screwdriver.
We hook the stopper and remove it from under the handle.
Pull the handle towards you and remove it.
We unscrew the two self-tapping screws securing the armrest.
We use a spatula to pry up the lower corner of the trim and move it away until the clip clicks, then we move the spatula to the next clip and repeat everything.
If the original clips seem too expensive to you, you can use products with code VAG 6Q0 868 243 (analogous to clips from Audi - they fit normally and cost half as much).
Electric window lifts
The work is carried out in almost the same way, but begins with dismantling the armrest, according to the same scheme as in the first case.
- After this, remove the plastic trim on the inside door handle, but before removing the trim, you must disconnect the wiring harness from the button. The connector is removed from the button after pressing the plastic lock.
- The door card is also secured using seven pistons; we pry the card off with a plastic spatula and move the panel to the side as far as the speaker wires allow. We disconnect the wires from the speaker by pressing the latch, now you can remove the casing completely.
Step-by-step instructions for FordFocus 1
The first generation of Focus hatchbacks, sedans and station wagons was produced from 1998 to 2005. In 2001, a planned restyling took place. The update did not affect the shape of the casing and the mounting locations of the pistons. The cladding has been modified since the first generation and installed on the restyled version in the standard places for screws and pistons. Disassembling the front door of Ford Focus 1 step by step:
- Use a thin screwdriver to pry the plate off the handle.
- Unscrew the two screws and remove the handle.
- Remove the cover near the locking lever socket, unscrew the screw, and remove the locking handle socket.
- Disconnect the locking plug and pull out the latch locking socket.
- Loosen the clamps, pull out the glass fastening channel, and pull out the glass.
- Unfasten 7 clips around the perimeter of the cladding: three on the outside of the panel, two on the inside, two at the bottom of the panel.
- Gently pull the casing towards you and up, gradually unfastening the pistons.
Sequence of removing trim from front and rear doors of Ford Focus 2
The second generation Focus was produced from 2004 to 2011. A new Ford C1 platform was chosen for the model, but the body shape for the entire line was carried over from the first generation. After restyling in 2008, the model range was completely rebuilt. The Focus received an updated body, stylish stampings appeared on the doors, the shape of the doors, the hood of the front and rear bumpers changed.
Craftsmen replace the metal doors and trim of pre-restaling cars with second-generation restalling ones. Repairs require significant modifications and are rarely done by hand. When reinstalling the cladding, the location of the pistons and linings changes. The procedure for removing the trim from the front door of a Ford Focus 2 restyling step by step:
- Lower the window and remove the protective grille from the speaker. The mesh is installed on internal clamps; you need to turn the cap to the side and pull it out of the grooves.
- Unscrew the two fastening screws with a T25 key.
- Remove the door seal. Try not to bend or break the staples.
- Insert a flat-head screwdriver into the slot in the armrest and pull out the plastic top trim.
- Unscrew the bolts with a 8mm head and disconnect the electrical circuit plug.
- Disassemble the edge of the door opening handle, pull out the part by prying it off with a flat-head screwdriver.
- Remove the handle.
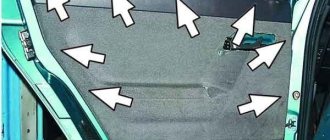
- Insert a plastic wedge or a thick ruler between the trim and the door, pull the trim towards you, walk around the perimeter, unfastening the internal pistons.
The clips come out of their sockets with a characteristic click. Broken fasteners can be pulled out from the trim with pliers and then replaced with new ones.
A special feature of dismantling passenger doors on a Ford remains the design of the window lifter handle. The engaging mechanism is attached to a steel clamp, which must be disconnected inside the mechanism. For this purpose, steel wire with a hook is used. The procedure for disassembling the rear door on Focus 2 restyling version:
- Pull the window handle towards you. Insert the wire with the hook into the connector. Unfasten the steel clamp in the window lifting mechanism.
- Pull out the spring clip and remove the handle.
- Pry up the plastic trim on the armrest and unscrew the two bolts located under the trim.
- Use a screwdriver to pry up the plastic panel on the inside door opening handle, give the handle, release the latch, and pull out the handle.
The passenger door trim is attached to 7 pistons. It’s worth carefully prying off the lining from the bottom corner, inserting a wedge between the door and the card, and unfastening all the clips around the perimeter.
Under the card there is a thick sheet of moisture protection, which is glued to the door and protects all internal mechanisms. If repairs of locks and rods are necessary, then it is necessary to carry out anti-corrosion treatment of the internal pockets; it is recommended to install new vibration and moisture protection after dismantling the old film.
Step-by-step instructions on how to remove the door trim on a FordFocus 2
1. First of all, lower the window and remove the protective grille of the tweeter speaker.
2. To remove the mesh, you need to pull it towards you; it is attached to the latches.
3. Then you need to take a TORX T25 wrench and unscrew the fastening screw with it.
4. Now you need to remove the door seal. Be very careful and careful not to repeat my mistakes and damage the staples. If you are careful they can be reused.
5. To avoid losing the staples, remove the tweeter triangle.
6. Take a flathead screwdriver and install it into the slot in the armrest. Then carefully lift it up and pull the lower part of the armrest towards you.
7. Using the “8” socket, unscrew the two bolts securing the casing.
8. Disconnect all connectors on the front door.
9. Next, with a careful movement so as not to damage the trim, pick up the edge of the door handle and slowly pull it towards you until it completely comes out of the hook. When this happens, remove it forward from the handle.
10. Pull the door trim towards you by the holes formed until the corner protrudes, and clicks will be heard, this is the sound of the pistons coming out of the hook.
11. The remaining pistons in the body are removed using pliers.
12. If you damage or break the caps, do not rush to despair, you can buy them in the store, the main thing is to take the old cap with you in order to choose the option you need.
That's all! The Ford Focus door trim has been removed, all that remains is to carry out the work you need and install the trim in place. Everything is assembled in reverse order.
Removing the trim from the front door of a Ford Focus3
The third generation Focus was produced for seven years, until 2021. The generation was modernized in 2014. In 2021, the fourth generation of cars entered the market, the lines received updated body shapes and new engines.
Removing the driver's door card on the Ford Focus 3 model is quite simple. As with previous generations, repairs can be carried out in 15–20 minutes. The main tool for working on Focus 3 remains a plastic ruler and a thin flat-blade screwdriver.
- Use a ruler or screwdriver to pry off the corner of the decorative trim near the front pillar.
- Remove the panel from the door handle, unscrew the two screws.
- At the end, remove the plug and reflector, unscrew the screws hidden under the protective covers.
- Pull out the plug in the handle.
The driver's door trim is installed on 6 pistons. It is necessary to carefully pry up the casing, starting from the bottom corner, applying force, and carefully snap the clips out of their places. Under the casing, the door is protected by a steel sheet in which there are technological holes for clamps with an exposed block of electrical cables.
Removing the door trim from a car 2 modifications
Front door
- The glass in the door is completely lowered and the protective mesh is removed from the tweeter speaker. The glass is lowered and the protective “grid” is removed from the speaker
- The mesh is attached to the latches, so to remove it, just pull it slightly towards you.
To remove the mesh you need to pull it towards you. - The fastening screws are unscrewed using a TORX T25 wrench.
The fastening screws are unscrewed - The seals are removed from the doors.
This is done very carefully - so that the staples remain intact. Dismantling of the seals is carried out very carefully so as not to damage the brackets - The tweeter triangle is removed to preserve the staples.
- A flat screwdriver is inserted into the slot in the armrest. It rises while the lower part of the armrest moves towards itself. A screwdriver is inserted into the slot of the armrest. The detached plastic pulls towards itself. The armrest is completely removed
- The sheathing fastening bolts are unscrewed using the “8” head. Location of fastening screws Use the head on “8” to unscrew all fastening bolts. Location of fastening bolts
- All connectors on the front door are disconnected.
All connectors on the front door must be disconnected - The edge of the door handle is carefully lifted and pulled towards itself until it is completely unhooked. Use a flat screwdriver to carefully pry up the edge of the handle. The plastic is pulled to the side until it comes loose from the fasteners. The handle can be carefully removed
- The door trim is carefully pulled out using the holes formed until its corner comes off. The pistons will come out of the hooks with characteristic clicks.
The casing is pulled towards itself by the holes formedPulling the trim to the side allows you to completely remove it
- Use pliers to remove the pistons remaining in the housing.
Pistons may remain in the door body, which can be removed with pliers. - Broken caps can always be replaced with new ones - they are sold in a wide range in car stores.
Broken caps can always be replaced with new ones
Video: dismantling the front door trim
Backdoor
- A wire is inserted between the socket and the window lifter handle, the end of which is bent in the shape of a hook.
A wire with a hook is inserted between the socket and the handle - The spring retainer is removed using a hook, then the window lifter handle is removed.
The spring retainer is released with a wire, after which the handle is removed - There is a decorative trim on the rear door armrest that can be pryed off with a flat-head screwdriver.
Remove the decorative trim with a flat screwdriver - The cover is detached from the clamps and removed.
The cover is detached from the clamps and removed - The armrest is attached to the door panel using two self-tapping screws, which are unscrewed with an “8” head.
The two screws securing the armrest are unscrewed and the part itself is removed - The decorative trim of the interior door handle is pryed off with a screwdriver.
Use a screwdriver to pry up and remove the door handle trim - The cover is removed after pressing the handle lever and releasing the latches.
To remove the cover, you need to press the latches - The trim can be separated from the inner door panel by pulling on the edge.
It is secured with seven pistons. The upholstery is secured with seven pistons, the release of which allows it to be removed. - The door trim is removed.
Removing the door trim - Installation of the casing is carried out in the reverse order.
Video: Removing the rear door trim
- https://infokuzov.ru/remont/snyat-obshivku-ff-2
- https://razborov.net/ford/kak-snyat-obshivku-dveri-ford-focus-2-2.html
- https://razborov.net/ford/sovety-otnositel-no-togo-kak-razobrat-dver-ford-fokus-2.html
- https://carnovato.ru/kak-snyat-obshivku-dveri-ford-fokus-2/
- https://ford-focus-fan.ru/kak-snyat-obshivku-perednej-dveri-ford-fokus-2/
- https://fordprof.ru/focus-3/snyatie-obshivki-dveri-ford-focus-3.html
- https://infokuzov.ru/remont/zamok-dveri-ford-fokus-2
- https://pol-z.ru/kak-snyat-obshivku-dveri-ford-fokus-2/
- https://ford-focus-fan.ru/kak-snyat-dver-na-ford-fokus-2/
How to remove an element from a Ford Focus 3
Removing the rear door trim on a Focus is considered the easiest repair. The driver needs to unscrew four screws and unfasten 7 internal clips. For some, the only difficulty is that the craftsmen do not always know where the bolts are located. Sequencing:
- Remove the window handle, first unfastening the inner spring latch.
- Remove the two screws hidden under the handle.
- Remove the cover from the handle, unscrew 2 screws.
- Pry the panel from the bottom corner with a flat ruler, unfasten the clips, remove the cladding by pulling the panel towards you and up.
Reinstalling door cards on the latest generation Focus is quite rare. For the third and fourth generations, the material used is heat-resistant plastic, with a texture reminiscent of genuine leather.