The Lancer 9 filter should either be changed more often, or at least cleaned once every 8000–9000 km. The original cabin filter for Lancer costs a little less than 2,000 rubles, but there are a large number of fairly cheap and good analogues (in the price range of 250-600 rubles).
Based on this, cleaning the filter or installing a new one is an independent choice of each car owner..
- Cabin filter codes Lancer 9Original MR 398288 (XR398288D), MME61701
- Analog codes (RUB 280-500)Goodwill AG 571 CF AMC Filters Mc-4015c
- Jakoparts J1345008
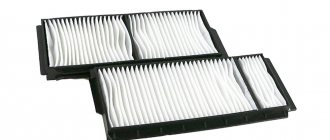
Cabin filter on Mitsubishi
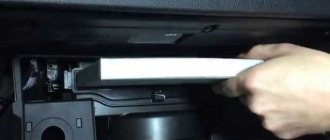
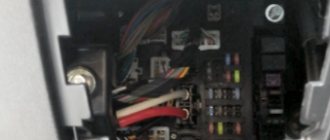
So, let's start replacing the cabin filter of Lancer 9. The process of replacing the filter: The filter is located behind the glove compartment.
Move the glove compartment to the left and down:
This is what opens up:
Behind the glove compartment we see a plastic cover with two screws in the corners diagonally. This is the filter. Unscrew the two screws and pull the filter out towards you:
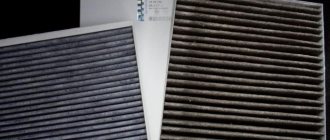
Carefully shake out the dirty filter, vacuum it, or (which is better) rinse it in warm water. You can use detergents, but we choose them carefully - because later you will have to breathe it. Dry the washed filter.
Or we change it to a new one.
Reassemble in reverse order.
Well, in the end, to finish my mini maintenance:
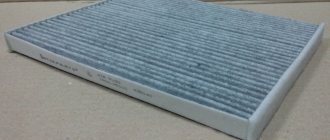
It was decided to update the cabin filter to the heap. There were 2 selection criteria: - cheaper than the previous filter, and the previous filter I had was Sakura art. CAC-1006 (this criterion was not fully met) - the filter must be carbon (to forget about odors overboard for a while)
As far as I know, Mitsubishi does not make filters, but only stamps boxes for them at outrageous price tags. Therefore, this time the choice fell on Denso. It was purchased: — Denso cabin filter — art. DCF300K - price 621 rub.
Full size Denso - art. DCF300K
Full size Denso - art. DCF300K
According to the manual, the cabin filter is changed at every service every 15,000 km. or after 1 year of operation, but this is not our method. As in the case of the air filter, the best option for replacing the cabin filter, in my opinion, would be along with an oil change after about 7000 km, and every 1000 km. take it out and shake it out or blow it out.
- Tools required: - Phillips screwdriver
- We tear off our glove compartment and on the right (for right-handed people) in the upper corner there is a latch, which needs to be removed.
- You can pry it with your finger and pull it out, then move the glove compartment to the right and down and get this view
This is where we need our Phillips screwdriver to unscrew these two screws. Then we take out the old one and install a new filter. To avoid mistakes, there is a guide there, so even if you are extremely crooked, you still won’t be able to put the filter on the wrong side. Let’s put everything back together.
Cabin filter Mitsubishi Lancer 9
The cabin filter prevents dust, pollen and other foreign air impurities from entering the interior of the Lancer 9.
In order for the filter element to efficiently cope with the functions assigned to it, the car owner must purchase an original or recommended product, as well as fully comply with the maintenance schedule.
The branded cabin filter for Lancer 9 has article number MME61701. Its price is more than 400 rubles.
The branded carbon cabin filter comes with the article number MR398288. This consumable is manufactured in a rigid case. Its cost is close to 1000 rubles. There is also a carbon cabin filter, which is made in a soft housing. Its article number is MZ690361, and the price is about 580 rubles.
Analogues of the Lancer 9 branded filter can be found in the table below.
| SCT | SA1173 | from 270 to 390 |
| JS ASAKASHI | AC3503 | from 420 and above |
| TOKO | BJ4-506 | from 450 to 690 |
| GOODWILL | AG571CF | from 280 and above |
| BIG FILTER | GB-9934 | from 250 to 400 |
The table below shows analogues of the original carbon cabin filter.
| -20 | 13-17 |
| 5,3-6,7 | |
| 20 | 2,3-3,0 |
| 40 | 1,0-1,5 |
| 60 | 0,56-0,76 |
| 80 | 0,3-0,42 |
Analogue of the original cabin filter Lancer 9
Description of replacing the cabin filter
Replacement of the cabin filter is carried out using screwdrivers with a Phillips and flat blade. In order to change the cabin filter with your own hands on a Mitsubishi Lancer 9, the car owner will need to use the instructions given below.
- Open the glove compartment. In the photo below, arrows indicate the mounting locations for the box.
Location of drawer fastenings
- Remove the left mount, which is shown in the photo below. To do this, you need to pry it off with a flat-blade screwdriver and pull out the latch.
Left glove compartment mountAttachment after removing the glove box
- By pressing on the right side, you need to move the glove compartment slightly inward. This will loosen its second fastening. After this, it is necessary to remove it downwards from the seat.
Removing the glove compartment mount
- Pull the glove compartment all the way down.
The process of gaining access to the cabin filter
- Unscrew the cabin filter cover, which is held on by two screws, using a screwdriver.
Cabin filter cover fastenings
- Open the filter cover. Behind it, the car owner can see where the cabin filter element is located.
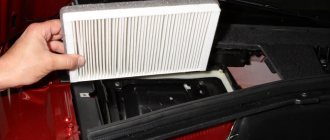
- Remove the old cabin filter.
- Visually assess the condition of the old cabin filter. This action will help determine the correct choice of replacement intervals.
New and removed cabin filter
- Install the new filter into the compartment. In this case, you should make sure that the arrow is pointing down.
- Replace the compartment cover and tighten the screws.
- Reassemble everything in reverse order.
How to replace the cabin filter on Lancer 9 and 10
Speaking about the cabin filter, I would immediately like to note that it becomes clogged much earlier than the time for the next maintenance. A clogged filter element cannot cope with its duties and functions, and contaminated air with bacteria and dust begins to enter the cabin. As a result, the idea of cleaning or replacing it seems rational.
According to the manufacturer's instructions, replacing the cabin filter for Lancer 9 and 10 is recommended at least every 15 thousand kilometers, but in our realities it is necessary to do this twice as often. The best time to inspect the filter material is spring.
How can you find out when it’s time to replace the filter? The atmosphere in the car becomes disgusting, the temperature rises in the summer, and problems with the heating system arise in winter. Apart from this, you will certainly feel the ingress of foreign odors from the street. The windows begin to fog up because the ventilation system is clogged. Dust appears on the dashboard.
To summarize, we can say that the cabin air barrier is an extremely important element in a car. In a word, there is no need to delay replacement, especially since the salon barrier is inexpensive. The original for Lancer is within $50.
Source: https://evrasia-today.ru/filtr-salona-lanser-9/
Cabin filter Mitsubishi Lancer 9th and 10th generations replacement
Remove the old cabin filter. Visually assess the condition of the old cabin filter. This action will help determine the correct choice of replacement intervals. New and removed cabin filter Install the new filter in the compartment.
In this case, you should make sure that the arrow is directed. Replace the compartment cover and tighten the screws. Mitsubishi Lancer 9 cabin filter all in reverse order. Over time, they become clogged with dirt.
But if the atmosphere in which the car is operated is heavily polluted, maintenance should be performed more often.
Choosing a part when purchasing Before getting down to business, it is recommended to visit the store and purchase a cabin filter for the Mitsubishi Lancer 9.
They come in two varieties. Partial, simply separating dust particles from the air.
Such components are cheaper. Carbon, which contains activated carbon. Such filter elements not only remove dust, but also absorb foreign odors.
They are more expensive to buy. The ventilation systems of machines are an environment favorable for the growth of legionella bacteria, the best protection against which is provided by carbon filter elements.
We will consider them further. Improving the appearance of Lancer 8 Purchasing an original part will cost rubles and.
When you turn on the heater or air conditioner, air comes out of the air ducts with dust, which is also a clear sign of a clogged filter. Where is the cabin filter located on the Lancer IX Like most cars, the cabin filter is located behind the glove compartment.
To replace it, you will need to remove the glove compartment and unscrew the filter housing cover. This is very easy to do and without the help of car services. Its cost at the moment is more than rubles.
However, in addition to the original, you can install cheaper, but good quality filter analogues. Before purchasing, be sure to check with the seller whether the filter you are purchasing is suitable for your car.
Among the design features are a Sakura CAC charcoal shelf at the bottom; there is no rigid body. Despite the presence of a carbon layer, the quality cannot be called good, first of all - due to the soft body, Denso DCFK carbon is more expensive than Sakura CAC, but its characteristics are practically no different from it.
The quality is not up to par, whistling is possible Mitwell MA One of the most affordable carbon filters. At the same time, the quality of workmanship is at a quite decent level, all flimsy elements are glued with Jakoparts J Coal, in a soft case.
The appearance does not inspire optimism, the cost for a soft case is average Oriparts CAA Another budget option for a carbon filter element. At the same time, it has a plastic body. However, in general, the quality of the filter does not inspire confidence in Toko BJ. The usual single-layer filter is enclosed in a plastic housing, there are foam pads, as well as a rear shelf.
It differs from it by the presence of a layer with activated carbon. It is quite expensive, but five, comparable in quality to the original Goodwill AGCF carbon filter. The single-layer filter is not of the best quality.
Surprisingly, the sales volume occupies one of the leading places, perhaps due to the popularity of the SCT SA brand. A regular filter is equipped with a hard plastic housing, but there are no gaskets from the Mitsubishi Lancer 9 cabin filter.
The quality of the case is not up to par - there are noticeable bends, which can lead to gaps and the notorious whistling noise. Another feature is the presence of an inscription on one of the side edges of the box, which indicates that inside there may be filters made by different manufacturers Japanparts MR carbon filter with a plastic housing around the perimeter.
A striking example of the fact that the Mitsubishi Lancer 9 cabin filter of a recognizable brand does not guarantee good quality, although there are external complaints about the product.
But as for the arrow indicating which side to insert the filter into the seat, its direction is indicated incorrectly.
Source: https://iaarus.ru/mitsubishi/salonnyj-filtr-mitsubisi-lanser-9-i-10-pokolenij.html
Which SF to choose
The Mitsubishi Lancer 9 is equipped with two types of filters: conventional single-layer (art. MME61701) and multi-layer carbon in hard and soft casings (art. MR398288, MZ690361, respectively). The first option is cheaper and simpler. The filter element is made of cellulose or synthetic fiber in the form of corrugation. Such cleaners freely retain small debris and dust. The second option is more expensive and includes activated carbon in the sealant. The filter provides better protection. However, it clogs faster and therefore requires frequent replacement.
In addition to original cabin filters, there are a number of non-original products from other manufacturers that perform well and work effectively.
These include filters Agama, AMD, Bosch, Champion, Denso, Filtron, Fortech, FRAM, Goodwill, Mann, Sakura. When purchasing, you need to pay attention to the coincidence of not only the catalog number, but also the size of the filter itself. Which filter to purchase depends on the desires and capabilities of the car owner himself, namely, what goal he is pursuing - cheapness or quality.
Replacing the cabin filter on a Mitsubishi Lancer
The cabin filter is a unique air purifier designed for the vehicle interior. It protects against extraneous unpleasant odors, dust and is able to clean the flow from the ventilation system from soot. But in order for its efficiency to be at its best, the element must be replaced after a certain interval of kilometers traveled. The procedure can be carried out with your own hands, including on a Mitsubishi Lancer. Just follow the instructions below.
How often to replace the cabin filter
On Lancer 9, the cabin filter is replaced every 15-25 thousand kilometers. It all depends on the climatic conditions in which the vehicle is operated.
For example, in Russian latitudes it is advisable to change consumables every 15 thousand kilometers if the car owner lives in a big city.
If the car is mainly driven on country roads, you can change the cabin filter less often (about once every 25 thousand km).
Signs of a clogged cabin filter
The cabin filter becomes dirty over time. Its efficiency decreases.
The main signs of a clogged cabin filter:
- Fogging of glass;
- Unpleasant odor when windows are closed.
Such signs can be detected both simultaneously and separately, due to different reasons for their occurrence. In the first situation, the element is completely contaminated with dust. As a result, the fan speed is not enough to ensure that the air flow penetrates into the car interior. A greenhouse effect occurs.
Perhaps there are no problems with fogging of the windows, but there is an unpleasant smell in the cabin. Buying and using air fresheners does not bring the desired results. Most likely, microflora multiplies on the filtration element, which negatively affects the purity of the air entering the cabin. In this case, replacement should be carried out immediately.
How to replace the cabin filter in Lancer-9 yourself
Lancers are one of the most popular models from Mitsubishi. And these are not just words, its popularity is confirmed by numbers: over the entire history of the Mitsubishi-Lancer, over 6 thousand cars of this modification have been sold.
A little history
The first Lancer hit the city roads in 1973. To date, ten Mitsubishi Lancer models have already been produced. The ninth model, presented to the European public in 2003 at the International Autobiennale in Moscow, is in great demand.
When to change the filter?
All car enthusiasts understand the importance of timely service, the quality of which will determine the service life of the vehicle. If you are not an experienced car mechanic, then it is better to entrust complex work to professionals. If you are confident in your technical skills, then first read how to change the cabin filter in Lancer-9.
Particularly in demand in technical centers is filter replacement.
How do you know when it’s time to replace the cabin filter in Lancer-9? Firstly, when you are in a car while driving, you will find that it is difficult for you to breathe due to excessive gas pollution and dust inside the cabin.
Secondly, the previously working air conditioner and furnace will become less productive. Thirdly, you may detect the presence of foreign objects on your filter: soot and debris.
How to choose a cabin filter for Mitsubishi Lancer 9?
The Lancer-9 cabin filter is an important component of the entire vehicle ventilation system. If it malfunctions, damage is caused not only to the car, but also, most importantly, to human health. After all, substances harmful to the body enter the cabin air, such as dust, allergens, exhaust gases and much more.
When purchasing a cabin filter, it is worth remembering that there are different types on the market. Therefore, before purchasing, you should study the Lancer-9 cabin filter, its types and operating features. The most common classification involves division depending on the cleaning method; ordinary, carbon and fine filters are distinguished.
Ordinary filters specialize in dealing with small substances and impurities: various allergens, insects. The effect of carbon filters is slightly wider. They will protect you from a number of harmful chemical elements that are part of car exhaust.
The difference is due to the structure.
If in ordinary devices the filter element is paper or special fiber with antibacterial impregnation, then in coal devices activated carbon additionally works; fine filters differ only in the large number of filter layers.
For uninterrupted operation, it is necessary to regularly replace cabin filters - at least 1-2 times a year. It is better to do this at the beginning of the winter and summer periods.
How to change the cabin filter in Lancer-9?
If you are a brave, experienced driver and decide to change the cabin filter yourself, then study the sequential operation algorithm, which will be discussed further. It is usually located in the glove compartment area or in the space under the hood.
Once you have found its location, you should remove the filter. For this:
- Open the glove box lid.
- We remove the limiter from its left wall.
- We tilt the glove box down, thereby gaining access to the element we need - the filter.
- Next, you should unscrew the existing screws holding the filter to the heater body.
- After which we remove the filter without any problems.
After replacing the old filter with a new one, perform the operation in reverse order. This whole procedure is quite quick and takes about 10 minutes.
Study your car, replace faulty parts in a timely manner, and then it will serve you for many years.
Source: https://monateka.com/article/287759/
How is the replacement made?
But even after purchasing a high-quality part, you can get to work only if you know where the Mitsubishi Lancer 9 cabin filter is located. Japanese developers have placed the critical component behind the glove compartment. You will gain access to it by performing a series of simple operations.
- Open the glove compartment and remove the contents from it, at the same time getting rid of accumulated debris.
- Remove the locking pin located in the upper left corner of the glove compartment. This can be done with your fingers or a screwdriver. After this, the lid will lower, opening access to the space behind the glove box, revealing a plastic plug secured with two screws.
- Unscrew the screws (using a Phillips screwdriver) and remove the plug. An air filter will be found underneath it. You can remove it by hooking it with your nails or prying it with a screwdriver.
- Install the new part in place. There are guides on its body, and you won’t be able to make a mistake with the location.
Assembly is carried out in reverse order. Obviously, replacing the Mitsubishi Lancer 9 cabin filter should not be considered a complex maintenance procedure that requires going to a service center. Most car owners can do simple work themselves.
Replacing the cabin filter on a Mitsubishi Lancer 10 is done in approximately the same way, although there are some differences.
Replacing the cabin filter Mitsubishi Lancer 9
Mitsubishi Lancer 9 is the penultimate generation of the legendary Lancer model range, which is the best seller of the Mitsubishi brand. The first generation of cars from this series appeared back in 1973, and the ninth was presented on the European market in 2003.
Lancers have become a particularly successful modification of Mitsubishi cars, since over 6 million units of cars have been sold during their existence.
This is not strange, since such vehicles are an example of an optimal city car, which, along with comfortable movement within the city, is not afraid of long trips.
Timely service of Lancer 9 is the basis of durability
To ensure that your car serves you for a long time and reliably, it would be appropriate to think about its quality maintenance. It provides a range of fastening, adjustment, and lubrication services, as well as replacement of parts and consumables that have already expired. One of these elements is the cabin filter, which is responsible for the cleanliness of the air in the car.
Replacement instructions
Tools
- screwdriver;
- filter element.
- First of all, you need to open the glove compartment itself.
Glove compartment of a Mitsubishi Lancer car
Location of glove box latches
Removing the glove box from its mount
Filter system location
Location of screws that need to be unscrewed