Replacing hydraulic compensators on a Priora 16 valves with your own hands + Video
The transition from adjusting washers, which were used on Soviet “eights” and “nines” to hydraulic compensators (HC), made it possible to abandon manual adjustment of the gaps. However, hydraulic compensators are installed only on 16-valve engines, so owners of 8-valve Prior and Kalin have to adjust the thermal clearances the old fashioned way, with washers. In this article we will talk about how to independently change hydraulic compensators on a 16-valve Lada Priora engine.
Tools and materials
To replace the HA you will need:
Before starting work, we recommend that you carefully read the article Why hydraulic lifters knock when hot and cold. If you have hydraulic lifters knocking on a Priora, you will understand what to do. After all, replacing hydraulic compensators is a rather complicated matter, so it is better not to touch the timing belt unless unnecessarily necessary, because incorrect alignment of the crankshaft and camshaft marks can lead to a drop in engine power and damage to the valves. If you decide to change hydraulic compensators, then read about safety precautions for car repair and maintenance in order to responsibly approach wheel removal and work under the car.
Replacing hydraulic compensators
Below are step-by-step instructions that will help you replace hydraulic compensators on a Priora.
- Open the hood, let the engine cool and disconnect the battery.
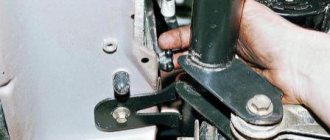
- Jack up the front right side of the car, install a safety stand, and remove the front right wheel.
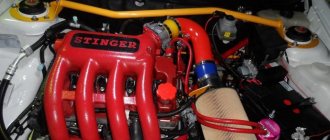
- Remove the plastic casing covering the injector, the air filter pipe, and the filter itself.
- Remove the spark plug wires.
- Install the air filter and its pipe.
- Connect all wires and ignition coils.
- Install the decorative plastic cover.
- Put on and tighten the wheel.
- Connect the battery.
- Start the engine. At first, the hydraulic compensators should knock, but after 3-5 minutes the knock should completely disappear. If the sound disappears, you did everything right. If not, then something was wrong.
- disconnect the car;
- remove the terminals from the battery;
- disconnect all wires and hoses that interfere with the process;
- Disconnect the air conditioning line if there is one in the car.
Video - Priora engine operation after replacing hydraulic compensators
How to change hydraulic compensators on a Priora with your own hands?
How to change hydraulics?
Replacing hydraulic valves with your own hands is done without much difficulty. If you have a Priora, the knocking sound of its engine really irritates the owner, and having money doesn’t put too much pressure on your pocket, but you still have time for creativity and expression of ambition, you can try yourself as a car mechanic.
Replacing hydraulic valves with your own hands is best done on a “cold” machine.
After letting the engine sit for about a day, let the oil drain into the oil pan and minimize its presence in the upper part of the engine.
In order to get to the cylinder block where the hydraulic compensators are located, you must:
To remove the cylinder head, you need to get to a very inconveniently located bolt, which can only be unscrewed after removing the timing belt, which is also not an easy task. If it is necessary to replace it, then it is advisable to do this at the same time.
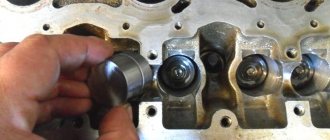
After removing the cylinder head cover, access to the hydraulic compensators will be practically open; all that remains is to remove the camshafts.
It is possible to check the functionality of compensators without removing them from their sockets. To do this, you need to press hard on each cylinder: if you encounter resistance and virtually no deformation, then the compensator is in order and can be left. If a weak link is identified, that is, an element that fails when pressed, its replacement is mandatory. Experts recommend replacing the entire set, since it is not possible to check the degree of wear of the remaining hydraulic compensators.
Additives for hydraulic compensators
The first thing you should do when the hydraulics start knocking is to try to clean the channels. Removing blockages manually is a labor-intensive process that requires complete disassembly of the engine. Therefore, to remove carbon deposits, a special additive for hydraulic compensators is used, which effectively dissolves build-up in the channels. There are many brands on the market, among which the following are worth highlighting:
- Lavr is a Russian company that has been producing oil and fuel additives since 1997.
- Wagner is a German company that also produces lubricants under the Windigo brand. Liqui Moly is a German company that is one of the leaders in the production of oils and additives.
- Hi-Gear is a well-known American concern specializing in auto chemicals.
- Mobil (Mobil) is a brand of synthetic oils and additives from ExxonMobil, whose headquarters are located in the USA, and production facilities are scattered across all continents.
There are two types of additives: for permanent use and for cleaning channels. The first prevents the appearance of deposits and gradually dissolves existing ones. The second is to effectively restore lubrication systems and hydraulic compensators, restoring their operation. It is filled in for a short time shortly before changing the oil. The maximum effect is achieved by an integrated approach: constant use of additives along with periodic flushing of the lubrication channels.
Do-it-yourself replacement of hydraulic compensators on a Lada Priora 16 valves: video instructions
Any experienced car enthusiast knows how important the gas distribution system, abbreviated as timing, is in a car. Its task is to supply air to the cylinders, where a working mixture is created to start and operate the engine. After the mixture burns out, exhaust gases are formed, which must be removed from the system, and here the timing belt also plays a decisive role.
For the correct operation of the timing belt, reliable operation of the hydraulic compensators is important. These devices are responsible for opening and closing the air intake valves. Moreover, they are responsible for opening the valves to a strictly defined amount, no more and no less. If the hydraulic compensators break down, the gap size will be disrupted, which will lead to a phase failure of the gas distribution system. A car enthusiast can detect a problem by a characteristic knocking sound, which often causes panic even for experienced drivers. Today we’ll talk about how hydraulic compensators are replaced on a Priora with a 1.6 engine with 16 valves with or without air conditioning.
How the system works
Hydraulic compensators are an integral attribute for many modern car models. Previously, valve stroke had to be adjusted manually, which was done on AvtoVAZ engines in earlier cars.
The hydraulic compensator is designed quite simply. It looks like a cylinder, inside of which a plunger is installed. Let's consider the principle of its operation step by step.
- When starting the engine, the device is affected by the camshaft cam.
- Under the action of the cam, the compensator moves lower, after which its plunger exerts pressure on the valve.
- Under the influence of pressure, the valve opens, but strictly to a certain height.
The operation of the devices is adjusted using ordinary oil. It enters the space located under the plunger, and the greater its pressure, the greater the load on the plunger itself.
Accordingly, the valve clearance is adjusted automatically, taking into account the oil level.
How to change a hydraulic compensator
If you hear a suspicious knocking noise under the hood of your engine, you need to check the hydraulic compensators. Sometimes the problem is solved by changing the oil, flushing the devices, etc. However, if nothing helps, you will have to change it. You will need the following tools:
- a set of socket and open-end wrenches;
- screwdrivers;
- new components;
- head cover gasket;
- new seals for the camshaft;
- sealant.
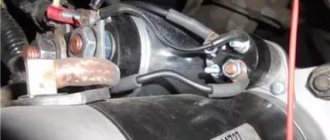
The repair begins with disconnecting the battery from the system, after which the cables from the ignition coils and injector are removed. Then the crankcase cooling system hose is disconnected. Next, you need to remove the bracket on which the oil dipstick is attached. Once this is done, unscrew the intake manifold fasteners and remove it from the engine.
The first step on the engine is to remove the timing belt covers along with the fasteners. Next, having loosened the tension roller, you should remove the belt itself from the camshafts. The next items to be removed are the gears and the rear belt cover. When removing gears, be careful because the keys on them can easily get lost.
Next in line will be the head cover bolts. The cover is fixed very well, so it is not always possible to remove it quickly. Here a minus screwdriver will come to your aid, with which you can lightly pry it off from different sides. Underneath you will find the camshaft bearings, which we also don’t need for now. The last step is to remove the camshafts. Experts advise marking structures so as not to confuse them during assembly. At this point the work will be completed, and the hydraulic compensators will appear in front of you.
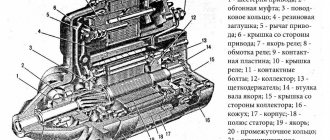
Operating principle of hydraulic compensator
The part serves as an intermediate link between the timing cam and the valve. Product design may vary depending on the model and engine type. A classic hydraulic pusher includes the following required elements:
- plunger with bushing;
- valve (spring-loaded ball);
- piston;
- frame.
The device operates due to the pressure of the engine oil entering through the plunger. After the engine starts, it fills the compensator cavity through the valve. As a result, the part body rests against the camshaft, ensuring minimal clearance of the mating parts. Thanks to the spring-loaded ball, oil does not flow out of the housing under the pressure of the cam and the hydraulic compensator acts as a rigid body that transmits force to the valve.
Replacing hydraulic compensators on a Lada Priora with your own hands: video instructions
It just so happens that the domestic auto industry has a special status among owners of wheeled vehicles.
On the one hand, everyone never tires of scolding it for its poor build quality, on the other hand, there is no doubt about the maintainability and unpretentiousness of cars produced in Russia. The Lada Priora, which replaced the VAZ-2110, immediately fell in love with many car owners, occupying a niche that is not very expensive in the price of the domestic sedan and hatchback. And something that is actively driven begins to break down, and Priora is no exception. One of the most common complaints from car enthusiasts is an extraneous knock in the engine, starting from 15-20 thousand kilometers.
Everything should be nearby, don’t start without preparation
Lada Priora can serve as an example to consider the replacement process. To avoid unpleasant surprises, any work must be planned and everything necessary must be prepared. In our case we will need:
- Gasket Maker - sealant (anaerobic);
- camshaft plugs and seals;
- 16 INA compensators.
Let's start by disconnecting the battery minus. Then we dismantle the air filter, throttle cables, wires that will interfere with manipulation, injector ignition coils and intake manifold.
Replacing hydraulic compensators on a Priora is complicated by the fact that the manifold mounting bolt is located under the generator.
To get to the hydraulic compensators:
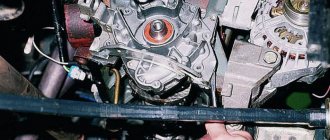
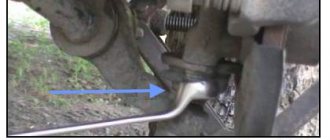
- The generator belt is removed, the generator itself is freed from the mounting bolts and carefully moved to the radiator. Using a wrench with a rotary head, the manifold mounting bolt is unscrewed.
- The ramp with nozzles is dismantled and the air conditioning pipes are disconnected (if equipped).
- The collector is dismantled. First, we lift its left edge and then the entire part, and then we move it to the left.
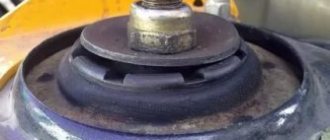
- The valve cover is removed using a screwdriver inserted into the technological grooves.
- Next, the timing belt is removed, the pulleys, camshaft bed and the shafts themselves are dismantled.
How to eliminate the knocking of hydraulic pushers on Lada Priora
Timely and high-quality maintenance of the engine oil system is the key to flawless operation of the hydraulic compensator mechanism. After all, the unit is designed for use throughout the entire resource of the power plant.
Use of recommended lubricant
When the hydraulic pushers just start knocking, the manufacturer recommends changing the lubricant to a proven option. Therefore, when the question arises of what kind of oil to pour in principle, it is worth analyzing reviews to determine the acceptability of a certain model of oil product for hydraulic compensators.
Of course, the best choice for Lada Priora will be the composition recommended by the manufacturer, specified in the instruction manual. However, not all current popular products are included in the list.
An analysis of opinions shows that, indeed, with the universal viscosity of 10W-40 or 5W-40 specified by the factory, not every oil is suitable. For example, Shell Helix Ultra 5W-40 causes knocking already at 15,000 km, while on Liqui Moly Optimal Synth 5W-40 the hydraulics are silent even at 80,000 km.
Reviews show that it is optimal to choose the following lubricants:
- Total Quartz 9000 Energy 5W-40.
- Mobil Ultra 10W-40.
- Wagner Windigo 10W-40.
Flushing
Many owners, in advanced cases, resort to general engine flushing. However, the effectiveness of such an event in the fight against knocking GCs is low. This is explained by poor oil pumpability in the area of the hydraulic pusher chambers.
If changing the lubricant does not help, the best solution is to remove the cylinder head cover and find which hydraulic compensators on the Lada Priora 16-valve engine are knocking and determine the reason for this. Defective parts are identified by diagnosing running resistance with a wooden wedge. A fast movement speed in comparison with other hydraulic supports indicates wear of the hydraulic module, the presence of a constant gap indicates its coking.
Attention! The wooden wedge must be pressed against the non-working surface of the cams.
Effective removal of carbon deposits inside the cylinders is their local washing. Worn assembly modules cannot be repaired.
Additives
Additive compounds help delay identifying the causes and cleaning the timing belt. There are several products available in the market. The most popular products are from Liqui Moly and XADO. The effectiveness of substances depends on the specific case. Fans of motor additives often equate this class of chemistry with a waste of money.
Assembly nuances
After replacing 16 hydraulic compensators, everything must be restored to its original form. The most important operations in order:
- We clean and degrease the camshafts and seats of the bed and valve cover, both on the parts and on the engine.
- We change the seals, plugs and put both shafts in place. The inlet has a special belt, which is not present on the outlet. This is its distinctive feature.
- Apply Gasket sealant to the mounting location of the camshaft bed and mount it (no gasket required).
- We treat the fit for the valve cover with sealant and mount it (no gasket required).
- We install injectors, condenser tubes, mount the manifold, generator, its belt, pulleys and timing belt.
- We restore the operation of the throttle valve, filter and connect all the wires.
Replacing hydraulic lifters sometimes results in the engine not starting due to lack of compression. As a rule, hydraulic valves are installed oil-filled and it may happen that due to the incompressibility of compensators, some valves will be open. To avoid this, it is necessary to tighten them with a clamp before installation.
Malfunctions and their causes
As mentioned above, the design of hydraulic compensators is extremely simple. But even such simple parts fail. There are three main signs that indicate that something is wrong with the hydraulic compensators:
- While the engine is running, a quick knocking noise is clearly audible.
- Engine power drops significantly, especially at high speeds.
- The engine runs rough, even at idle.
If any of these signs are observed, then it’s time to change the hydraulic compensators. The main problem with these parts is that they are extremely sensitive to the quality of the engine oil. Sometimes it doesn’t even get to the point of replacing hydraulic compensators. The car owner simply drains the old oil, fills in new oil (after flushing the engine) and the knocking disappears. If the problem does not go away, it means that there is mechanical wear of the hydraulic compensators (usually this occurs due to the so-called metal fatigue).
We recommend: What to do if a hernia appears on the wheel