The process of replacing the starter on a VAZ-2112
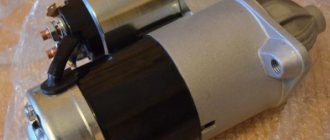
Old and new starter
We will need the new starter itself, keys “13” and “15”; we can also use heads and ratchets for convenience.
- First of all, remove the negative terminal on the battery (this is necessary for safety, to avoid a short circuit).
Remove the terminal - Disconnect the wire at the traction relay.
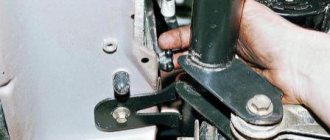
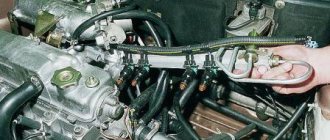
- The next step is to unscrew the starter using a ratchet and a 15mm socket 2 fasteners (one from the bottom).
Unscrew the starter fasteners - After the above operations, you can safely remove the starter.
Installing the starter is done in the reverse order, but for simplicity, here is a small and clear diagram of the connection to the starter relay:
Connection diagram of the starter to the car relay
Or according to this scheme:
More details here
What is a starter for?
Let's introduce a little theory about the ignition system and the starter itself.
The ignition system is necessary to start the engine; the starter itself is designed to create a powerful current (by passing, so to speak, through the starter winding). This is done so that this energy turns the flywheel half a turn.
Main starter components:
- VAZ Starter Relay Connection Diagram
You can see more details in the picture.
- Front cover with plain bearing.
- Bendix (engagement drive).
- Planetary reductor.
- Rotor with collector.
- Housing with stator.
- Solenoid relay.
- Brush unit.
- The back cover has a plain bearing. You can see more details in the picture.
Reasons why it is necessary to replace the starter
- The solenoid relay armature is broken.
- Broken wiring.
- Short circuit to negative.
Most of these reasons can be diagnosed if you try to start the engine by closing the contacts on the starter.
Starter malfunctions and disassembly
If the VAZ-2110 starter does not work, then you will not be able to start the car. When the key is turned, it does not work and the engine does not spin up. In an emergency, it is possible to start the engine “from the pusher,” that is, by spinning the crankshaft directly through physical effort.
Basic starter malfunctions:
- damage to the winding and, as a result, disruption of the ignition circuit;
- natural mechanical wear of brushes;
- jamming of the “shoe”;
- destruction of contacts;
- failure of the coil, which is responsible for transforming the 12-volt voltage.
For example, replacing starter brushes is not difficult. But burning through the copper wiring will make it unsuitable for further use. It would be easier to completely replace the starter. Its circuit itself is extremely simple - an electric motor with a rotating core enclosed in a monolithic metal casing. All this is connected to a coil, which increases the voltage frequency and current strength hundreds of times.
In any case, repair of the VAZ-2110 starter should begin with diagnostics. Disassembly takes place in several stages. In order to remove the unit, it is recommended to place the car on an overpass and remove the raincoats (rubber curtains) from the front wheels. Next, disconnect the negative terminal of the battery and the traction relay directly from the starter. Then, using a 13 key, remove the positive wire from the monolithic body. It remains to unscrew 3 nuts (in the VAZ-2112 there are only 2 nuts, without the “blind” one) by 15, which secure the starter to the crankcase, after which it can be completely removed.
The gear starter in the “ten” is connected together with a traction relay. It is disconnected using keys 8 and 10. After this, the starter itself is disassembled (by unscrewing 2 stop pins with a nut 10). Next, the body can be separated into 2 parts and the central anchor can be removed, and the brush holder can be removed from the other part (also held on by 2 nuts). By removing the protective cover from the back of the starter, you can see the stator. It is there that the anchor with the winding is hidden. All that remains is to examine everything in detail and identify the cause of the breakdown.
Starter problems and their elimination
If the starter does not turn, the car does not start, and the traction relay clicks characteristically, then the culprit is often a discharged battery. Due to insufficient battery charge, when voltage is applied to the starter, its level in the circuit drops, which causes the traction relay to turn off. To resolve this situation, you need to recharge the battery.
The culprit for the relay clicking may also be an oxidized terminal. Because of this, the voltage in the circuit is unstable and varies significantly depending on the load. To eliminate problems, you should grind the terminal connection, clearing the oxides. If the damage is significant, the defective element must be replaced.
The main problems with the starter are divided into mechanical and electrical. Among the first, the most popular is a Bendix malfunction. During operation, it wears out, which leads to backlash. Mechanical damage to the gear and clutch is also possible. If problems arise with the bendix, it must be replaced, since it is difficult to repair.
The planetary gearbox has improved the performance characteristics of the starter. At the same time, he introduced an additional malfunction, characteristic of VAZ 2112 units. The lubricant thickens over time, this manifests itself in sluggish rotation of the crankshaft, which can ultimately lead to the fact that the car will no longer start. To solve the problem, you should disassemble the assembly, wash the gears of the gearbox and fill the planetary gear with fresh lubricant.
- Replacing the VAZ 2112 starter relay if necessary
In the electrical part, brushes are most susceptible to wear. They wear out at the point of contact with the collector. Insufficient brush length leads to unstable power supply to the armature windings, which affects the inability to rotate the crankshaft normally. To eliminate problems associated with brush wear, you should measure their length and if it does not reach 4 mm, replace the worn-out elements.
A large current flows through the brushes and commutator. It causes heat, which under unfavorable conditions leads to thermal and mechanical damage. Small defects can be eliminated by sanding. If the damage is significant, then the failed elements must be replaced.
Also, when diagnosing the starter armature, you should check the windings for an interturn short circuit, open circuit or breakdown to the housing. This will reveal damage to conductors or insulation.
Diagnosis and troubleshooting
It is necessary to replace the starter with a new one only if the fault has been accurately diagnosed. After all, the problem may be that the relay does not work, and not that the starter does not turn. Replacing the relay is a more budget-friendly solution; often it is enough to clean it properly.
With the starter removed from the car, checking whether the relay works is much easier. You need to use a size 8 wrench to unscrew the two bolts from the front cover of the device. Remove the cover, the spring will fall out into your hands and the anchor will become visible. Check the armature stroke; if it is tight, you need to clean the core.
One of the most common reasons for the starter not turning over is worn brushes.
Then the contact with the collector weakens or disappears completely, as a result the engine does not turn at all or turns jerkily. To check brush wear, simply place the starter on its side without disassembling the device. Connect power to it and rotate it on its side. If the armature turns sluggishly or jerkily, these are signs of brush wear.
If the cause of the breakdown is a short circuit or break in the winding, then there is no point in repairing the starter. It will be easier to buy a new one. The winding is checked with a special device - a flaw detector. You should not refuse diagnostics, as it will not only help identify the malfunction, but also discover the causes of its occurrence. For example, if during diagnostics it was revealed that the shaft bushings are worn out and the gear teeth are worn out, this is a sure sign that the starter is not securely fastened in the engine compartment. This point will need to be taken into account and the new part should be secured more securely in order to avoid the same problems.
Having made sure that the procedure for removing the starter is very simple, car owners begin to replace domestic starters with imported models in order to improve their car. Pay attention to such a nuance as fastening. The VAZ 2110 has two bolts, not three. Externally identical parts will differ only in the number of holes.
Article number and approximate price for the original VAZ 2112 starter
The original starters, which are equipped with power units with 8 or 16 valves, have article numbers 2108370801006 and 21130370801000. The price of a new unit ranges from 3,400 to 5,100 rubles.
You can buy a branded unit cheaper at auto wrecking yards. The cost of a used original starter starts at 1,600 rubles. Reviews from car owners indicate that the original VAZ 2112 starters do not have a long service life. Therefore, when purchasing a used spare part, you do not have to count on its long service life.
Starter VAZ 2111
The starter on the VAZ 2111 is used to start the internal combustion engine. It rotates the crankshaft until the power plant begins to operate stably on its own.
During operation, natural wear and tear of the unit occurs, and breakdowns of various types may also occur. Malfunctions make it difficult or impossible to start the car. Therefore, it is important for the car owner to monitor the condition of the starter and, at the first suspicion of incorrect operation, carry out diagnostics, based on the results of which make decisions about repairing or replacing the unit.
Catalog number and cost of a good starter for VAZ 2112
Since there are a large number of defects among branded VAZ 2112 starters, and the components themselves do not show high quality, experienced car owners recommend buying analogues from third-party manufacturers. Among the alternative options, there are a lot of low-quality products, but there are also very worthy examples. The best brands that produce starters for the VAZ 2112, which have proven themselves well and sell their units at an attractive price, are presented in the table below.
Table - Good analogues of the original VAZ 2112 starter
| Manufacturer | vendor code | Approximate cost, ruble |
| Bosch | 986014950 | 7300-8900 |
| As-pl | S9008 | 1700-2500 |
| Startvolt | LST0115 | 2550-3150 |
| Eldix | ELDST2108 | 2600-3500 |
| Unit | 1100351 | 3200-4100 |
Original parts and their analogues: which is better
Despite the fact that this vehicle model ceased production more than 10 years ago, it is not difficult to purchase original starters made by AvtoVAZ. Moreover, their quality is not always higher than their analogues. Original part:
| Manufacturer's name | vendor code | Options | Cost, rubles |
| AvtoVAZ | 2112-3708010. | 9 bendix teeth 3 mounting bolts | From 4 000 |
There are many analogues on sale from a variety of manufacturers. The cost fluctuates quite significantly. The following manufacturers have proven themselves to be good:
| Manufacturer's name | vendor code | Options | Cost, rubles |
| StartVolt | 2110-3708010-00 | 1.5 kW | From 2 800 |
| KENO | KNV-3708010-31 | 2 kW | From 3 000 |
| ELPROM ELHOVO | ST2110E | 1.5 kW | From 3 100 |
Bosch starters have proven themselves to be good. This manufacturer carries out quality control. There is no chance of purchasing a product that does not work. It should also be noted that different manufacturers may produce parts of different sizes.
For example, the Bosch starter is slightly larger than the KEHO starter. The price of the part will vary significantly depending on the manufacturer. The difference between the dimensions can be seen in the photo. Larger parts will be difficult to install.
Required Tools
In order to carry out repairs yourself and replace the starter on a VAZ 2112, you need the tools from the table below.
Table - Tools required to replace the front strut
- VAZ 2107 starter relay: purpose, malfunctions and repairs
| Name | Note |
| open-end wrench | "at 13" |
| Spanner | "at 13" |
| Head | "at 15" |
| Ratchet | With extension |
| Rags and wire brush | To clean dirt |
| Penetrating lubricant | For example, WD-40 |
Starter replacement process
In order to remove the old assembly and install a new starter, it is recommended to follow the step-by-step instructions below.
- To prevent unauthorized movement of the vehicle, its rear axle must be secured with a parking brake.
- Open the hood.
- Disconnect the negative terminal from the battery. There is no need to disconnect the second connector, but some car owners recommend completely de-energizing the on-board circuit.
- Remove the air filter. This action will open access to the place where the VAZ 2112 starter is located.
- Disconnect the terminal from the relay and the power wire.
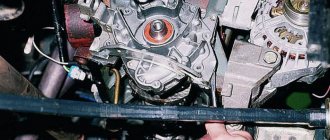
- Unscrew the starter mount. To do this, it is recommended to use a ratchet, as shown in the photo below.
- Remove the starter from the engine compartment.
- Install the new unit in the reverse order of removal.
- Reassemble everything in the reverse order of removal.
- Check the functionality of the new starter by test running the power unit of a VAZ 2112 car.
This article will detail the instructions for removing the starter from a VAZ-2112 car; it will describe and visually show the design of the starter and, indeed, the entire ignition system as a whole. The video below shows how to replace the starter on a VAZ-2110 (on a 16-valve VAZ-2112 it changes in the same way):
Content
1The process of replacing a starter on a VAZ-21122What is a starter needed for?3Reasons for which a starter replacement is necessary4Conclusion5Design of the VAZ 21100 starting mechanism6Signs and causes of a malfunction of the starting mechanism7Replacing a starter on a VAZ 2110 injector8Recommendations for “extending the life” of the starting mechanism
DIY starter repair on a VAZ car
The article describes in great detail with photo accompaniment the process of repairing a starter on a VAZ 2110 car.
In a new car, breakdowns and malfunctions in the starter rarely occur. But if the car has been in service for more than 5 years, then problems may arise. The car owner himself can determine if the starter is faulty - the car will not start, there are uncharacteristic sounds when starting the engine, the starter turns off spontaneously.
But many motorists do not pay attention to such car signals. And they bring the situation to the point where it is no longer possible to “save” the starter. But an experienced motorist who monitors his car will immediately determine the malfunction of this part by the sound of the car running. So how do you repair a starter? Its repair takes place in several dozen stages described below.
The process of replacing the starter on a VAZ-2112
We will need the new starter itself, keys “13” and “15”; we can also use heads and ratchets for convenience.
- First of all, remove the negative terminal on the battery (this is necessary for safety, to avoid a short circuit).
- Disconnect the wire at the traction relay.
- The next step is to unscrew the starter using a ratchet and a 15mm socket 2 fasteners (one from the bottom).
Unscrew the starter fasteners - After the above operations, you can safely remove the starter.
None Diagram for connecting the starter to the car relay Or according to this diagram:
What is a starter for?
Let's introduce a little theory about the ignition system and the starter itself.
The ignition system is necessary to start the engine; the starter itself is designed to create a powerful current (by passing, so to speak, through the starter winding). This is done so that this energy turns the flywheel half a turn. Main starter components:
You can see more details in the picture.
- Front cover with plain bearing.
- Bendix (engagement drive).
- Planetary reductor.
- Rotor with collector.
- Housing with stator.
- Solenoid relay.
- Brush unit.
- The back cover has a plain bearing. You can see more details in the picture.
VAZ 2110 trigger mechanism
The device for starting the VAZ 2110 engine has an electric motor with a planetary gearbox, as well as a starting solenoid relay. The gears of the planetary gearbox rotate on needle bearings, transmitting torque to the drive shaft. The traction relay switches a large amount of current and transfers it to the electric motor when the ignition key is turned.
The traction relay is returned to its original position using a powerful return spring. The interior of the assembly is a standard electric motor powered by DC battery power. An electric motor consists of a rotor, a magnetic stator and a brush assembly.
This is how the VAZ 2110 starter works. The photo (see below) shows in detail the structure of the unit.
Various external factors, including driver actions, can contribute to malfunctions. To troubleshoot the problem, it is important to understand how to disassemble the VAZ 2110 starter.
The VAZ 2110 starter buzzes, but does not turn the engine.
Indicates that the electrical circuit is being closed and power is being supplied to the motor brushes. The electric motor is in working condition. The holding coil of the solenoid relay does not operate and the bendix does not move. Bendix gear does not engage with flywheel gear. The electric motor runs in idle mode. The cause may be either mechanical or electrical in nature.
Mechanical part. The force from the relay retracting element is transmitted to the bendix through a plastic lever shaped like a grip. If there is high resistance to the movement of the bendix along the rotor shaft, this plastic part breaks. The Bendix does not move to the working position, and the starter rotates without transmitting torque to the flywheel.
Another mechanical reason for the starter idling is the destruction of the teeth on the engine flywheel. The malfunction refers to a motor failure and is not directly related to the operation of the drive. The likelihood of such a malfunction may be indicated by the activation of all working elements of the starter, the spin-up of the electric motor and the transfer of the bendix to the working position, which is detected by a characteristic click when turning the ignition key.
Signs and causes of trigger malfunction
Fortunately, the element in question is not a non-separable structure and, having identified the cause of the breakdown, you can get by at much lower costs than replacing the entire assembled mechanism. Let's look at the signs and their corresponding malfunctions:
- The solenoid relay clicks, but the motor rotates. In this case, it is necessary to check all power wire connections. From the battery to the solenoid relay and from the solenoid relay to the starter housing. If current is present, then the problem is most likely in the electric motor itself (usually a burnt out rotor or brushes).
- When you turn the key, the dashboard lights immediately go out. The engine does not rotate. Most likely there is a short circuit in the electric motor or relay. Stop trying to start the engine until the problem is resolved.
- The starter "snacks". This may be due to both the mechanical elements of the unit (bearings, gears) and engine problems.
Replacing bushings
If you need to replace the bushings, there are two of them, in the gearbox housing and in the lower part of the starter. In the starter housing it can be changed without problems, but in the gearbox housing it is problematic to change it without a special tool (riber); this procedure is recommended to be done at a service station by a specialist.
After repair, it is recommended to check it on site before installation, with the power terminals from the battery.
A step-by-step guide to dismantling the dashboard is presented here: https://vazweb.ru/desyatka/salon/kak-snyat-panel.html
Installation is carried out in reverse order. The nuts for 13 fastening the terminals must be tightened without much force, since the terminals are copper and if tightened too tightly, the threads can be damaged.
Replacing the starter on a VAZ 2110 injector
Removing the starter is not a complicated procedure that will take you no more than an hour of time. But if you plan to repair this mechanism, then you will need a little more time, since after removing this unit, it will need to be examined separately and the failed parts replaced. To remove this unit from the VAZ 2110 engine, you will need a tool: 10 and 8 mm sockets, as well as a 13-mm open-end wrench.
First of all, turn off the power supply by removing the terminal from the battery. Next follow the instructions:
- Remove the control wire from the solenoid relay.
- Unscrew the positive terminal from the electric motor with a 13 mm wrench.
- Unscrew the two nuts securing the starter to the gearbox housing.
- Carefully, without damaging the wires, remove the assembly.
To remove the solenoid relay, unscrew the two fastening nuts with a socket 8, having previously unscrewed the power wire nut with a socket 10. The starting unit is assembled in the reverse order of removal.
Replacement and repair of starter Lada (VAZ) 2110 in St. Petersburg
Starter repair Lada (VAZ) 2110
generations: Premiere, I in the
Pit-Stop 24
is available around the clock and seven days a week - in the workshop itself or with a technician visiting the site of the breakdown.
In the first case, you either bring us the car or the already removed starter: a qualified auto electrician, after checking and troubleshooting, will repair it by replacing the necessary spare parts. In the second, a specialist arrives on call and removes the starter from a VAZ 2110
and either repairs it on site or takes it to a workshop for this. In any of the options, we provide a full quality guarantee.
How can I repair the starter of a VAZ 2110 car?
Delivering it to the workshop
A more profitable way: you do not pay for an auto repairman to travel to a location around the city.
Call a specialist on site
If you cannot remove the starter yourself or tow the car to us, calling an auto electrician is cheaper than the services of a tow truck.
Lada (VAZ) 2110 units
produced by competent specialists at a specially equipped stand. We can offer replacement both more expensive original spare parts (if the manufacturer supplies them) and quality-tested “non-original” ones.
Repair of VAZ 2110 starters
VAZ 2110 Premiere
Recommendations for “extending the life” of the trigger mechanism
Above, we studied the structure of the electric motor and the starting relay, and also answered the question of how to remove the starter on a VAZ 2110 with your own hands. Let's add to all this a number of recommendations for careful handling of this element - this will reduce the likelihood of part failure:
- Never spin the engine for more than 7-8 seconds.
- Wait at least 1 minute between attempts to start the engine.
- Always depress the clutch before starting - this will eliminate additional stress in the form of the clutch and the transmission input shaft.
- Fill the engine with engine oil appropriate for the season of operation - thick oil greatly increases the load on the starting mechanism.
If signs of a malfunction nevertheless appear, the first thing to do is stop trying to start the engine and figure out the cause, otherwise there is a high probability of complete failure of the mechanism. In such a case, it is better to spend time starting the car “from the pusher”.
.
Loading…
Sources:
Welcome! Starter - there are many important electronic things in a car, but the starter and generator are the most important and therefore they need to be looked after and not allowed to wear out, for example, if you want to kill the generator very quickly, then it will be enough to remove the minus terminal from the battery and wait for the moment until the diode bridge fails, with the starter everything is also simple, it will be enough to turn it (There are cases when the engine does not start) until it fails (In general, you should not turn the starter for a long time, 10 seconds without stops are already long for him, so keep breaks of 30 seconds if the car does not want to start for more than 10 seconds) and you can go buy a new one and what is most important is that without a starter it is very, very inconvenient (You will have to constantly push the car), and without a generator, you won’t even be able to go anywhere (or rather, you can, until the battery completely runs out and the car stalls as a result), so be careful with these things and don’t put too much load on them, which can damage them.
Note! To replace the starter with a new one, you will need to take from the tools: A set of wrenches and gloves (We recommend working with gloves, because the distance is small and it’s easy to skin your hands) and also an inspection hole would be useful, or just hang the front part of the car and remove the wheel , because the starter is located at the very bottom and you can’t reach its bottom bolt from above!
Summary:
Where is the starter located? If you look from the top of the car, it will be a little difficult to see it, because some details will interfere with seeing it, but still, if you look at it from a certain angle, then everything is clearly visible, for clarity, in the photo below, the starter is indicated by a red arrow .
When should you replace the starter? Any part wears out from time to time, the same thing happens with the starter, but most often one problem happens to it, it starts to click (When you turn the key to start the car), because of these clicks the car does not start and from time to time the starter may then grab, then click, in addition, another reason that indicates that the starter has become unusable is its weak rotation, that is, you turned the key, it began to turn and turns very weakly, and therefore the car does not start properly and you have to wait for a long time until the engine starts (in this case, also check the battery, it may be discharged), in addition to these faults, there are others, such as turning on the starter repeatedly and turning it off, or when you turn the key and you can hear the sound of the starter, but it spins at idle or when you turn on the starter, you hear an unusual noise (crackling or as if the starter’s armature is touching something and similar noises that you will immediately understand).
The process of removing the starter and installing a new element
Starter removal process:
- Place the car on the inspection pit. If this is not possible, use an overpass or just a good jack.
- Lift one side, remove the wheel, remove the boot or crankcase guard (if equipped).
- The next step is to unscrew the top nut that secures the starter. This can be done both from the engine compartment and from under the car - whatever is convenient. Additionally, unscrew the nut that secures the terminal to the solenoid relay. Remove it so it doesn't interfere.
- Disconnect the nearby wire going to the starter.
- The final step is to unscrew the nut, which secures the part from below.
- Now you can pull the element out of the clutch housing.
Checking starter malfunction:
- Take a flathead screwdriver and try to move the coupling forward/backward along the shaft. It should spin easily and not hit anything.
- Use a screwdriver to turn the gear. If everything is spinning in the same direction, everything is fine. If the scrolling goes in the opposite direction, the part will need repair.
- Checking the retractor relay is carried out using two wires with “crocodiles” for convenience. Place the red one on the positive terminal of the battery, and place the other end on the control terminal of the relay. Use the negative conductor to connect the negative battery and the starter housing. After such actions, a click will appear and the clutch will come forward. After disconnecting the wires, the coupling will return.
- The final stage of the test is to disconnect the wire from the control terminal of the traction relay. Connect the crocodile clips in exactly the same way. When voltage is applied, the starter armature should spin at a frequency of more than 5 thousand revolutions per minute. If everything is so, the element is working.
Installing a new starter is carried out in the reverse order of removal. If you do not want to completely change the part in question, but want to repair it, then we recommend that you familiarize yourself with the relevant information. We do not recommend that you do everything yourself without knowledge of the entire process. In this case, it is better to contact a service station.
To summarize, we note that the starter on the VAZ-2110, as on other cars, is a very important unit, the failure of which is a rather unpleasant situation. In the article we examined the main points for dismantling the old part and installing a new element. Carrying out the work should not cause any difficulties. It is enough to use the recommendations from the article to successfully repair your car.
How to replace the starter on a VAZ 2110-VAZ 2112?
Note! The first and most important rule when working with electricians is to disconnect the battery so that it does not supply current, this is done by removing the minus terminal from the battery; how to do this in more detail, read the article: “Replacing the battery in a car,” point 1!
Removal: 1) First, drive the car into a viewing hole, overpass, or lift the front part very high with a good jack (it will be enough to lift only one side, two at once are not necessary) and remove the wheel from the car, after the operation, remove the boot or if If you have a crankcase protection installed, then remove it too, because it will prevent access to the starter, immediately after which, by the way, in the engine compartment or under the car (Whichever is more convenient for you), unscrew the top nut securing the starter (see large photo) and also unscrew the nut that attaches the terminal to the solenoid relay (see small photo) and remove this terminal so that it does not interfere (Next to this terminal there will be another wire that is attached to the starter, you will also disconnect it).
2) And finally, unscrew the nut that secures the starter from below (see photo 1) and after that, carefully pull it out of the clutch housing and put it on the ground or put it where you need it, if you suddenly decide to check the starter for serviceability, we’ll give you a couple of tips on how this is done, first use a flat screwdriver to move the coupling back and forth along the shaft and make sure that it moves easily and does not jam anywhere (see photo 2), then twist the gear with the same screwdriver or with your finger (see photo 3), it it should also spin easily and spin only in one direction, it should, if it spins both clockwise and counterclockwise, then the starter will have to be disassembled and repaired, in addition to this, you can also check the solenoid relay, which sometimes clicks and the starter does not engage, to do this, pull two wires so that they have crocodile clips at both ends (it will be easier this way, you can also run clean bare wires), so place the red wire on the plus terminal of the battery and its other end on the control terminal (a wire is also attached to this terminal) of the solenoid relay , as for the black wire, then throw one end to the minus on the battery, and connect the other end to the starter housing as it is all shown in figure number 4, after this operation you will hear a click and the clutch will come forward, when you remove the wires it will be the same again the same click and the clutch will run back, well, the final check is to disconnect this very wire from the control terminal of the traction relay and connect all the wires with the alligator clips in the same way, but only with this wire removed and when the voltage goes back, the armature at the starter should rotate with frequency of more than 5000 min, if this is the case, then the starter is fully operational and by the way, do not hold the wires that come from the battery and that you connected to the starter for more than 10 seconds, otherwise problems may begin with the starter.
Installation: Installation of a new starter occurs in the reverse order of removal; if you do not want to completely change the starter, but you want to overhaul it, then study the article entitled: “Repairing a starter on a car.”
Additional video clip: You can see the process of replacing an element such as a starter in the video located just below, but it shows how to remove the starter from the top without crawling under the car, the article describes a slightly different method, which way you will go, it’s up to you to decide just for you, by the way, in addition to the replacement, this video also describes the test for the functionality of the starter in detail, although the entire operation is performed on a VAZ 2114 car, there are practically no differences from the tenth family.
Different types of starting devices are installed on the domestic VAZ car of the twelfth model. The VAZ 2112 starter must be 12-volt, have left rotation and a power of at least 1.4 kW. And also equipped with nine teeth of the drive gear.
general information
VAZ 2112 starter removal
As mentioned above, the starter provides current support due to permanent magnets. Producing a power of 1.55 kW, this element provides the starting frequency that is so necessary for the cylinders of the car’s power unit. Different motor types have different frequencies, but there is an average starting frequency. It is equal to 40-50 revolutions per minute, if we mean the operation of a gasoline engine, which is the VAZ 2112 engine.
Note. As a comparative example, diesel engines will require the starter to rev at 100-200 RPM.
Consists of the following components:
- Permanent magnets in the amount of 4 pieces. They are mounted inside the starter and perform one of the important missions.
- An anchor that rotates the flywheel, and with it the crankshaft of the car engine.
- Brush unit with 4 brushes. Two of the brushes are called positive, two are called negative. The brush assembly is designed to provide electrical connection.
Note. This assembly has been proven to be one of the least reliable parts of the starter. It is the brushes that are the first to be questioned when the stator is performing poorly and are subject to testing, followed by replacement.
- The planetary gearbox is the next component. It is also the most important element, as it is responsible for transmitting torque to the drive shaft. The gearbox itself consists of several gears that reliably perform their functions.
- A drive that is designed to insert the stator gear into connection with the engine flywheel. The mechanism of this drive is located on the armature shaft.
- Covers, front and back, which are cast mainly from aluminum, or rather from its alloy. The front cover is needed to mount the relay, which is connected to the drive through a plastic lever and ring. Brush holders are located on the back cover.
- Solenoid relay, also called traction relay. Thanks to this component, the drive gear meshes with the ring gear. As soon as the driver turns the key, voltage will not flow anywhere, but to the windings (holding/retracting) of this relay. As soon as the contact relay closes, the pull-in winding is switched off.
Note. It will be useful to know that 8V is the normal voltage of the traction relay, of course, if the ambient temperature is average. It is by this parameter that electricians determine the malfunction of this relay.
- Light weight and small dimensions, making it compact, are among the obvious advantages of this element.
- On the other hand, this is the most loaded part in the entire car system, because being small in size, it must spin the heavy flywheel of a strong car engine. In addition, the starter is also responsible for rotating the crankshaft along with connecting rods and pistons. Because of this drawback, the starter cannot serve for a long time and after a certain time (usually 5-6 years) fails.
Briefly, you can imagine the work of the starter. Through the ignition switch, power is supplied to the relay windings. The windings create an E.M.F. that is transmitted to the relay core. This, in turn, closes the power contacts, transferring power to the stator motor. At the same time, the relay influences the drive, which, with its gear, engages with the engine flywheel.
Note. To prevent reverse transmission of torque, the overrunning clutch disengages the rollers as soon as the machine's engine starts.
Replacing a starter in a VAZ 2112
The main symptoms of element malfunction are the following:
- The starter does not work (see VAZ starter repair - we do everything ourselves) after trying to start the power unit.
- The starter does not turn off when the engine has already started. It keeps spinning.
- The starter turns normally, but the engine does not start. The reason is that the crankshaft does not turn.
- While the car is moving, a characteristic noise and grinding noise is heard.
We make sure that the problem point in the car system is the starter:
- We check the reliability of the wires going from the battery to the starter. It is quite possible that they have a break or the contacts do not fit well.
- Turn on the signal and headlights if the wires are ok. The fact is that if the battery is weak and not fully charged, the problems described above with starting the engine may occur. If the headlights are dim and the signal is weak, then the battery is discharged.
- We remove the wires from the terminals of the ignition switch, if the battery is in order, and connect them together (these wires are marked on the car diagram with the numbers “30” and “50”). If the starter turns normally when the wires are briefly shorted, then the problem is in the ignition switch.
- If the lock is working properly and the starter still does not work, you can try connecting an additional wire to the relay plug and at the same time to the end of the battery positive wire. If the starter starts working, then there is clearly a malfunction in the circuit from the battery to the relay, which must be eliminated.
- If this does not help, you will have to remove the starter and check it.
So, the starter is not working well and you need to dismantle it to determine the severity of the malfunction with subsequent repair or replacement. Let's get started:
- Remove the negative wire from the battery.
- Now we disconnect the wire going to the traction relay.
- Using a 13mm wrench, unscrew the nut that holds the positive wire going from the battery to the starter.
VAZ 2112 remove starter
- The wire is removed.
- Now you need to unscrew the nuts that secure the starter to the clutch housing. To do this we use a key of 15.
- We remove the starter.
Replacing the starter on a VAZ 2112
Note. To avoid confusion when reinstalling the wires, it is recommended to mark them. For example, you can use separate pieces of wire of different colors for marking.
The starter has been removed. Now we need to disassemble it:
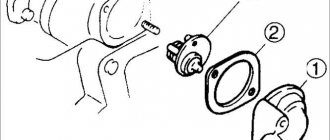
- Take a 10mm socket or wrench. Unscrew the nut on the relay and remove the wire going to the starter.
- We unscrew the relay bolts securing it to the starter with a wrench or a 8mm socket.
- Remove the starter relay.
- We see the gasket between the front cover and the relay, which we also remove.
- We dismantle the spring and armature.
- We dismantle the tie rod nuts.
- We remove the starter from the studs along with the anchor.
At this stage, the internal elements are cleaned. The contacts are checked, you can disassemble the brush assembly and check it. Detailed information on how to repair a starter can be found in other publications on our website. If it is not possible to repair the starter, you will have to replace it. The price for this element varies. Usually, if the starter is new, you will have to spend about 2-3 thousand rubles.
Replacing the starter VAZ 21124
In the process of carrying out this work with your own hands, it is highly recommended to use video and photos - materials that provide a practical understanding of the process. Everything must be done strictly according to the instructions so that no problems arise.
Starter selection
The main components of the mechanism
So, first, let's look at the faults that cause the starter to not turn on a VAZ 2112.
If the engine does not start, it does not mean that the problem lies in this particular device, so first you need to make sure that the problem does not lie in a discharged battery:
- If, when trying to start the VAZ 2111 starter with the key, the crankshaft turns once or frequent clicks of the device are heard, this is indicative of a low battery. Also, the reason may be poor contact of the terminals with the battery or disconnection or poor contact of the mechanism ground.
- If, when starting the engine with the key, you heard only one click, but the starter does not turn, and therefore the engine does not start, most likely the problem lies in burnt power contacts. In particular, we are talking about the retractor relay mechanism. Due to burning, these contacts will not be able to conduct voltage through them. It also happens that when starting the engine with the key on a VAZ 2112, the starter does not turn, but the contacts are intact; if this is the case, then the reason should be sought in the non-working electric motor of the mechanism or its drive.
- The appearance of uncharacteristic noise during operation of the device may be due to wear of the bushings of the bearing devices. In addition, the reason may lie in the wear of the journals on the armature shaft.
- It is necessary to check the quality of fastening of the device. It is quite possible that problems in its performance are due to loosening of the screws. It must be taken into account that vibrations can negatively affect the functionality of the mechanism.
- The reason may also be damage to the drive teeth (the author of the video is the Lexin channel).
Installing an additional relay
If after 2-3 thousand kilometers a VAZ 2112 has a problem with the starter - it stops starting the overheated engine normally, rotates lazily and sluggishly - it is recommended to install an additional relay. It will save the contact group and increase the voltage to the solenoid relay. You can, of course, disassemble the device and reassemble it, thoroughly cleaning the contacts from oxides. You can also quickly start the engine with a long screwdriver by closing the bolts of the retractor relay. Or simply ask several people to push the car. But over time, the problem will make itself felt again.
Below is a diagram of connecting a starter device with an additional relay:
- the positive impulse goes from the battery directly to the starter;
- the ignition key is connected to the positive terminal through an additional relay;
- a line is drawn from the relay not only to the starter, but also to the battery;
- minus or ground from the battery is shorted to the body.
In both options, the additional relay must be powered from a separate fuse. The latter can also be used as a variant of a kind of “secret”.
Now about what you will need:
- four-contact relay 98.3777-10 with an iron ear for 30 or 40 amperes;
- plugs: 2 ring plugs, 1 female relay plug, 5 standard female plugs and 1 standard male plug;
- new wiring.
Next we connect according to the following diagram.
Compactness - small weight and dimensions - are the advantages of the starter 12 of the VAZ model. On the other hand, this is the most loaded part in the entire electrical system. It is the starting device that must spin the heavy flywheel of a powerful engine. In addition, it is responsible for the rotation of the crankshaft with the connecting rod and piston group. For these reasons, the starter does not serve for a long time, failing after 5-6 years of continuous operation.
Final diagnostics of the starter before replacement
If the starter on a VAZ 2112 does not allow you to start the engine, before starting repairs, you should carry out a full diagnosis of the device. First, you will need to open the hood and dismantle the air filter element; to do this, unscrew the bolt on the body and use a screwdriver to loosen the clamp on the hose.
The VAZ 2112 starter itself is located directly under the air filter housing, the diagnostic procedure is carried out as follows:
- First you need to check how well the wires connected to the mechanism are connected. There is a possibility that the problem lies in the electrical circuit.
- If the wiring is intact, then turn on the optics. When the battery is discharged, the light from the flashlights will be quite weak.
- Remove the wires from the ignition switch connectors, and then connect them to each other (wires 30 and 50 in accordance with the car diagram). When the contacts are closed for a short time, the mechanism will begin to rotate; if this is the case, then the reason lies in the ignition switch.
- When the lock is working, an additional wire is connected to the connector and relay, as well as to the positive terminal of the battery. If the starter unit works, this may indicate a problem in the circuit from the battery to the relay.
- If these actions did not help identify the malfunction, then you will have to dismantle the unit and check it in more detail (the author of the video is Avtoelektika HF).
Diagnostics
How can we determine that the cause of the problem was the worn starter brushes of the 2109, 2110 VAZ model? First, you should make sure that there is no break in the electrical circuit of the device. Check if the connection of the wires to ground is secure. If everything is fine with them, take an insulated wire and connect the positive terminal of the starter to the positive terminal of the battery. Don't forget to turn the ignition into neutral before doing this. If there is a problem with the wiring, the starter will operate and start the engine.
If this does not happen, the starter will have to be dismantled for further diagnostics.
DIY mechanism repair and replacement
If the power unit does not start, it is necessary to repair the VAZ starter.
This procedure looks like this:
- First of all, you should disconnect the battery, and then disconnect the wires connected to the traction relay.
- Using a 13mm wrench, you will need to unscrew the nut that secures the positive contact of the cable connected from the battery to the starter assembly. The wire itself can then be dismantled.
- Next, you will need to unscrew the nuts that secure the mechanism to the clutch housing. To unscrew the nuts you will need a 15mm wrench.
- After completing these steps, the starter assembly can be removed. If you plan to replace it with a new one, then the replacement can be done at this stage. When replacing, you need to take into account the location of the wires connected to the starter; under no circumstances should they be mixed up. Therefore, before disconnecting the wires, it is advisable to mark them. If you do not want to change the mechanism, but plan to repair it, then you can start disassembling it.
- To disassemble, you will need a 10mm wrench; you can use it to unscrew the nut located on the relay and remove the wire connected to the starter.
- The relay screws that secure it to the starter assembly must be unscrewed using a size 8 wrench. Having done this, you can dismantle the relay.
- After removing the relay, you can see the gasket, which is located between the front cover of the mechanism and the relay itself. It should also be removed for disassembly, but when dismantling it is worth paying attention to its condition. If you see that the sealing element is worn out and its quality is quite low, then it is better to replace this component.
- When the seal is dismantled, it will be necessary to remove the spring, as well as the anchor.
- The next step is to remove the parking stud nuts.
- After completing these steps, you can dismantle the mechanism from the studs with the anchor itself. After this, it is necessary to thoroughly clean the internal parts and components of the device. For proper repairs, you should diagnose the contacts, and also completely disassemble the brush assembly and check its condition. In general, the procedure for repairing a mechanism is quite complicated, so not every car enthusiast chooses this method - sometimes it is easier to simply replace the unit with a new one. In particular, this will be necessary if the repair process did not produce any results.
VAZ 2110 starter solenoid relay: where is it located, do-it-yourself replacement
Many owners of the domestic “ten” are faced with a situation where it is impossible to start the engine using the starter. Moreover, they do not blame the starter itself, but the relay.
But when the process of searching the engine compartment begins, they fail to find the starter relay on the VAZ 2110. It is not surprising that numerous websites, forums, and social networks regularly publish questions of approximately the same nature - where is the starter relay on a VAZ 2110.
How it works
Plus, when the contacts on the traction winding are closed, the starter motor is supplied with power from the battery. The contacts are washed out, the blocking is activated, due to which the retractor winding is “cut out”.
The retractor is controlled directly from the ignition switch. Plus it plays the role of starter protection. The fact that the relay will require an impressive amount of current leads to gradual wear of the contacts in the contact group.
This can be noticed by the unclear start of the power unit; periodically the starter may not operate or may rotate the engine slowly. You can solve this problem on your own.
Examination
First, it is recommended to perform a check. Now we will tell you how to check the starter solenoid relay on a VAZ 2110.
- We get to the starter itself.
- To the left and slightly below the battery, directly next to the gearbox, is the starter we are looking for.
- The starter and relay, as you remember, are located in a common housing with two terminals. Be sure to ensure that these terminals do not short out.
- Check the voltage limit on the solenoid relay. The maximum value is not higher than 8V.
- Make sure that the temperature at activation does not exceed 25 degrees Celsius. If the number is higher, then don't expect the starter and his defense to perform effectively.
- Some breakdowns are determined visually, so inspect every centimeter of the device in detail and disassemble it.
Dismantling
The dismantling process cannot be called difficult; even a beginner can handle it. Just follow the given instructions.
- Disconnect the negative cable from the battery.
- Remove the air filter.
- Disconnect the set of wires that go to the retractor.
- Remove the nut responsible for securing the tip of the power wire. To do this you will need a 13 key.
- Now it is the turn to dismantle the nuts that hold the starter. Here you need a larger key - 15 millimeters. But if the top one unscrews without any problems, then it will not be easy to get to the bottom one. But it will have to be done.
- Remove the starter.
- Remove the nut of the lower terminal of the solenoid relay and disconnect the wiring.
- Unscrew the relay mounting bolts using a size 8 wrench and remove it completely.
Typical breakdowns
Now let’s figure out how to check the starter solenoid relay on a VAZ 2110. It must be carefully inspected after dismantling.
This unit is characterized by certain breakdowns, which we will talk about.
- The fastening is loose or the nuts responsible for fastening the wire end are completely loose. Everything is simple here, as you understand. You just need to tighten the fasteners.
- Oxidation has formed on the windings, connections or wiring. If everything is not too serious, you can simply clean the contacts. In case of serious oxidation, it is better to replace them with new ones.
- The power supply circuit has breaks. Again, you don’t need to come up with anything fancy, just replace the chain.
- The armature exhibits idle operation or slow operation. Just replace the armature and that's it, problem solved.
- Check the short circuit of the turns of the two windings using an ohmmeter.
Replacement
In fact, it is theoretically possible to repair the relay. But in reality this is rarely justified in terms of financial and time costs.
A much simpler and more rational solution is replacement. The procedure will not take much time, but the unit will definitely work properly and reliably. It is unknown what the result of the repair will be.