Replacing the drive seal of VAZ 2109, VAZ 2110, VAZ 2112, VAZ 2114, VAZ 2115
You can replace the drive seal of a
VAZ 2109, VAZ 2110, VAZ 2112, VAZ 2114, VAZ 2115 car with your own hands, in a garage. Now we will look at how to replace the drive seal of a VAZ 2109, VAZ 2110, VAZ 2112, VAZ 2114, VAZ 2115 car yourself.
When should the oil seal be changed?
We are all fans of driving cars; we often forget about such an event as replacing the drive seal, or rather the internal grenade seal. Let's remember what signs indicate the need to replace the drive seal?
— oil leakage from the gearbox (formation of an oily film on the gearbox); If you notice an oil film, be aware that over time, more oil will ooze out, even to the point of forming oil droplets on the asphalt under the car.
Do not forget! Oil seals are left and right, and they should not be confused. The left and right drive seals are different in color. The left oil seal of a VAZ is usually brown and is installed on the driver’s side, while the right oil seal is black and is installed on the passenger’s side.
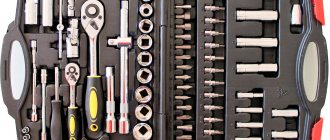
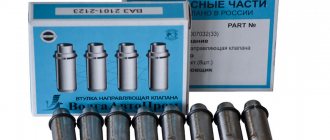
Tool for replacing the drive oil seal of a VAZ 2109, VAZ 2110, VAZ 2112, VAZ 2114, VAZ 2115 :
- Wrench 17;
- 30mm socket wrench;
- Mount ;
- Screwdriver;
- Hammer ;
- Mandrel for pressing the oil seal;
- Container for draining oil.
- Pipe of suitable diameter.
How to buy a VAZ drive oil seal?
Before you run out to buy a drive seal, decide which drive seal you need (left or right). You can buy a drive oil seal at any VAZ auto store or at the car market.
What is the difference between the left and right drive oil seal?
The left-hand drive oil seal differs from the right-hand drive oil seal of the car in that it has oil drainage grooves in different directions.
The main differences between the left and right drive oil seal.
- Different directions of arrows on the inside of the seals;
- The numbering of the right oil seal has an even number at the end, and the left one has an uneven number.
- The color of the left oil seal is brown, and the color of the right one is black.
How to replace the drive seal of a VAZ 2109, VAZ 2110, VAZ 2112, VAZ 2114, VAZ 2115 car yourself?
- Drain the oil from the vehicle's gearbox.
- Loosen the wheel bolts and unscrew the VAZ front wheel bearing nut.
- Using a jack, raise the car and remove the ball joint from the steering knuckle by unscrewing the bolts.
- Using a pry bar, push the lower arm down and pull one end of the drive out of the hub.
- Then we push the drive out of the gearbox (for this we drained the oil from the gearbox))) so that it doesn’t drip into the eyes.
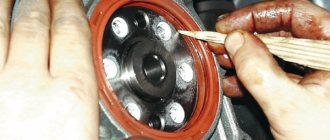
- Using a screwdriver, remove the drive seal from the gearbox.
- Press in a new oil seal. The oil seal should fit freely.
Gearbox device
General view of the gearbox
Before proceeding directly to the process of replacing the oil seal, it is necessary to consider the structure of one of the main elements of the car - the gearbox. So, what parts does the unit consist of:
Transmission device diagram
Gearbox: 1 – clutch release bearing; 2 – guide sleeve; 3 – input shaft; 4 – roller bearing of the secondary shaft; 5 – secondary shaft; 6 – retaining ring; 7 – satellite axis; 8 – speedometer drive drive gear; 9 – transport plug; 10 – wheel drive oil seal; 11 – tapered roller bearing of the differential; 12 – axle gear; 13 – satellite; 14 – differential box; 15 – clutch housing; 16 – driven gear of the main gear; 17 – drain plug; 18 – adjusting ring; 19 – driven gear of the 1st gear of the secondary shaft; 20 – synchronizer for 1st and 2nd gears; 21 – driven gear of the second gear of the secondary shaft; 22 – retaining ring; 23 – persistent half ring; 24 – driven gear of the third gear of the secondary shaft; 25 – synchronizer for 3rd and 4th gears; 26 – driven gear of the fourth gear of the secondary shaft; 27 – needle bearing of the secondary shaft gears; 28 – ball bearing of the secondary shaft; 29 – thrust plate; 30 – driven gear V of the secondary shaft transmission; 31 – 5th gear synchronizer assembly; 32 – nut; 33 – thrust washer; 34 – drive gear V of the input shaft; 35 – rear cover of the gearbox housing; 36 – ball bearing of the input shaft; 37 – gearbox housing; 38 – roller bearing of the input shaft; 39 – breather; 40 – input shaft oil seal
Types of faults
Regardless of the side of the drive shaft, its layout looks identical, except that the length of the axle shafts differs. The edges of the shafts have splined sections, due to which engagement with the CV joints (external and internal) occurs.
Most Renault Logan cars have a special balancer in the center of one of their drive shafts. Operation makes its negative contribution to the condition of this unit, since the ingress of a salt-mud mixture in winter provokes corrosion. Mostly, owners neglect this point and continue to operate the car until the moment when the specified unit breaks down. The malfunction is quite common and is also typical for Renault Logan.
An equally well-known malfunction is wear of the splined section on the edge of the axle shaft. The breakdown is accompanied by an unpleasant crunching sound, and the car refuses to move when the owner tries to start moving. The cause may be either progressive corrosion or excessive load on the drive itself.
How it works?
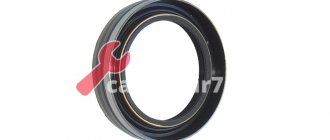
The oil seal consists of a rigid (outer) surface that is mounted in a hole. Often the kit includes a metal ring that is hermetically connected to the rubber seal. It fits tightly into the landing niche.
The inner part is softer, it seems to envelop the rotating shaft. The oil seal leaks from the inside of the circle. Manufacturers are constantly looking for compromise:
- hard material is more durable, but does not fit tightly around a rotating object;
- soft, elastic rubber provides excellent sealing, but wears out quickly.
To enhance the girth, a ring spring is often installed on the inner side. If it comes off, the grenade seal will leak.
Box nuances
The VAZ 2114 uses a five-speed manual gearbox. It is quite simple in design, which allows you to independently carry out preventive and repair work.
Device diagram
Experts recommend identifying a malfunction at the initial stage of its occurrence, since delaying means wasting even more time, effort and money.
Signs of a leaking oil seal
If a puddle of oil forms under the car, this is a clinical case. The cause of the malfunction is clearly visible to the naked eye. The seal of the inner CV joint does not leak so clearly. Oil droplets may appear after sitting in the garage, especially in winter, when the tires become tanned. Don't be lazy to regularly look under the bottom. When the oil seal is “snotty”, there will be a dirty oil stain around the junction of the CV joint with the box.
Lubricant leaks, splashing onto the muffler, give off an unpleasant burnt smell. This is also an indirect sign of a leaky seal. In general, make it a rule to inspect all places of potential oil leakage at every maintenance or transition to the summer (winter) operating season.
Outer CV joint Renault Logan
The outer “grenade” is a body with slots; there is a thread at the end of the slots. The spline connection prevents the CV joint from turning in the wheel hub, so the hub rotates together with the hinge. A nut is screwed onto the thread, it firmly fixes the “grenade” in the hub. A cage (separator) is installed in the body of the “grenade”, in the slots of which six balls (bearings) are placed; the internal cavity of the cage is filled with grease specially designed for wheel joints.
During operation, all parts of the external “grenade” wear out, and breakdowns also occur due to impacts. Both the holder itself and the internal cavity of the housing can wear out; as a result of wear, play appears in the connection. It is easy to determine the play on the removed drive shaft - you need to grab the shaft with one hand and the outer “grenade” with the other and try to rotate one part relative to the other. If there is play, you can feel it with your hands.
The outer CV joint may also have other faults:
- the separator splits (cracks);
- Due to lack of lubrication, the balls will rust or become covered with dirt. If there is not enough lubrication, the grenade will fail and “burn out.”
The main signs of a faulty external “grenade” are the occurrence of clicks while the car is moving when turning the steering wheel; if the car is driving straight, the defect is not detected.
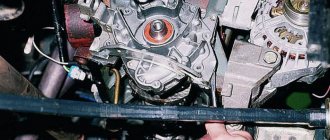
Do-it-yourself oil seal replacement
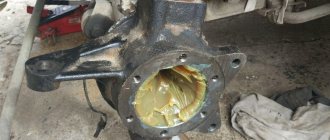
The complexity of the procedure depends on the design of the drives. If the internal CV joint grenade has a flange connection, it will be enough to just unscrew the drive and move it to the side. All work is performed on the flange. But most often on compact front-wheel drive cars, a floating spline connection is used on both sides of the drive. In this case, replacing the CV joint seals entails dismantling the wheel knuckle.
- We jack up the car body, allowing the suspension arms of the front wheel (on which the repair is being carried out) to move freely;
- After removing the wheel, unscrew the brake caliper and hang it on a wire;
- We unscrew the stabilizer links (if necessary, we change them, since we disassembled the suspension anyway);
- We release the steering knuckle from the steering rod, unscrew the CV joint hub nut;
- We remove the hub with the steering knuckle, disengaging the splined connection of the outer grenade. Check the instructions to see if the transmission oil needs to be drained. If the seal leaks, dirt and moisture can get inside. Therefore, it is advisable to replace the fluid in any case;
- We pry up the inner grenade with a puller (with a pry bar or a nail puller, if there is no puller), and with a sharp movement we pull out the splined joint, overcoming the resistance of the locking ring;
- We remove the damaged oil seal and thoroughly clean all surfaces of dirt and old oil. There are special pullers; you can use a wide flat-head screwdriver. Important! Before changing the oil seal, it is necessary to wash the adjacent surface with any means. We start work only after the unit has dried;
- Inspect the seal. If there are no signs of wear, then there is another reason for the leaks. Often the ventilation breather on the gearbox or transfer case becomes clogged. The heated air squeezes the oil through a working oil seal. Therefore, check the fitting and breather tube. If this is the reason, you will still have to replace the oil seal; it is not recommended to reinstall it;
- Install a new oil seal, first moistening the installation site with lubricant. Shrinkage is carried out using a mandrel, which you can make yourself from a pipe of a suitable diameter;
- Carefully insert the splined connection of the inner CV joint into the gearbox (transfer case);
- Check the free longitudinal movement and rotation of the shaft in the oil seal;
- Place the outer axle shaft into the hub and assemble the steering knuckle in reverse order;
- Fill the gearbox with oil and test drive;
- Check for oil seal leaks.
Design features
Ring elements used to seal rotating mechanisms in various vehicle components are classified depending on the type, design characteristics and scope of application.
View by material
Depending on the material involved in the manufacture, seals (specific buffers) for the drive can be presented:
- butadiene-nitrile cuffs – highly resistant to low temperatures and elastic elements;
- polyacrylic cuffs - heat-resistant elements with increased resistance to petroleum products and ozone;
- silicone cuffs - elements for use in a wide temperature range, but not sufficiently resistant to chemical compounds;
- fluorine-polymer cuffs - elements resistant to chemicals and high temperatures.
The type of oil seal based on the composition of the rubber mixture is selected for specific operating conditions, including aggressive external influences and the temperature range of the working environment.
Presence of edges
The standards provide for the production of different types of sealing cuffs. Today, single-lip oil seals are produced with and without anther. It is the second option with an additional protrusion that prevents dust from entering and liquid leaking out. According to the type of execution, seals can have an edge that is machined and molded.
Item type
Frameless elastic drive seals are represented by a synthetic rubber ring. The inner surface is distinguished by the presence of molded working edges. Single- and double-edge products (front and rear working parts) are considered standard, but some seals are equipped with four edges. Thanks to the coiled and twisted inner spring, a tight connection of the seal with the protected shaft is ensured.
The presence of a special reinforcing belt in the oil seal design gives the sealing collar additional advantages.
Types of reinforced seals:
- closed frame;
- partially exposed frame;
- bare frame.
The frame part can be straight (in the form of a plate rolled into a ring), or have an L-shaped or other complex (in terms of shape) profile.
Shaft rotation
Depending on the type of rotational movements of the shaft, sealing cuffs differ for constant and reverse direction of rotation, which can be determined by the type of notch or knurling applied to the working surface. The oil seals of the first type have shading, which is directed to the right or left side. Reversible cuffs are distinguished by a zigzag or other complex shaped notch.
Protection level
In addition to standard designs, cassette-type cuffs are used as seals. Such buffers are represented by a pair of rings inserted into each other. High resistance to severe mechanical loads and full protection are ensured by reliable support of the outer ring directly into the shaft. The inner ring element tightly presses the outer one and is also partially fixed on the shaft.
Additional items
Drive oil seals of the same size differ significantly not only in properties, but also in the presence of additional elements in the design:
- anther;
- corrugation;
- knurling and notches.
The anthers on the front of the ring are small protrusions responsible for protecting the oil seal from the penetration of large contaminants. The boot is connected to the shaft using a spring method or through the natural elasticity of the element.
Complex and simple corrugation of the outer part makes it easier to fit the seal and makes it more dense, which has a positive effect on protection against fluid leakage at high speeds and operation at high temperatures. The presence of hydrodynamic knurls and notches on the working part of the oil seal has similar properties.
How to change the oil seal on a VAZ 2114 gearbox
Oil seals and other sealing elements are characterized by a high degree of wear. Therefore, their service life, especially with intensive use, quickly ends. As a result, the tightness of the connections is broken, which can cause oil leakage. Therefore, such a problem must be solved as early as possible, otherwise it is fraught with negative consequences for the mechanisms. Let's look at how to change the oil seal in a VAZ-2114 gearbox. But first, let’s figure out when this needs to be done and what could be the reasons for the failure of this element.
Part selection
96273760 — catalog number of the Chevrolet Lacetti CV joint. Dimensions - 22x52x33. Produced by General Motors with an average cost of 10,000 rubles.
Analogs
In addition to original parts, you can also find analogues.
Analogues of the outer CV joint
| Manufacturer | Catalog number | Cost in rubles |
| Ruville | 79104S | 2500 |
| Febest | 1110-J200A47 | 2500 |
| Sangsin | C03007 | 5000 |
| GKN-Spidan | 24988 | 7000 |
| Loebro | 305237 | 10000 |
Extending the service life of gearboxes
You will be able to use your car for many years without going to car repair shops if you can follow basic recommendations. They will extend the service life of the gearbox, minimize possible problems, breakdowns and the need for repair work.
Transmission shaft assemblies
There are only two recommendations.
- Always try to monitor the oil level in the gearbox. If it drops, be sure to top it up immediately, do not delay the procedure until later. When the oil becomes unusable, change it completely, rather than fill in the missing amount.
- Avoid aggressive use, do not jerk the gears sharply, accelerate smoothly, and brake similarly. A simple caring attitude towards the gearbox will allow you to avoid wear and tear and numerous breakdowns.
As you can see, solving problems with checkpoints is not so easy. Therefore, the best option is to prevent their occurrence.
New or refurbished old?
If replacing the gearbox cannot be avoided, it is worth considering one very attractive option - installing a rebuilt gearbox. To do this, companies purchase old, damaged boxes, restore them to the highest possible quality and offer installation with a guarantee.
Disassembled gearbox
As practice shows, such gearboxes are approximately 30-70% cheaper than purchasing a new gearbox.
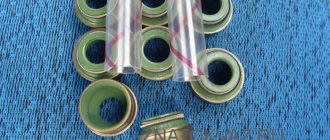
Manual transmission oil seals BRT VAZ 2108-21099, 2110-2112, 2113-2115, Kalina, Priora, Granta (4 pieces)
- We guarantee fast processing of your order during business hours (we work from 11-00 to 20-00, Saturday and Sunday are days off).
- We guarantee reliable packaging of your order (when sending it by Russian Post or transport company).
- We guarantee the fastest possible dispatch of your paid order (within 2-4 business days after receipt of payment).
- We guarantee a refund or exchange for another product (with recalculation) within 14 days from the date of receipt of the order (the product must be in good condition, without traces of installation, delivery costs are not reimbursed).
- We guarantee a free exchange of goods (transportation costs at our expense) if the purchased goods turn out to be defective.
Payment Methods
Delivery in Russia and abroad
Pickup in Moscow
- Description
- Reviews
APPLICABILITY: VAZ 2108, 2109, 21099, VAZ 2110, 2111, 2112, VAZ 2113, 2114, 2115, VAZ 1117, 1118, 1119 (Lada-Kalina), VAZ 2170, 2171, 2172 (Lada-Priora ), VAZ 2190, 2191 (Lada-Granta), VAZ 2192, 2194 (Lada-Kalina 2), DATSUN on-DO, mi-DO with manual gearbox.
Oil Seal Replacement Procedure
So, here are the instructions on how to change the oil seal in a VAZ-2114 gearbox:
- We use a pit for repairs;
- the boot is located on the gear selector rod;
- it must be bent to gain access to the cardan, which must be dismantled;
- the boot should be removed completely;
- the oil seal is located in a small recess at the exit of the rod;
- it must be removed and the seating surface must be cleaned;
- a new oil seal should be prepared and installed, which requires pressing;
- Assembly of the remaining parts is carried out in the reverse order.
Attention! Remember that the car must first be set to the parking brake, and wheel chocks must be provided. Even with a pit repair, precautions must be taken to prevent injury and financial damage.
So, if the oil seal is installed correctly, the oil leak will stop. However, be prepared that you will not succeed. This often happens due to a lack of knowledge or experience. In this case, experts recommend immediately contacting the workshop. Professionals will be able to do everything quickly and without negative consequences.
Source: www.rti-prom.ru