Half a year ago I suffered and took off the manifold for half a day and then put it on for half a day, all because there were no suitable keys, I had to go buy more. Now things have moved much faster.
I won’t tell you how to disconnect all the hoses, the generator roller, protection, pipes and the dipstick with the throttle.
Ratchet 1.4. Ratchet extension. Kardanchik. The head is 13 short. The head is 10 short.
(all this usually comes in a standard, cheap set with a ratchet)
I bought a 13 long socket for a 1.4 ratchet. The key is the “tensioner” of the generator roller. 17 key for removing the generator roller.
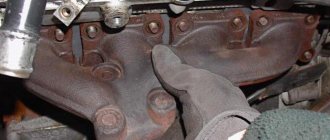
Removing the intake pipe
We remove the inlet pipeline to replace the sealing gaskets.
in connecting the pipeline and the cylinder head, for removing the fuel rail, as well as when repairing the cylinder head. Disconnect the wire terminal from the negative terminal of the battery. Remove the plastic engine cover. Use a Phillips screwdriver to loosen the clamp securing the crankcase ventilation hose... ...and remove the hose from the cylinder head cover pipe.
Using a Phillips screwdriver, unscrew the self-tapping screw securing the guide tube of the oil level indicator to the intake pipe...
...and lift up the tube with the oil level indicator.
Using pliers, loosen the tightening of the band clamp securing the vacuum brake booster hose... ...and remove the hose from the intake manifold. Disconnect the end of the throttle drive cable from the drive sector (see “Replacing the throttle drive cable”). Having unscrewed the nuts securing the throttle assembly and without disconnecting the coolant hoses from it, remove the throttle assembly from the inlet pipeline (see “Removing the throttle assembly”). We disconnect the wire blocks from the ignition coils of the 1st, 2nd and 3rd cylinders (see “Checking the condition and replacing the spark plugs”)...
...and move the wiring harness to the side.
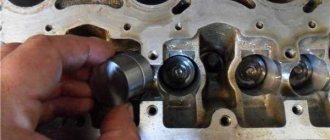
Using a 10mm socket, unscrew the two nuts of the upper fastening of the intake manifold to the cylinder head cover. Using a 13mm socket, unscrew the two bolts and three nuts of the lower fastening of the intake manifold.
Places for attaching the intake manifold to the cylinder head
(for clarity, the intake pipeline and the fuel rail with injectors have been removed): 1 - studs; 2 - holes for bolts
Unfasten or cut the two clamps securing the engine management system wiring harness to the upper timing belt cover. Disconnect the engine control system wiring harness block from the phase sensor (see “Removing the phase sensor”). We remove the ignition coils of the first, second and third cylinders (see “Checking the condition and replacing spark plugs”). We close the holes for the ignition coils in the cylinder head cover with a rag.
Determining whether the engine is sucking in air
Before you start removing more than half the engine parts to get to the manifold, you should check other parts of the air system.
And after that, carry out a complete tuning of the car. First of all, you need to inspect all the hoses and gaskets located on the cylinder block. The most common method of finding air leaks is to spray the hoses with plain water; if there is a hole in one of them, the engine speed will decrease when water enters.
Detailed instructions for removing the intake manifold on a new Priora
It is necessary to remove parts from a cooled engine. It will take about an hour, provided that you have at least a little understanding of the injection system. The following sequence of actions must be followed:
- First of all, you need to remove the throttle. There is no need to completely remove it, just move the assembly connecting it to the manifold to the side. You also need to remove the throttle valve to thoroughly clean everything;
- disconnect the drive throttle cable from the manifold;
- disconnect the connectors from each other to remove the wires from the ignition coils;
- on the camshaft, disconnect the sensor wires;
- disconnect all canister wires;
- disconnect the brake booster vacuum hose going to the manifold;
- then unscrew the clamp and remove the ventilation pipe;
- Unscrew the self-tapping screw of the oil level indicator guide tube;
- remove the dipstick with the guide tube;
- using sockets and a ten-size wrench, unscrew the nuts and bolts securing the exhaust module and coils from cylinders 1-2-3;
- remove the coils;
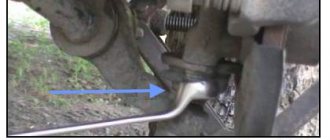
- then you need to unscrew the collector fasteners;
- slide it forward and remove the manifold.
Replacement and installation of the intake manifold Lada Priora 8 and 16 valves
Sooner or later, the car needs to be repaired.
In some places the replacement must be carried out as planned, in others it is not. But every car owner faces a similar problem. The question immediately arises: what repairs can you realistically carry out on your own, and where do you need to go to a car service center? Thanks to the Internet, all the necessary information, even with video instructions, can be found quickly.
The main function of the manifold is to distribute air among the engine cylinders, and also mix the fuel-air mixture there. And if you do not diagnose the operation of the air system in a timely manner and do not pay attention to the symptoms, this can lead to more serious engine damage.
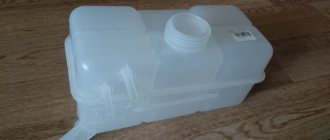
Reasons for replacing the Lada Priora receiver
There are a considerable number of varieties of intake manifolds, for example, made from various types of metals or composite materials. However, the Priora receiver is made entirely of plastic. This material prevents excessive heating of the manifold due to a hot car engine.
Thus, the air flow characteristics are improved, which has a positive effect on the proportions and quality of the air-fuel mixture. However, plastic also has a main, negative side - fragility. As a result, numerous breakdowns occur both due to the fault of the car owner and due to low temperatures at which the plastic loses its strength coefficient.
The most common damage can be caused by: - road traffic accidents (even minor ones); — accidental impacts during any repair work in the engine compartment; — other reasons;
If the receiver on your car has through holes or any other leaks, then it must be repaired (if possible) or replaced. If a part is faulty, air loss will occur, resulting in improper engine operation.
Other work on replacing parts on Priora
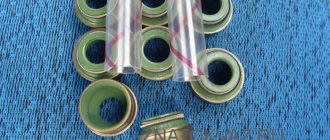
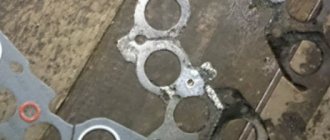
To ensure a good seal between the flanges of the cylinder head and the throttle assembly at the manifold, sealing rings are installed there.
But before you put the manifold in place, you should plug the holes in the intake channels with a plug. To avoid excess debris when cleaning out the seats of the new rings, you must carefully align the O-rings so that they fit snugly into place.
You can replace the rings yourself, the main thing is to do everything according to the instructions and put the parts back in the reverse order of removal.
Which receiver is better for Priora?
There is no clear answer to this question. Each situation is individual. However, some comparisons can be made between receivers made of plastic and aluminum.
Advantages of aluminum products:
- higher strength and wear resistance;
- increased engine power due to design features and a larger volume of supplied air;
- Some models are easier to install and therefore easier to remove.
In addition, the shape of the collector itself plays an important role in ensuring increased power, which should not contain sharp corners and transitions. The most important difference between plastic and metal is the strength and durability of the latter. Therefore, we can recommend installing metal types of intake manifolds for Lada Priora cars.
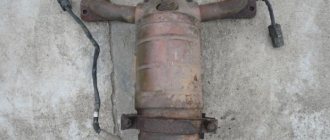
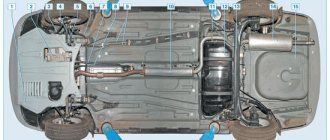
How is the catalyst on a Priora replaced with a flame arrester?
The procedure should be carried out carefully so as not to damage the exhaust system elements adjacent to the catalyst. The work must be done in a well-equipped garage pit or using a lift.
Many motorists are interested in how to remove the catalyst on a Priora and replace it. The process involves cutting out the element or carefully knocking it out.
The correct insertion of a flame arrester instead of a Priora catalyst is also quite simple. It is necessary to weld a new one in place of the removed element. The lack of high-quality welding leads to the need to contact a specialized workshop.
Typically, replacement work takes a minimum of time and requires minor investments. But the owner will be confident in the quality of professional work.
Installing a flame arrester is the best option for saving money. It is not recommended to weld a simple piece of pipe, which many craftsmen offer. Such a solution can lead to serious overheating of the remaining elements of the exhaust system and subsequent damage to their condition. As a result, expensive repairs of many parts will be required.
We remove the intake manifold on a 16-valve VAZ-2112 with our own hands
Sooner or later, any car enthusiast may be faced with the need to remove the intake manifold on a 16-valve VAZ-2112 engine. This may be needed to carry out incidental repair operations or other work.
The video will tell you how to remove the intake manifold, and also tell you about all the subtleties and nuances
We change the cylinder head gasket on the Lada Priora ourselves
The cylinder head gasket must be replaced as soon as signs of its burnout are detected. Otherwise, it will negatively affect the operation of the engine. Changing the cylinder head gasket on a Lada Priora is not difficult. To do this, it is enough to have the necessary tools and follow the instructions for performing the replacement.
Why and when is the seal replaced?
The gasket acts as a seal, sealing the connection between the cylinder head and the cylinder block. It prevents mixing of working fluids. Therefore, high demands are placed on it. This is a disposable part that must be replaced in two cases:
- during any repair work accompanied by dismantling the cylinder head;
if signs of burning or deformation are detected.
The need for replacement can be determined by the following characteristic signs:
- At the junction, smudges from antifreeze or motor lubricant are visible. The reason is often engine overheating, which leads to gasket deformation and burnout.
- When coolant gets into the oil, traces of whitish liquid remain on the dipstick.
- White smoke comes out of the muffler, caused by antifreeze getting into the cylinders.
- When exhaust gases enter the cooling system, bubbles are visible in the conservator or radiator.
- Oil stains have appeared on the surface of the condenser or radiator. They indicate that lubricating fluid has entered the cooling system.
Preparing tools and consumables for replacement
Tools you will need:
- set of heads;
- flat blade screwdriver;
- a set of keys;
- torque wrench;
- hex wrench;
- pliers.
When purchasing a cylinder head gasket, you should pay attention that it is designed for the tightening torque of the head mounting bolts, which is specified in the Lada Priora manual. There are several types of gaskets, differing in the material used:
- Using asbestos.
- Non-asbestos.
- Using metal components.
Help. Priora engine (16 valves) stalls after installing plugs on the intake manifold
Greetings to all.
This is the situation. Purchased a Priora hatchback secondhand. I got there at the end of March - the ice was like in Antarctica - it started to melt, water was everywhere, ice and so on. I didn’t really get to ride it before purchasing it, but I liked it and had no questions. Only while we were driving around with the seller and registering it, the check came on. Dkmaldi water got somewhere.
Let's go to the diagnostician. He connected and looked.
He asks, haven’t you changed the battery?
The seller says no.
The diagnostician opens the hood and says - your plug has fallen off the intake manifold, can you hear the engine shaking? Buy a rubber hose 10-12 centimeters long, put both ends on the pipes, and you will be happy.
In general, we went, bought it, installed it, and went on to complete the formalities.
Everything has been formalized, I get behind the wheel, try to start it, the starter sticks a little and the engine immediately stalls.
We removed this hose from the manifold holes - everything was fine - it started.
Well, I think the hose is not the issue; you need to install separate plugs.
I shook hands with the seller, and will put the plugs in later.
In general, I drove like this for three days, then I found the plugs, I come to the parking lot in the morning, put them in, try to start - zero, the starter makes a little noise and the engine stalls.
In general, I took it off again. Now, when you first start it at idle, the engine “floats”, while running the water would be fine, but yesterday I tried to overtake on the highway, I felt like the car was reluctantly doing it.
I think it's these plugs.
Help with advice on what to do.
The check is either on or off.
The check light comes on when the electronics are faulty - some kind of sensor! Look at the antifreeze temperature sensor!
I wrote in a message that we were at the diagnostics, a specialist checked all the electronics - found nothing
He said exactly about these plugs
It turns out that he “dumped us”?
It’s somehow confusing and incomprehensible, like from this crap into this mess, this kind of crap should, in theory, fit. more specifically, which plug and what hose it connects to. buy a primer, explain it in terms that are more understandable. and the check light is on, as has already been said
aveiro today at 23:27 # 0 / 0
The check light comes on when the electronics are faulty - some kind of sensor! Look at the antifreeze temperature sensor!
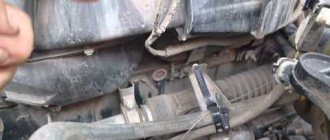
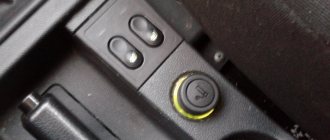
Well, why immediately talk about the primer? I can buy it for you myself if it’s not clear what an intake manifold is, especially since the photo shows in red the installation location of that same plug.
At the rear of the engine, closer to the passenger side, there are two pipes - air is sucked into them. They are fitted with a plug from the factory, but it is so flimsy that it cracks and falls off in the first year of the car’s life.
The check is on. I repeat, I visited the diagnostician, he indicated that these pipes should be “plugged” again.
It’s worth mentioning here that these very original rubber bands plug holes for additional equipment in the receiver and they are made of such blatantly shitty rubber that they easily fail after a year or 15 thousand kilometers of operation - they crack lengthwise and the receiver begins to suck outside air bypassing air filter and sensors; The mixture therefore becomes leaner, and the engine is also choked with dust. Tough, in short.
But after installing the new ones, the engine will not start.
Maybe the electronics found a workaround and now need to reset the firmware?
Maybe remove the battery negative terminal for about three minutes. Help with advice from someone who really understands this.
You're not rude, take criticism normally. A primer is a clear instruction manual for the operation and repair of a car. the photo is so small that nothing is clear at all, and what’s marked in red))))) and find a normal diagnostician, in the end. The computer gives a clear error, and it’s not possible that there’s something there.
What criticism? In your opinion, I should know what is called an “primer” in your professional community? If I were a pro, I wouldn’t bother asking you questions, and if I’m not much and say that I’m incompetent, then you also need to choose terms in order to understand each other normally.
I’ll follow your advice and go to another diagnostician - that’s a fact.
But the question still remains regarding these damn plugs. If I install them, then why won't the engine start? That is the question. And driving without them - I've read all sorts of things, I'm afraid I'll damage the engine.
How to be. We're not talking about a check, but about this rubbish - plugs.
Tomorrow I’ll take a clearer photo, it’s not mine, but taken from another forum.
It is possible that you were simply deceived. Maybe there weren’t plugs there at all, but there were actually some hoses that went to some sensors. In general, you are causing air leaks into the manifold, which may indicate a malfunction of the air flow sensor, or a problem in the throttle assembly. Go to a competent diagnostician, otherwise we’ll be guessing on the coffee grounds.
Do-it-yourself throttle cleaning on Priora
Of course, no special skills are required to perform this repair. The only thing you need to have on hand is a high-quality carburetor cleaner, which can be found in almost any auto store.
In order to most effectively carry out this work, we first dismantle the TPS and IAC. Thoroughly rinses the installation sites of these sensors, as well as the needle of the idle speed control (do not generously apply cleaner to the regulator - just clean the needle). Also, the entire inside of the throttle assembly must be very well cleaned with a product.
Once this has been dealt with, you can install all the sensors in their places and install the throttle on the car.