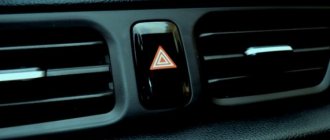
What is a cigarette lighter for?
A cigarette lighter can be used not only for lighting cigarettes, but also for more useful actions. You can connect a lot of different equipment to the cigarette lighter socket, which, of course, has a voltage of no higher than 12V.
What can be connected to the cigarette lighter:
- Charger for phone, laptop or tablet;
- Automobile compressor;
- DVR, radar detector;
- Car refrigerator;
- Car vacuum cleaner, etc.;
Currently, there are a huge number of car accessories powered by a cigarette lighter; such a connection has made it possible to use these devices with ease.
Additional block
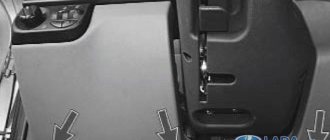
Additional relays are mounted on a bar and located under the dashboard, near the front passenger's feet. To get to them, you need to remove the right tunnel lining. Next to the additional relays is the electronic engine control unit (ECU).
If its connector interferes with access to the relay, disconnect it by first removing the negative terminal from the battery.
Circuit breakers
F1 (15 A) – main relay circuit, starter interlock.
F2 (7.5 A) – power circuit of the electronic control unit (ECU).
F3 (15 A) – electric fuel pump . If the fuel pump has stopped pumping (this can be determined by the absence of a sound when the ignition is turned on), check together with relay K2. There may also be problems with the immobilizer, it blocks the pump, see information about F20. If the wiring, this fuse and the relay are good, most likely the fuel pump itself has failed. To remove it, you need to disconnect the battery, remove the rear seat cushion, unscrew the cover, ring and fuel hoses, then carefully remove the entire fuel pump.
K1 – main relay.
K2 – electric fuel pump relay . See above about F3.
How does a cigarette lighter work?
The cigarette lighter is made in the form of a cylinder into which the heating element or plug of a car accessory is placed. The power supply in it has a constant voltage of 12V, which is protected by a fuse. The cigarette lighter has “+” and “-” through which current flows when a load is connected. The backlight is also powered from the cigarette lighter, which also operates at 12V.
The standard cigarette lighter socket has the form of a cylinder, inside of which there is a nichrome filament, which subsequently heats up to a high temperature.
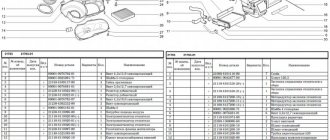
Fuse box in the passenger compartment of VAZ-2170, -2171, -2172
The fuse box in Priora is located at the bottom of the dashboard, on the left side of the steering wheel. To get to it, you need to open the cover, which is held on by three latches. Rotate each locking knob 90 degrees and pull the lid down and it will snap open.
Fuses in the interior mounting block
F1 (25 A) - radiator cooling fan . If your fan does not work, check its motor by applying 12 V directly to it from the battery. If the engine is working properly, then most likely the problem is in the wiring or connectors. Check the serviceability of relay K1.
The fan in the Priora usually turns on at a temperature of 105-110 degrees. Do not allow the engine to overheat, watch the arrow of the temperature sensor.
If the fan runs constantly and does not turn off, check the coolant temperature sensor located on the thermostat. If you remove the connector from the working sensor, the fan should turn on. Check the wiring to this temperature sensor, as well as the contacts of relay K1, move this relay, clean the contacts. If this is the case, replace it with a new relay.
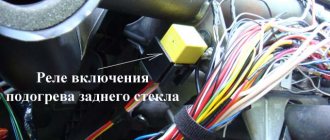
F2 (25 A) - heated rear window . Check together with fuse F11 and relay K2. If the rear window does not fog up, the heating element threads may have broken. Inspect all the threads and if you find a break, seal it with special glue or varnish, which can be bought at car dealerships for 200-300 rubles. Check the connection contacts at the terminals to the heating elements at the edges of the glass, as well as the switch on the dashboard and the wiring from it to the rear window.
F3 (10 A) - high beam, right headlight . F4 (10 A) - high beam, left headlight . If the headlights do not shine on high beam, check the K7 relay and the headlight bulbs. The steering column switch, wiring or connectors may also be faulty.
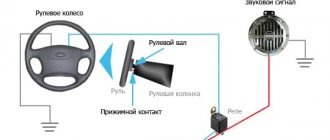
F5 (10 A) - sound signal.
If the signal does not work when you press the steering wheel button, check relay K8. The signal itself is located under the radiator grille; you can get to it by removing the plastic casing from above. Check it by connecting the voltage to 12 V. If it doesn’t work, try turning the adjusting screw, or replace it with a new one.
F6 (7.5 A) - low beam, left headlight . F7 (7.5 A) - low beam, right headlight . When replacing lamps, be careful; there are separate lamps for the low and high beams, so they can be easily confused. It is better not to install lamps in high-power headlights; the reflectors may melt and the desired effect will not be achieved. Most low beam headlight problems that cannot be corrected by conventional means can be related to the light control module (LCM). The low beam relay is only available in cars equipped with a light sensor, it is located in the place of relay K1; on most cars this relay is not in the mounting block; the low beam circuit goes through the MUS block. It happens that the tracks in the block burn out; if there are problems, it is better to replace it with a new one. If the windshield wipers turn on spontaneously when the low beam is not working correctly, the problem is most likely in the windshield wiper control unit, located in the center of the dashboard, the topmost block, next to the radio, is best reached from the glove compartment, or by hand through the removed console covers at the feet.
F8 (10 A) - alarm signal . If the alarm does not work, also check relay K9.
F9 (25 A) - stove fan.
If your stove does not work in any mode, the problem may be with the stove speed controller or with the engine. Check the stove motor by applying 12 V voltage directly to it. If it does not work, remove it, open the cover and check the condition of the brushes. If the stove does not work only in the first modes, but works in the last mode, most likely you need to replace the heater resistance, located under the hood on the fan scroll.
The price of these resistors is about 200 rubles. Also check that the filter and all pipes are clean and that air flows normally into the stove. If the stove fan squeaks or turns with difficulty, try lubricating it. If the stove turns on and off, check the connectors and contacts in them, they could have melted or oxidized, in this case, replace the connector.
Possible causes of failure
There are quite a few reasons why the cigarette lighter on a Priora may not work, but most often they are of the same type and are associated with improper use of this part or due to its aging.
- Contamination of the contacts inside the cigarette lighter, which makes it impossible to conduct current through them. This problem occurs quite often if the cigarette lighter is used as intended. Remaining ash gets inside the cigarette lighter and contaminates it.
- The cigarette lighter connector, which is connected to it from below, is also susceptible to damage. When using powerful accessories, the contacts may burn.
- The cigarette lighter fuse is one of the most common problems with a non-working cigarette lighter. Fuse blowing occurs due to a possible short circuit or the use of powerful car accessories.
- A malfunction of the cigarette lighter illumination does not lead to its failure, but still, when something in the car does not work, it is not good and requires repair.
The problems that happen with the cigarette lighter are clear, now you need to figure out how to solve them and fix the cigarette lighter.
Video on replacing the cigarette lighter and its backlight lamp on a Priora
This review was specially prepared for the site https://priora-remont.ru and embedded from my YouTube channel.
You can buy a new cigarette lighter assembly for a Priora at a price of 400 rubles. Of course, the new model part is more expensive than the old ones, but there is no escape from this. If you have any questions after reading this article or video, you can write your questions and suggestions in the comments below.
Sources used:
- https://enginehack.ru/prikurivatel-priora/
- https://umelyeruki.info/avto/zamena-prikurivatelya-lada-priora/
- https://xn—-8sbabr6ahc3e.xn--p1ai/priora-remont/589-kak-snyat-prikurivatel-na-priora.html
- https://mylada.net/remont/predoxranitel-prikurivatelya-na-priore.html
- https://priora-remont.ru/zamena-prikurivatelya-i-lampy-podsvetki/
Cigarette lighter fuse. Where is?
The fuse is responsible for protecting the circuit from short circuit or overload, therefore, if a problem occurs in the cigarette lighter, its fuse blows first. The Priora cigarette lighter fuse is located in the mounting block and is numbered F13 and has a rated current of 15A. If the cigarette lighter breaks, you first need to check its integrity.
If the fuse is intact, proceed to further actions.
How to replace the cigarette lighter fuse in the engine compartment - step-by-step instructions
To replace the cigarette lighter fuse in the engine compartment, follow these instructions:
- Turn off the ignition and disconnect the battery.
- The main fuse box is located next to the battery. Find, checking the diagram, the element marked F3.
- Remove the faulty fuse in the same way as the previous algorithm. Install a new element with a current rating of 60 A.
- Connect the battery.
Enjoy life and take advantage of new technological advances. But do it wisely by choosing the right devices that suit your Lada Priora car.
Removing the cigarette lighter
To diagnose the Priora cigarette lighter, it must be dismantled. Removal must be done with the fuse removed, so as not to cause an accidental short circuit during operation. We remove fuse F13 from the mounting block and get to work.
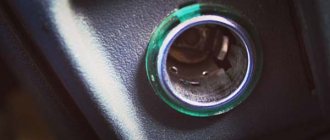
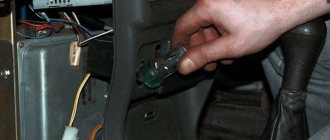
- Insert a small flat-head screwdriver into the hole on the cigarette lighter and lightly press on the plastic retainer, as shown in the picture. Then turn the metal part of the cigarette lighter counterclockwise.
- We take out the metal part up and disconnect the connector.
- Use your finger to pry up the green outline of the cigarette lighter illumination and remove it as shown in the picture.
- We perform assembly in reverse order.
Replacing the cigarette lighter lamp on a Priora
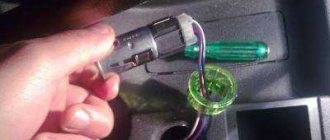
Also, using a thin screwdriver, pry up the green plastic insert and carefully remove it from the hole in the floor tunnel.
As a result, we get the following picture.
To remove and change the backlight bulb, you just need to remove the black cover, and under it there is already the lamp itself, inserted together with the “socket” into the cigarette lighter housing. And to get it out of there, just pry it slightly with a screwdriver so that the latch does not interfere with removal.
The light bulb itself is also easy to change - just slightly pull it to the side, removing it from the “socket”.
Installation occurs in the reverse order of removal and no difficulties should arise as a result of this repair. If someone found the photo report not entirely clear and legible, then everything will be presented below in a more convenient form.
The cigarette lighter light does not light up
This reason occurs due to the burnout of the backlight lamp or its poor contact with the cigarette lighter body. To check, you need to remove the cigarette lighter and inspect the lamp. If the lamp is intact and has no signs of damage, most likely it does not work due to poor contact.
To ensure reliable contact, it is necessary to bend two contacts on the lamp socket and clean them with sandpaper. It is also a good idea to clean off carbon deposits, if there is any, on the outside of the cigarette lighter, where the lamp contacts come into contact with the cigarette lighter body.
Serial number and part numbers
Before you begin repairing the cigarette lighter and disassembling the central tunnel, you need to buy a suitable spare part. There are different device options for the Lada Priora on sale, both original and not. Cigarette lighters from the AvtoVAZ factory have article number 21230-3725010-00.
When purchasing, you need to pay attention to the cost of the spare part. A cigarette lighter price that is too low indicates the use of low-quality materials. Such a part may burn out within several weeks after replacement. In addition, the item must be well packaged and have a certificate of conformity.
Common faults
Like any other electromechanical device, the Priora cigarette lighter tends to break. Sometimes this can be caused by design defects, sometimes by malfunctions in the machine's on-board circuit, and sometimes by the fault of the user himself. Common cigarette lighter malfunctions include:
- sinking of those same bimetallic “ears”;
- burnout of the spiral;
- broken contact in the connector;
- fuse blown.
Malfunctions can also include the burnout of a backlight lamp, however, this is more related to a decrease in the level of comfort than to serious breakdowns. In addition, it does not in any way affect the operation of the device itself and can be easily eliminated by replacing the lamp.
The sinking of the lugs is characterized by the lack of fixation of the cartridge in the pressed position. It can be caused either by the low quality of the metal from which they are made, i.e. defect, or high intensity or long period of use of the cigarette lighter.
The problem is solved by bending the “ears” inward using a thin screwdriver, naturally after de-energizing the on-board circuit. If after a short period of use the problem occurs again, it is better to replace the cigarette lighter.
When the spiral burns out, the cartridge is fixed when pressed, but does not heat up. The fault is diagnosed by ringing it using a car tester. It is not recommended to restore the spiral, as this may lead to a decrease in its resistance, which will make unwanted adjustments to the operation of the on-board circuit. In this case, the cigarette lighter also needs to be replaced.
Contact failure can be easily determined by removing the tunnel lining and checking the condition of the connector. This malfunction is not critical and can be fixed independently in a few minutes.
But as for the fuse, it makes sense to consider this malfunction separately, since its malfunction is most often caused by the human factor.