Replacing the Mazda 3 cabin filter is demonstrated in detail in this photo report. In many cars, replacing the cabin filter is not a difficult task, a 5-10 minute procedure, where the most difficult thing is just removing the glove compartment. However, the design of the Mazda 3 BL does not provide easy ways for those who want to change the cabin filter with their own hands.
In addition to the usual removal of the glove compartment, the car owner will have to tinker with the battery, remove decorative panels, and also disconnect fuses. However, any car enthusiast can handle replacing the wave filter.
Parts and consumables:
- Rags
- Container with clean water
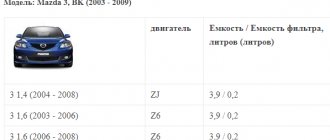
- Original Mazda cabin filter BP4K-61-J6X or Mazda BP4K-61-J6X9A
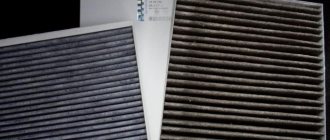
According to routine maintenance, the Mazda 3 BK cabin filter is replaced every 15 thousand km. mileage Even if the quality of the filter element itself is quite high, particles of debris and dust will inevitably penetrate into the combustion chamber and reduce ignition efficiency.
If you notice an unpleasant odor in the cabin while the air conditioner is operating, replace the filter and do not wait until the above threshold is reached.
When to change the Mazda 3 BL cabin filter
The maintenance schedule for the Mazda 3 BL requires replacing the cabin filter every 15,000 km, i.e. every oil change. It is better to reduce the lubricant change interval to 10 thousand, but the filter can be changed every fifteen thousand.
Signs of a clogged filter element
A sign of a worn cabin filter is a characteristic odor penetrating the Mazda 3 BL. If you do not change the filter element in time, it itself will become a source of stench. All because of the toxins that constantly accumulate in it.
The average lifespan of the cabin filter is stated in the manual. For example, the filter element of a Mazda 3 BL 2011 is changed after 10-30 thousand kilometers .
(Link to photo source)
But if the Mazda 3 mainly drives in a huge city and you constantly sit idle in traffic jams, then the effective operation of the filter element may expire earlier. Since the terms are calculated based on the average performance indicators of Mazda under normal conditions. Therefore, to accurately determine when to replace the cabin filter, remember the signs of its contamination:
- dust from air ducts;
- ventilation malfunctions;
- foggy windows.
The sign is a situation where, when you turn on the ventilation system, you can see more and more dust appearing in the Mazda 3’s interior, although there is nowhere for such an amount to come from in a closed car. Along with dust, an expired filter allows sand and dirt particles to pass through. At the same time, being a guardian of air purity, the unit itself is already very clogged and has turned into a source of bad odor and a breeding ground for bacteria.
(Link to photo source)
Another sign is a tightly clogged cabin filter, which impairs the performance of the Mazda 3 ventilation system, which leads to a reduction in the incoming air flow. This may cause the driver and passengers to have a headache and become drowsy. The filter insert should not be washed, cleaned or vacuumed. It won't help. You can only replace it, especially since comfort and health will not cost too much.
Another sign of poor performance of the ventilation system is constantly fogged up Mazda 3 windows. Dirt and slag do not let air flow through, less of it penetrates into the cabin, the air mass inside the Mazda 3 BL stagnates and becomes saturated with moisture. Which means it's time to change the cabin filter.
(Link to photo source)
When to change more often
If you constantly use Mazda in conditions with dirty (dusty) roads, near coal-fired power plants, the filter will require replacement sooner.
The same thing happens with the 2013 Mazda 3, which is constantly used in a big city among dense traffic. The presence of pollen, fluff and insects in the atmosphere also affects the reduction in service life, since they also clog the filter in the cabin.
To replace the Mazda 3 BK cabin filter, do the following:
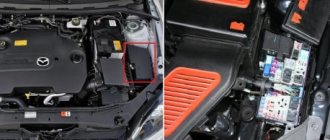
1. Place the vehicle on a level surface and open the hood.
2. Disconnect the wire from the negative terminal of the Mazda 3 battery.
3. To access the filter, you need to remove the glove box. Open the glove compartment and remove all contents.
4. Pull it towards you and remove the central decorative trim of the instrument panel (held on by 4 clips).
5. Using a Phillips screwdriver, remove the 2 screws securing the glove box.
6. Move the entire structure of the box towards you and down (the car door should be open).
7. Unscrew the screw securing the glove box light.
8. Using a thin slotted screwdriver, remove the clip of the plastic shield on the side panel under the glove box.
9. Remove the plastic panel by moving it out of the grooves.
10. Remove the decorative panel under the glove compartment. It is held on by 2 latches.
This will give you access to the fuse box.
11. Unscrew the 2 fasteners securing the fuse box.
12. Lower the fuse box down.
13. Disconnect all plugs from the unit (3 large and 3 small). Place the fuse and relay box aside.
14. The fuse box mounting bracket limits access to the hole where the Mazda 3 cabin filter is located. Therefore, using a 12-socket wrench, unscrew the 2 nuts securing the metal bracket. Put it aside.
15. Using a flathead screwdriver, disconnect the 2 chips from the resistor.
16. Use a Phillips screwdriver to unscrew the bolts and remove the heater resistor.
17. Using a Phillips screwdriver, remove the screws securing the air conditioner filter cover.
18. Move the cover aside.
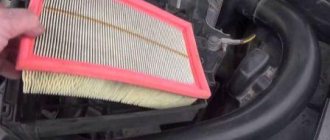
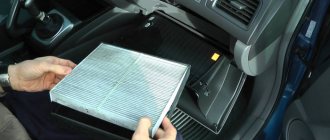
19. Remove first the lower and then the upper parts of the filter element.
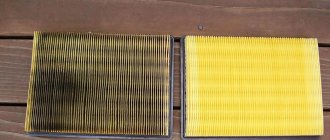
Removed old filter
20. Use a brush to remove all debris from the housing and, if possible, wipe the inside.
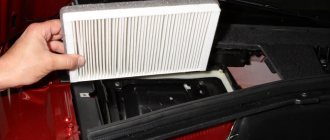
21. Replace the Mazda 3 cabin filter with a new one.
22. Insert the new filter into the housing along the existing grooves.
Step-by-step replacement instructions
Over time, any filter element becomes dirty and requires replacement. Reasons for replacing the filter:
- the throughput of the filter element decreases;
- air circulation in the cabin deteriorates;
- high humidity;
- accumulation of foreign odors and harmful chemicals;
- fogging of windows.
We recommend: MAZ spare parts
According to the regulations in the Mazda 3, it is recommended to change the cabin filter after 10 thousand kilometers or after six months. But the frequency of replacement depends on the conditions in which the car is used. If the car most of the time drives off-road in rural areas or in city conditions with a lot of gas pollution, then the filter should be changed more often.
Dirty filter elements
Sometimes you can judge the need to replace the filter by the musty smell entering the cabin. These odors come from a dirty filter element and evaporator. The evaporator in the air conditioner serves to dry the air, so it is in a humid state. This is the reason for the development of pathogenic microflora in it. To avoid negative effects on the human body, the evaporator must be regularly treated with antibacterial agents.
What will you need?
To replace the cabin filter in Mazda 3 2008, 2011, 2012, as well as other years of production, you need to purchase new consumables. The best option is the original Mazda (BP4K-61-J6X-9A). But it can be replaced with any recommended filter element. You should not save on this consumable, since the health of passengers and the driver of the car depends on the cleanliness of the air in the cabin.
Original consumables
The cabin filter not only cleans the incoming air flow of contaminants, but also of foreign odors and harmful chemicals. Therefore, when choosing consumables, you need to pay attention to both the quality and the material of manufacture. When choosing a filter element, you need to consider what degree of air purification you would like.
Coal products are well cleaned from foreign odors. There are filter elements with antibacterial coating that prevent the development of bacteria that enter the filter along with the air. It is better to buy products from well-known brands in high-quality packaging to eliminate the risk of buying a counterfeit.
Although replacing the cabin filter in a Mazda 3 is somewhat more difficult than in other cars, any car enthusiast can perform this procedure with his own hands without the help of specialists. This way you can save on car service costs.
To replace, you need to prepare some tools and materials:
- two filters, preferably originals - Mazda (BP4K-61-J6X-9A);
- spanners or sockets with extensions;
- thin screwdriver;
- knife or flat screwdriver;
- clean rag.
You can also supply non-branded consumables.
Stages
The process of replacing the cabin filter in a Mazda 3 contains the following steps:
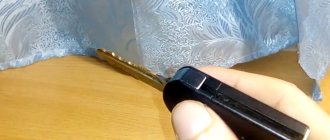
- First of all, to replace the cabin filter, you should disconnect the battery. To do this, you need to lift the hood and disconnect the negative terminal of the battery.
Remove the terminal from the battery
- The Mazda 3's cabin filter is located behind the glove compartment. Therefore, it is necessary to remove it to get to the fuse box and filter element.
- The screws that hold the glove box in place are located under the decorative plate. Use a thin screwdriver to carefully remove it. Before removing the panel, you need to slide it to the left, then it can be easily removed.
Removing the decorative panel
- Next, you need to unscrew the screws holding the glove compartment. Rocking from side to side, the glove box is removed.
- Under the glove compartment there is a screw that holds the plug; it needs to be unscrewed.
- Next you need to remove the decorative panels.
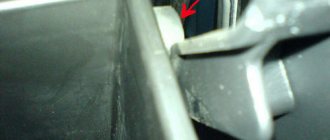
- Using a knife or flat-head screwdriver, you need to pry the cap of the plug holding the panel, which is located to the left of the passenger, and remove it from the panel. Then the panel itself is removed.
Remove the clip on the panel
- Under the glove compartment there is another panel, which is held in place by two clips located on the right and left of the front. The panel folds down easily after pressing these clips.
- The second step is to free yourself from the fuse box. To do this, unscrew two screws. In this case, the screws do not need to be removed; they remain in the block.
- Then the plugs are disconnected and the unit is removed to the side. To remove the box you need to unscrew the two fastening nuts.
Removing the fuse box
- The next step is to find the two screws securing the cabin filter housing and unscrew them.
- Next, carefully disconnect the electrical control plug located in the housing.
- Then remove the cover from the compartment in which the filter elements are located.
Removing the compartment cover
- Now you should take out two old filters.
- Before installing new consumables, you should thoroughly clean the inside of the case by wiping it with a clean cloth.
- If you are replacing it yourself, you can slightly modernize the consumable by covering it with a foam rubber seal. This will make it possible to better strengthen it in the housing and eliminate gaps between the housing and the filter element.
We cover the new filter elements with foam rubber
- Now you need to replace the old filters with new ones and tighten the housing cover.
- Next, all steps are performed in reverse order.
- At the last stage, do not forget to connect the negative terminal to the battery.
Thus, any car enthusiast without special skills can change the cabin filter in a Mazda 3 2008, 2011, 2012 on their own. Timely implementation of this procedure will create comfortable conditions inside the car.
Note:
When installing, make sure that the filters are positioned correctly among each other: the arrows on the element bodies should be opposite each other and directed backwards. The protrusion of the lower part of the filter should fit into the groove of the upper part.
It is very important to insert new elements into the housing correctly and evenly. There are guides on the far wall of the filter housing. When inserting the first element, you need to get into the guides on the far wall and into the guides on the near wall. Then lift the filter up. After this, install the lower element.
Location of grooves in the filter box
23. Reassemble the structure in reverse order.
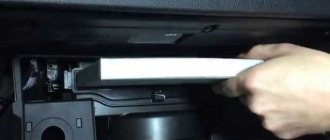
How to change the cabin filter on later models
In later versions of the car (2011 - 2012 model years), the manufacturer simplified the change procedure. The filter is located in the same place, but it’s easier to get to.
- Move the passenger seat back.
- Remove the glove compartment cover.
- Remove the trim on the right side of the center console.
- Unscrew the three screws securing the cover.
- Take out the elements and, after removing all accumulated debris, install new ones.
- After checking the operation of the stove, reassemble everything in the reverse order.
A replaced filter will improve the performance of your heater or air conditioner. And it will make staying in the car more comfortable due to the absence of a large amount of dust and foreign odors in the air.
How to replace
The replacement process can be roughly divided into five stages. You must first disconnect the battery terminals. Then remove the decorative panels and glove compartment of the Mazda 3. Next, dismantle the fuse box, open the compartment with the filter elements, remove them and install new ones.
More details about how to change the cabin filter are described in the section of the article with a detailed manual.