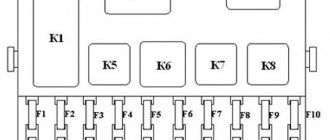
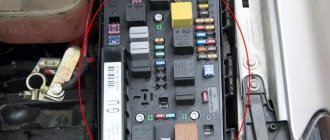
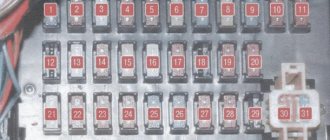
Fuse and relay box in the interior of Mitsubishi Lancer 10
The mounting block is located at the bottom of the instrument panel, on the driver's side. The fuse and relay box in the passenger compartment is covered with a protective cover, on the reverse side of which there is a diagram and designation of the fuses.
Mitsubishi Lancer 10 fuse and relay block diagram
Description
| 1 | 30A Heater / heater |
| 2 | 15A Brake lights |
| 3 | 10A Rear fog lamp |
| 4 | 30A Glass wind window cleaner |
| 5 | Reserve |
| 6 | 10A Accessory circuit |
| 7 | 20A Door locks |
| 8 | 15A Audio system |
| 9 | 7.5A Accessory circuit |
| 10 | 15A Interior lamps |
| 11 | 15A Hazard warning lights |
| 12 | 15A Glass tailgate window cleaner |
| 13 | 7.5A Instrumentation |
| 14 | Reserve |
| 15 | 15A Cigarette lighter (front power outlet) |
| 16 | 10A Ignition switch |
| 17 | 20A Electric sunroof |
| 18 | Reserve |
| 19 | 10A External rear view mirrors |
| 20 | 10A All-wheel drive system |
| 21 | 7.5A Reversing lights |
| 22 | Reserve |
| 23 | 15A Additional power outlet |
| 24 | 30A Electric windows |
| 25 | 30A Heated tailgate glass |
| 26 | 7.5A Heaters for exterior rear view mirrors |
| 27 | 15A Power supply |
| 28 | 20/25A Electric seats |
| 29 | 30A Heated seats |
Wiring and terminals
If the fuse is intact, then the cause of the malfunction is elsewhere. To repair the Lancer 9 cigarette lighter, you will need to test the integrity of the wiring. To do this, you need to get a multitester and remember the pinout of the device. In total, three wires come to the device - two positive and one negative.
- Red, positive – connected to the battery. The circuit current is no more than 15 amperes, and if this parameter is exceeded, the fuse blows.
- Yellow. The positive wire is responsible for the backlight bulb.
- Black, minus. It comes to the body of the device, and the other end is a mass powered through the body of the car.
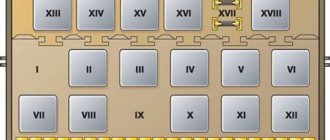
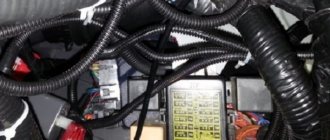
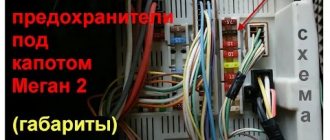
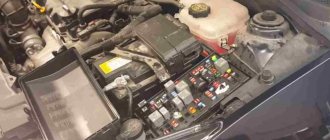
Fuses and relays under the hood of Mitsubishi Lancer 10
In the engine compartment there is a main fuse and relay box and 2 additional ones.
Fuse box diagram in the engine compartment of Mitsubishi Lancer 10
Description
| 1 | 30A Input-output device |
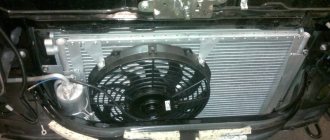
| 2 | 40A Cooling fan motor |
| 3 | 30A Condenser Fan Motor |
| 4 | 30A ABS |
| 5 | 40A ABS |
| 6 | Reserve |
| 7 | 30A Starter |
| 8 | 15A Front fog lights |
| 9 | 7.5 Engine management |
| 10 | 20A automatic transmission |
| 11 | 10A Horn |
| 12 | 7.5A Generator |
| 13 | 20A Headlight washer |
| 14 | 10A Air conditioner |
| 15 | 15A Throttle valve |
| 16 | 20A Anti-theft alarm sound |
| 17 | 15A Wiper blade heater |
| 18 | Reserve |
| 19 | 30A Electric tailgate drive |
| 20 | 10A Outdoor lighting system during daytime |
| 21 | 10A High beam headlight (left) |
| 22 | 10A High beam headlight (right) |
| 23 | 30A Audio Amplifier |
| 24 | 30A Electrical equipment of diesel engine |
| 25 | 20A Left low beam headlight (with gas discharge lamps) |
| 26 | 20A Right low beam headlight (with gas discharge lamps) |
| 27 | 10A Left low beam headlight (with halogen lamps) |
| 28 | 10A Right low beam headlight (with halogen lamps) |
| 29 | 10A Engine electrical power supply circuit |
| 30 | 10A Ignition Coil |
| 31 | 20A Engine electrical power supply circuit |
| 32 | 15A Fuel pump |
Relay
| R1 | Glow plug relay (for diesel engines) |
| R2 | Radiator Fan Relay |
| R3 | Heater relay |
| R4 | Engine control relay |
| R5 | Stability control relay |
| R6 | A/C Radiator Fan Relay |
| R7 | Engine control relay |
| R8 | Low beam relay |
| R9 | Engine control relay |
| R10 | Wiper Blade Heater Relay |
| R11 | Daytime lighting relay |
| R12 | Engine control relay |
| R13 | Anti-theft horn relay |
| R14 | Automatic transmission relay |
| R15 | Headlight washer relay |
| R16 | High beam relay |
| R17 | Front fog lamp relay |
| R18 | Horn relay |
| R19 | Air conditioner relay |
What to do
Fixing cigarette lighter breakdowns does not take much time. However, the car owner needs to get a general idea of the repair and draw up a step-by-step action plan.
The simplest solution is to seek help from specialists. An experienced service center employee will return the product to working order in a short time. However, you will have to pay for such a service.
To do all the work yourself, follow the following instructions:
Make sure that the fuse is in the correct place. According to the diagram, it should be fixed in a common box and indicated by the symbol of a smoking cigarette or the inscription “Cigar”. If a part fails, replace it with a new one. If the product is working properly and continues to conduct current, evaluate the condition of the socket. Pay attention to the interior of the nest. It may be clogged with some debris. To remove a foreign object from the slot, you need to use tweezers
However, the action must be performed with extreme caution.
If there are traces of burning on the cigarette lighter, you will need to buy a new product. If there is a soldered wire, it is enough to solder it.
Required Tools
To repair the cigarette lighter, you should prepare the following tools:
- Tweezers.
- Screwdriver (phillips or flathead).
Also, a flashlight, a multimeter and a printed wiring diagram may be useful for the upcoming work.
How to remove the cigarette lighter
If you have found the cause of the cigarette lighter failure and prepared the necessary equipment, proceed to disassemble the part. The dismantling process involves the following steps:
- First you need to open the hood and remove the negative terminal from the battery.
- Next, you need to disassemble the facing panel to gain access to the socket connection connector.
- Then you can unscrew the screws and disconnect the block.
- The next step is to dismantle the metal cigarette lighter tube using a screwdriver.
- After removing the part, you must turn off the backlight.
Car cigarette lighter button repair
Often the device stops working due to damage to the power button.
The repair process does not take much time and is done with your own hands.
Cigarette lighter head repair
In some cases, it is necessary to perform partial repairs of the car cigarette lighter. To do this, the element is dismantled according to simple instructions and checked for defects under the housing. Inside the part there is a miniature mica plate, which acts as a semiconductor and often fails. The product must be removed, repaired, and then put back.
Fuse box for Mitsubishi Lancer 10 battery
Scheme
Description:
- 33 - 120A Fusible jumper No. 37 / Fusible jumpers No. 34-36
- 34 - 80A Fuses No. 2, 4, 5, 10, 11, 12, 14, 15, 17, 18, 23, 24, 25 and fuse No. 20 in the passenger compartment, and ETACS-ECU
- 35 - 80A Reserve
- 36 - 120A Fuses No. 1-23, 30-32 and fusible links No. 24-29 in the engine compartment, engine control relay, headlight relay (high beam) and headlight relay (low beam)
- 37 - 80A Fuse links No. 1 and 21, fuses No. 3, 6, 13, 16, 19, 22 in the passenger compartment, fan relay and ETACS-ECU
General recommendations for troubleshooting faults related to blown fuses
- If several Lancer 10 electrical equipment systems fail, then most likely one of the fuses installed on the positive terminal of the battery or in the engine compartment unit has failed.
- If the engine fails to start, the fuses labeled ECU should be checked.
- Checking the fuses should be done with a multimeter turned on in the “dial” mode (buzzer). The fuse must be removed from its original location. The visual inspection method should not be trusted. As a last resort, you can swap fuses of the same color (value). You cannot remove several fuses for testing at the same time.
It is allowed to increase the value of the cigarette lighter fuse when powering auto gadgets to 25 Amperes.
Source
Where is the cigarette lighter fuse located?
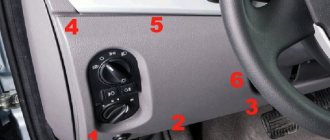
The location of the mounting block on the model is identical to the design of its predecessor. To the left of the steering column there is a compartment for small items, the lid of which must be opened and then pulled out, overcoming the resistance of the latches.
On the inside of the cover there are special tweezers that will help you remove the fuse, as well as a diagram of the location of the protective elements. We are interested in the 13th fuse. It is responsible for the car cigarette lighter itself and the 12-volt power outlet. A faulty fuse should be replaced with a new one rated 15 amps. Installing a part with a high value may result in a short circuit or fire.
Mitsubishi Lancer Akulych › Logbook › Fuel pump relay
After reading the drive I came across an article on replacing the fuel pump relay with an updated one
Mitsubishi Motors changed the relay like this: -> black Nais (MR588567) -> green Nais (8627A011) -> blue Omron (8627A024) -> black Panasonic (8627A030) -> latest orange Panasonic (8627A049)
Well, the price of the experiment is 377 rubles. Ordered: — Fuel pump relay 8627A030 MITSUBISHI — 377 rubles
I originally had a green relay, one of the very initial ones
I decided to order a black Panasonic, not the latest of course, but according to the VIN it gives out exactly that
I was skeptical about all this, i.e. This is a procedure for Evovodov and Rallyartovodov, I rode about 200 km. I observed it in different driving modes. In general, according to my feelings, it didn’t get better, but it didn’t get worse either. there was no obvious increase. I think that others experience an increase, or more specifically, their former agility returns, because... The contacts get tired over time (they burn out). My car is fairly new, it’s only been in its 5th year, so it makes no difference to me. I didn’t take the old relay apart and look at it because... It is sealed and I will try to install the old one and observe further.
The price of independent work is priceless! Peace and smooth roads to everyone!
Removing the cigarette lighter Lancer 10
On next-generation cars, repairs are carried out differently. The set of tools remains the same. In order to remove the cigarette lighter on the Lancer 10 model, you need to follow the steps.
- Open the hood and remove the negative terminal from the battery. This will help avoid short circuits during work.
- We unscrew the two bolts securing the trim located directly in the front armrest.
- We pull the trim up, gaining access to the button for turning on the seat heating.
- We disconnect it, and then easily remove the plastic lining of the center console.
- Unscrew the two screws near the gearbox lever.
- We take out the Lancer cigarette lighter block.
- Disconnect the contact chip.
- Now you can remove and repair the cigarette lighter itself.
- Reassembling the device is carried out in reverse order.
Sometimes it is possible to repair a Lancer device directly on site, with your own hands. To do this, you need to examine the back of the device. Often the wire coming into the structure burns out and the fuse trips. “Swelling” of the insulation will help detect this malfunction. Using a key, we disassemble the back part, remove the burnt wires and insert a new copper wire into the holes. Then we assemble the part in reverse order and diagnose its serviceability.
Why does the Lancer 9 cigarette lighter not work?
The device is located on the front panel of the car. The operating principle of the Mitsubishi cigarette lighter is simple. Inside the metal cartridge there is a nichrome thread, which heats up when the contacts close. When you press the cigarette lighter button, the contacts automatically close and the coil begins to heat up. When the maximum temperature is reached, the thermal relay gives a command to release the cartridge.
Over time, the device may break down and the fuse will trip. The Mitsubishi model 10 or 9 cigarette lighter does not work due to various reasons. Main sources of malfunction.
- Blown fuse. Especially for network safety, there is a safety element that burns out when the current exceeds 15 amperes. If one or more powerful devices are connected to the cigarette lighter socket, the current rating exceeds the resistance of the fuse, causing it to blow. This can be solved by replacing the element with a new one.
- The cigarette lighter may stop working due to poor cartridge contact or the appearance of oxides. Over time, the nest becomes loose, and rust or oxides appear on the antennae. Repairing such a device is simple - just remove the cigarette lighter, bend the contacts, and process them with a file or sandpaper for better contact.
- Broken wire or short circuit. If the fuses burn frequently or the cigarette lighter does not work completely, then you should look for an open circuit. To do this, you will need a multitester, which must be set to resistance and check the integrity of each wire connected to the cigarette lighter.
- Burnt out backlight bulb. There is a special lighting ring around the cigarette lighter. The lamp inside may burn out. It must be replaced with a new element. In the event of a breakdown, you should check fuse number 21 in the block located under the hood of the car. He is responsible for lighting the device.
Cigarette lighter fuse Mitsubishi Lancer 9
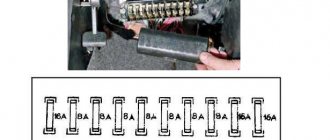
If the device fails, this element should be checked. The Mitsubishi Lancer 9 mounting block is located in the cabin on the left side of the steering column. There is a drawer for small items here.
- We open the cover and then remove it, overcoming the resistance of the latches.
- On the back cover of the box there are tweezers to make it easier to pull out fuses, as well as two spare elements rated 20/30 amps.
- We are interested in element number 22 (see photo). It is he who is responsible for the car's cigarette lighter.
- To restore the device's functionality, it is necessary to replace the blown fuse with a new one. It is prohibited to install coins or metal jumpers. Fuses with a rating greater than 15 amps are not suitable. This may result in a short circuit or fire.