Opel Astra H is the third generation of the Opel Astra compact passenger car, produced in 2004, 2005, 2006, 2007, 2008, 2009 with both gasoline and diesel engines. During this time, the car was restyled. In our article you will find the locations of the control units, a detailed description of the fuse and relay blocks of the Opel Astra h, their diagrams and photo examples of execution. Let's highlight the fuse responsible for the cigarette lighter. In conclusion, we will offer for download complete repair and maintenance manuals for the Opel Astra Ash.
The purpose of the elements in the units of your Opel Astra H may differ from those presented and depend on the year of manufacture, country of delivery and level of electronic equipment.
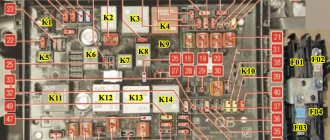
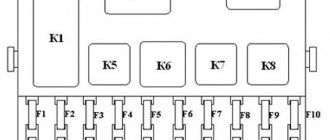
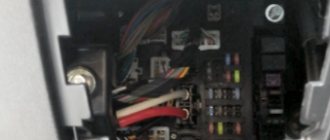
Block under the hood
It is located on the left side of the engine compartment, next to the pillar and is covered with a protective cover.
Consists of two sections (fuse and relay box and high power power fuse box)
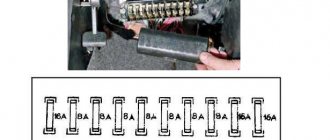
Photo - diagram
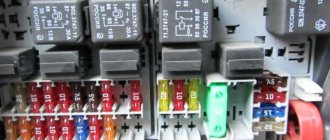
Description of fuses
| FB1 | 50A Electro-hydraulic hard top HT |
| FB2 | 80A Diesel (Glow time controller) |
| FB3 | 80A EGUR |
| FB4 | 30A Independent heater IH 100A Additional heater - electric, passenger compartment EH |
| FB5 | 80A at REC/Rear fuse block |
| FB6 | 80A at REC/Rear fuse block |
| F1 | 20A Anti-lock Braking System (ABS) |
| F2 | 30A Anti-lock Braking System (ABS) |
| F3 | 30A Heating system, interior ventilation, climate control (HVAC) |
| F4 | 30A Heating, ventilation and air conditioning (HVAC) system |
| F5 | 30/40A Cooling fan 1* |
| F6 | 30/40A Cooling fan 2* |
| F7 | 10A Window washers 20A (without REC) Central locking ZV |
| F8 | 15A Horn 10A (without REC) Central locking ZV, Windshield washer front, rear WA |
| F9 | 25A Headlight washers 25A (without REC) Heated rear window HFH (K17_X125) |
| F10 | 7.5A To DIAG diagnostic connector |
| F11 | 7.5A Instruments |
| F12 | 5A Circulation pump 7.5A (without REC) Info. ID display, Twin Audio TWA, DAB digital radio, TCV voice control telephone |
| F13 | 15A Fog lights 5A Interior lamp IRL(K18_X125) |
| F14 | 30A Windshield wiper |
| F15 | 30A Door window wiper |
| F16 | 5A Engine control module/Open-Start/Stop system (without REC) ABS-ESP, Horn (K4_X125), Air conditioning, semi-automatic air conditioning, electronic climate control, Stop light switch, el. hydraulic hard top |
| F17 | 25A Fuel filter heating (diesel models) |
| F18 | 25A Starter |
| F19 | 30A Transmission electronics |
| F20 | 10A Air conditioning / Horn (K4_X125) |
| F21 | 20A Engine electronics |
| F22 | 7.5A Engine electronics |
| F23 | 10A Adaptive headlight system (AFL), headlight range control |
| F24 | 15A Fuel pump |
| F25 | 15A Transmission electronics |
| F26 | 10A Engine electronics |
| F27 | 5A Power steering |
| F28 | 5A Transmission electronics |
| F29 | 7.5A Transmission electronics 7.5A (with REC) Automatic/Easytronic transmission control unit |
| F30 | 10A Engine electronics (ignition coils) |
| F31 | 10A Adaptive headlight system (AFL). Headlight leveling 15A (without REC) Rear window wiper (K56) |
| F32 | 5A Brake system fault warning light, air conditioning, clutch pedal switch |
| F33 | 5A Adaptive headlight system (AFL). Headlight level adjustment |
| F34 | 7.5A Steering column module control unit |
| F35 | 20A Infotainment system |
| F36 | 7.5A Mobile phone / radio / Twin Audio system / multifunction display 15A (without REC) Cigarette lighter |
In one of the versions, fuse number 36 at 15A is responsible for the operation of the cigarette lighter. In other cases, look at the block in the luggage compartment.
Relay purpose
- K1 (K11_X125) Radiator fan (FE5, FE6)
- K2 (K12_X125) Radiator fan (FE5, FE6)
- K3 (K7_X125) (with REC) Headlight washer pump (FE9)
- K3 (K17_X125) (without REC) Heated rear window (FE9)
- K4 (K16_X125) (with REC) Fog lights, front (FE13)
- K4 (K18_X125) (without REC) Boot cut-out (interior lighting, etc.) (FE13)
- K5 (K5_X125) Wiper, windshield, low/high (FE14, FE15)
- K6 (K6_X125) Wiper, windshield, ON/OFF (FE14, FE15)
- K7 (K15_X125) Fan, passenger compartment - Air conditioning/heating (FE4)
- K8 (K14_X125) (with REC) Filter heating (Diesel) (FE17)
- K8 (K8_X125) (without REC) Compressor, air conditioning (FE17)
- K9 (K1_X125) Starter (FE18, K3_X125)
- K10 (K13_X125) Radiator fan (FE5, FE6)
- K11 (K8_X125) (with REC) Compressor, air conditioning (FE20, FE32)
- K11 (K4_X125) (without REC) Horn horn (FE20, FE16)
- K12 (K2_X125) Engine control controller (on FE21, FE26, FE32)
- K13 (K10_X125) Fuel pump (FE24)
- K14 (K3_X125) Pin 15 (on K1_X125, FE23, FE24, FE25, FE27, FE29, FE30, FE31, FE33)
Individual relay elements may be located outside the main unit, for example:
- K30A Relay - radiator fan (FE5, FE6)
- K30B Relay - radiator fan (FE5, FE6)
- K84LD/RD Relay - hydraulic unit (convertible top) (FB1)
- K93 Relay - unlocking the gear lever (Automatic transmission AF17/4, AF22/4)
How to remove the cigarette lighter
Device removal algorithm:
- Disconnect the battery from the on-board network; since the cars have a standard radio, you need to find the activation code. The digital password is written in the service book; if the code is missing, then the information is requested through the dealership. If the car was assembled after 2005, then after the power supply is restored, the code does not need to be entered; the on-board electronics automatically recognizes the radio.
- Use a plastic spatula or hook to lift the lid covering the upper part of the console between the seats. The casing is installed in the space between the gear shift lever and the parking brake handle.
- Use a Torx screwdriver to unscrew the screws located under the cover. The screws hold the plastic casing with the speed selection knob.
- Use a plastic spatula to pry off the frame of the decorative casing covering the base of the gear shift knob.
- Remove the plastic casing towards the parking brake lever, and then remove the ashtray with the base in which the cigarette lighter housing is located.
- Disconnect the power supply harnesses to the heating element and the backlight lamp.
- Check the functionality of the device, and then install the removed parts in the reverse order.
Repair
Cigarette lighter repair involves checking the integrity of the heating coil.
If a metal element breaks, the assembly must be replaced.
A short circuit is possible, which occurs when the dielectric ring made of plastic is destroyed. The part is not supplied as spare parts; the manufacturer provides for replacement of the cigarette lighter. If the heating element does not stay inside the housing, then you need to bend the spring clips with a screwdriver.
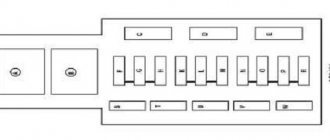
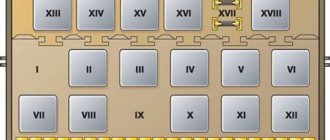
Block in luggage compartment
Located behind the left interior trim.
Option 1
Scheme
Designation
| 1 | 25/30A Electric drive for controlling front windows |
| 2 | Not used |
| 3 | 7.5A Instrument cluster |
| 4 | 5A Heating/air conditioning/climate control (HVAC) |
| 5 | 7.5A Airbags |
| 6 | Not used |
| 7 | Not used |
| 8 | Not used |
| 9 | Not used |
| 10 | Not used |
| 11 | 25A Heated rear window (tailgate window glass) |
| 12 | 15A Tailgate window wiper |
| 13 | 5A Parking assistance system |
| 14 | 7.5A Air conditioning system |
| 15 | Not used |
| 16 | 5A Seat Occupancy Recognition/Open-Start System |
| 17 | 5A Rain sensor/air quality sensor/tire pressure monitoring system/interior rear view mirror |
| 18 | 5A Devices/switches |
| 19 | Not used |
| 20 | 10A Dynamic Damper Control (CDC) |
| 21 | 7.5A Heated exterior mirrors |
| 22 | 25A Top hatch |
| 23 | 25/30A Electric rear door windows |
| 24 | 7.5A Diagnostic connector |
| 25 | Not used |
| 26 | 7.5A Electric folding exterior mirrors |
| 27 | 5A Ultrasonic sensor, anti-theft alarm system |
| 28 | Not used |
| 29 | 15A Cigarette lighter, front socket |
| 30 | 10A Rear socket for connecting additional electrical appliances |
| 31 | Not used |
| 32 | Open & Start system |
| 33 | Not used |
| 34 | 25A Top hatch |
| 35 | 10A Rear socket for connecting additional electrical appliances |
| 36 | 20A Socket of towing coupling device |
| 37 | 5A Interior lighting |
| 38 | 30A Central locking, pin “30” |
| 39 | 15A Left front seat heating |
| 40 | 15A Right front seat heating |
| 41 | Not used |
| 42 | Not used |
| 43 | Not used |
| 44 | Not used |
- K2 (K3_X131) Relay - heated rear window, mirrors (on FR11, FR21), (from FB5, FB6)
- K3 (K1_X131) Relay - pin 15 (on FR12, FR13, FR14, FR16, FR17, FR18, FR20)
- K4 (K2_X131) Relay - pin 15a (on FR39, FR40)
Fuse number 29 for 15A is responsible for the operation of the cigarette lighter, and fuse number 30 for 10A is responsible for additional sockets.
Option 2
Scheme
Decoding the scheme
| F50 | 10A AC AC (on relay K5) |
| F51 | 15A Fog lights (front) (on relay K39) |
| F52 | 15A Additional socket (rear cigarette lighter) ACS |
| F53 | 7.5A Heated mirrors |
| F54 | 30A Front window regulators FHF |
| F55 | 30A Rear windows FHR |
| F56 | 7.5A Tail lights (on K71), Lock without handle (on K24D) |
| K5 | Relay - compressor, air conditioning (FE33, F50) |
| K24D | Dead lock relay (F56) |
| K39 | Relay - fog lamp, front (F51) |
| K56 | Relay - wiper, rear window (FE31, FE33) |
| K71 | Relay - reverse light (F56, FE33) |
Where is the fuse located
On Opel Astra H vehicles the fuse box is located on the left luggage compartment trim. On cars with a sedan body, the cover is located closer to the trunk floor; on station wagons, the cover is mounted near the top decorative shelf. To access the junction box, you need to turn the latches and then remove the plug. The protective element for the cigarette lighter and additional socket is mounted in the 7th position on the left in the bottom row (product rating is 15 A). To the right is an insert to protect the socket in the trunk (optional).
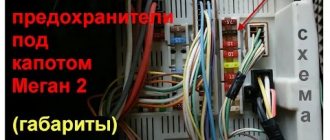
Some Astra Ash vehicles use a simplified unit, since the electronic module is excluded from the electrical system. In this case, the fuse element for protecting the interior cigarette lighter circuit is placed in a box mounted in the engine compartment. The insert is located in the lower right corner of the block (marked on the case with the number 36), the rating is 7.5 A. If the backlight lamp does not work, then a separate element with a rating of 5 A is used for it (located on the right in the lowest row of fuses, marked on the plastic with the number 33).
Check and replacement
To make a replacement, you must:
- Open the trunk lid or hood (depending on the design features of the car).
- Open the valve in the trunk or remove the block cover in the engine compartment.
- Using plastic tweezers, remove the element being tested. The tool is located inside the junction box, the jaws are put on the plastic body of the insert, which is then pulled out of the socket.
- Check the condition of the conductive plate that connects the contact plates. The fuse body has a control slot; some products are made of transparent plastic. If the jumper is torn, then the element must be replaced. The vehicle manufacturer requires that you use the same fuse rating as was previously used. Installing inserts with an increased cross-section of the jumper leads to overheating of the wiring when switching equipment with increased power.
- After the owner has found and replaced the protective element, it is necessary to check the functionality of the equipment. If the coil does not heat up, then it is necessary to remove the cigarette lighter for inspection and repair.
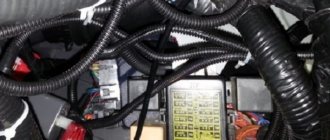
Removal and replacement process
Luggage compartment
The Opel Astra mounting block, located in the trunk, is located in an easily accessible place, and in order to get to it, you do not need to dismantle any components or parts. To open it, you need to turn the hatch lock 90 degrees and tilt it down. Next, according to the diagram, we find the electrical fuse we need and replace it. Close the hatch and secure it with a latch.
Engine compartment
The compartment with electrical fuses, located in the compartment where the Opel Astra engine is located, is located in a visible place, and in order to gain access to the electrical fuses that are located in it, you need to press the latches with a screwdriver and remove the cover. Find and replace the burnt one, close the lid and snap the latches.
Under the dashboard
To get to the unit located in the instrument panel of the Opel Astra, you need to remove the storage compartment.
- Press the latch with your finger.
- Move the harness block retainer.
- Disconnect it.
- In the same way, disconnect the other harness block.
- Attention! Mark the pads and retainers with different colors.
- Press down on the latch.
- Disconnect the small block of the block harness.
- Unscrew the nut securing the mounting block.
- Press the latch.
- Remove the block.
- Carry out the necessary work.
- Installation occurs in reverse order.
In any car, the fuse box performs the function of protecting the electronics and all devices powered by it. If a short circuit occurs in the circuit, then the first blow will be taken by the fuse in the power supply unit (fuse block). Today you will learn what circuit G looks like, where the blocks are located in this car model and how to replace blown fuses.
Connection diagram
The cigarette lighter on the Opel Astra H is connected with a negative wire with a cross-section of 1.5 mm² to the car body, the cable runs in the electrical wiring harness to a welded bolt. If the insulator is damaged and the metal core breaks, then it is necessary to re-route the cord to the nearest ground bolt. The positive power supply wire to the backlight lamp (cross section 0.5 mm²) is connected in parallel with the instrument cluster illumination. The light bulbs turn on simultaneously, and synchronous adjustment of the brightness of the filaments is provided.
The positive wire for connecting the heating coil has a cross-section of 1.5 mm². The cable passes through the fuse box, protecting the device from short circuits or operation under excessive load. If damaged, the cord is removed from the bundle to replace or restore the insulator.
Error diagnosis Opel Astra H
To determine the cause of the malfunction, you can diagnose the system without a special device using the methods described below.
For manual transmissions or Easytronic
- press the gas pedal and brake pedal simultaneously and hold them down
- insert the key into the ignition
- turn the key, turning on the ignition, but without starting the engine
- Continuing to hold the pedals, wait a few seconds until error messages appear on the on-board computer display
For automatic transmissions
- insert the key into the ignition
- turn the key, turning on the ignition, but without starting the engine
- press the brake pedal and hold it down
- switch the gearbox lever to position D
- turn off the ignition, release the brake pedal
- press the gas pedal and brake pedal simultaneously and hold them down
- turn the key, turning on the ignition, but without starting the engine
- While holding the pedals, wait a few seconds until messages appear on the on-board computer display
In diagnostic mode, the ECN message with error codes will appear on the display. 4 digits - error code, 2 digits - value.