Assessing the scale of the problem
If, when you turn the key in the ignition switch, the starter does not turn, no clicks or sounds are heard, then the reason may be this:
- the battery is discharged or faulty;
- battery contacts are oxidized;
- problem with the contacts of the starter itself;
- a break in the windings of the device or the electrical circuit of the car.
When the starter turns slowly, clicks of the traction relay are heard, the reason may be this:
- there is a charge in the battery, but it is not enough to properly spin the moving parts of the starter;
- carbon deposits have formed on the contacts or they have oxidized;
- worn brushes or burnt commutator;
- short circuits in windings or brush holders.
Starter brush wear
Repeated operation of the relay and its spontaneous shutdown can be caused by a voltage drop in the network due to oxidized contacts or a malfunction of the traction relay. When the starter turns, but the flywheel does not rotate, there may be several reasons:
- problem with the freewheel (Bendix);
- drive or flywheel teeth are damaged;
- The bearings or springs of the traction relay are worn out.
These are perhaps the main malfunctions and their most common explanations. They are equally valid for carburetor models and injectors.
What is a VAZ 2107 starter and how to change it?
A faulty VAZ 2107 starter causes the engine to simply stop starting.
When the key is turned in the ignition switch, the electrical circuit is closed, but the starter itself does not fire, so no force is transmitted to the crankshaft and it simply does not turn.
There can be many reasons why this happens, ranging from a banal short circuit in the car’s electrical system, to failure of the starter rotor winding or mechanical wear of the brushes. How to properly disassemble and repair a VAZ 2107 starter?
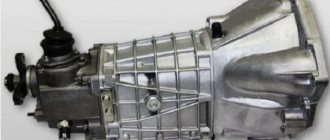
Starter device for a VAZ 2107 car
The design of the VAZ 2107 starter is to some extent reminiscent of an ordinary electric motor. The basis of the design is the so-called shoe, which is driven by the rotor.
t, in turn, begins to rotate when a voltage of 12 V is applied to it. This is the so-called gear starter. An ordinary electromagnet, which consists of an insulated copper winding, a metal core and brushes, is responsible for generating the magnetic field.
On the VAZ 21074 car, a similar scheme is used, but a slightly different fastening is used - 3 bolts each. The brushes transmit voltage to the rotor. They wear out not only due to friction, but also due to the high current generated by the coil.
The starter switching relay, located with it in a single housing, is responsible for the supply of electricity and timely shutdown of the shoe.
The operating principle of the classic starter on the VAZ 2107 is extremely simple: the device is connected to the crankshaft. When voltage is applied to the rotor, it spins and turns the fists.
As a result, the engine starts, after which power is supplied to the spark plugs from the generator, and not from the battery.
During an emergency engine start, a similar scheme is used - artificial cranking of the crankshaft.
It is not always the case that the engine does not start due to a faulty starter. It is possible that the problem lies in the wiring. Therefore, the first step is to study the starter connection diagram and all underwater wiring for a break. If one is found, the area will have to be replaced. At the same time, it is advisable to check the operation of the fuse (it is located on the left side of the hood).
It should also be mentioned that in some starter models protection is installed - this is an additional relay that automatically turns off the traction and prevents the supply of electricity from the battery even when the engine is running. These were not included in the factory configuration, but many install them after a certain period of operation.
Starters: how they work and how to repair them
The history of the starter
Initially, the car was born without a starter - the engines were started with a crank, and this was considered the norm. Actually, the cars of the dawn of motorization had enough other, more pressing problems, against the background of which turning the handle before the trip was not the most significant. However, the difficult and unsafe starting of the engine by hand was still an obvious bottleneck of the first self-running carts, and in 1911 the American mechanical engineer Charles Kettering proposed the design of an electric starter. And already in 1912, the first car powered by Kettering’s invention, the Cadillac Model 30, was produced.
1 / 4
2 / 4
3 / 4
4 / 4
However, despite this, a technical revolution did not occur - which can be traced at least by the famous Ford T, which, produced in millions of copies, was wound up with a handle until 1919... Actually, the reason was to a large extent that Charles Kettering, crowned the inventor of the starter, proposed to Cadillac a completely different design than is used everywhere these days!
Pictured: Charles Kettering
Its design was complex and unreliable, since the starter, after starting the engine, was not disconnected from the crankshaft, but switched to generator mode, and the leading American automakers of that era reacted coolly to the idea. The reason for Cadillac's support for Kettering's invention lay in the personality of the company's founder, Henry Leland, whose close friend was seriously injured in 1910 by the reverse jerk of the crank when the ignition was too early and died as a result...
Leland vowed that an alternative to manual starting would be found, and welcomed Kettering with open arms, whose starter was pompously called a “World Wonder” in the Model 30 advertising brochure!
A technical mini-revolution in the automobile industry, thanks to the starter, did happen - but four years later, in 1916. Namely, when another American engineer, Vincent Hugo Bendix, proposed dividing the generator and starter into two separate units, and connecting the latter to the engine only for a short time - using an overrunning clutch, known to this day as “Bendix”.
Starter design
All car starters are very similar to each other. If you understand the device of anyone, you will understand them all. Be it a Matiz or a Kamaz...
The basis of any starter is a simple electric motor. Current is supplied to the rotor (aka “armature”) by powerful copper-graphite brushes, and the magnetic force of the stator is provided either by electromagnets or permanent magnets. The electrical circuits of most modern starters do not have any fundamental differences - all starters are connected to the car's electrical system at three points - power plus from the battery, ground through the body, and control plus from the ignition switch. In fact, only the power expressed in dimensions differs.
On the cylindrical body of the starter there is a smaller “barrel” - this is the so-called “retractor relay”. It performs two functions - in fact, it supplies power to the starter, having powerful contacts that can withstand currents of hundreds of amperes, and also engages the starter shaft with the engine shaft through a rocker arm and a Bendix overrunning clutch.
This clutch works on the principle of a classic bicycle hub - that is, the starter can turn the engine, but once the engine has started, it will not “drag along” the starter, spinning up at destructive high speeds.
Visual 3D animation of the starter design
More noticeable differences between one starter model and another lie in the design of the front rotor support. The classic device is when the rotor axis is installed in the starter on two bearings - support bushings made of a bronze-graphite alloy. These bushings are located, respectively, in the front and rear starter covers.
In principle, this “double-support” design is the most reliable and correct. But there are often “single-support” starters (in garage jargon they are often not very correctly called UNSUPPORTED), in which the rear support of the rotor shaft is located, as it should be, in the rear cover of the starter, but the front cover is missing altogether.
Articles / Practice We charge a dead battery in 10 minutes: experiment Kolesa.ru Many of those who are not shy about getting into the “guts” of their car with tools know in practice about a very curious, useful, but at the same time strange and poorly explained... 237111 9 62 04/18/2016
In this case, the front support becomes the engine clutch housing or gearbox housing, into which the support sleeve is pressed. The starter is installed in its place in the car - and the shaft rests on two bushings, as it should. As a rule, such a solution is used to reduce the size of components, and in principle, as long as everything is in order, it is no worse than the classic one. But if the front support bushing in the gearbox housing breaks, it is much more difficult to replace it - this is done by car and sometimes in very inconvenient conditions. Whereas in a two-bearing starter, the bushings are changed on a workbench, where everything is visible and easily accessible.
Another fundamental design point that distinguishes starter models from each other is the gearbox. More precisely, its absence or presence, and if present, its type. The fact is that the transmission of torque from the starter rotor to the engine flywheel can be carried out directly or through a gearbox built into the starter.
The “direct” option is when the Bendix gear, which rotates the engine flywheel crown, is located directly on the axis of the starter rotor. This design is quite archaic, characterized by excessive dimensions and weight, as well as huge current consumption, but it still occurs. Gear starters are much more efficient, lighter and more compact. In them, the moment is transmitted to the flywheel crown either through one intermediate gear or through a planetary gear with even greater deceleration.
"Planetary" starters are the most common today. With them, to start the engine, a battery with almost half the capacity and starting current required for the same motor with a starter operating directly is enough.
Starter repair example
Let's move on from theory to a real unit that requires repair. In our case, the symptoms of the malfunction were as follows: the starter began to rotate the engine very sluggishly, regardless of the state of charge of the battery. At the same time, being removed from the engine and connected by starting wires to the battery, it rotated vigorously. The well-functioning engine somehow managed to start even with such sluggish rotation, but at some point the starter stopped completely and emitted smoke...
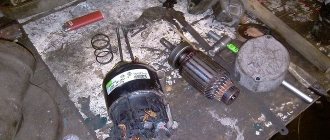
After removing the back cover, a couple of tablespoons of black dust spilled out of the starter housing. Therefore, the first diagnosis is brushes. We remove the brush assembly, remove the housing with magnets (which auto electricians among themselves call a “bulb”), and take out the rotor.
After blowing all the parts with compressed air and washing them in gasoline, it became clear that the brushes were almost completely worn out, and their remains were almost short-circuited with graphite powder. The force of the springs pressing the remains of the brushes weakened, the contact resistance increased, the brush holders and springs heated up until they turned blue, melted, the coils closed and the brushes froze.
1 / 2
2 / 2
We pick up the brush assembly as a sample and go to the nearest office for the repair of starters and generators, where we ask them to pick up a similar part. The complete brush assembly costs us 400 rubles, which, considering the cost of a new starter from 4 to 5 thousand, is quite inexpensive!
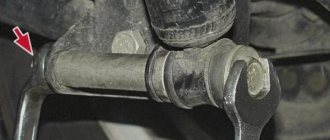
We clean the rotor and assess the condition of the commutator - the slip ring along which the brushes operate. Wear is noticeable to the naked eye (shown by arrows in the photo), but the commutator can still work after replacing the brushes. We do without a groove, sanding it with fine sandpaper - that's enough.
In general, wear of the rotor commutator is a serious problem. In principle, under normal conditions, the commutator of any starter is capable of replacing a couple of sets of brushes, but if its contact lamellas become very thin, the rotor goes to waste. This part is expensive, it is not easy to purchase it separately, and it is rational to replace it only for free - if a similar starter with a living rotor turns up from old stocks of auto junk at home or from friends... Because if the collector is completely killed, there is usually no living space on the starter.
We inspect the overrunning clutch, otherwise known as “Bendix” (the name, by the way, comes from the manufacturer Bendix). We rotate its gear manually. It spins one way, but not the other. We move it back and forth along the axis of the shaft - it moves easily, without jamming. In our case with the Bendix everything is okay, that’s how it should be.
Meanwhile, the failure of the overrunning clutch is also a serious malfunction, since it is easy to buy the required modification only for starters of common models - problems may arise with finding a “Bendix”... The main typical reason for the malfunction of the clutch is the wear of the springs and rollers inside it, due to why it slips without blocking when rotating in the working direction. As a result, the starter hums and spins, but the crankshaft stops. This malfunction is easily diagnosed - the Bendix rotates manually in both directions, when it should only rotate in one direction. In a good way, the overrunning clutch in this case must be replaced, since it has a non-separable design. Although some enthusiasts flare its body, stretch the “trampled” springs, and cut new rollers from hardened rods, the result of this fuss is most often short-lived.
Articles / Practice Overhaul of a Mitsubishi turbodiesel with a mileage of 500 thousand kilometers: cylinder head No one can avoid this. Sooner or later He will knock on your... cylinder head or cylinder block. It is a major engine overhaul. The times of “millionaires” have long since sunk into oblivion, and large-scale... 12001 0 1 09/28/2016
Since the rotor has been removed, we simultaneously assess the condition of the planetary gearbox. We take out the gears, wash them with gasoline, and inspect them. Everything is in order, there are no complaints about the gearbox. Apply a light coat of CV joint grease to the gears and their bearings.
Note that the gearbox is a fairly reliable starter unit. It happens that the axes of the satellite gears are cut off or the outer gear ring bursts - but this happens rarely and most often due to initial defects in the metal or its processing, and not because of the loads during everyday work. For example, in planetary starter gearboxes, the outer gear ring, called the “crown,” is often made of plastic and is quite durable (in our case, as can be seen in the photo below, the “crown” is metal).
As a gear lubricant, ideally, special compounds for planetary gears or special consistent low-temperature compounds are required, but they are expensive and rare - it is irrational to buy them for a one-time job, where you will only need one gram out of the entire expensive tube. Therefore, it is quite acceptable to use a common lubricant for CV joints or a good imported lubricant for hub bearings. The main thing is to apply it in a very small amount - there is no need to fill the gearbox! The abundance of lithol, which thickens strongly in the cold, is pressed between the teeth of the gears, causing an excessive current surge and even threatening to break the plastic “crown”...
Now there is more tricky work to be done. It would be unwise not to evaluate the condition of the solenoid relay contacts once the starter has been removed and gutted. But if to disassemble the starter we only needed 8, 10 keys, and a Phillips screwdriver, then we can only open the traction relay with a 100-watt soldering iron. Wires come out of the relay, pass through the contact pins in the cover, and are soldered externally. Therefore, after unscrewing the two Phillips screws of the cover, it will be possible to lift it only by heating the solder one by one on the two contacts, shown in the photo with arrows. In fact, this is a simple procedure, and it can be done many times if necessary.
We are lucky - our contacts are in order. We lightly refresh them by rubbing them with a wad of sandpaper held in the “duckbills.” After this, we warm up the pass-through pistons on the lid one by one with a soldering iron, and sharply slam the lid on the table - by inertia, the remains of the molten solder fly out of the pistons, the holes are freed, and now the lid can be put back on the protruding wires and soldered back.
By the way, a serious mistake made by car owners who carry out repairs and maintenance of the starter themselves is to lubricate the solenoid relay core. In this unit, lubrication is not needed at all - at most, you can lightly coat the core and its socket with engine oil and wipe it almost dry - purely for the sake of reducing the likelihood of corrosion. And any greases in this unit are contraindicated - in the cold, even the best and cold-resistant ones can jam the core. The gap between the solenoid relay must be clean and dry!
Articles / Practice Knocking is not good: adjusting valves with nuts, why and how correctly Those were the glorious times when every second owner of a classic Lada car knew how to adjust the engine valves of his car! And it was not considered something extremely difficult, and in every city... 23987 5 26 09.19.2016
We assemble the starter in the reverse order, not forgetting to lubricate (also without fanaticism!) the rear rotor bushing. Can the unit be installed on a car? You can, but first let's do one more thing!
The fact is that in the newly acquired brush assembly the brushes are even parallelepipeds. And the collector is cylindrical, and even has acquired the shape of a not quite regular cylinder due to wear. And, in a good way, the working edges of the brushes should have semicircular grooves to increase the contact area, plus they should get used to the real profile of the commutator.
Therefore, to prevent the first activation of the starter on the engine from causing excessive heating of the commutator and brushes due to the passage of large current through the reduced contact patch, we will carry out a light grinding-in. Let's take the wires for “lighting up”, and with their help we connect the starter, lying on the table, to the battery, and turn it idle for a minute or two, intermittently.
That's it now. We install the starter on the engine and enjoy a quick and confident start.
Survey
Have you ever had to deal with starter repair?
Your voice
Total votes:
Work order
- We place the car on a viewing hole or overpass and secure it with the parking brake.
- Open the hood and disconnect the ground wire from the battery.
- Using a 10mm socket, unscrew the bolt of the lower fastening of the starter heat shield.
- We dismantle the air filter housing and the warm air supply hose (for injection units, remove the fastenings of the intake pipeline).
- Using a socket wrench with a 13 mm extension, unscrew the 3 bolts securing the starter housing. It is better to unscrew the bottom bolt from the inspection hole.
- Using a 13mm wrench, unscrew the nut (on the injection engine there are two nuts) securing the starter shield. Let's take it out.
- Using a socket wrench with a 13 mm extension, unscrew the 3 bolts securing the starter housing. It is better to unscrew the bottom bolt from the inspection hole.
- Using the same tool, unscrew the nut securing the tip of the wire going to the “+” battery.
- Disconnect the start relay wire.
- We remove the starter from the rear wall of the engine compartment.
- We install a new starter in its place.
- We carry out installation work in reverse order.
What to do first?
Disassembling the mechanism is not a priority task, since the starter’s power supply is connected to the battery, so you need to start with it. If the car is not too old, it is unlikely that the problems will lie in the design of the starter itself. It is enough to clean the contacts of the battery or the device itself for everything to work again in the desired mode.
Difficulties begin when the machine has worked for a long time and its operation has not been delicate. If, after a complete check of the electrical equipment of your VAZ 2107, the starter still does not start or continues to work intermittently, then the reason is inside the device and it is necessary to remove and disassemble the starter. On this model, both in carburetor and injection versions, it is installed rather inconveniently. To get to it normally, you will have to drive the car onto an overpass or inspection hole.
Disassembling the VAZ 2107 starter
After the ignition is turned off, you can begin the “operation”. It must be done in the following order:
- remove the ground terminal from the battery;
- if there is a protective mud casing at the bottom, then it must be dismantled;
- remove the electrical wires from the solenoid relay;
- unscrew the three mounting bolts (two upper, one lower);
- remove the starter.
As you can see, nothing complicated. The only thing is that in the case of an injection model, mechanics advise removing the inlet pipe extensions as well. Now we have to disassemble the device itself.
Starter disconnection process
The standard location of this piece of electrical equipment in most vehicles is at the bottom of the engine. To make it convenient to remove it, you need to drive onto an inspection hole (or overpass). It is impossible to get the starter from above.
The inconvenient location is the only difficulty in the dismantling process. All basic operations are performed quite simply. No specific tools or special professional knowledge are required.
The starter must be removed with the ignition off and proceed in the following sequence:
- First you need to disconnect the battery ground terminal (removable);
- For convenient operation, remove the battery together with the holder;
- Next, you need to remove the protection at the bottom of the engine (if installed), which opens free access to the starter;
- Unscrew the clamp of the set of suitable wires;
- Unscrew and remove the wire holder from the relay;
- Unscrew the mounting bolts;
- Remove the completely free unit from below the car.
Now the starter can be repaired or replaced, which is done in the reverse order.
Detailed installation process
In order to correctly install the starter, you must adhere to the following points:
1. Conduct a visual inspection of the device. 2. Installation of the device in its original place. First fasten with a long bolt, and then with two short ones. 3. Install the wire terminals and tighten the nuts. 4. Replace the battery. 5. Connect the terminals on the battery. 6. Install the braces coming from the intake pipe or air duct and air filter. 7. Replace the mudguard (if equipped).
After everything is done, you should start the engine. If everything works as expected, then the starter connection is made correctly. If the engine does not start, you should look for where the error was made.
Starter performance check and repair
First of all, you should clean the starter housing from dirt, which inevitably accumulates on it during the operation of the car. Then connect the mechanism to the battery: the “negative” wire to the starter housing, the “positive” wire to the contact of the traction relay. A characteristic click should follow, and a drive gear will appear in the front “cutout” of the casing. Now use an ohmmeter and check the armature windings for opens and shorts. To do this, you need to open the cover at the back of the starter and remove the brush holders with brushes.
Then connect the ohmmeter with one end to the armature body, and the other - alternately to the sectors of the winding. If there are no short circuits or breaks, the instrument needle will fluctuate from a minimum value of 10 kOhm and above.
Now comes the integrity check of the stator winding (in other words, located inside the housing, along the walls of the cylinder). Here you simply connect the ohmmeter contacts to the copper wire terminals. The arrow of the measuring device should “lie” in the area of the highest value if there are no problems. If there are breaks or short circuits in the windings of the starter or solenoid relay, there is no point in bothering with repairs if you have never dealt with electromechanics and have not encountered the technology of manufacturing electric coils. It is best (and easier) to purchase a complete starter and install a new starter.
Checking the integrity of the stator winding
An operation that can really be called a repair is replacing brushes. You can easily find out that they are erased during diagnostics. It is enough to turn the starter on its side when it is connected to the battery and turns properly. If the unit immediately stalls, brush wear is to blame. Replacing parts is simple and accessible even to a beginner. It was already mentioned above that it is enough to remove the cover at the rear of the starter. When the brush holder is removed, the springs in it will themselves push out the brushes, which will hang on the wires. Replacement is a matter of minutes.
The main thing is to never allow oil or fuel to come into contact with brushes or wire windings. Electrics do not tolerate moisture or grease. Therefore, during any operations with starter parts, especially when assembling it, act carefully and, if possible, stay away from liquids and fuels and lubricants.
There is one rare malfunction when the starter turns on, but nothing turns. In this case, the bendix is to blame - a device that prevents the teeth of the drive gear from sharply hitting the flywheel. Its main malfunctions are wear of the rollers, the gear itself, weakening of the pressure spring or unsuitability of the lubricant. This part is inexpensive, changes quickly, and therefore there is no point in bothering with repairs. It is better to purchase it in a store; replacement is done on the “return” when the starter is being assembled.
Sometimes the armature bushings need to be replaced, but this is extremely rare because they are made of very reliable material and wear only appears after a really long period of use. There are only two of them - in the toe and back cover. The process of knocking the bushings out of their seats is usually confusing, but by choosing the right attachment, you won’t ruin anything. Next, a part of the required diameter is lubricated and pushed into the hole. If things get tight, don’t use more force; it’s better to sand the bushing body and try again, otherwise the socket may simply burst.
- “They moved my car onto the lawn, and it turned out to be my fault” - the story of a motorist who suffered because of utility workers
- 6 Mercedes that were officially imported to the USSR
- 4 ways to deceive drivers in tire shops
- 4 mistakes when transporting cargo on the roof of a car that can lead to serious damage
- Advice from psychologists: how not to look at a traffic police inspector to avoid problems
- Celebrities who collect cars
- I found out why people buy used oil - you need to be careful
- “I was charged money for an accident in Volgograd, although I did not have an accident and had never been to this city,” is the story of our subscriber
Starter diagnostics and repair
The procedure for checking and repairing the mechanism is divided into several stages:
- removal;
- device disassembly;
- diagnostics and recovery;
- assembly and installation.
Dismantling
The removal procedure is considered using the example of the VAZ 2101 model:
- The negative contact from the battery is disconnected, which will prevent short circuits in the system. It is recommended to treat the starter mounting screws with WD-40. They are usually tightly fixed and may be difficult to remove.
- The air filter device is removed from the internal combustion engine carburetor. To do this, the screws securing it are unscrewed and the assembly is dismantled.
- Using a wrench, you need to unscrew the nuts that secure the starter mechanism to the engine block.
- Then the assembly is moved forward and the connected wires are disconnected from it. When performing a task, it is recommended to remember their location, or better yet, take a photo so as not to confuse them when connecting.
- The starter mechanism is removed.
The “Auto Repair and Maintenance” channel presented a detailed guide to dismantling the device, describing all the features of this process.
Parsing the device
It is recommended to perform the disassembly procedure on a previously prepared clean surface:
- The retractor cylinder is removed from the device. To do this, disconnect the cable and unscrew the nut on the contact screw. Then it is recommended to screw the fastening element with the washer back on so as not to lose it.
- Using a screwdriver, remove three screws that secure the cylinder to the starter device. The retractor element is dismantled and the spring part is removed. The anchor device is being removed. To do this, it must be pulled up, disengaged and dismantled.
- The next step is to remove the protective casing of the starter mechanism. To do this, use a screwdriver to unscrew the two mounting bolts and dismantle the cover.
- The two coupling bolts are unscrewed. The cover is removed from the starter mechanism housing.
- The screws are unscrewed, with the help of which the winding of the device is fixed to the plates of the brush assembly holder. The insulating pipe is removed.
- The cover on the side of the collector device is disconnected from the body of the mechanism itself.
- The starter winding jumper is removed from the brush holder. The elements themselves are removed using a screwdriver.
- The rear bushing is being pressed out; to complete the task, a mandrel of the appropriate diameter will be required.
- Then the cotter pin of the drive device lever, as well as its axis, is removed. To do this you will need a flat head screwdriver.
- After dismantling the rubberized plug, the starter drive unit must be disengaged from the clutch and removed.
- The next step is to remove the drive lever.
- The washer and the retaining ring are removed. At this stage you need to be careful not to lose details.
- Next, the coupling of the drive device is removed from the shaft of the anchor element of the mechanism.
- At the final stage of disassembly, the front bushing is pressed out of the assembly cover. A mandrel of the required size is used.
Check and recovery
After disassembling the device, all components are diagnosed and repaired or replaced:
- At the first stage, brushes are diagnosed for wear. The height of these elements must be at least 1.2 cm for the VAZ 2101. This value may differ depending on the car model. A caliper is used for diagnosis. If the check shows wear on the brushes, these elements must be replaced.
- Then a visual diagnosis of the windings is performed; traces of burning are not allowed on them. The anchor assembly must be intact, there must be no defects or chips on it.
- If cracks are found on the housing of the starter device, this problem can only be solved by replacement. Through such damage, moisture can enter the mechanism, which will lead to its complete breakdown. Finding a new housing is problematic, and if this cannot be done, then the starter is replaced.
- The coupling must not wear out. It is necessary to visually assess the integrity of its teeth. If at least one of them is missing, the coupling must be replaced.
- The so-called nickels of the retractor cylinder are diagnosed. These elements must have good contact. Otherwise they change.
- If, when the device is activated, the assembly rotates, but the flywheel does not rotate, the problem must be looked for in the gears. Damaged items must be replaced.
- If, when you try to start the engine, a click is heard, but the internal combustion engine does not start, then the retractor cylinder must be replaced.
- Then the shaft seat is diagnosed; it must have the appropriate diameter. A small gap is allowed on the anchor device of the starter mechanism, but if the gap is significant, the part must be replaced. It is recommended to clean the surface of the element with fine-grained sandpaper. You also need to flush the collector device.
The drive gear, armature seat, and bearing elements are subject to lubricant treatment - this will prevent rapid wear of the starter.
Assembly and installation
The assembly procedure is a more complex task that is performed in reverse order, with:
- When installing the retaining ring on the anchor element, you must be careful: if the part falls, you need to find and install it.
- When performing a task, the brushes of the mechanism must not be swapped. This will lead to incorrect operation of the device and a short circuit.
- During installation, all bolts must be fully tightened to secure them. In this case, you should be careful not to damage the threads on the elements. Before tightening, it is recommended to treat the screws with lubricant, which will make them easier to unscrew during further disassembly.
- When installing the device, tightening the fastening elements to the power unit must be done gradually. This will prevent possible distortion of the mechanism.
- After installing the device, all previously removed components are reinstalled in the engine compartment. The air filter is put in place. A block with wires is connected to the starter mechanism. Then you need to reconnect the cables to the battery terminals.
Diagnosing starter problems
After removal, it is necessary to very carefully clean the starter from any dirt adhering to it to prevent it from penetrating inside the housing. Then we begin diagnostic work. First you need to make sure that the traction relay is working properly, for which we carry out the following actions:
- connect the positive terminal of the battery to the starter output, and the negative terminal to its housing;
- apply a voltage of 50 volts;
- If at the same time the gear of the part (the Bendix, designed to engage with the flywheel and spin it to the required speed) moves out of the housing with a characteristic click, we continue the diagnosis. Otherwise, replace the traction relay.
How to remove
So, let's start with what methods you can easily remove this part. As you know, car service employees know how to do this and perform this procedure almost playfully. What does it mean? The simple fact is that anyone who wants to learn it can perform such a procedure, and it is necessary to master the techniques, as well as have a little patience.
In principle, experts recommend that beginners remove this part with someone’s help. It is not necessary that this person be an experienced person. The assistant will help in difficult situations when you need to support or present some instrument. Although a beginner will be able to dismantle the starter on his own, the removal procedure will take a little longer. As a rule, this takes from 40 to 60 minutes.
It is known that the procedure for removing the electric starter from different brands of cars differs from each other. But if you know the general removal process, then dismantling it on any car model will not cause any difficulties. You should always have the right tools at hand, which will greatly facilitate and speed up the process.
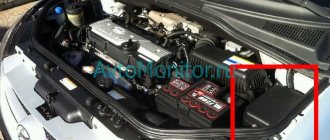
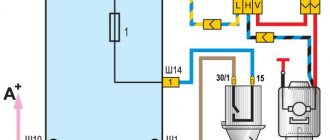
The first thing to do is disconnect the battery terminals and then remove the engine protection. We carefully examine the engine to find the starter mountings. Look at the diagram below. This is how this part is usually mounted on all cars.
As you can see, the electric starter is located to the right of the engine. The numbers indicate the bolts that secure the starter to the engine. These are the ones that will need to be unscrewed. In this case, beginners need to remember that the electric starter is attached with bolts, but with nuts and studs. Often when they start to unscrew these parts, the studs come off along with the nuts. There is no need to panic, as this phenomenon will not cause problems.
After the fastenings have been removed, the driver will need to crawl under the car. It is recommended to place the car in a viewing hole in advance or, if you are far from the garage, use a regular jack. We will use it to lift the part of the car where the starter is located. Be sure to place stops under the cars, since you can’t rely on a lift alone. The car can easily jump off it.
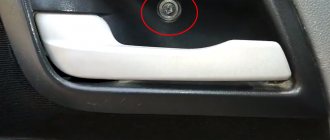
So we're under the car. Now we need to unscrew the nuts that secure the wires coming from the battery. There are several wires on the starter, but we only need to unscrew two nuts: one that secures the “plus” wire that comes from the battery, and the other with the wire responsible for controlling the solenoid relay. Look at the photo below:
Pay attention to the third nut, which is smaller in size. It will also need to be unscrewed. Now you can climb up.
You should know that in the process of unscrewing the starter studs that secure it to the engine, you do not need to remove all of them. You should leave the top bolt so that the electric starter does not fall, climb under the car, carry out the techniques described above, and then unscrew this same bolt completely. That's all. The starter will come out without difficulty.
Although even in this case it will be a little difficult for a beginner to do it. The fact is that if you remove the unscrewed starter from the battery side, it will be almost impossible to do this. Wiring placed in this location will interfere. Therefore, the electric starter should be removed from the air filter side. Be sure to make sure that the engine is completely cool before removing it, otherwise you could seriously burn your hands. The entire starter has been removed from the vehicle.
The video shows the principle of operation of a car starter:
Preparation for repair and dismantling of the device
It is more convenient to carry out work in a specially equipped room - a garage box. The VAZ 2107 is installed above the inspection hole; for repair and restoration operations, a set of wrenches, a set of heads with a wrench and a device for pressing out the bearing are required. In the event of a malfunction of several other components in addition to the bendix, it makes sense to replace the starter assembly. On a car where there is an injector in the power supply system, repair work is best carried out from below.
The procedure for dismantling the starter on a VAZ 2107 car is as follows:
- Disconnect the battery and remove it from the engine compartment.
- We unscrew the terminal and disconnect the terminal and the wire that supplies power to the starter.
- We unscrew the bolts securing the device that ensures engine starting.
- We remove the unit complete with the bendix feed mechanism from the hole in the housing.
On a VAZ 2107 car, an engine with an injector installed will require a number of additional operations. In this case, replacing the faulty unit is only possible from below. To gain access to the assembly, you need to remove the steel protection and boots covering the engine compartment from below. The remaining operations carried out on the starter are carried out similarly to those described.
Removing the starter
There are several options for removing the starter from the engine. The choice mainly depends on whether the car owner has a garage with a pit and free time to replace the starter on his own.
It is best to organize access to this unit from both sides by removing the lower engine protection, and partially dismantling the air cooling system, removing the battery. This is possible in a service station on a lift or in a pit garage. However, even in its absence, repairing the starter is quite possible, but with increased labor costs and work time.
On a pit or lift
Before removing the starter yourself, you need to drive the car into a pit to provide access to the engine protection mounting bolts from below. This part is made of thick-walled sheet steel and is attached at 4 points; problems with unscrewing usually do not arise, since it is removed very often when servicing the car. If necessary, threaded parts are pre-treated with WD-40 lubricant.
Rice. 3 Providing access from below
Attention: In some cases, work is hindered by the cover protecting the muffler, which will also have to be removed. On foreign cars, under the engine protection there may be a duplicate plate made of polymer material, which also needs to be dismantled.
Replacing the starter begins with dismantling this engine starting unit, however, with the protection removed, it is convenient to unscrew only the bottom bolt. The upper fasteners are easier to unscrew from the top. To do this, depending on the layout of the units and components of the car under the hood, you will have to remove:
- terminals from the battery (in any case);
- pull the battery out;
- dismantle the air filter housing if necessary;
- Unscrew the bracket on which the cooling pipe is attached.
Rice. 4 Providing access from the hood side from above
After which, work continues in the pit:
- from the starter it is necessary to disconnect all the wires coming to it from the battery, so unscrew the nut that secures the “+” cable, then the wire that goes to the control contacts of the retractor relay;
- Unscrew the lower nut securing the starter using a 13mm wrench.
Work continues from above, from the side of the car hood:
- unscrew two or one remaining upper bolt with a 13 key;
- the starter is moved by the body towards the passenger seat so that the bendix comes out of its seat near the flywheel;
- this knot is pulled out through the top.
Rice. 5 Dismantling the starter in the pit
Depending on the type of internal combustion engine, the operations for dismantling the starter may vary:
- C-type engine - classic dismantling according to the above scheme;
- F-type engine - first, the starter mounting bolts are dismantled with your own hands, then the protection is removed, the rear engine support is disconnected;
- V8 engine - if there are 16 valves, the protection is removed, the starter mounting bolts are unscrewed, the right front wheel and the reinforcement of the exhaust system manifold are dismantled, and the rear engine mount is removed.
Service station employees are familiar with such nuances, so it is recommended that the starter be replaced by specialists.
Mechanism repair and installation
After removing the starter from the car, we disassemble it and inspect the components. Particular attention is paid to the condition of the bendix and sliding bearing bushings; the housing must be disassembled for inspection. Carefully remove the brushes from their sockets and clean the commutator of dirt. We assemble the device and check its functionality using the battery.
Installation of the VAZ 2107 engine starting mechanism is carried out in the reverse order of removal. If during testing it is revealed that the starter cannot be restored, it is replaced with a new one. If an injector is installed on the car, after connecting the battery, it will take some time to create the necessary pressure in the gas line. The engine should be started only after the pump has stopped running.
How to replace the starter on a VAZ 2101-VAZ 2107?
Note! Before you start replacing this unit, be sure to make sure that its performance is not due to other reasons, for example, the battery is discharged, or its terminals are oxidized, or the wiring that goes to the starter is not working properly!
And also take into account the fact that the starter must be replaced in an inspection ditch, otherwise it will be inconvenient and very problematic to remove from the car!
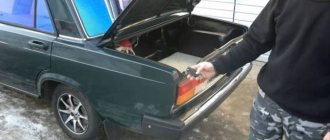
Removal: 1) First, loosen the clamp that secures the warm air supply hose to the air filter housing.
2) Then loosen the clamp that secures the hose to the air intake itself.
3) And then remove this hose from the car engine.
4) Next, loosen the lower nut that secures the air intake.
5) Next, unscrew the top nut that secures the same air intake.
6) And then remove this air intake from the car engine.
7) Now remove both nuts that secure the heat shield to the engine.
 And then, using an extension joint with the socket head, unscrew the remaining bolt that secures the heat-insulating shield to the right engine mount bracket. (For information on how to unscrew the remaining bolt that secures the heat-insulating shield to the bracket, see the very bottom of the article in the “For Beginners!” section)
9) After unscrewing the bolt, remove the heat insulation shield from the engine.
10) Next, unscrew the bottom bolt that secures the starter.
11) Then unscrew the remaining two upper bolts, which also secure the starter.
12) Moving the starter a little forward... (Continued in point 13)
13) Disconnect the wire block from the starter traction relay terminal on the starter.
14) Then unscrew the nut that secures the wire to the upper contact of the traction relay.
15) And then disconnect the wire from the upper contact, and also remove the bolt and nut that held this contact.
16) Next, remove the starter from the car engine.
Installation: 1) Installation of a new starter is carried out in the reverse order of removal.
Important! 1) Before starting work, disconnect the negative terminal from the battery! (For information on how to disconnect this terminal, see the article: “About the battery”)
For newbies! Question: How to unscrew the bolt securing the heat-insulating shield to the bracket of the right engine mount. Answer: Using an extension joint with the socket head “2”, unscrew the bolt “1” securing the heat-insulating shield to the bracket of the right engine mount.
Additional video: To understand in more detail how to replace the starter, watch an interesting video in which the replacement process will be described in detail:
Replacing the battery on all VAZ cars
Replacing the gearbox on a VAZ 2101-VAZ 2107
Starter replacement
To conveniently dismantle the starter, it is best to use an overpass or pit. Auto repair shops provide a lift for this purpose. Prepare a standard set of tools:
· spanners and open-end wrenches, extension and ratchet for heads;
· the starter is located in the lower part of the engine compartment, under the engine, and water gets on it and on the mounting bolts, which rust. Therefore, stock up on “liquid key” or WD fluid. Sometimes, to easily unscrew a bolt, it is enough to spray the joint and leave for half an hour.
Starter removal procedure
1. Separate all the wires that connect the starter to the battery: the nut that secures the positive wire and the wire that goes to the contacts of the solenoid relay. It is better to try to do this while the starter is secured; when the starter is not secured, it can be difficult to remove the nut that secures the contact.
2. Unscrew the starter mounting bolts and move the starter forward towards the power unit so that the overrunning clutch (Bendix) gear comes out of the seat.
3. Now we take out the starter, whichever is convenient, either through the bottom or through the top.
Reasons for starter failure on a VAZ 2101 and ways to solve problems
- Reasons for starter failure on a VAZ 2101 and ways to solve problems1
- Original parts and their analogues: which is better2
- Procedure for replacing and installing starter3
If one day you got behind the wheel of your car and could not start it, most likely the problem is that the starter does not turn. There can be many reasons for this “behavior”. The problem does not always lie in the device itself:
- low battery charge;
- poor contact at the junction of power wires.
It is important to note that in order for the starter bendix to rotate, a voltage of at least 11.0 V is required. If the battery cannot maintain this value at the moment of starting, then the car simply will not start. As a result, it’s simply not possible to go anywhere. If the engine does not start, then first of all you need to check the presence of voltage at the battery terminals.
If it is normal, you need to make sure that it is present on the incoming wires. This can be done using a multimeter. If there is voltage and there is no break, the problem may be in the electrical part of the starter:
- the solenoid relay does not work;
- The carbon brushes have failed.
You can check the relay without removing the starter itself. It will be enough just to close the contacts directly. This can be done using a screwdriver or insulated wiring with exposed contacts. After closing the contacts, the relay must click - this indicates its operation. If there are no such sounds, then the relay has simply failed. There is no point in repairing it; you just need to replace it.
Another common problem is that the carbon brushes have failed and the stator winding has short circuited. But these faults can only be determined after removing the starter from the car. As well as mechanical failures:
- Bendix failed;
- bearings are worn out;
- The starter fork is broken.
The main working mechanism of the starter is the bendix. It connects the engine flywheel and the starter shaft - which allows torque to be transmitted. The bendix itself is a shaft with a gear at the end. It is its splines that engage. Over time they wear out. The situation can only be resolved by replacing the Bendix.
Bearing wear is also a common problem. You can check their condition without removing them. It is enough to try to rotate the shaft with the starter removed. If it rotates with force or is completely jammed, then the bearings definitely need to be changed. The starter shaft must rotate freely, without applying any force.
During prolonged intensive use of the car, the fork often fails. Figuring out where this component is located is not difficult. You need to remove the starter and disassemble it. This will allow you to determine all the problems that exist in it, what problems there are. In some cases, you will even need a special sdend.