Even the most technically advanced car does not last forever. And if you consider that its parts and components are not operated in greenhouse conditions, it is not surprising that any aged vehicle needs repair.
The VAZ classic is no exception - owners of the Four often face the problem of heating the interior in the cold season.
And it’s not so much a matter of the driver and passengers’ aversion to the cold. The lack of heat in the cabin is fraught with frequent and almost uncontrollable fogging of the windows. And this is a direct threat to safety when making even short trips.
The heating system of any car is closely integrated with the cooling system. From a physics point of view, this is quite logical: why waste the heat that is removed from a hot engine if you can use it to heat the cabin? In summer, naturally, this thermal energy is wasted without benefit, but in winter you cannot do without a stove in your car.
Today we will look at the main malfunctions of the standard VAZ-2104 heater and how to eliminate them.
Control mechanism
The control of the VAZ 2107 stove is mechanical. It consists of a fan switch and a block of sliders. The control mechanism is installed on the center console at the top, which provides easy access to the elements.
There are three sliders of the control mechanism, and each of them controls its own element:
- The top one is responsible for supplying antifreeze to the radiator and is connected by a cable to a tap installed on the inlet pipe. The extreme left position of the slider means the tap is closed (the stove does not heat), the right position means the tap is open (antifreeze enters the radiator).
- Middle – air supply damper control. When you move it to the left, the damper shuts off the air supply from the street (closed air circulation in the cabin), while the right position means the air flow is open (air from the street enters the cabin).
- The lower one controls the damper for distributing the flow through the air ducts. Left position - the flow is supplied through the side and central deflectors, right - to the windshield area. Each of these sliders can be adjusted to any position to achieve optimal stove operation.
Principle of operation
The heating system works simply - to ensure air heating, the driver uses the upper slider to open the antifreeze supply valve to the heater radiator. If the air supply damper is open (the middle slider is in the extreme right position), then the air flow through the box that separates the moisture and the damper enters the stove body. Passing through the radiator, the air heats up, and then moves depending on the location of the remaining dampers.
If the lower slider is moved to the right, then the heated air will go to the windshield area, and if it is positioned to the left, it will go to the center of the cabin and to the side windows. To supply heated air to the feet, the driver needs to lower the lower damper lever down.
When driving at high speeds, the air flow through the air intakes moves intensively, so it is not necessary to turn on the fan. But if the movement speed is not enough, the fan creates forced circulation.
Using dampers and a fan, the driver controls the stove - sets the speed of air movement, the degree of its heating and the area of distribution.
Simple rules that, if followed, will extend the life of the heater radiator
In order for the radiator to last a long time, you need to follow a number of rules:
- When purchasing, you should not save money and buy a low-quality unit. You should pay attention to the material of manufacture and the manufacturer.
- Only high-quality liquids should be poured into the system. Do not pour water and mix antifreeze with antifreeze. No lubricant or fuel should enter the system.
- When idle during the warm season, when the heater is not in use, you need to open the heater tap at least twice a month so that liquid enters the radiator. Thus, the unit will not dry out and the heater tap will not stick.
If you carefully operate the heating system and fill it with high-quality antifreeze or antifreeze, then its components will last for many years.
Control module
The heating system of the VAZ-2107 is controlled using a special module located at the bottom of the dashboard. Its design includes three levers and a heater fan mode switch.
The topmost lever controls the “stove” tap. In the extreme left position it is closed, and the coolant flows bypassing the heating radiator. If the switch is moved all the way to the right, the refrigerant will begin to flow into it in full, heating the air to the maximum.
The middle lever allows you to close and open the air supply cover. In the left position it will be completely closed and outside air will not be able to enter the cabin. The lid will open completely when we move the switch to the far left position.
The heating system of the VAZ-2107 provides for the distribution of air flows for blowing the windshield and front side windows. This is done using the lower lever. In the right position, the air is directed to the side windows, in the left - to the windshield.
The heater valve, air supply cover, as well as dampers that redirect air flows are driven by cables.
The fan mode switch is located to the left of the control levers. It has four positions in which the fan:
- switched off;
- works at first speed;
- at second speed;
- at third speed.
Anti-fog protection for windshield, front door glass and rear window
To protect the windshield and front door windows from fogging, it is enough to direct cold air onto them, for which:
- close the air distribution cover of the heater with lever 3;
- move lever 6 to the right, and set lever 5 to the middle position;
- Turn the guide vanes of the side nozzles so that the air flow is directed towards the front door windows.
If you need to warm up the incoming air a little, move the heater valve control lever 7 partially to the right. If necessary, turn on the electric heater fan.
To protect the rear window from fogging, turn on its electric heating with switch 4.
Heater radiator malfunctions
The design of the element and the use of non-ferrous metals and alloys for their manufacture ensures high reliability; there is nothing to break in it. But malfunctions in the heater radiator still occur.
Main faults:
- clogging of the tubes, due to which the throughput of the heat exchanger decreases;
- loss of tightness due to crack formation.
In the first case, the blockage affects the operation of the heating system - the heated coolant cannot circulate normally in the heater, and therefore cannot transfer heat to the air. Cracks are the cause of antifreeze leakage, which flows onto the floor in the cabin. They can form on the components of the radiator (tanks and tubes) and on the pipelines through which the heat exchanger is connected to the engine cooling system. The antifreeze shut-off valve may also be leaking.
If the stove does not heat up or traces of antifreeze are found on the floor mat, you should inspect the VAZ-2107 interior heater radiator, and this can only be done by removing the part from the car.
Dismantling algorithm
VAZ cars of the classic family, which includes modification 2107, are good because to remove the heater radiator you do not need to dismantle the front panel, so the work of removing the heat exchanger of the interior heating system is not difficult. No specific tools are required, just 8 and 10 size screwdrivers and wrenches are needed.
We recommend: High-quality spare parts for German cars
Algorithm for removing the heater radiator:
- Drain the coolant by unscrewing the drain plugs on the engine and main radiator.
- On the left side of the engine shield (standing in front of the car) we look for two rubber tubes through which coolant is supplied and discharged to the heater. We loosen the clamps of these tubes and tighten them.
- We unscrew the screws securing the rubber seal through which the metal radiator pipes pass. Let's remove the seal.
- We move to the salon.
- We dismantle the shelf under the storage compartment on the passenger side. To do this, you need to unscrew the screws that secure it.
- Remove the lower part of the center console. It is attached to the floor and front panel with self-tapping screws. Since keys, a cigarette lighter, and a clock are installed on the lower part, after unscrewing the fastening elements, we move the box toward you (by turning on the reverse gear at the gearbox) and disconnect the wiring going to the indicated elements (it is better to mark the wires so as not to confuse them during assembly). After this, the box can be removed from the cabin.
- Unscrew the control mechanism cable from the antifreeze supply shut-off valve.
- We disconnect the lower part in which the fan is located from the stove body. It is attached to the top of the case using 4 latches installed on the sides. Use a screwdriver to pry up the latches, after which the lower part of the case will drop down. We move it to the side or completely remove it, having first disconnected the power wires of the fan motor.
- After dismantling the bottom of the case, you will have access to the radiator, which can be removed by pulling it down using the metal pipes.
Radiator installation
Note that this is only one of the methods for disassembling the stove on a VAZ-2107. It is not necessary to drain the antifreeze; you can disconnect the rubber tubes without removing them, and 1.0-1.5 liters of coolant will flow out of the cooling system, which are topped up after assembly. The main thing is that after disconnecting the tubes, lift their ends up and secure them in this position.
During the disassembly process, you can immediately disconnect the pipelines from the radiator along with the shut-off valve and then remove the heat exchanger itself.
Features of replacing the stove on a VAZ-2107
The work of replacing the stove on a VAZ-2107 does not have any significant difficulties in execution. Despite this, you will have to disassemble a significant part of the car’s dashboard. Therefore, before starting work, you need to find out whether it is really necessary to replace or dismantle the heater.
Key indicators for removing the stove
The main indicator for dismantling the heating element is liquid leakage. It is not difficult to determine such a breakdown - in the event of an antifreeze leak, a puddle appears under the rug of the front passenger seat. Then an urgent replacement of the radiator is required, since when the coolant evaporates, it releases toxic gases that can cause significant harm to human health. The radiator can be replaced only after dismantling the vehicle heater.
The next indicator for removing the heating element is the supply of cold air to the interior of the car. If the radiator tap is open and the stove does not heat, then it must be removed and the cause of the breakdown must be looked for. Most often in this case the problem is in the faucet, clogged pipes or radiator. Only after dismantling the stove can the fault be identified and corrected. There are times when the stove cannot be repaired, then you will have to buy a new product.
Preparatory stage
Let us consider in detail how to remove the stove so as not to damage the plastic parts of the body, fasteners and parts of the heating system. The work of dismantling the product requires attentiveness and accuracy from the performer.
To get started, stock up on all the necessary tools. To remove the heater, you will need a Phillips screwdriver, keys 7 and 10, a container for draining antifreeze, unnecessary pieces of fabric or rags. The fact is that when dismantling the stove, you will have to unscrew the radiator pipes, from which antifreeze will flow. To prevent toxic liquid from getting on the mats, you need to cover the bottom of the car well. Also, to install a repaired stove, you will need rubber gaskets and antifreeze for topping up.
When you have all the necessary parts in stock, you can proceed directly to removing the VAZ-2107 heater.
The procedure for removing the VAZ-2107 stove
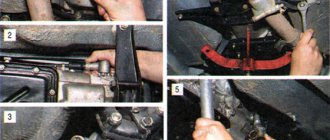
First, let's begin dismantling the heater housing in the car's interior. Initially, the radio panel is removed, which is attached with self-tapping screws, the glove box is dismantled, and the fan is unscrewed.
Now let's move on to the engine compartment. First, remove all the clamps that secure the heater valve pipes and hoses. The hoses are dismantled very carefully so as not to injure your hands on the manifold. Next, using a 7mm socket, the fasteners of the heater seal to the car body are unscrewed, and the sealing element is removed from the pipes. Further work on disassembling the stove is carried out inside the car. To get to the radiator, you need to remove the casing of the faucet adjustment cable and remove the loop from the lever.
The radiator no longer holds anything, it must be removed and disassembled. Initially, use a 10mm wrench to unscrew the two mounting bolts and remove the radiator pipe and valve. There are rubber seals between the pipe and the radiator, which must be replaced when assembling the heater.
As a result of the manipulations carried out, there is a completely disassembled VAZ-2107 stove. Further actions depend on the purpose for which the product was dismantled.
Carrying out heater diagnostics
Before starting to assemble the product, a visual inspection of the heating system parts is carried out. The most common cause of heater malfunction is deposits in the heater tap, due to which coolant does not flow into the radiator. The breakdown is eliminated by replacing the tap with a new product.
A heating problem can also be caused by a clogged radiator and pipes. In this case, the radiator will need to be flushed. To do this, you need a special liquid or citric acid solution. You need to take three hundred grams of acid per five liters of water and use a compressor to rinse the product. If the actions taken did not give the desired result, namely good tube capacity, then you need to purchase a new product.
Sometimes when removing the heating element, obvious damage is visible on it or the pipes. In this case, you will also have to buy a new product. Some craftsmen repair holes by soldering damaged elements, however, such repairs will not give long-lasting results.
To properly heat the interior, you need to purchase a new radiator. There are two types of stoves on sale for the VAZ-2107. From the factory, the car is equipped with a copper radiator, which has high heat transfer, but has a low service life. Aluminum heaters are considered more reliable, however, their level of heat transfer is much lower. It’s up to you to decide which part to purchase, since in this case you have to choose between comfort and practicality. After troubleshooting the heating system or purchasing a new radiator, you can proceed directly to assembling the stove.
We recommend: Setting up a Tesla car: useful tips
How to remove the VAZ 2107 heater fan.
Let me show you photos of where and what needs to be unscrewed.
Unscrew the four screws securing the shelf.
We remove the panel with the clock and the cigarette lighter by prying it with a flat screwdriver on both sides and pulling it out towards you.
Unhook all the wires from the clock panel and unscrew the two 10mm nuts.
Now at the bottom, where the buttons are located, on the side facing the rear passengers there is a plastic plug. We unscrew it with a flat screwdriver and see two screws. We unscrew them.
We disconnect the wires from the buttons and move the beard to the side, now nothing is holding it.
The stove motor is located in the lower part of the housing. To get it out, use a flat screwdriver to carefully remove the four iron brackets. Be careful when removing brackets ! They can fly away and get lost!
After removing the brackets, the stove body is simply pulled out.
The wires going to the heater motor will prevent us from completely pulling out the housing. We disconnect them.
The motor is attached to the body with two iron brackets, snap them off and you're done! You can replace the VAZ 2107 stove fan.
The process of disassembling the stove body on a VAZ-2107
Of course, simply disassembling the stove cannot make it work. To do this, it is necessary to repair or replace the motor or radiator itself. But first you need to disassemble the case. The procedure is as follows:
- The fan motor is equipped with two spring clips. They should be removed, and then the fan should be freed from the casing.
- We unscrew the nut that secures the impeller; it must be disconnected from the electric motor.
- After unscrewing the nut securing the bracket, remove the air distribution cover of the fan casing.
- Inside the casing there are latches for the damper housings of the air duct that is responsible for heating the side windows. Remove the casing and then disconnect the rods.
- We loosen the bolts that secure the bracket that clamps the shell of the flexible rod of the windshield heated air duct damper, and remove it.
- We unscrew the nut of the bracket securing the outlet and inlet pipes, remove the bracket and remove the heater radiator.
- Now you need to disconnect the stove faucet and the outlet pipe. To do this, unscrew the fastening nuts.
- We slightly loosen the bolt of the bracket, due to which the shell of the flexible rod of the air supply cover drive is secured, and remove the rod itself.
- We unscrew all the nuts securing the air intake and remove the cover from it.
This completes the work of disassembling the stove body. Reassembly should be done in reverse order. As you can see, this is quite easy to do, without any special skills or specialized tools.
Lada 2104 › Logbook › Day two: removing the VAZ 2105 stove, disassembling the wires + trouble!
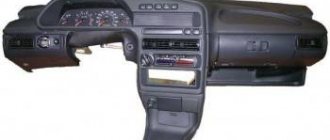
Yesterday, after removing the panel, I drove without a dashboard (I was scared that they might stop me for driving without instruments, but I had to go) and while driving, the turn signals stopped working. I thought that somewhere I had powered the ground crookedly or damaged the connection of the terminals. I stopped and checked everything, nothing helped. The next day (today) everything was the same, only the wipers barely worked (it was raining a little). I finally got to the garage and decided to check everything. I turn off the car and immediately try to start it. The starter barely turns and does not have enough power for the engine to start. The battery is dead! I put it on charge and try to understand the reason for its “landing”.
It turns out that the battery is charged from the generator through the dashboard (namely the battery charging indicator light). And if this circuit is opened, then the generator does not charge the battery and the car simply runs on the battery until it is “drained”. Connecting the dashboard solved the problem.
Next, the plan is to remove the wires that go to the dashboard and buttons. Unhook the 8-pin terminals (red green and white colors). And we throw it aside (=
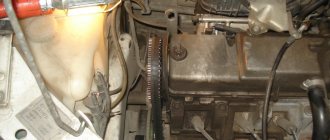
The next step is the long-awaited meeting with the stove! It was not easy to remove it. I disconnected the air duct that goes to the windshield (it just fell off). Wild cracks were discovered in it, which will be eliminated in the future. Afterwards I decided to disconnect the air ducts on the side windows. It was easy to remove the passenger one - unscrew the nut that goes behind the glove compartment and the air duct itself fell down. But I had to struggle with the driver’s license to remove it; I had to cut it in half and pull it in different directions. I will still be replacing this plastic with corrugation and therefore such a radical removal does not scare me at all (=
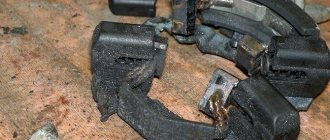
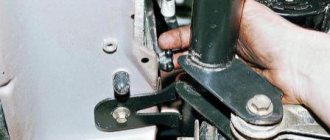
The air ducts have been removed, now you need to free the stove itself. It is held on by four metal brackets. It was difficult to remove them (secured tightly). During the removal process, the heaviest one was the one on the far side in the driver's seat. The steering wheel was very much in the way. As a result, it flew off in an unknown direction (I don’t know what to replace it with now). We take out the stove and place it carefully (this will come in handy).
Basic malfunctions and ways to eliminate them
The most typical malfunctions of the VAZ 2107 stove include:
- Air entering the cooling system. This usually happens after the system has been filled with antifreeze. Removing the airlock normalizes the heating process of the interior.
- When the heater tap is open, coolant does not flow into the radiator. This most often occurs when water is used as antifreeze. Scale forms in the system, clogging the faucet and impeding the passage of coolant. The problem is eliminated by dismantling the tap and then cleaning or replacing it.
- Poorly functioning or failed water pump. If the pump does not pump coolant, this can lead not only to a lack of heating of the interior, but also to more serious problems, such as engine overheating. The water pump does not work, as a rule, when the generator belt breaks, as well as when it jams as a result of wear on the bearings.
- Clogged stove radiator honeycomb. In this case, the supply pipe will be warm and the outgoing pipe will be cold. The radiator often becomes clogged when water is used as a coolant, as well as when oil or additive particles enter the system to eliminate leaks. Cleaning or replacing the radiator will help restore normal operation of the stove.
- Displacement of the partition in the radiator. If both radiator hoses are hot, but warm air does not enter the cabin, then most likely the partition in the radiator has shifted. The only solution to the problem is to replace the radiator with a new one.
If an oily residue appears on the floor or glass, you should look for an antifreeze leak, which may be:
- on tap;
- on pipes;
- on the radiator.
If a faucet or pipe is leaking, it should be replaced. A leaking radiator can be temporarily sealed, but it will still need to be replaced soon.
The list of possible stove malfunctions is not limited to this.
It can be quite difficult to get to some elements of the VAZ 2107 heating system
The stove does not turn off in the summer
Sometimes during the warm season it is impossible to turn off the stove by setting the upper handle of the control unit to the extreme left position. If you cannot turn off the tap, the tap itself or its drive cable is faulty. The tap can be found under the instrument panel on the passenger side. If you also cannot close it manually, you should not apply much effort. The faucet may break and antifreeze may leak into the cabin.
You can replace the faucet after purchasing a new one at any car service center. However, you can try to do this yourself. It should be noted that changing the faucet with your own hands is quite inconvenient due to its location. First, open the hood and disconnect the pipe going to the tap. Since coolant will flow from the pipe, it is necessary to place a previously prepared container under it. After this, you need to remove the storage shelf and, using a 10mm wrench, unscrew the two nuts securing the faucet to the heater body from the passenger seat. Then the tap is removed from the studs, removed and replaced with a new tap in the reverse order.
The reason for the inability to turn off the heater is usually a faulty heater valve.
Heater radiator clogged
You can clean a clogged stove radiator yourself. To do this you will need:
- two new rubber gaskets;
- two worm clamps;
- a set of keys;
- coolant;
- container for collecting coolant.
You can wash a clogged heater radiator yourself.
The radiator is flushed on a cold engine in the following sequence:
- Rags are placed under the pipes that will be removed.
- The clamps securing the radiator pipes and faucet are loosened.
- The pipes are removed. The coolant from them is drained into a pre-prepared container.
- Use a key number 7 to remove the seal fastening from the partition of the engine compartment.
- The heater valve drive is disassembled.
- The fan casing is removed.
- The heater pipes are pulled out through the hole. The radiator is removed.
- Using a 10mm wrench, unscrew the bolts securing the radiator outlet pipe.
- The old gasket is replaced with a new one.
- The heater valve is disconnected and cleaned.
- The radiator is cleaned from the outside of leaves and dirt.
- The pipe is cleaned from the inside using a brush.
- The radiator is washed with Karcher under a pressure of 5.5 atm until clear water comes out of it. This will require about 160 liters of water.
- If you don’t have Karcher, you can use caustic soda for washing. The soda solution is poured into the radiator and left for one hour. The solution is then drained and its color is compared with the color of the fresh solution. The procedure is repeated until the color of the drained and filled liquids becomes the same.
- After washing with caustic soda, the radiator is purged with a compressor.
Installing the radiator is done in the reverse order. It is recommended to replace all clamps and gaskets with new ones.
The removed radiator can be disassembled by unsoldering its top and bottom using a gas torch, and cleaning its insides with a metal mesh mounted on a drill. In this case, you can use a special washing liquid, alkali or citric acid. The radiator is then sealed and returned to its place. This procedure is quite labor-intensive, so it is often more advisable to replace the radiator with a new one.
We recommend: Lada Vesta head unit - price, replacement, connection and pinout
Video: replacing the radiator of a VAZ 2107 stove
Replacing the VAZ 2105 heater yourself
Many owners of the Five have tried and are trying to improve the heating system of their car. And not always only a complete replacement of the VAZ 2105 heater is the only correct solution. Often on a VAZ 2105, replacing the heater valve or other modifications is of great benefit. For example, you can independently seal the joints of the air exhaust hoses or redistribute the air flows, but still, this does not provide much efficiency.
Replacing the heater valve VAZ 2105
Heater valve VAZ 2105
Replacing the heater tap with a VAZ 2105 and other improvements are aimed only at maximizing the operation of the stove. As mentioned above, this replacement is carried out due to the improvement and modernization of the operation of the stove (a ceramic version can be installed) or if the old tap begins to leak. A leaking faucet can cause a lot of trouble for a car owner. Therefore, eliminating the leak will be the only correct solution, and this can only be done by replacing the tap.
Advice. We purchase a heater stove faucet in a store, preferably with two pipes. It is worth noting that the choice of cranes today is huge. Still, experts and experienced drivers advise buying a ceramic faucet. It has better equipment than the regular one. There are a lot of details in it.
- Rubber rings.
- Fastening nuts.
- Washers.
- Aluminium case.
- Ceramic filling and much more.
Ceramic faucets last much longer than regular metal ones. They practically do not stick like regular ones. We begin the replacement, armed with a jack, spanners and wrenches, sockets and an extension cord. We lift the car onto the inspection hole, which will greatly facilitate the work process. Let's get started:
- take some container and place it under the engine;
- unscrew the plug on the block and then drain the coolant;
- after this we remove the container, but not far, since it will still be needed;
- we find the pipes that go from the engine to the heater tap;
Pipes going from the engine to the tap
- loosen the pipe clamps;
- take a metal brush and clean the threaded connections of the two studs.
Advice. To avoid problems with loosening the nuts, it is recommended to moisten the connections with brake fluid. After all, studs are not ordinary bolts, but parts whose heads are buried in the plastic body of the faucet. The fastening nuts on the caps are self-locking and have plastic rings that are difficult to unscrew. Well, if you add corrosion to this, then everything becomes clear.
- remove the pipes while the threaded connections are acidifying (remember that you need to place a container under the pipes, since liquid flows from there);
- go to the salon;
- remove the side panel of the torpedo;
- then we find the pipe clamps;
- take a socket wrench with a cardan and unscrew the clamps;
- remove the pipes and replace them with new ones;
- after removing all the pipes, we climb under the car again;
- we find the nuts securing the heater valve;
- use a 10mm wrench to unscrew them;
- we return to the salon;
- pull the tap towards you;
- remove the spring clip;
- disconnect the control cable from the crane;
- install a new heater tap, first connecting the cable and attaching the tap to the body.
That's all! A new heater valve has been installed. The rest of the assembly is carried out in reverse order.
Radiator and heater fan
You should know that in order to always keep the interior of a five-wheeler warm and cozy, especially on winter days, you need to be able to increase the amount of heat supplied. Which part is directly responsible for supplying warm air? Of course, the radiator. But there is a problem - at the top five the fan is so loud that it makes you laugh. It is very small and simply not capable of creating the required flow. What to do? First, let's compare the fans on the VAZ 2105 and the VAZ 2108. The first motor consumes 4.5 A current and has a rotation speed of 3000 rpm, and the second one 14 A, but spins 4100 rpm. This already says something. It is recommended to replace the fan with another one.
Replacing the heater fan VAZ 2105
Replacing the heater fan on a VAZ 2105 is carried out as follows:
- the lower part of the stove is removed (this is a simple casing, on top of which a regular electric fan is installed);
- the old fan is removed;
- we cut off one of the aerodynamic ridges that supply air to the legs of the driver and passenger (this is done due to the fact that the fan motor of the VAZ 2108 is much longer);
- the impeller is also removed, which will not allow the fan from the VAZ 2108 to sit in place;
- Instead, a homemade one is installed.
Advice. In order not to remove the impeller, but to leave everything as is, you can use another fan. A standard five-bladed fan for classics, which has a motor several times more powerful, is suitable. And its weight is much lighter, and the rotor of the new motor rotates stronger than even that of the VAZ 2108.
- increase the diameter of the impeller hole;
- we insert a new shaft there (we do this very carefully so as not to break the impeller);
- connect the fan and check its operation;
- adjust the resistor and assemble everything in reverse order.
Heater VAZ 2105 fan replacement
Advice. It is recommended to replace the resistor on the five by installing the eight version. The new resistor must ensure quiet operation of the fan. The fan switch should also be replaced.
Replacing the heater VAZ 2105
Replacing the heater VAZ 2105
Repair and replacement of individual heating system elements
In addition to the radiator, the heating system includes a fan with an electric motor, a tap and a control unit.
Drivers who have been driving Zhiguli cars for many years often say that the VAZ 2107’s stove sometimes does not heat well. The most common cause of malfunctions in a system such as the VAZ 2107 stove is a leak in the radiator, as well as in pipes, taps and connections located directly between them. To this can be added switch failures for electric fan modes, damage to the device wires or oxidation of their components.
Fan motor
The electric motor of the stove is considered one of the weakest points of the VAZ 2107. This is due to the material of the bushings on which the rotor rotates. When these bushings wear out, the fan operation is accompanied by a characteristic whistle. This happens after two to three years of using the car. The electric motor can be brought back into working condition by cleaning and lubricating. However, after a short time the whistle from the stove fan will appear again. In such cases, experts recommend replacing the standard electric motor with a new one - a bearing one. As a result, the whistle will disappear, and the reliability of the unit will increase. The replacement process is associated with certain difficulties, since the electric motor is located in a rather inaccessible place. Nevertheless, after installation, the bearing motor is guaranteed to work for several years.
The factory electric motor of the VAZ 2107 heater fan is usually replaced with a bearing one
Heater valve
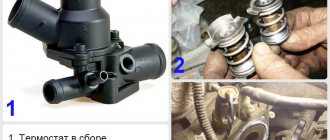
The heater valve is replaced when it jams, leaks, or in other cases when repair is impossible. Experts recommend installing a ceramic faucet in this case.
The metal heater valve usually opens in the fall and closes in the spring. During periods of inactivity, it can sour, become covered with scale and simply fail. The result can be extremely unpleasant for the car owner. These disadvantages do not exist with a ceramic faucet. There is practically no scale accumulation on ceramics, and it is not subject to corrosion. As a result, even after a long period of inactivity, the heater valve will be in working order.
The standard faucet of the VAZ 2107 stove is often replaced with a ceramic one
Control block
The heating system is controlled from the interior of the VAZ 2107 by several levers on the instrument panel, connected to the controlled elements by a flexible rod (steel wire). Using these levers you can:
- adjust the degree of opening of the air dampers;
- open and close the heater tap;
- distribute air flows between the windshield and side windows;
- take air from the engine compartment.
Each of the levers of the control unit is responsible for the operation of a specific unit.
In addition, there is also a lower damper (air distribution cover), which is controlled by a special lever located under the instrument panel on the driver’s side.
Thus, any car owner can perform most of the work on repair, maintenance and replacement of elements of the VAZ 2107 heating system independently. In addition, recommendations from experts will help you modify the stove yourself and make it work more efficiently.
Installing a stove radiator
Installing the radiator is done in the reverse order. To prevent future coolant leaks, it is better to replace the radiator clamps and pipes with new ones. This especially applies to pipes.
Open the heater valve before adding coolant. After adding antifreeze, you need to start the engine and let it run a little at high speeds. The circulation of coolant from the pump will expel any air pockets that could have formed when filling it. After all this, we check the antifreeze level and if it is low, then add it to the radiator and expansion tank to the mark.
Air in the cooling line
This kind of malfunction occurs quite often, and experienced drivers who begin to experience problems with the operation of the stove, first of all, eliminate air locks.
The fact is that a car’s cooling system is a smaller analogue of domestic heating: the presence of air in one of the coolant supply channels leads to problems with its circulation. If a plug has formed in the area of the stove radiator (which happens quite often due to the fairly high position of its upper part), the engine will not experience a shortage of antifreeze, but the heater radiator will heat up much less. Accordingly, it will not receive heat and air passing through the radiator and directed into the cabin.
However, the problem can be solved quite simply by running the engine at high speeds for several (5-7) minutes. This is enough so that, with the expansion tank plug intact, excess air is bled out of the system.
The most common cause of airiness is improper filling/topping up of coolant, as well as antifreeze leaks. In the latter case, before eliminating the air locks, you must find the location of the leak and eliminate the malfunction. If the problem is a loose or worn clamp, or a leaky pipe, they are replaced. Leaks in the pump, thermostat, and radiators are eliminated by replacing or repairing these parts.
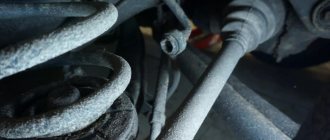
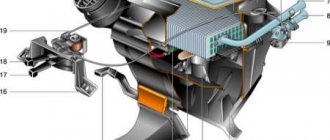
Interior heater VAZ-2104 assembled
How to install an additional stove
To install an additional heater in a VAZ-2107 you will need:
- stove (homemade, purchased);
- pipelines;
- tees for insertion into the cooling system;
- shut-off valve (to completely shut off the second radiator).
The installation algorithm is relatively simple and includes the following steps:
- Drain the coolant from the engine.
- Place and secure the stove in the chosen location
- We cut tees into the cooling system pipes
- Install the shutoff valve on the supply pipe
- We connect the radiator to the cooling system using pipelines through a tap according to the selected circuit (series, parallel). We place the tubes laid throughout the cabin secretly (in places where they are not visible and the likelihood of damage is low).
- We lay the power wires for the stove fan and install the control button.
- We fill the cooling system with antifreeze and check the connections for leaks.
- We remove air pockets from the cooling system.
- We check the functionality of the second stove.
If everything is done correctly, then the second heater, after heating the engine, supplies a heated air flow into the cabin. Finally, we note that if the additional stove heats poorly, it means that the performance of the standard water pump of the cooling system is not enough to ensure proper circulation of the liquid. In this case, installing another pump - an electric one from GAZelle - can solve the problem.
Another pump cuts into the pipes through which antifreeze is supplied to the interior heating system. This unit ensured proper fluid flow through the system.
Main malfunctions of the VAZ-2105 heating system
Let's consider the main reasons that cause the inoperability or decrease in the efficiency of the “five” heating system:
- Often the cause of deterioration in interior heating is a decrease in the level of antifreeze in the cooling system. If the car has been in use for a long time, this phenomenon can be considered quite natural, but if the level drops sharply, it is necessary to look for the reasons. If a leak is detected, it should be eliminated, coolant should be added and the air lock should be eliminated by pushing through the hoses with the power unit running;
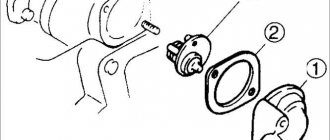
- a malfunction of the thermostat, which is responsible for the possibility of coolant circulation through a large or small circuit, can also cause the inability to reach the required temperature regime, as well as a breakdown of the heater tap;
- A common cause of poor heating efficiency is a clogged stove radiator. The fault can be localized by touch while the power unit is running: in the place where the radiator honeycombs are heavily clogged, there will be a noticeable temperature difference;
- Finally, problems may arise due to the heater fan not working or not working at full strength.
Stove modernization
Very often, in parallel with the prevention of stove malfunctions and its settings, the driver modernizes the heating system for more efficient operation.
We recommend: How to calculate engine hours in kilometers and what is an engine hour?
Most often, for these purposes, the standard fan and resistor are replaced with products from the figure eight. The new fan is larger in size, due to which a larger amount of warm air is supplied, and the vehicle interior warms up faster. The new fan fits into the standard seat with virtually no modifications. It is only necessary to cut off one of the aerodynamic ridges from the impeller. After such improvements, it will also be necessary to replace the standard fan button with a product from the figure eight.
Sometimes, for better airflow of the driver’s side windows, additional small fans are installed in the deflectors. Such improvements, combined with preventive maintenance, will ensure comfort and warmth in the cabin even in the coldest times.
Let's sum it up
Even a novice driver can handle replacing the stove on a 7 on his own, the main thing is the desire to work for a positive result. Carry out regular preventive diagnostics of your car's heating system at least once a year, before the onset of cold weather. This will provide you with comfort in the car at any time of the year.
Sources
- https://avto-idea.ru/sovety/pechka-vaz-2107-ustroystvo-rabota-osnovnye-neispravnosti/
- https://avtocity365.ru/ustrojstvo-i-ekspluatatsiya-avtomobilya/remont-radiatora-vaz-2107/
- https://7road.ru/drugoe/radiator-pechki-2107-razmery.html
- https://avto-idea.ru/remont/vaz-2107-remont-pechki-svoimi-rukami-zamena-pechki-vaz-2107/
- https://ladaautos.ru/vaz-2107/kak-pravilno-razobrat-pechku-na-vaz-2107.html
- https://bumper.guru/klassicheskie-modeli-vaz/sistema-ohdazhdeniya/pechka-vaz-2107.html
- https://7-vaz.ru/remont/kak-zamenit-radiator-pechki-na-vaz-2107.html
- https://akki-carsh.ru/dvigatel/otopitel-vaz-2107.html
- https://remam.ru/vozdsys/zamena-pechki-vaz-2107.html