Design and purpose of the heating system
The design of the VAZ 2108 stove and the principle of its operation are quite simple. The heated coolant enters the heater radiator located under the dashboard. In order for the liquid to circulate between the heater radiator and the cooling system, rubber pipes are installed, secured with metal clamps for a tight connection.
In the interior of the VAZ 2108, there are several holes for the release of warm air. Since the radiator is located in the center of the dashboard, and the holes are also located at the edges, a special heater motor is used for uniform air circulation. It has a built-in fan that circulates warm air throughout the cabin, ensuring rapid heating.
The stove motor is considered one of the most important parts of the entire system. The scheme of its work includes:
- additional resistor;
- electric motor rotating the fan;
- switch for the current operating mode.
All these systems, when assembled, provide uniform heating of the interior of the VAZ 2108 car.
How does the heater work?
In order to understand how to correctly remove the device, for example, in the case when it is necessary to replace the body of the VAZ-21099 stove, it is worth familiarizing yourself with its design. In this car, the heater is located in the central part of the instrument panel between the engine shield and the dashboard on the air supply line, to which the heater is attached with four bolts. The design of the 99 VAZ stove is represented by two casings made of durable plastic (casing), between which there is a radiator. There is a fan on top of the heater housing that blows heated air to heat the interior. You can get to it through the engine compartment. In order to shut off the supply of hot coolant to the heater and turn it off during the warm season, a special tap is provided. The stove design also contains heat-conducting lines, pipes and rods.
Dismantling process
- After draining the antifreeze, you can begin replacing the radiator itself.
- Remove the screws that hold the front panel in place.
- Unscrew the fasteners located on the rear wall of the glove compartment.
- You also need to remove the screw, which you will find near the side mirror on the passenger side.
- Once these fasteners are removed, the front panel will move freely up and down on the passenger side.
- To make your work easier, lift the panel as high as possible and insert something like a wooden block into the resulting gap. Usually you need a stopper about 7 centimeters thick.
- Lie on your back on the floor on the passenger side, unscrew the three fasteners that hold the heater in place. Get her out. The radiator has been removed.
- Apply a rubber seal to the new unit and insert the device in place of the old radiator. Don’t forget to clean the unit’s landing site first.
- Reassemble the unit.
- Fill the system with old or new coolant. This is an excellent reason to change the antifreeze if the old one has been in use for a long time.
Antifreeze should be added sequentially. First add fluid to the reservoir up to the MAX mark. After this, you need to start the engine so that it runs for about 15 minutes. The antifreeze level will drop, and you can add the missing amount.
The work is completed. The old radiator is recycled, the interior is tidied up and you can enjoy the result.
Didn't find the information you are looking for? on our forum.
We recommend reading:
The dimensions of the VAZ 2114 have disappeared
How to increase the charging of a VAZ 2110 generator, increase the voltage by soldering a diode
How to remove the fuel rail on a VAZ 2112 16 valves
How to connect the stove to a VAZ 2106, do-it-yourself replacement, step-by-step description
DIY podiums at VAZ
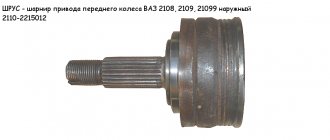
Replacing the CV joint on a VAZ 2114
Why does the low beam not work on the VAZ 2106?
VAZ 2114 how to change a headlight on a car, choosing optics, replacing a rear headlight, replacing glass on the front...
Step-by-step process for replacing a stove radiator
So, how to replace a radiator using the example of a VAZ-2109? The work can be carried out using two methods – with removal of the dashboard and without dismantling the device.
The first option involves an easier process that will take about 6 hours. In the second, everything will be somewhat more complicated, but the time spent will not exceed two hours. It's quick or easy - it's up to you. We will tell you how to replace it without disassembling the car dashboard.
To get started, prepare the following tools:
- two screwdrivers - cross and flat;
- ratchet with a set of heads;
- any container with a volume of up to 8 liters so that the coolant can be drained;
- rubber gloves to avoid chemical burns;
- spanners.
It is recommended to carry out work in a garage with an inspection pit.
After everything is prepared, you can begin replacing the heater radiator on a VAZ-2109 car. Following our recommendations, the process will not seem so difficult.
Let's start:
- Put on gloves and climb into the inspection hole. Unscrew the radiator cap and drain the liquid into a container. To simplify the process, take a hose 1 m long and 1 cm in diameter.
- After all the liquid has been drained, it should be about two liters by eye, it is necessary to drain the coolant from the engine cooling system. To do this, just find the appropriate plug on the engine and do everything in the same way as with the radiator. The button is unscrewed using a key with a diameter of 17 mm.
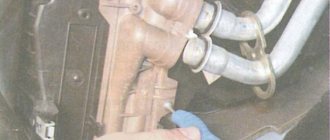
- At the next step, the pipes of the clamps are lowered and the remaining antifreeze is drained from the heating system. To do this, you need to get to these nodes from the salon and carry out this procedure. It's easier to do this from the front passenger seat.
- After draining all the antifreeze, proceed to dismantling the radiator. First, remove the screws that hold the front panel in place.
- The next step is to remove the screw on the back wall of the glove compartment and the screw located next to the passenger side rear view mirror.
- Once all the screws are removed, the front panel should move up/down freely. To simplify the work, lift it up to the maximum and place a 7 cm block under it.
- Place your back on the passenger seat mat and unscrew the 3 screws that hold the heater in place and remove it.
- At this stage, cover the new radiator with rubber band and put it in place. Be sure to clean this area before installation.
- Final step: Reassemble the entire system in reverse order. This should no longer cause additional difficulties.
We recommend: How to remove the window regulator on a Priora
How to change the heater radiator on a VAZ 2109
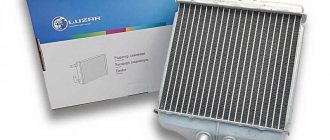
Most often, when there are problems with the heater core, we are talking about detecting a leak. This situation implies replacement of the unit.
Heater parts: 1 – elastic bushing; 2 – spring nut; 3 – left fan casing; 4 – electric motor; 5 – impeller; 6 – right fan casing; 7 – windshield heating flap; 8 – damper for the foot airflow channel; 9 – heater control damper; 10 – right heater casing; 11 – bracket for fastening the heater casings; 12 – gasket; 13 – radiator; 14 – clamp; 15 – supply hose; 16 – outlet hose; 17 – tap; 18 – left heater casing; 19 – sealing cover; 20 – resistor; 21 – support for the heater control damper axis
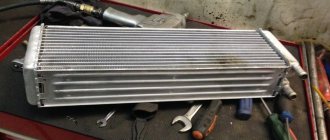
Radiator Maintenance
Clean the outside of the radiator of dirt, leaves and other debris. Inspect it carefully for any coolant leaks. If you find any leaks, it is advisable to replace it. If everything is fine, rinse it with a descaling agent (available at any hardware or auto store). If such a remedy is not available, use whey or a weak solution (3 - 5%) of sulfuric or hydrochloric acid. Pour the product into the radiator until it is completely filled. Perform this work wearing rubber gloves and safety glasses.
Remember that the chemical reaction will cause the product to bubble a lot, so work carefully. Cleaning time using whey 20 – 40 hours
Cleaning time using ready-made descaling agents or acid solutions is 5 – 10 minutes. After which the liquid must be poured out and the radiator thoroughly rinsed with clean water.
How to remove the radiator for 2108 – 21099 and 2113 – 2115
Cars of the Samara 2 family - VAZ 2113 - 2115 are copies of the Samara 1 family that have been restyled. Therefore, the technology for replacing the radiator for these machines is the same. To remove the heater radiator, you will need:
- plumbing hose from the mixer;
- basin;
- small containers to place under the radiator;
- a set of keys;
- normal-sized flathead and Phillips screwdrivers;
- wooden block 5 - 7 cm wide;
- flat and Phillips screwdrivers with short blade.
Access to the heater radiator of these cars is from the passenger compartment, from the passenger seat. Therefore, first of all, remove the front passenger seat, this will free up space for work and save you from having to work in very cramped conditions. Then disconnect the battery. This procedure is required because part of the electrical wiring runs next to the radiator. Then place a basin for coolant on the ground under the engine and use the handle on the instrument panel to open the heater tap (turn the handle to maximum heating mode). There are two options for draining the liquid. In the first option, the drain plug on the cylinder block is unscrewed and the liquid pours down somewhere, flooding the engine protection and splashing the engine compartment. In the second option, a plumbing hose from the mixer is quickly screwed into place of the drain plug. Its thread matches the thread of the drain plug, so this operation does not cause any difficulties. The hose is passed through the holes in the engine protection and directed into the basin.
Despite some differences in the dashboard of different models, most of the subsequent steps are performed in the same way, with all differences indicated. First of all, you need to unscrew the screws on the console trim. Then pull out and disconnect the radio, remove its mounting socket and unscrew the screw that secures the panel. It is also necessary to remove all stove control knobs. To do this, you need to insert a long thin screwdriver under them, this will help to separate the handle latch and the lever. On cars of the Samara 1 family (2108 - 21099), it is necessary to remove the heated glass deflector grille on the right side and unscrew the self-tapping screw securing the panel to the body. On the right side of the panel (torpedo), you need to unscrew two screws (on some models, self-tapping screws are installed instead of screws) securing the panel to the body.
Having completed all this, pull the right edge of the panel towards you, moving it 5 - 7 cm and place a block to fix the torpedo. Now you can start removing the radiator. It is located next to the right side of the body just below the instrument panel. You can identify the radiator by the rubber hoses that fit to it. Place a small container under the radiator to prevent coolant from spilling onto the floor. Using a small screwdriver, unscrew the clamps and remove the rubber hoses from the radiator tubes. Unscrew the two screws that secure the radiator and remove it out.
How to remove the stove VAZ 21099 High Panel
Device on the device panel
Sometimes you open the car door, sit in the driver's seat, put the key in the ignition, start it, and fluid starts dripping from under the center console. And from time to time it doesn’t just drip, it pours. If you are an inexperienced car owner, immediately think about what happened. And if you have no experience, you know very well that the internal heating system does not work. Let's see how to remove parts of the VAZ 21099 stove for diagnostics without the help of professionals, repairs, and possibly modifications.
Let's first look at the design of this device. The VAZ 2108-21099 plate is located under the central panel, between the dashboard and the engine shield. Attach with 4 bolts to the air box. Consists of 2 plastic shells - left and right. There is a radiator plate inside the cases. It consists of 2 rows of tubes, heat transfer plates and 2 plastic reservoirs attached with 3 screws to the right shell. An electric fan is installed on the top of the heater; this is necessary to supply air to the cabin. It can be removed from the engine compartment. There is also a heater mixer, a miracle device that allows you to store hot antifreeze outside the heater, as well as draft and mixing pipes.
In the event of flooding in the cabin, you must first move the control knob to the last left position. This will save you from burns, engine overheating and the need to take another bucket of antifreeze. If the valve is closed, but coolant flows out from under the dashboard, this means that the pipes, hoses or valve have burst. In this case, you need to immediately brake, turn off the engine and either take the car to a service center, or remove the necessary tools from the trunk and begin repairs.
How to replace a VAZ 21099 radiator plate
Choice
When choosing a new radiator for the stove of your VAZ 2109, you should understand what exactly you want to achieve and what budget you have.
Today, consumers are offered two types of units to choose from.
Radiator type
Peculiarities
Aluminum
A relatively inexpensive radiator option, which is characterized by high thermal conductivity. However, such a device cannot be repaired, which is its main drawback.
But in practice, repairs are not carried out so often, so few people pay attention to this disadvantage
Copper
If necessary and a leak is detected, the copper radiator can be repaired - soldered. Thermal conductivity indicators are slightly higher when compared with aluminum analogues
But at the same time, the price is quite high - both for repairs and for the radiator itself
Aluminum unit
Due to unprofitability and high cost, most VAZ 2109 owners choose aluminum radiators. But it all depends on your personal decisions and preferences. When actively using a car in harsh winter conditions, a copper radiator is fully justified.
Copper unit
Troubleshooting
To find the source of a leak in a stove radiator, pay attention to the following points:
- The primary sign of a leak in the interior heating system is an increased frequency of adding antifreeze to the expansion tank. At the same time, it is impossible to guarantee that the problem is in the radiator itself;
- Examine the condition of the heater valve and pipes;
- If the culprit is a faucet, it is not difficult to determine. If there are no unpleasant sweetish odors inside the cabin and the floor is not covered with traces of coolant, then this is definitely not it. The presence of such signs indicates that the stove tap needs to be replaced;
- The presence of deformations and cracks in the pipes can only be determined by visual inspection. Therefore, dismantling work will have to be carried out;
- Having discarded the options with pipes and tap, there is only one option left - damage to the heater radiator itself.
You should not delay repairing the radiator, as this will first lead to the need to spend extra money on antifreeze. A liter of coolant costs about 100 rubles. And over time, the problem will worsen, antifreeze will fill the interior, begin to corrode the floor covering, and cause a lot of other troubles.
Determining faults
We identify a radiator malfunction. The first signal that there is a malfunction is the frequent pouring of antifreeze into the tank. In this situation, it is impossible to say for sure that the problem lies precisely in the radiator. The culprits may be the pipes or tap of the heating system. To isolate the option with a tap, it is enough to check the interior of the car for an unpleasant odor and drops of antifreeze on the floor covering. If there are none, the problem is definitely not in the faucet. To determine the condition of the pipes, gain access to them to visually inspect them. This way you will understand whether they are leaking or not.
If there are no problems as such, the problem lies in the radiator. The problem must be solved quickly enough, since antifreeze can get into the interior and ruin the carpeting.
Dismantling the heater radiator on a VAZ 2110 – 2112
To remove the radiator, you will need the same tools as described in the previous section. During the preparatory steps, disconnect the battery and drain the coolant (the technology is the same as described above), then remove the frill and wipers. These operations are described in detail in the article repairing the windshield wiper trapezoid on a VAZ 2110. The radiator is located immediately behind the vacuum brake booster (VUT). To get to it, you need to remove the VUT. To do this, unscrew the two nuts securing the brake master cylinder (MBC) from the VUT and move the cylinder to the side. Then, from the passenger compartment (you may need to remove the driver's seat), unscrew the 4 nuts securing the brake pedal and pull out the VUT assembly with the pedal through the hood. Access to the heater radiator is open; it is located to the left of the place where the VUT stood. You can identify it by the rubber hoses that go with it. Unscrew the clamps and remove the hoses. Then unscrew the three fastening screws and pull the radiator to the right, remove it from the stove.
Progress
- Remove the lower console, which goes from the interior heating control levers to the gearbox housing.
- Move both front seats as far back as possible. If, in addition to the heater radiator, you also want to replace the faucet, then you will need to remove the plastic trim from the thresholds and lift up the carpet.
- File the magazine shelf under the glove compartment on one side; you can screw it back using self-tapping screws.
- After which you will see that you can easily remove the part into the resulting gap without any problems.
- Turn off the heater tap and prepare plugs that you will use as plugs and a container for the remaining coolant to prevent the remaining antifreeze that has accumulated in the radiator itself from spilling.
- Unscrew three bolts on each side of the radiator.
- Loosen only those clamps that fit directly to the radiator, but do not tighten them.
- Now the hardest part is that you need to drain the remaining antifreeze from the radiator. To prevent coolant from spilling on the floor, place waterproof mats or an old cloth under the faucet, at the front passenger's feet, and under the radiator.
- Pull off the pipes from the radiator, the first one to remove is the bottom one, which is located below on the tap; it is closed. Place a container and drain the coolant from the radiator. Keep the cork ready. About a liter of liquid may leak out. You may need to drain the liquid several times, so you will most likely have to plug the pipe with a plug.
- Remove the outlet pipe from the radiator, but do not lower it down, as coolant may pour out of it, keep it at the level of the attachment to the radiator. There is no need to drain the liquid, just plug the pipe with a plug.
- Now you can pull out the radiator itself.
- Replace it with a new one.
- Plug in the top outlet pipe.
- Then the bottom one.
- Tighten the clamps.
- If necessary, remove the air lock.
We recommend: How to determine air leaks in the intake manifold?
What is needed and when is it necessary to replace the radiator?
Repair and replacement of the VAZ 2109 heater radiator is required if:
- The radiator is leaking, there is a smell of coolant in the cabin, stains, drips from it;
- the radiator grille is clogged with dust, leaves, insects, as a result, air does not pass through it, and it is impossible to clean them;
- scale, corrosion of the walls of radiator tubes, aluminum radiators are especially susceptible to this;
- powder sealant, if used, may clog the system by getting into the coolant. In this case, thin radiator tubes are damaged and clogged faster than others.
Before replacing the heater radiator on a VAZ 2109, you need to check other elements of the system to see if there are any antifreeze leaks, cracks, or air pockets. But it is still recommended to change the pipes along with the radiator.
Tools, materials
Replacing the VAZ 2109 heater radiator requires a minimum of tools:
- screwdrivers - Phillips, slotted, preferably a set;
- wrenches and sockets, preferably in a set; if not available, you can get by with a socket head No. 10 and a deep socket, also 10;
- ratchet handle, extension;
- Rubber gloves, dishes for antifreeze, and the antifreeze itself are also desirable;
- It’s most convenient if the car can be driven into a viewing hole.
Before replacing the heater radiator on a VAZ 2109, you need to select and purchase it. For the VAZ 2109, auto stores offer 3 types of radiators, these are:
- Made from copper. Weighty, more expensive than standard ones (not much, the difference is about 700 rubles). They are distinguished by high reliability and long service life. Their main advantage is that they can be cleaned, restored, and if a leak is detected, such a radiator can simply be soldered. The only drawback is that it heats a little worse than aluminum, it warms up more slowly.
- A standard VAZ aluminum radiator is sold complete with pipes and clamps, the cost of the entire set is around 1,000 rubles. It heats up quickly, transfers heat well, requires replacement in case of any malfunction, maintainability is zero.
- Non-original radiators can cost up to 500 rubles; their low quality is not justified by the low price; in addition, due to less frequently placed plates, they heat worse.
After preparing all the tools, spare parts, materials, you can begin the repair.
Replacing the Radiator Heater VAZ 2108 Low Panel
If during a routine inspection of a tank with coolant VAZ 2108 2109 21099 you saw that it became smaller, increased to its usual level, and after a few days the level dropped again. This means that there are some leaks in the cooling system. It is sought through a visual inspection: the attachment points of the hoses, clamps, and the absence of cracks in the hoses are checked. If during the inspection you find that coolant is entering the passenger compartment, this indicates that VAZ 2108 2109 21099 is leaking from the heater radiator. With this malfunction, you begin to drip antifreeze onto the accelerator pedal and connect with it on the driver’s shoes. Antifreeze. corrosive liquid, so you can ruin good shoes. In addition, the antifreeze itself costs money; a liter tube of antifreeze costs about 5. Therefore, since antifreeze begins to leak from the radiators of the VAZ 2109, you need to look for this leak and fix it. What do you need: a replacement heating radiator (stove) for a VAZ 2109 . But it is not easy to approach him. Our client is still in control of the vehicle, saying he needs to disassemble the entire front panel. Of course, without this it will be even more convenient to change the radiator, but it will take you about 3 hours, we are not talking about reassembly. Therefore, the method for replacing the VAZ 2108 2109 21099 heater radiator without removing the front panel is given below. But first you need to drain all the antifreeze from the engine cooling system. Only a VAZ 2109 filled into the cooling system circulates about 8 liters. antifreeze, so prepare tanks where you will pour it in advance. Wear rubber gloves because it is best not to touch antifreeze with bare hands. It will also be useful to have a couple of liters. , because perhaps a little, however, it will shed. Open the coolant reservoir cap and find the cap at the bottom of the radiator.
READ Replacing Brake Light Bulbs Solaris 2017
VAZ 2109, radiator drain plug
Prepare a hose about a meter long and a centimeter across. Insert one end into antifreeze. Remove the radiator cap and push the 2 ends of the hose to the radiator outlet. In a VAZ 2108 2109, the radiator 21099 usually holds about 2 liters. antifreeze. When the antifreeze does not leak out, unscrew the plug. Now you need to drain the antifreeze from the small cooling circuit. The engine has a special limiter for discharging antifreeze. This is the vehicle's lowest cooling point.
Drain plug VAZ 2109 for the cooling system
Prepare several plastic bottles (preferably 5 liters), cut off their necks to make it easier to drain the antifreeze. Open the heater mixer in the cab (closed in the picture) to allow all the antifreeze to flow out of the radiator.
Open the VAZ 2109 heated radiator mixer
Unscrew the plug with a 17 key and again press the hose to the drain hole in the engine. Waiting for all the antifreeze to come into contact with the small cooling circuit. Then insert the plug into the area.
Now you need to remove and loosen the clamps on the heater radiator. Unless, of course, you are a very thin person, remove the passenger seat. There will be more than just maneuvers. If you don't want to take photos, move them as far back as possible. We rise to the place where the heater radiator is attached to the hoses of the heating metering system.
READ Replacing Front Silent Blocks Subaru Outback
VAZ repair. Plate VAZ 08-099 How to remove the plate assembly.
VAZ 2109 radiator clamp heater
Loosen the clamps and remove the hoses from the radiator. Be prepared for some more antifreeze to pop, so keep a container nearby. Congratulations, the antifreeze has been drained.
We are currently working on replacing VAZ 2108 2109 21099 with a plate. Unscrew the screws to secure the front panel.
Loosen the screws to secure the VAZ 2109 dashboard
We open the glove compartment, take it out, our client remains, and unscrew the screw on the back wall.
Disconnect the self-tapping screw in the VAZ 2109 glove
And unscrew the fastening screw on the panel near the mirror on the passenger side.
Unscrew the screw near the VAZ 2109 mirror
The passenger side dash now moves up and down. Now you need to move the block (about 7 cm thick) between the panel and the frame of the VAZ 2108 2109 21099. Also take several centimeter wide boards if the rod is not thick enough.
Replacing the VAZ 2109 heater radiator without removing the panel. car repair.
READ Replacing the Clutch Slave Cylinder Niva Chevrolet Video
Flexible rods
Next, remove the three screws that secure the cooktop and try to slowly remove it. To do this, it is better for our client to lie down on the passenger mat. If the slab is on a panel, install an additional slab. So, you took out the oven. Of course, everything will be sticky and wet from freezing. Birch and pine needles will also be glued here.
VAZ 2109 heater radiator
Take a rag and clean the area where the stove may come from. We take the last plate, glue it down using the rubber pad that comes with the kit, and set it in place. Screw in and connect the hoses. Then we remove the strips and fix the panel. A new VAZ 2108 2109 21099 plate was installed, but now you need to pour antifreeze into the system. After filling the antifreeze to the correct level, make sure there are no leaks, and then start the engine. After a couple of minutes of its operation, it is clear that the antifreeze level has dropped. This is normal, the water pump has compressed the air. Top up to the required level. And here is the finale, your VAZ 2108 2109 21099 is now equipped with the latest plate.
Source
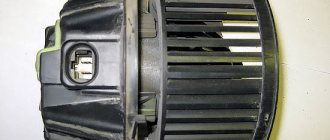
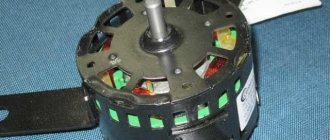
The procedure for removing and installing the heater motor on a VAZ 2109-2108
First of all, you need to open the car hood and unscrew the 5 bolts securing the plastic trim, as shown in the photo:
And remove it so that it doesn’t get in the way in the future:
Now you need to remove the hood seal:
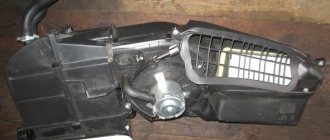
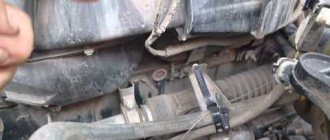
To then easily pull off the protective cover, under which the heater motor on the VAZ 2109-2108 is located:
After which access to the fan is open:
As you can see from the picture above, you need to unscrew the two mounting bolts that are located on the sides of the motor:
Well, then you will have to suffer a little. The fact is that on the VAZ 2109-2108 the power wires are soldered directly to the motor, and the terminals are connected to the electrical wiring inside the car. To put it mildly, the decision is simply idiotic. Now, in the cabin, by putting your hand under the panel on the driver’s side, we find the positive wire plug and disconnect it:
In the same area there is a negative wire, and there are even more problems with it, since it is secured with a nut, and in order to unscrew it, you must first feel it with your hand, and then use a socket and a ratchet to do this work. Immediately from the passenger compartment, you can insert these wires through the rubber seal in the hole in the body - it is visible in the top photo - from there two wires enter the passenger compartment.
And now, from the outside, turning the heater motor at different angles, we find the most convenient position, and remove it through the right side (in the direction of travel of the car):
And finally remove it from the engine compartment, as shown in the photo below:
If the part needs to be replaced, you need to buy a new stove fan, the price of which for a VAZ 2109-2108 is about 500 rubles for one motor. And if you buy it complete with the case, the price will be about 1000 rubles. We carry out the installation in reverse order.
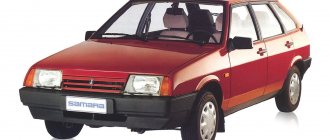
Today, no car can do without a heater in the cabin. The VAZ 2108 is no exception. This model was equipped from the factory with a stove capable of heating the interior up to 25 degrees, with a “+” sign. This is a pretty good indicator, considering that the G8 began production back in 1971.
Part selection
Before replacing, the first thing you need to do is select a radiator and buy it. Aluminum and copper radiators are available on the market today.
Aluminum has the following features:
- low price;
- high thermal conductivity;
- In the event of a breakdown, repair is not possible.
Copper radiators are characterized as follows:
- unlike aluminum analogues, the thermal conductivity is higher;
- If there is a leak, you can always solder the part;
- the cost is slightly higher than that of aluminum analogues;
- The price of repairs is also not cheap.
The high price of copper radiators, as well as low demand, makes copper radiators a rare item that cannot always be found in stores (a small number of manufacturers produce them).
Which one to choose is up to you. In this article you will learn only food for thought, on the basis of which you can make an informed choice. The main thing worth noting is do not buy painted radiators.
Basic faults
Sometimes, there are cases when the heater motor fails. In order to determine that it is the motor that is broken, it is enough to know a number of characteristic symptoms of motor failure.
The first sign of a malfunction is that the motor that activates the fan stops working when switching from one mode to another. Usually, the cause of such a breakdown lies in the additional resistor. Since this part cannot be repaired, it just needs to be replaced with a new one.
The second sign is that when the electric motor is turned on, the corresponding fuse blows. In this case, you need to check the winding of the armature located on the ground. It often happens that it simply closes.
The third symptom is that the fan rotates slowly, regardless of the mode in which the stove motor operates. This, as practice shows, is a consequence of contamination, or worse, oxidation of the collector. To eliminate this malfunction, the collector must be thoroughly cleaned. If this procedure does not produce results and the fan still rotates slowly, then try replacing the bearings. They have probably reached a critical stage of wear and tear and are moving with great difficulty. Less commonly, the cause may be an interturn short circuit inside the armature winding. If the motor of the VAZ 2108 stove does not turn on at all and does not rotate the fan, then the reason is not in the design of the motor, but in a break in the circuit itself. To make sure of this, use a voltmeter and carry out diagnostics.