How to step by step remove the heater motor on a VAZ-2109
Many owners of the VAZ-2109 and other domestic cars have encountered a situation where turning on the stove was accompanied by a high-pitched squealing sound or an unpleasant creaking sound.
To eliminate them, you can, of course, use lubricant, but, as practice shows, such elimination of the problem is not enough for a long time, and after a while the unpleasant sounds appear again. In this case, only replacing the fan, or more precisely, the heater motor, will help. For car enthusiasts who decided to remove the heater motor on their own for the first time on a VAZ-2109, after lifting the hood, the question immediately arises: how can it be removed and pulled out of this place? In fact, everything is much simpler than it seems at first glance, but you will have to tinker for half an hour. In order to remove the stove motor, you will need a Phillips screwdriver, a 10mm socket and a handle with a ratchet. Below is everything step by step:
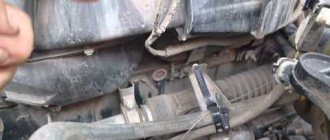
- First of all, you need to open the hood, find the place where the stove is located, and unscrew the 5 bolts of the plastic cover. After unscrewing, remove and place near the car. In order not to look for new bolts during the assembly process, instead of those lost during dismantling, it is advisable to initially prepare a small box for them.
- The next step is to carefully remove the rubber sealing gasket of the hood, as it will interfere with the removal of the protective casing, under which the VAZ-2109 heater motor is located. After completing these steps, access to the motor will be completely open.
- Next you need to unscrew the two bolts that hold the heater motor. They are located on the sides of it. They also need to be put in a safe place.
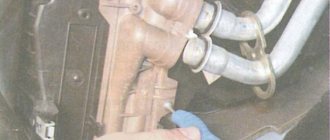
- Now let's move on to something more complex. On the VAZ-2109, the wiring going to the heater is soldered directly, and on the other side it is connected to the general wiring located in the car interior. Therefore, you will have to tinker a little. You need to find the positive wire plug and disconnect it. It is located in the passenger compartment under the panel on the driver's side.
- Let's move on to finding the negative wire. Its location is also under the panel on the driver's side, but there is a certain problem, since it is secured with a nut. Therefore, you need to feel it with your hand and use a 10mm socket and a ratchet to unscrew it. The wires can be immediately pushed out without leaving the cabin, through the rubber seal in the body.
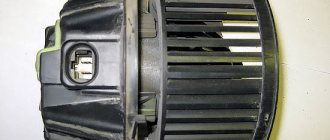
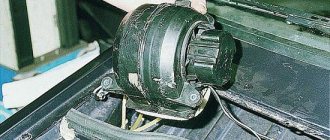
- We return to the stove motor and try to pull it out of its seat, changing the angle. We find the most acceptable position and carefully move it to the right side as the car moves almost all the way.
- When the motor is at the point of maximum expansion of the engine compartment, we finally pull it out of the car body.
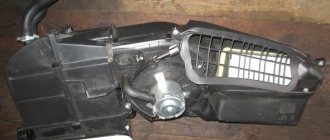
- After the stove motor is in good hands, use a screwdriver to pry up the casing seal and separate it into pieces.
- We release the mounting brackets and remove the cover from the motor and take it out along with the wheel.
In order not to disturb the balancing, it is not advisable to remove the wheel from the motor shaft.
Assembling and replacing the stove motor is carried out in the reverse order. There is no need to try to repair the motor or try to replace it with something else, this can lead to failure of the entire heating system of the “nine”. As a last resort, you can install a part from another, similar car model, but it is better to purchase a new device.
conclusions
Replacing the stove fan on a VAZ-2115 is quite easy and simple. As practice shows, most motorists do just that, saving their time and money. But, if the process seems very difficult, then it is recommended to contact the service, where they will do everything quickly and efficiently.
Sources
- https://FB.ru/article/307660/vaz—-zamena-ventilyatora-pechki-poshagovaya-instruktsiya
- https://ladaautos.ru/vaz-2115/kak-mozhno-snyat-ventilyator-pechki-vaz-2115-samostoyatelno.html
- https://luxvaz.ru/vaz-2114/189-zamena-ventilyatora-pechki.html
- https://KrutiMotor.ru/zamena-motorchika-pechki-vaz-2114-svoimi-rukami/
- https://carfrance.ru/zamena-ventilyatora-pechki-vaz-2114-poshagovaya-instrukciya-ot-a-do-ya/
- https://autorn.ru/vaz/2113/428-zamena-ventilyatora-pechki-vaz-2113-2114-2115.html
[collapse]
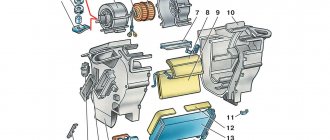
Heater motor: repair, replacement
The purpose of the heater motor is to increase the efficiency of heating and air circulation in the cabin. The quality of heating is significantly reduced if it breaks down. There is also the possibility of extraneous noise that irritates the driver and distracts attention. The way out of the situation is replacement or repair, and since removing the heater motor is not difficult, you don’t have to contact a car service center and carry out all the work yourself.
What is a stove fan
A car heater, which is popularly called a stove, is designed to perform a simple and at the same time important function - heating the interior. In addition, the device helps eliminate fogging of windows in cold and damp weather. During normal operation of the heating system, the temperature in the interior of the “nine” should be maintained at +20 ˚С with the same indicators outside, but only with a minus sign. In the legs, with maximum heating mode, the value should be maintained at +25 ˚С. One of the important components of the stove, in addition to the radiator, is the fan. The purpose of this device, its malfunctions and repairs should be considered in more detail.
Purpose of the device
The purpose of the motor is to increase the efficiency of the heating system and air circulation in the car. Its operation is based on air intake from outside and its subsequent supply into the cabin through the radiator. As a result of the air flow passing through the heat exchanger, the air enters the cabin already warmed up.
Possible problems
There are several other faults that cause the heating device to fail:
- Poor quality connection in the mounting block. This problem occurs in many cars, regardless of the country of manufacture, but it has an easy solution in the form of pulling a contact or stripping a group of contacts.
- Fuse failure. The integrity of the power supply may be compromised, and a short circuit will cause the entire structure to malfunction. At the same time, it is worth remembering that the heated mirrors and glove compartment lighting can be powered by the same fuse link as the fan. Accordingly, other elements also need to be checked.
- Turn on the airflow only in the third operating mode. Having understood the design, it is easy to understand the reason for the failure. At the first two speeds, additional resistance is connected. Direct switching is carried out in the third position. That is, if you replace the resistor, the problem will be solved.
- The ignition relay may stick in some cases. The heater motor starts working only after the engine has completely warmed up. If such a property is noted, it is worth checking the control device for malfunction and replacing it with a new one if necessary.
- Fan malfunction. If it does not respond to being turned on, and the voltage from the switch continues to flow, we can talk about a poor-quality connection at “minus”.
How to clean the heater air duct on a Renault Duster without removing the dashboard
The Renault Duster heater fan is not particularly quiet at speeds 3 and 4, but in normal working condition at speeds 1 and 2 it is quite quiet and vibration-free. Increased noise, vibration and crackling when the fan is turned on indicates that debris has entered the turbine, which needs to be removed somehow. Of course, the most effective option is to completely disassemble the front panel.
However, there are several ways to get rid of the noise and vibration of the stove on a Duster by simply cleaning the air duct. The essence of the technique is that we will try to blow through the ventilation duct and thus try to wash away the adhering dust from the fan, which leads to rotor imbalance, vibration and noise. There are no guarantees, but in many cases cleaning solved the problem 100%. Let's do it this way.
- Remove the protective grille under the hood.
- We find the air intake hole, it is almost in the middle of the engine shield.
- We remove the cabin filter, it is located at the feet of the front passenger.
- We set the heater to the foot blowing mode and turn on the 1st speed of the heater motor.
- Place containers to collect water on the front mats.
- We take a compressor, an air gun and a sprayer...
We carry out the purge procedure for about 30-40 minutes, periodically switching between operating modes of the stove motor. We spray water minimally, since it is still undesirable to flood the electric motor.
Switch failure
The switch itself often causes problems. Using a standard light bulb with soldered wires, you can check this device. In order to provide free access to it, the main part of the console is turned off. When the engine is turned on, one wire is placed at minus, the other touches all speeds separately. When the lamp on each element is triggered, there is no doubt that the switch is working. If there is no reaction, the wire is set to “plus”. The lamp should light up, but if this does not happen, the fuse may break, or the heater motor may have an open circuit.
How to check the serviceability of the motor
After removing the electric fan, first of all, inspect the impeller and bearings for contamination. Checking the output of the heater motor without disassembling it is possible with your fingers.
It is necessary to move the impeller and determine the amount of play, both in the longitudinal direction (back and forth) and in the transverse direction. There shouldn’t be any noticeable movement, but if there is, there should be production. If it is small (small play with almost no knocking) - you need to lubricate the bearings and bushings, and if it is large (it hangs noticeably, sometimes to the point that the impeller catches other parts) - replace them.
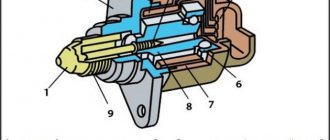
Disassembling and checking the stove motor (determining a malfunction)
Stove motor connection diagram
If the stove motor does not work at all, it should be disassembled (remove from the casing) and checked with a multimeter. You need to understand where the problem is: in the electric motor itself or in its power supply circuit. The easiest way to check if the stove motor is working is to apply 12 volts directly to it.
On some cars, the motor does not have additional electronics and is connected with two wires “+” and “-” (as on a VAZ and most other cars). In this case, it is enough to connect these contacts directly to the battery (usually red, blue or yellow for positive, black for ground). If there are more contacts, you will need a wiring diagram for the heater motor specifically for your car.
If, with direct power supply, the motor spins poorly or stands still, the problem is in the electric motor itself, and when it spins well, check the electrical circuits.
How to check a heater motor with a multimeter
Using a multimeter you need to check the resistance of the armature windings and ring the wires going to the brushes. The heater resistor is also checked separately (if the electric motor rotates straight, but with a resistor it does not). Possible causes of the malfunction most often lie in:
How the system works
It is worth first understanding the principle of operation of the system. The temperature is set to the desired level by closing and opening the tap of the heating element. At the same time, a heat source enters the radiator - heated coolant, the temperature of which when the engine is heated reaches 95 degrees.
The operating speed is set by switching the speed mode. This has a direct impact on the amount of cold or heated air entering the vehicle's interior. Afterwards, the air supply is varied using panel dampers, and they also regulate the direction, for example, into the cabin or onto the windshield.
Where is the heater fan located and how to remove it?
Practical training on dismantling the VAZ 2114 heater begins with determining its location. If you follow the sound, the heater along with the fan can be found under the windshield in the space under the hood. In general, the factory says that you can dismantle the engine without removing the heater. For this purpose, the following technique has been developed, which we are happy to share:
Further repairs and disassembly should be carried out only if there is no way to find a new engine assembled with a fan, and only if no one is going to remove the turbine from the shaft, otherwise the entire assembly will have to be thrown away, since the factory alignment cannot be achieved under any circumstances. Verified.
Replacing the stove motor
If the fan does not work or noise and squeaking occur, you need to change it. To begin, prepare a tool: a ratchet handle, a Phillips screwdriver and a head.
The screws used to secure the plastic trim next to the windshield are unscrewed, which is subsequently removed. It will interfere with operation, just like the hood seal.
The protective casing, which hides the stove motor, is pulled out, and the bolts securing it to the machine body are unscrewed.
On the driver's side in the cabin, you need to find the fan wire with a positive value and move it away. Next to it is a negative wire, the fastening of which can be removed using a head of a suitable size or a handle with a ratchet. There are no other options for stress relief, since the device features a direct method of soldering the wiring. Before changing the heater motor, you should rotate it to simplify the process. With knowledge and time, it can be repaired. In another case, a new device is installed, and all elements are returned in the reverse order specified.
Replacement
Now we proceed directly to replacing the motor. You will carry out the procedure from the salon, so make yourself comfortable.
Extraction process
Dismantled unit
Useful tips
After completing dismantling work, you can remove damaged, non-functioning elements and then install new ones in their place.
But when making repairs, we advise you to follow some important recommendations.
It is not difficult to dismantle the motor yourself, but to repair it, the most correct solution would be to purchase a new electric motor with a motor.
The stove motor is a rather sensitive element that periodically fails. To replace it, no special skills are required, but to repair the element, it is better to contact trusted service stations.
Source
Heater motor: repair
First, you should check for foreign objects in the air duct, as they can cause noise when they come into contact with the impeller. If they are missing, you will have to disassemble the electric motor. The disassembly process has a similar principle for different types of devices.
You need to pull out the armature; to do this, access to the brush assembly is provided by removing the fan cover. The bushings located on the cover and body are cleaned and lubricated.
The bearings are thoroughly washed in kerosene; the rubber anthers are first removed from them and lubricated with lithol. This algorithm often allows the bearings to return to serviceability.
If necessary, they can be replaced with new ones. In this case, before removal, the seats are marked on the shaft. To remove, you can use a screwdriver or a core, but the best option is a specialized puller.
The new element is pressed in with a hammer or a block of wood, and it is advisable to apply machine oil to the rod.
It is advisable to clean the collector from possible oxidation phenomena before assembling the stove motor. This will improve electrical conductivity with the brushes. Lubricating the fan with lithol will ensure easier installation in a plastic cup.
Recommendations and tips for repairing the stove fan
In order for the car heater motor repair to be successful, you should prepare in advance and take on board a few useful tips:
After the repair of the car heater motor is completed, you need to check it, first by manual rotation, and then by connecting it to a 12-volt power source (battery). If the electric motor works normally, does not howl and does not catch anything anywhere, you can begin to install it in place. So that later you don’t have to disassemble the panel again, because it is often quite difficult to remove the stove fan.
Source
Repair of the electric heater motor - replacement of the commutator and brushes
The information is suitable for repairing many vehicles.
In general, the original heater motor on my car, after 27 years of operation and 442 thousand km, stopped spinning. Once upon a time, there was a case that it was whistling for a year or more (approximately 2010 - 2012 it was whistling) - lubricated it with cyatim and since then it worked quietly for many years, until the factory commutator and brushes were worn out. I had no experience with such repairs, so I made a lot of mistakes in places - but nevertheless, I’ll tell you how it is, then the next ones won’t mess up. Removing the motor does not require dismantling the stove, but you need good screwdrivers and a retaining ring remover. 3 self-tapping screws and 1 retaining ring - removable and the motor can be removed (this is in versions without climate control). I would like to note that when reinstalling, be careful with the position of the protrusion, which should clearly fit into the groove of the stove body, do not use force.
By the way, the motor number is 4A0 959 101A
, some people recommend
Termal 402102M
; in theory, you should have bought it right away, but the desire to restore the original engine was stronger
At first, I didn’t notice that the commutator lamellas were basically gone and thought that I could get by with simply replacing the brushes. To replace them, you need to bend the 2 edges at the top of the holder and pull out the brush and spring:
Brush size 8x8mm:
I only had larger brushes at hand - I ground them to 8x8 using sandpaper + a file and set them up:
Connection diagram, resistors and fan relays
In principle, changing a fan is not difficult, but you will have to remember your service in the army and the vocabulary of the duty officer. We have placed the technical characteristics of the fan and its connection diagram on the page, if this will somehow help with dismantling. Just in case, if anyone cannot find the original fan, the engine must develop at least 4200 rpm with a current consumption of no more than 14 amperes.
Whistling and howling can be different at different engine operating modes. This is because the connection diagram assumes the presence of a resistor with a resistance of 0.23 and 0.65 Ohms. One limits the current for low speed, and the other is used to obtain the second speed. But this is a theory.
Replacing the stove fan VAZ 2113, 2114, 2115
The VAZ 2114 stove fan is designed to force air into the interior heating radiator. After the air passes through the radiator honeycombs, it becomes warm and enters the car interior through the air ducts. If the fan fails, the entire heating system stops working correctly and its efficiency is zero.
In this article, we will analyze the process of replacing the VAZ 2114 stove fan, list the tools for the job, and also talk about choosing a fan and the reasons for the breakdown.
What is a heater fan
The VAZ-2115 stove fan is a conventional DC electric motor, powered by the vehicle’s on-board power supply. The air flow is created by the rotation of a cylindrical impeller mounted on the armature shaft.
The fan is controlled using a special switch located on the control panel. It has four positions corresponding to its operating modes: “OFF” mode and three speeds. The higher the speed of rotation of the impeller, the stronger the flow of air supplied to the cabin.
Fan location
In VAZ-2114 and 2115 cars it is located on the left side of the engine compartment, under the windshield. Due to the fact that it is attached in an easily accessible place, dismantling the heater fan does not require a lot of time and significant labor costs.
This does not require disassembling other parts of the heating system. Tools for the job will require a Phillips screwdriver and a set of wrenches.
Step-by-step replacement process
- Open the hood and disconnect the negative terminal of the battery.
- Behind the engine shield, unscrew the four screws securing the fan casing and remove it. Phillips head screws.
After removing the casing, remove the two screws that hold the fan housing in place.
Using a slotted screwdriver, open the latches and separate the plastic fan housing into two halves.
Disconnect the heater motor power supply terminal (it is located above the gas pedal).
Unscrew the nut by ten and remove the ground terminal of the heater motor (the terminal is located above the gas pedal).
After removing the wires, remove the fan along with the motor.
Unscrew the two screws and you will be able to remove the plastic casing.
- After completing the above operations, the fan and motor are free. We take a new fan and reassemble it.
The process of replacing the VAZ 2113, 2114, 2115 stove fan is clearly shown in this video:
Examination
To make sure that the motor is the cause of the heating system malfunction, you should carry out a simple but indicative procedure:
- Start the car;
- Turn on the first, second and third speeds of the stove alternately;
- If there are no sounds indicating the start of the fan operation, the motor has failed;
- If the fan did not turn on at speeds 1 and 2, but started working at speed 3, then the cause of the problem may be a switch or an additional resistor.
Causes of failure
The motor may not work for several reasons. Each of them requires separate consideration. Therefore, we invite you to familiarize yourself with the possible causes of fan failure in our table.
| Cause | It is important to know |
| Fuse blown | The fuse F7 with a voltage of 30A is responsible for the stove. Replacing it is not difficult, but the main problem lies in the possible occurrence of a short circuit. This fuse is responsible for the lighting in the glove compartment, headlight washers, cigarette lighter, and heated mirrors. If it malfunctions, all specified devices will stop working. |
| There is no contact in the mounting block | This is a common problem in cars and occurs as a result of contact oxidation or loss of connection strength. |
| Ignition relay sticks | The heater turns on only after the car has warmed up. Therefore, it is recommended to check the condition of the ignition relay if the fan is not working. Replace relay if necessary |
| The heater only turns on at speed 3 | Speeds 1 and 2 are activated by an additional resistor, and in mode 3 the current goes directly to the motor. In this situation, you should replace the additional resistor or check its contacts |
| The heater switch is broken | Here we are talking about problems with the electrical target or fuse. To check their condition, you can use a test lamp |
| Problems in motor design | If everything is fine with the switch and current, but the fan does not respond, you should check the level of overheating of the motor, its ground contacts or brushes for sticking |
This is interesting: What are the types of lubricants for calipers and guides: what to look for when choosing
Depending on the troubles that arise, you may need to replace the fan. Changing the motor is not difficult, although to do this you must have some skill or at least minimal experience in working with the electrical equipment of your car.
The first step when replacing the heater motor is to disconnect the battery.
Motor location
Bearing wear
A sign of wear on the fan motor bearings is a characteristic hum. At the initial stage of the malfunction, this phenomenon usually does not affect the operation of the device in any way, but over time it will definitely develop into a more serious problem. Therefore, if you notice that the fan of the VAZ-2115 stove is humming, hurry to lubricate the bearings.
Brush wear and commutator destruction
The brushes supply electric current to the armature of the electric motor. They are made of graphite and are naturally subject to wear. If the electric motor operates in normal mode, they can last for 50-70 thousand kilometers. However, the influence of various negative factors reduces the service life of the latter several times.
Destruction of the commutator is most often a consequence of wear or distortion of the brushes. Restoring this element is quite problematic even for a specialist, therefore, if a similar problem is discovered, then replacing the stove fan for the VAZ-2115 will become inevitable.
Break or short circuit of windings
With windings the situation is even more complicated. If a collector malfunction can be identified visually, then you will have to measure the resistance in different areas, and even then it is not a fact that after identifying the problem it can be eliminated by rewinding. The best option in this case for the VAZ-2115 is to replace the heater fan. In addition, the new device will not be so expensive. An electric motor with an impeller costs about 1,100 rubles, with a casing – 1,300 rubles.
How to step by step remove the heater motor on a VAZ-2109
Many owners of the VAZ-2109 and other domestic cars have encountered a situation where turning on the stove was accompanied by a high-pitched squealing sound or an unpleasant creaking sound.
To eliminate them, you can, of course, use lubricant, but, as practice shows, such elimination of the problem is not enough for a long time, and after a while the unpleasant sounds appear again. In this case, only replacing the fan, or more precisely, the heater motor, will help. For car enthusiasts who decided to remove the heater motor on their own for the first time on a VAZ-2109, after lifting the hood, the question immediately arises: how can it be removed and pulled out of this place? In fact, everything is much simpler than it seems at first glance, but you will have to tinker for half an hour.
In order to remove the stove motor, you will need a Phillips screwdriver, a 10mm socket and a handle with a ratchet. Below is everything step by step:
- First of all, you need to open the hood, find the place where the stove is located, and unscrew the 5 bolts of the plastic cover. After unscrewing, remove and place near the car. In order not to look for new bolts during the assembly process, instead of those lost during dismantling, it is advisable to initially prepare a small box for them.
- The next step is to carefully remove the rubber sealing gasket of the hood, as it will interfere with the removal of the protective casing, under which the VAZ-2109 heater motor is located. After completing these steps, access to the motor will be completely open.
- Next you need to unscrew the two bolts that hold the heater motor. They are located on the sides of it. They also need to be put in a safe place.
- Now let's move on to something more complex. On the VAZ-2109, the wiring going to the heater is soldered directly, and on the other side it is connected to the general wiring located in the car interior. Therefore, you will have to tinker a little. You need to find the positive wire plug and disconnect it. It is located in the passenger compartment under the panel on the driver's side.
- Let's move on to finding the negative wire. Its location is also under the panel on the driver's side, but there is a certain problem, since it is secured with a nut. Therefore, you need to feel it with your hand and use a 10mm socket and a ratchet to unscrew it. The wires can be immediately pushed out without leaving the cabin, through the rubber seal in the body.
- We return to the stove motor and try to pull it out of its seat, changing the angle. We find the most acceptable position and carefully move it to the right side as the car moves almost all the way.
- When the motor is at the point of maximum expansion of the engine compartment, we finally pull it out of the car body.
- After the stove motor is in good hands, use a screwdriver to pry up the casing seal and separate it into pieces.
- We release the mounting brackets and remove the cover from the motor and take it out along with the wheel.
In order not to disturb the balancing, it is not advisable to remove the wheel from the motor shaft.
Assembling and replacing the stove motor is carried out in the reverse order. There is no need to try to repair the motor or try to replace it with something else, this can lead to failure of the entire heating system of the “nine”. As a last resort, you can install a part from another, similar car model, but it is better to purchase a new device.
Replacing the heating fan on a VAZ 2107
Before starting work, you should select everything you need. Here's what we need:
- screwdrivers (phillips and flat);
- wrenches (set of open-end and socket wrenches);
- new stove fan for VAZ 2107.
Sequencing
First you need to carry out one preparatory operation: remove the gear shift lever. In the VAZ 2107 it creates serious problems when dismantling the furnace fan. Then you should remove the radio from its niche. It is attached with two self-tapping screws. When removing the radio, do not forget about the wires that are located behind it. The device carefully slides out of the niche so that you can stick your hand into the gap formed between the radio and the front panel and remove all the connectors with wires located on the back cover of the radio.
- Now, using a Phillips screwdriver, unscrew the shelf located in front of the passenger. It is attached with four self-tapping screws.
The shelf in the interior of the VAZ 2107 is held on by only four screws - Next, remove the console with the cigarette lighter. It is carefully pryed up in the lower left corner with a flat screwdriver and bent towards itself until it clicks. The same is done with other corners, after which the panel is removed from the niche.
To remove the VAZ 2107 cigarette lighter panel, you will have to carefully pry it off with a screwdriver - Behind it are wires that are manually disconnected from the panel. Before disconnecting the wires, it is strongly recommended to put some marks on them so that nothing gets mixed up when reassembling. At the top of the niche there are two 10mm fastening nuts. It is most convenient to unscrew them with a socket head.
It is most convenient to unscrew the nuts on the casing of the VAZ 2107 with a 10mm socket - Above the panel with the cigarette lighter there is another panel with buttons. It is pryed from below with a flat screwdriver and bent upward. Underneath there are two screws with washers that can be unscrewed with a Phillips screwdriver.
You can only get to the screws under the buttons by bending the panel with a screwdriver - Now the cigarette lighter panel is completely freed from its fasteners, and it can be removed and placed on the floor of the cabin.
Having removed all the fasteners, it is better to place the panel on the floor, to the right of the gearshift lever - The next step is to disconnect the air ducts. They are held on by flat plastic latches that can be easily bent with a flat screwdriver.
The latches on the air duct of the VAZ 2107 are made of very fragile white plastic - After removing the air ducts, access to the VAZ 2107 heater itself, or rather, to its lower part, opens. It has four steel latches: two on the left, two on the right. If you have certain skills, the latches can be bent with your fingers. If that doesn’t work, then you’ll have to use a flat-head screwdriver again (it should be noted here that you need to use the screwdriver as carefully as possible, since when bent, the latches pop out of their sockets and fly away to God knows where).
Extreme caution must be used when bending these latches. - Access to the electric motor and fan is open. The motor with the fan attached to it is held in place by two steel latches located at the top and bottom. It is impossible to bend them by hand, so you cannot do without a screwdriver (and the blade of the screwdriver must be very thin and narrow, since another blade simply will not fit into the slot of the latch).
It is better to open the latches on the heating motor of the VAZ 2107 with a long and very thin screwdriver - The motor with the fan, free from fasteners, is removed and replaced with a new one. After this, the VAZ 2107 heating system is reassembled.
The VAZ 2107 stove fan is freed from the fasteners and is removed together with the motor
Video: independently changing the stove fan on a “classic” (VAZ 2101–2107)
Stop trash
In some cases, it is possible to reach an agreement with the engine by lubricating the bushings with graphite grease. There is no guarantee that he will calm down, but you can try. Throw it away anyway. Noise, creaking and squealing of the fan can be associated not only with the engine itself. Often there is a simple clogging of the air duct and debris getting inside the fan. The meanness of the situation is that it is almost impossible to check this without dismantling the fan.
What do you want? You have to fight for warmth in the car. And if this heat is also silent, there is no price for it. But it’s still better to try to prevent debris from getting into the air duct, and then the VAZ 2114 will delight its owner with a warm and quiet interior. Good luck on your journey!
A stove is a necessary element of comfort in any car, especially when driving in the winter season.
This article will detail the possible causes of its malfunction, and the nuances of repairing the heater with your own hands. You will learn how to change the heater motor, fan and fuse yourself, without having to spend money on the services of specialists at a service station.