Signs of injector failure
The injector's job is to supply fuel to the combustion chamber. Therefore, the main malfunction that can occur with it is clogging or its complete failure. Signs of malfunctioning injectors include the following factors:
- unstable engine operation at idle;
- significant increase in fuel consumption;
- problems with starting the engine, especially when cold;
- in some cases, a significant amount of black smoke may appear from the exhaust pipe (if a lot of fuel enters the combustion chamber through a leaking nozzle), and sometimes it is also accompanied by periodic loud pops from the muffler;
- loss of the dynamic qualities of the car, expressed in the fact that the car accelerates poorly, it lacks power, jerking is felt while driving even on a flat surface, including when releasing the gas and when the load on the engine changes.
These signs, of course, may indicate other problems with the car’s power unit, but if they occur, we advise you to check the injectors and, if necessary, repair or replace them.
Malfunctions in the operation of injectors entail significant wear of the internal combustion engine, and the time for its major repairs is approaching.
Injectors for engines installed on GAZelle
The popular GAZelle car of various modifications has been traveling on Russian roads since the early 90s of the last century. During this time it has undergone many changes. Under its hood are several ZMZ (Zavolzhsky Motor Plant) gasoline engines - 402, 406 and 405. The most successful of them was the injection 405 model, with a power of 152 hp. With. In addition, diesel units are used - the Russian licensed GAZ 560, as well as a Cummins 2.8 ICF, 120 horsepower, Chinese assembled, designed in the USA. Cummins have been installed on GAZelle “Business” and “Next” modifications since 2010. An integral part of injection and diesel engines are fuel nozzles.
Injectors spray the fuel mixture inside the combustion chambers under high pressure. This ensures complete combustion of the mixture. The nozzle of the electromagnetic injector, which sprays fuel, opens and is locked by a shut-off needle. The locking element is controlled by the electromagnetic field created by the electromagnet winding. If voltage is applied to it, under the influence of the field the needle rises and releases the nozzle, overcoming the force of the pressure spring. An additional filter is installed at the fuel supply inlet.
Video: how an electromagnetic injector works
Injectors for the ZMZ 405 engine
At first, injection internal combustion engines were equipped with domestic sprayers produced by GAZ. But they were forced to abandon them, since these injectors quickly failed. They were replaced by imported ones produced by German companies Bosch, Siemens or analogues - for example, ZMZ Deka.
The injection distribution is controlled by an electronic unit (ECU), which alternates pulses to the windings of the injection electromagnets. Being an intelligent device, the control unit constantly monitors and improves the efficiency of the fuel system. The fuel supply to each cylinder is synchronized by the engine crankshaft. When the engine starts, fuel is supplied asynchronously, that is, regardless of the position of the crankshaft. The injectors are unpretentious to the quality of gasoline - just like the 405th engine model.
Injectors for Cummins 2.8 ICF engines
Cummins diesel engines do not like low-quality domestically produced diesel fuel. Therefore, it is recommended to install only imported original injectors on them. Although their price is high, sprayers from German manufacturers are capable of working reliably for 100-120 thousand km of travel. To prevent them from failing prematurely, you need to install only original filters recommended by the manufacturer into the fuel system.
The presented sprayer is a closed type device. Its device is similar to the circuit of an electromagnetic gasoline injector. Open type injectors are also used. Their spray hole is not closed by a shut-off needle. Such devices are less reliable and do not last as long. Closing nozzles go through four stages of the working process:
- the needle closes the injector nozzle, diesel fuel is not supplied;
- the needle rises, diesel fuel begins to be injected into the combustion chamber;
- the nozzle is fully open, fuel is atomized as much as possible;
- closing phase - the needle lowers, closing the nozzle, the supply of diesel fuel stops.
The latest modifications of Cummins engines are equipped with a Common Rail fuel system. Piezoelectric atomizers are used for it. Their response speed is several times higher than that of electromagnetic injectors. Thanks to this, the supply of diesel fuel is better dosed and its overconsumption is eliminated. The supply of diesel fuel is controlled by a piezoelectric element that can change its size under the influence of an electrical impulse. The piezoelectric crystal controls the valve that regulates the flow of fuel to the injector nozzle.
This is interesting: Why do brake pads squeak?
Why do injectors fail?
Contaminants can enter the fuel system along with gasoline. For cleaning, filters are installed that capture contaminants larger than 20 microns. Such filters are provided both on the fuel line and in the injector itself.
Gasoline contains heavy fractions. They settle on the injector seats, and over time turn into resinous growths. This leads to deterioration of the injectors or their complete failure.
How deposits appear
When the engine stops working, light fractions of the fuel evaporate on hot surfaces. Heavy fractions settle on parts, including nozzles. There is nothing to wash them off - fuel no longer flows.
Over time, the shut-off cone can no longer fit tightly into the seat - therefore, the tightness of the nozzle is broken. This leads to interruptions when starting the engine, as the pressure in the fuel line decreases. Resinous deposits clog the injector nozzle. As a result, the amount of fuel ejected by the nozzle in each operating act decreases.
The spray pattern of the injector also changes. The sprayer has its own standards and tolerances. Solid contaminants lead to the formation of an irregularly shaped torch, fuel atomization occurs smoothly, and fuel leaks appear. Often deposits form more intensively on individual injectors, while the load on the “cleaner” ones increases.
Filter contamination
Another main reason for injector failure is dirty filters. Filters are installed along the fuel path and the injector itself has a filter. Its size is small and it is designed only to filter out very small fuel contaminants. If during operation of the fuel system the main filter, which is supposed to catch increasingly larger particles, is clogged, the injector filter instantly becomes clogged. Therefore, timely replacement of fuel system filters is the key to injector performance.
How to remove
The procedure for dismantling and installing injectors is not particularly difficult, but it does take a lot of time. You need to prepare a set of tools in advance:
Before removing the injectors for replacement, it is necessary to relieve the pressure in the vehicle's fuel system. This is a necessary measure to ensure safe work and eliminate the possibility of injury.
To relieve fuel pressure, you must turn off the fuel pump. It is located in VAZ 2114/2115 cars in the fuel tank. The easiest way to get to the pump is through the hatch located under the rear seat cushion. For this:
Remove the cover and remove the contact block from the fuel pump housing.
Then you need to start the engine. The engine will run on the amount of fuel that remains in the system, since the pump will not build up pressure after removing the block. You must wait until the engine has completely used up the remaining gasoline and stalls.
More information about replacing the fuel tank in VAZ 2108/2109/2114/2115 cars can be read in this article: https://vazweb.ru/desyatka/pitanie/zamena-benzobaka-vaz-2114.html
The procedure for removing injectors is as follows:
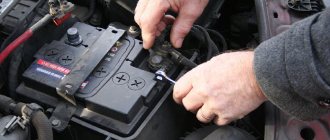
Open the hood of the car and remove the wire from the negative terminal on the battery.
For ease of dismantling, it is recommended to remove the air filter box. It will prevent free access to the engine.
After that, use your finger to snap off the plastic retainer on the engine and disconnect the connector from the throttle valve.
The connector from the idle air control regulator is removed in the same way.
Next, you need to disconnect the connector block from the wiring harness of the injectors themselves.
The injectors can only be removed together with the fuel rail. Therefore, you need to unscrew the bolts securing the ramp to the body.
After which it will be possible to move the ramp to the side so that each of the nozzles moves slightly out of the mounting socket. The wires are removed from the injectors, otherwise it will be impossible to pull out the ramp.
READ How to Check Ford Focus 2
The ramp is pulled out and placed in a clean place. Now you can easily remove all the injectors - they are pressed out using a plastic clamp.
Disconnecting the injectors is only possible after dismantling the ramp itself
Accordingly, new products are inserted in place of the old ones. And then the installation work is carried out in the reverse order.
How can you check the injectors?
Why do we need injectors at all?
The main function of this element is to supply fuel to the combustion chambers. Moreover, you need to supply a certain amount of gasoline mixed with air. This is the only way to form a flammable mixture that will ignite in the combustion chamber. Given this, it is logical to assume that the injectors may malfunction due to bad fuel. And this is true in 90% of cases. Car owners who pour bad gasoline into their car are forced to clean or change this engine element more often. But for this you need to know how to check the injectors correctly.
Injectors on the VAZ 2114: faults and their elimination
In the VAZ 2114, the carburetor, used in AvtoVAZ cars before this model, was replaced by a more modern injector. If earlier the fuel supply could be adjusted manually by moving the valves, now an electronic system has begun to control the injection of gasoline, and in order to customize it you need to arm yourself with a computer and a programmer.
To carry out control using the ECU, it was necessary to install many sensors on the engine, increase the pressure in the fuel rail, and perform injection using injectors.
Injectors are solenoid valves that open a very small hole when the ECU sends a signal to it. Due to high pressure, fuel is injected through this hole. How much gasoline will be injected into the combustion chamber depends on the opening time, hole size and pressure. The time is calculated by the ECU in accordance with a program that takes into account the indicators of many sensors.
The maximum possible performance of VAZ 2114 injectors depends on the size of the hole; when tuning, they are replaced with more efficient ones, but do not forget about the pressure. It is created by the fuel pump, and is discharged from the fuel rail by the regulator into the “return”.
When installing powerful injectors on a VAZ 2114, it will most likely be necessary to improve the fuel pump so that it can maintain the required pressure and ensure normal operation of the injectors.
Injectors for the VAZ 2114 8 valves and 16 valves are installed one on each cylinder, that is, there are four in total. Fuel is injected not directly into the combustion chamber, but into the intake manifold, which also branches into four in front of it, where gasoline is mixed with air; for this, gasoline must be sprayed as much as possible before injection.
Methods for cleaning and flushing the injector
The most widely used methods for flushing the injector are:
- Washing with special detergent additives for gasoline.
- Cleaning and washing the injector without removing the injectors from the engine.
- Washing injector nozzles in an ultrasonic cleaning stand.
Let's take a closer look at each of them.
Gasoline additives for injector flushing
Additives for flushing the injector are the cheapest and easiest way to clean it from contaminants. Such additives are available in the range of many auto chemical manufacturers. They are most effective when added regularly to the gas tank.
When the first signs of injector contamination appear, you can apply a shock dose of such additives, but provided that the gas tank and pipelines are relatively clean. Otherwise, all the dirt will end up in the electric fuel pump and fine fuel filter, which obviously will not add durability to these components.
Flushing the injector without removing the injectors from the engine
Cleaning and washing the injector without removing the injectors from the engine is carried out using a simple washing unit:
- to do this, the engine is disconnected from the standard power system;
- instead, a unit for washing the injector is connected;
- after which the motor is forced to run for 20-30 minutes using a special solvent.
The washing ability of this composition is very high and it easily washes away all deposits (for an example, see the video at the end of the article).
Washing and cleaning the injector with ultrasound
Ultrasonic injector cleaning is by far the most effective cleaning method. To do this, the injectors are removed from the engine and placed in an ultrasonic unit with a special solvent.
The operating principle of the installation is as follows:
- In order to help the solvent wash out toxins, it is forced to vibrate using ultrasound.
- Liquid vibrations have virtually no effect on the nozzle, but cause slags to resonate, which peel off from the metal and become easy prey for the solvent.
The time for such injector flushing usually ranges from half an hour to an hour. The advantages of this method include the uselessness of an expensive solvent, however, a fairly large amount of work is required to remove and reinstall the injectors on the engine.
Causes of malfunction of injection nozzles
Nozzle device
Modern fuel injectors in gasoline engines come in two types: electromagnetic and mechanical. The first is a solenoid valve that is controlled by the vehicle's ECU system. When the appropriate signals are given, the valve opens to a certain angle, regulating the amount of fuel supplied to the cylinder. The second only supplies fuel to the channel. Its design includes a needle with a step. When there is enough pressure, the fuel overcomes the resistance of the spring and the needle rises. Accordingly, the nozzle opens and fuel is supplied to the chamber. Currently, electromagnetic injectors have gained wide popularity as they are more technologically advanced. Therefore, we will further consider checking and cleaning using their example.
There can be only a few malfunctions of the electromagnetic injector:
- lack of signal from the ECU;
- malfunction or complete failure of the winding;
- nozzle outlet is clogged.
As practice shows, it is the latter option that is the most common cause of complete or partial failure of the nozzle.
What are the types of injector malfunctions?
On injection engines, two types of injectors are used - electromagnetic and mechanical.
We recommend: What kind of drilling is on a VAZ-2114 wheel rim?
The electromagnetic injector operates on the principle of a valve, which, depending on the signal from the vehicle's control unit, opens, injecting the required amount of fuel into the cylinder.
The mechanical nozzle opens under pressure. It is based on a spring and a needle. It works as follows: when fuel is supplied, a certain pressure is created, the needle rises and fuel is sprayed into the cylinder.
Nowadays, mechanical injectors are practically not used on modern cars, so we will talk about malfunctions of electromagnetic injectors.
Since the nozzle is a fairly simple part in its structure, it can have several faults:
- No signal from the control unit
- Internal winding break or other malfunction
- Contamination of fuel supply channels
As a rule, most often the injectors stop working as they should due to contamination.
Signs of malfunctioning gasoline engine injectors
There are two common injector malfunctions - a violation of the quantitative composition of the mixture and a distortion of the spray pattern. The latter also reduces the quality of mixture formation.
Since high-quality compliance with the mixture composition when starting a cold engine is of particular importance, problems with injectors most clearly manifest themselves in this mode.
The injector may “overflow” when the valve is unable to maintain the gasoline pressure and the over-enriched mixture refuses to ignite, and the spark plugs will be bombarded with gasoline in the liquid phase. Such an engine cannot be started without purging with additional air.
The designers even provide a special mode for blowing the spark plugs, for which you need to completely press the accelerator pedal and crank the engine with the starter, while the fuel is completely shut off. But even this will not help when a closed nozzle does not hold pressure.
Related article: Why the starter turns, but the engine does not start
Poor atomization can lead to a lean mixture. Engine power will drop, acceleration dynamics will decrease, misfires in individual cylinders are possible, which will cause the lamp on the instrument panel to light up.
Any deviations in the composition of the mixture, including due to its insufficient homogenization, will lead to a significant increase in fuel consumption. This does not necessarily mean that the mixture is too rich, but a lean one will have the same effect as it will reduce the overall efficiency of the engine.
Detonation may occur, it will go out of thermal mode and the catalytic converter will be destroyed, popping sounds will appear in the intake manifold or muffler. The engine will require immediate diagnosis.
How to change VAZ 2114-2115 injectors or clean the injectors
A fuel injector is an electromagnetic valve with a small hole that opens at the command of the electronic control unit for a certain time. Through this hole, the fuel required to form the fuel-air mixture is supplied under high pressure.
READ How to Check the Armored Wiring of a VAZ 2110
The following signs usually indicate problems with injectors:
- the engine is difficult to start;
- the engine is unstable;
- the power unit is troit;
- dips and loss of power are noticeable;
- revolutions float;
- increased fuel consumption;
In such a situation, the injection nozzles must be cleaned or replaced regularly. At the same time, you can check, clean or replace injectors 2114-2115 on a VAZ yourself. Read more in our article.
How to check fuel injectors on a fuel injection engine
There are several methods for checking the performance of an injector. Let us list them in order with a detailed indication of the algorithm of actions.
Check using resistance measurement
You can check the injectors without removing them using a multimeter. First, check which injectors are installed on your car - high or low impedance (electrical resistance). This data will be necessary to perform an accurate diagnosis. In order to check the injectors with a tester without removing them from the engine, you must adhere to the following plan:
Measuring the resistance of the injector winding
- remove the high-voltage wires from the injectors;
- set the multimeter to the mode for measuring insulation resistance (ohmmeter) in the range from 0 to 200 Ohms (depending on the technical parameters of the device, the upper limit may differ, the main thing is that the ohmmeter can show a resistance value of several tens of Ohms);
- turn off the ignition and remove the negative terminal from the battery;
- disconnect the electrical connector on the injector being diagnosed (as a rule, to do this, unclip the fastening clip located on the block body);
- connect the tester's measuring probes to the injector terminals and take measurements.
High impedance injectors have insulation resistances ranging from 11...17 Ohms, and low impedance injectors - 2...5 Ohms.
If the measured insulation resistance value differs significantly from the specified value, this indicates that the injector is faulty. Accordingly, the injector must be dismantled and detailed diagnostics performed.
Remember that when checking injectors with a multimeter, you need to diagnose all devices one by one! This way you can check which injector is not working.
It is important to know that the voltage to the injectors from the ECU is supplied in pulsed and not constant form. Therefore, it is recommended not only to measure the resistance with an ohmmeter, but also to take an oscillogram of the pulsed voltage transmission using an oscilloscope, so you can see what peak voltage it receives. The tester will only show you average values.
How to check power to injectors
Checking the power supply to the fuel rail of VAZ 2110-2112
Let's look at checking the availability of power to the ramp using the example of VAZ 2110, 2111, 2112 cars, as some of the most popular. But first, let us recall that in the block with contacts, four of them supply power to the injectors, and one (pink wire with a black stripe) is the common ground. You need to act according to the following algorithm:
- disconnect the power plug;
- on the multimeter, set the upper limit of the measured resistance to around 200 Ohms (this value depends on the specific model of the tester);
- measure each of the four contacts from the injectors with a common connector in pairs.
The resistance value should be within 11.5...15.5 Ohms . Remember that this will only measure the resistance of each injector on the ramp.
You can check the injector simply for vibration. When the engine is running, a working injector should vibrate slightly . If there is no shaking, it means it is out of order.
Checking the power supply from the car's electrical circuit is quite simple, you just need:
- it is necessary to disconnect the supply wire block from each injector one by one;
- After this, use two pieces of wire to connect the injector directly to the battery;
- turn on the ignition.
If the injector starts spraying fuel, then the problem must be looked for in the wiring.
Be careful not to let fuel from the injector spill on you or other objects. Point its nozzle into a closed container.
How to check the starting injector
First, let's say a few words about the monoinjector. Today, such units are becoming less and less common, since the system is outdated. Its essence lies in installing only one injector - in front of the throttle valve. They can be found on old models of foreign cars from VW, Audi, Skoda, Seat and others.
Let us describe the algorithm for checking the resistance of an injector on a monoinjector:
- check the contacts from the injectors in pairs and compare them with the data from the manual (as a rule, these values should be within 1.2...1.6 Ohms);
- when checking pins 1 and 4, you need to make sure that the DATV (intake air temperature sensor) is working correctly; for this, also use the resistance data from the manual;
- if the resistance value is outside the acceptable limits, it is necessary to diagnose the injector in more detail.
Start injector
Often in old mono-injection engines, in addition to the valve injector, a so-called starting injector is also used, the task of which is to provide additional fuel when starting the engine, especially in cold weather and at high engine speeds, in order to facilitate its starting. Its operation time is determined automatically by the computer (in particular, a thermal relay), but as a rule, it lasts only a few seconds, after which it turns off as the engine starts and there is no need for its further use.
Its operation is completely similar to the operation of the nozzles in the injector. During operation, it may also partially or completely fail. A clear sign of such problems is the fact that a cold engine starts and immediately stalls. The starting injector is checked according to the following algorithm:
- pick up some small measuring container (like a glass);
- remove the injector from the engine and install it in the mentioned container;
- one contact of the injector is connected directly to the car’s battery, and the other to its “ground”;
- The fuel pump relay is also connected to the “plus” of the battery, thereby putting it into operation.
When operating and checking the pump, the injectors must be paid to the angle of fuel spray, as well as the amount of gasoline pumped. You will find reference data in the reference information for the injector that is installed in your car. As an indicative example, the data on the K-Jetronic system can be cited. In this case, the spray angle is 80°, and the volume is from 70 to 100 cubic centimeters of fuel per minute. Naturally, in other systems these indicators will be different.
After you have checked the operation of the mono nozzle, disconnect it and wipe it dry. In normal operating condition, its body is sealed. This means that fuel should not leak from it. Wait a while and make sure of this (1...2 minutes is enough for this).
Checking the injector by ear
Experienced motorists are able to check the condition and performance of injectors without removing them from the engine, in particular, by ear . To do this, use a regular rectangular board or, better yet, a stethoscope.
Place one edge of it tightly against the nozzle being tested, and the other edge to your ear. If the nozzle is in normal operating condition , then you will not hear any extraneous sounds or vibrations from it, only uniform clicks . But if it does not click or the sounds are not uniform, and other vibrations and knocks are also present, this means that the nozzle in question is clogged. And the stronger the knocks and noises, the greater the degree of blockage.
In general, you can listen to the injectors without the mentioned board. However, this requires relevant experience. The fact is that if the unit is faulty, a muffled high-frequency sound will be heard from the cylinder block, similar to a squeak or whistle. If you hear it while the engine is running, we recommend that you check the operation of the injector in more detail on a stand or ramp.
Checking the injector on the ramp
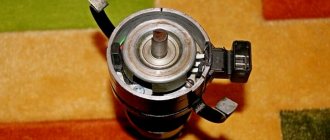
Fuel rail
Another method for checking injectors is with the fuel rail removed (it is removed together with the injectors, so this method can be classified as one that involves removing the injectors). To do this, the ramp is removed along with the injectors, and cups or other containers are installed under them to receive the fuel. In this case, it is advisable to remove the “negative” terminal from the battery and disconnect the supply wire harnesses. Before switching on, the circuit must be restored.
After this, connect the two fuel pipes and tighten the fittings holding them with a wrench. Next, you need to turn the starter for 10...15 seconds (but not longer, as this is harmful to it). It is important to note the shape of the “torch” under which the fuel is supplied, as well as the amount of gasoline in the glasses. If the injectors are working properly, the amount of gasoline in them should be the same . If this is not the case, then for further detailed diagnostics it must be removed and checked on a stand.
It will also be useful to notice whether gasoline is leaking from the injector when the engine is turned off. If this is the case, then it makes sense to check the integrity of the injector body, as well as the degree of its closure.
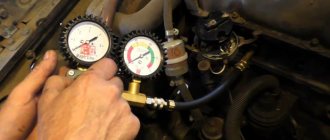
Checking the injector balance
Checking the injector balance
Let's look at checking the balance of injectors using the example of VAZ cars. Actions are performed in the following sequence:
- turn off the fuel pump and start the car in order to remove excess fuel pressure in the system (the car should run for a few seconds and stall);
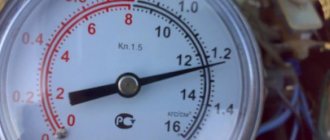
- connect the pressure gauge to the fuel system;
- connect the fuel pump back into the system;
- connect a computer with the appropriate software and a cable for taking and diagnosing readings to the car’s computer.
Further actions are carried out in the software, with the help of which the fuel pump and injectors are turned on and off. The action algorithm for each of them is as follows:
- turn on the ignition;
- we check the readings on the pressure gauge (should be about 2.8...3 at);
- using the software, turn off the fuel pump relay;
- the pressure on the pressure gauge has dropped slightly (approximately 2.8 at);
- use the software to turn on the first injector;
- check the pressure on the pressure gauge (ideally, the pressure should not drop significantly);
- again, using the program, turn on the fuel pump relay in order to restore the pressure to the original 2.8...3 atm;
- then repeat the procedure with all the injectors, and then do not forget to restore the pressure in the system using the fuel pump.
Ideally, all injectors should show the same pressure release value. If in any of them the reset occurs with a very different value, this means that something is wrong with the injector, and additional diagnostics are needed.
After performing the described procedures, do not forget to completely relieve the pressure in the system. You need to connect the fuel pump and start the car, after which you can disconnect the pressure gauge.
Checking injectors on a bench
Injector testing stand
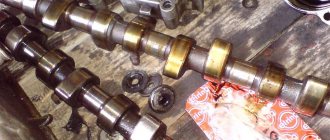
Mechanical characteristics affect the performance of injectors. And their verification is possible only at a special stand. You can read how to make it yourself in a separate article. In particular, at the stand they check:
- the amount of fuel passing through the injector;
- fuel pressure;
- the shape of the “torch” of the nozzle.
Checking a removed injector on a bench is the most accurate diagnostic method. With its help, you can determine the degree of damage to the injector and the feasibility of repair.
Possible malfunctions of diesel injectors
The most common cause of malfunction is a malfunction of the needle in the nozzle guide sleeve. If its value is reduced, then a large amount of fuel flows through the new gap. In particular, for a new injector, a leak of no more than 4% of the working fuel that enters the cylinder is allowed. In general, the amount of fuel from the injectors should be the same. You can detect a fuel leak at the injector as follows:
- find information about what pressure should be when opening the needle in the injector (it will be different for each engine);
- remove the nozzle and install it on the test bench;
- create obviously high pressure on the nozzle;
- Using a stopwatch, measure the time after which the pressure drops by 50 kgf/cm2 (50 atmospheres) from the recommended value.
This time is also specified in the technical documentation for the engine. Typically for new injectors it is 15 seconds or more. If the nozzle is worn, this time can be reduced to 5 seconds. If the time is less than 5 seconds, then the injector is already inoperative.
If the injector valve seat is worn out (does not hold the required pressure and excessive drainage occurs), repairs are useless and will cost more than half the cost of a new one.
Sometimes a diesel injector may leak a small or heavy amount of fuel. And if in the second case only repairs and a complete replacement of the nozzle are necessary, then in the first case you can do it yourself. In particular, it is necessary to grind the needle to the seat. After all, the main reason for leakage is a violation of the seal at the end of the needle (another name is a sealing cone).
Replacing one needle in an injector without replacing the guide bushing is not recommended, since they fit together with high precision.
To remove leaks from a diesel injector, thin GOI grinding paste is often used, which is diluted with kerosene. During lapping, it is necessary to ensure that the paste does not get into the gap between the needle and the bushing. At the end of the work, all elements are washed in kerosene or diesel fuel without impurities. After this, you need to blow them with compressed air from the compressor. After assembly, check again for leaks.
conclusions
Partially failed injectors are not critical, but a very unpleasant breakdown. After all, their incorrect operation leads to a significant load on other components of the power unit. In general, the machine can be operated with clogged or misconfigured injectors, but it is advisable to carry out repairs as quickly as possible. This will keep your car engine in working condition, which will save you from even greater financial expenses. So, when the first symptoms of unstable operation of the injectors on your diesel car appear, we recommend that you at least check the functionality of the injector in an elementary way, which, as you can see, anyone can do at home.
Determining damage by hearing
Most experienced drivers can try to determine the operation of the injectors even by ear. Beginners are not recommended to use this method due to lack of experience.
To try to diagnose injectors by ear without removing them from the engine, you will ideally need a stethoscope or a small thin board. One side of the board must be pressed tightly against the TF being examined, and we place our ear on the other side.
When working properly, the nozzle does not emit any extraneous sounds, does not emit vibration, and generates rhythmic clicks extremely clearly. If uneven noises or knocking noises are heard, we can conclude that the nozzle is clogged. The degree of damage is determined by the volume and frequency of the unusual noise.
Motorists with extensive experience can do without a plate during analysis. If a malfunction exists, a muffled high-frequency sound will emanate from the engine area, very much like a squeak. If it is continuously heard while the engine is running, then the fuel injectors must be examined on a ramp or stand.
Troubleshooting
To quickly check the injectors without removing them, you will need an indicator screwdriver. It consists of a metal rod and handle on which a switch and a contact are located to create a conductive circuit, clamped by one of the fingers. When moving the switch forward towards the rod, the device becomes less sensitive; when moving to the upper position, its sensitivity increases. In the first case, the red indicator lamp will light up or flicker, in the second case, the green lamp will light up.
Before carrying out the test, the screwdriver switch must be moved forward, towards the working part (rod) until it stops, and your finger must be pressed against the open contact located on the handle of the indicator screwdriver. The hand must remain in this position during the entire test, closing the electrical circuit, otherwise there will be no indication.
The working rod of the screwdriver must be positioned so that it touches the metal bracket on the block holding the nozzle. There is an opinion that it is enough to simply bring the rod to the block for an indication to occur, but this is not so. The metal clamp catches the electromagnetic pulse generated during the operation of the injectors; a potential difference and alternating currents arise in it, which the device records.
This test checks the injector while the engine is running, so it must be started and left at idle. When the rod of the indicator screwdriver comes into contact with the metal bracket on the screwdriver, the red indicator should light up. This checks performance on all cylinders. If the injector of one of the cylinders is not working, the indicator will not light or blink.
Using the indicator does not necessarily indicate that the injector is faulty, it signals that it is not working. The problem may be there, or in the voltage supply system, poor contact, failure in the electronic control unit, etc.
Some models do not have metal pad clamps in which currents are generated; in this case, is it possible to determine the faulty injector without removing it from the engine? Yes, this can be done using the same indicator screwdriver. To do this, you need to set the switch in the uppermost position (this is the highest level of sensitivity of the device) and perform additional manipulations.
After starting the engine, the screwdriver rod is brought to the injector block, and no indication will appear, even if it is working. Therefore, you need to attach a metal bracket to the screwdriver shaft, which will serve as an antenna where electromagnetic oscillations will occur. A paper clip carefully pressed around the rod with pliers is suitable for this.
During the fuel injector test, the switch remains in the highest sensitivity up position. With the engine running at idle speed, you need to bring the bracket as close to the block as possible, it should cover it. A blinking indication should appear on the device due to currents excited by the electromagnetic field that occurs during operation of the nozzle. If there is a non-working injector under the column, there will be no indication. This technique is also suitable for pads equipped with a metal bracket.
Conclusion
Testing with an indicator screwdriver will help you quickly find a problem when the engine is misfiring due to an injector, or other problems from the list above arise. If you have this tool, you can carry out diagnostics in your garage, and having identified a malfunction, fix it, if possible. The proposed test only reveals the fact that the injector is not working, and this can be done without disassembling the engine.
To identify the reasons why the fuel does not ignite in the cylinder, more detailed diagnostics and subsequent repairs will be required. However, it is not always necessary to replace the nozzle; there are other reasons why it does not function or is unstable. Sometimes you just need to seal the pad contact and the problem of stable engine operation is immediately solved; in more complex cases, for example, to clean the injectors, you will need to contact specialists.
The main signs that the injector is leaking, including into the cylinder
If the injector does not let fuel through at the moments when it is required, the common people say that “the injector is pouring into the cylinder.” In this case, the fuel is poorly atomized or simply flows in a small stream into the combustion chamber. What are the signs of this failure? First of all, at idle or at low loads, characteristic engine jerks appear. As the engine warms up, the degree of jerking decreases due to much better evaporation of fuel in a warm engine, even in the event of injection irregularities.
Another sign of an injector leaking into the cylinder is difficulties in starting the engine - it can only be started on the second or third attempt. Moreover, such problems did not arise before under exactly the same conditions. The reason is that the injector flows even when the engine is not running, which leads to a drop in pressure in the rail. And since the fuel pump operates for only a few seconds at startup and is then switched off by software, it cannot restore the required pressure. And in this case, only by repeatedly starting the engine is it possible to equalize the pressure in the ramp to normal.
In addition, the air-fuel mixture becomes very lean, even if only one of the injectors begins to pour into the cylinder. The combustion of a lean mixture worsens significantly, but the sensitivity to detonation increases, which will be signaled by the corresponding sensor. Unfortunately, many car owners ignore this signal, believing that the sensor is simply faulty.
We recommend
Sometimes a flash in the engine can occur even before the starter starts working, which is another sign of a leaking injector. In this case, an idle spark when turning the ignition key manages to ignite the leaked fuel.
How to clean injectors
Most often, the problem with the operation of injectors is their banal contamination. Therefore, to restore their functionality and return the injector to its nominal performance, it is enough to clean it. This can be done in two ways - without removing it from the engine (by adding a special cleaner to the fuel) and in the removed state (passing the cleaner through a separate nozzle or using ultrasound). The following methods are used for cleaning:
- mechanical;
- ultrasonic;
- using chemical compounds.
In this article we will talk about only a few, since cleaning injectors often requires additional professional equipment. You will find detailed information about self-cleaning in another material. Here we will briefly touch on these methods.
Cleaning the nozzle at home
A separate nozzle can be cleaned using special chemical compounds. For example, the same additives that are added to fuel to clean the system or the so-called “Carburetor Cleaner”. In this case, it is necessary to act according to the following algorithm:
- prepare in advance “Carburetor Cleaner” (or its equivalent in the form of a spray can), a contact button without locking the closed position, a syringe with a volume of 5 ml or more, a tube to extend the neck of the syringe with a seal, an empty container, preferably of large volume (5-10 liters ), a mobile phone charger with a cut plug, contact wires with terminals;
- Next, you need to insert the test nozzle into the back of the syringe (as tightly as possible, with or without a rubber band);
- after that, connect the terminals through the button to the charger and plug it into the outlet;
- insert the tube into the cleaning agent sprayer, and unfold the back of the nozzle into the prepared empty container;
- after that, press the sprayer so that a certain amount of the substance enters the nozzle;
- press the contact button to activate the nozzle.
If the nozzle is working properly, detergent should come out from its reverse side under pressure. The purging procedure must be repeated several times to achieve the required degree of cleanliness.
If your car has low-resistance injectors, then you need to press the injector open button for a split second. If you have high-resistance injectors, then you can hold the button for 2-3 seconds.
In addition to the check methods listed above, you can also mention checking the toxicity of gases and smoke - a low level of CO during gas release is a sign of poor injector performance. This method is practiced at some service stations as a way to monitor engine operation. Since both certain knowledge and equipment are needed, we will not consider it as one of the options for self-diagnosis.
You also cannot ignore and not pay attention to checking the injectors for fuel supply correction and lambda, but here the situation is the same as with toxicity, you will need not only diagnostic equipment, but also be able to understand all the numbers that the diagnostics will show you.
Cleaning the nozzle without removing it
How to check the engine cooling fan on a VAZ-2114 with your own hands
In this case, cleaning can be carried out using several methods:
- Using special cleaning additives that are added to the fuel. They contain special cleaning agents that gently clean the injector openings.
- Cleaning using pressure. To do this, you need to accelerate the car to a speed of 110.130 km/h, and drive for 10.15 km (about 5.6 minutes) at high engine speeds. Due to the high load, natural cleaning will occur in the nozzles.
- Idling. This method is similar to the previous one. It is necessary to start the engine while the car is stationary and maintain the speed at 4.5 thousand for 3.4 minutes. This will also clean the injectors. However, the previous cleaning method is better because the load under its conditions is higher.
conclusions
Problems with the operation of the injectors are not a critical failure, but if they occur, we recommend that you do not delay checking and eliminating the malfunction. In most cases, repair work can be carried out independently using the methods described above. Timely checking and diagnostics of injectors will allow you to avoid problems with the operation of the machine. Prevention will cost you less than repair work on injectors or other engine components. We recommend that you clean the injectors every 30.35 thousand kilometers of your car, regardless of their condition.
Source m.etlib.ru
Welcome to ChipTuner Forum.
mel2004
voltage is checked with a multimeter, oscilloscope
remove the connector from the injector, find the power wire, connect the device and measure
Bugulma
voltage is checked with a multimeter, oscilloscope
remove the connector from the injector, find the power wire, connect the device and measure
It’s better to do this with the connector on and the engine running; a load won’t hurt either.
Source chiptuner.ru
Is a 12 volt LED suitable for checking the signal on the injectors? If not, how long is the LED needed?
Comprehensive diagnostics of the operation of injectors on the ramp
For such a check, the fuel rail will need to be removed from the engine along with the injectors attached to it. After this, you need to connect all electrical contacts to the ramp and injectors if they were disconnected before removal. It is also necessary to return the negative terminal of the battery to its place.
- The ramp must be placed in the engine compartment so that a measuring container with a scale can be placed under each of the injectors.
- It is necessary to connect the fuel supply pipes to the ramp and additionally check the reliability of their fastening.
- The next step is to turn on the ignition, after which you need to crank the engine a little with the starter. This operation is best performed with an assistant.
- While an assistant rotates the engine, check the efficiency of all injectors. The fuel supply must be the same on all injectors.
- The final step will be to turn off the ignition and check the fuel level in the containers. The specified level must be equal in each container.
More or less fuel in the measuring containers will indicate a faulty injector or the need to clean one or more injectors. If the nozzle shows underfilling, then the element needs to be cleaned or replaced. Fuel leakage after turning off the ignition will indicate that the injector is “flowing” and has lost its seal.
In addition to self-checking, you can use the injector diagnostic service at a car service center. This operation is performed on a special testing stand. Testing an injector on a bench allows you to accurately determine not only the efficiency of fuel supply, but also the shape of the torch during fuel spraying.
Step-by-step procedure for dismantling injectors
Despite the fact that many advise carrying out such work in the company of an assistant, it is difficult, but it is quite possible to do it alone, with your own hands.
- First of all, put the car on a flat surface and turn on the handbrake.
- We relieve the pressure in the fuel system: to do this, disconnect the terminal from the fuel pump and start the engine. When it has used up all the remaining gasoline, crank the engine with the starter a couple more times, thereby finally relieving the pressure in the fuel line.
Use a screwdriver to unscrew the bracket on which the fuel pipes are attached.
Replacing rubber rings and seals on injectors
Usually, when washing or repairing injectors, car enthusiasts immediately change all rubber elements. This is due to high wear rates. The cost of rings and seals is very low, but after replacement you can immediately observe the stability of the motor.
Rings and seals can be removed with one movement of the hand. However, installing new ones will require care, as it is easy to damage the rubber. The plastic element is first lubricated with gasoline, and then pulled in place of the old seal.
Spare parts for VAZ injectors can be purchased at a minimal price
READ Which injectors to put on Priora
Almost every driver can clean or replace the injectors on VAZ 2114/2115 cars on their own. Difficulties can arise only in the process of unscrewing the fuel rail or reconnecting the wires to the injector contacts. However, if each stage of work is carefully carried out, even a beginner can independently maintain this element of the fuel system.
Hearing test
This is the simplest and most accessible way. However, it requires a lot of experience, because you need to know how the working nozzle “sounds”. To listen, use a rectangular board or a stethoscope. One edge of the “device” must be applied to the nozzle being tested, the other to the ear.
If you hear only uniform clicks, the injector is working properly. If there are knocks, pops, or vibrations of varying intensity, you can definitely say that the nozzle is clogged.
How to check injector nozzles
Troubleshooting and checking injectors when diagnosing an injector are not very different from similar operations with a carburetor engine.
- To check the injector for functionality, it is necessary, as when searching for a “dead” spark plug (ignition system malfunction), to turn off the power to each injector one by one. At what stage the shutdown will not cause changes in the operation of the motor - this means that the problem is in this element.
- Next, you should check the presence of voltage at the non-working injector with a voltmeter with a measuring range ranging from 0 to 2.5-3 V.
- After this, you should check the solenoid valve for operation: momentarily apply current from the battery to the injector terminal - if characteristic clicks are heard, then the valve is working.
If checking the injectors shows their performance, then all problems associated with their unstable engine operation should disappear immediately after flushing the injector.
Checking the injector balance
To balance the fuel pump, you must first turn off the fuel pump and start the car. After a few seconds of operation, the engine should stall - this is necessary to eliminate excess pressure of the mixture. Then the pressure gauge is connected, and only after that the fuel pump returns to its place. Next, a computer with the necessary software is connected and diagnostics are carried out.
Subsequent actions are performed exclusively using specialized programs. You may notice that the fuel pump will gradually turn on and off, as will the injectors. In general, the following algorithm can be distinguished:
- Turning on the ignition;
- Pressure gauge readings are in the range of 2.8–3 atm;
- The fuel pump turns off;
- Pressure drop to 2.5–2.8 atm;
- Checking one TF;
- Analysis of pressure gauge data – significant dynamics should not be observed;
- The pressure is restored to its original value by turning on the fuel pump;
- The procedure is repeated one by one with all nozzles.
When working correctly, each element will give approximately the same performance. If the reset is different in a certain place, then we can talk about a malfunction of the injector or its further diagnostics. After completing the manipulations, the pressure gauge must be turned off only after first releasing the pressure in the system.
Injector diagnostic stand
Modern service stations are always equipped with stands for diagnosing and cleaning injectors. This method involves removing the fuel rail and injectors from the vehicle. At such stands, complete diagnostics are carried out: checking the power supply, measuring electrical resistance, and checking the performance of the diagnosed injectors. Some people construct similar stands on their own.
Monitor the condition of the injectors, change fuel filters on time, refuel with high-quality fuel at trusted gas stations, undergo maintenance on time and you will not have problems with the fuel system.