Modernization of the body of the Largus model
We have seen that in some cases it is not difficult to transform the characteristics of a motor, although an infusion of a certain financial resource is required.
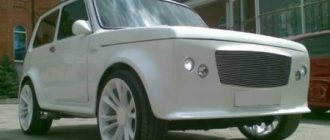
What should an owner do if he is “satisfied” with the modernized engine, but is not satisfied with the appearance of the body? Here the saving measure will be a transformation in the exterior of the Lada Largus.
In this case, you can also lean towards two courses of action:
- perform structural transformation of body components;
- so-called cosmetic modification.
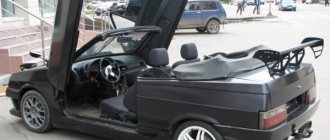
The first option involves replacing some body elements with new products, usually of an individual design. Note that a well-executed modification of this nature can not only significantly transform the exterior of the car, giving it speed and sportiness, but also significantly improve aerodynamic performance.
The most common structural modifications that most owners of Lada Largus Cross are inclined towards are the following:
- spoiler installation;
- installation of body kit on the hood (linings, buckets, intakes, etc.);
- replacing head and rear optics with more advanced and powerful lighting designs;
- the use of reinforcing components around the perimeter of the body (front grille, protective linings, skirts, etc.);
- installation of new wheels complete with tires instead of standard products;
- replacement of bumpers, exterior mirrors, etc.
Naturally, such transformations cost a lot of money and require the allocation of significant time resources.
A simpler version of the transformation will be cosmetic tuning. It involves the implementation of activities in the following areas:
- updating the paintwork of the body;
- tinting of glass, as well as optical devices;
- airbrushed designs on body panels;
- wrapping the body with various polymer materials (carbon films, vinyl, etc.);
- use of additional LED lighting sources.
Such events can provide the Lada Largus Cross with an updated look, allowing it to stand out in the gray mass of traffic. The main advantage of this method is its low cost.
Tuning with protection elements
Lada-Largus-Cross review, technical specifications, description
Tuning your favorite Lada with specially produced protection elements for this car brand.
Rear bumper protection and front bumper protection can be made from either stainless steel or polymer coating.
You can purchase threshold protection, both aluminum and polymer.
A special protective pad will protect the rear bumper when unloading or loading things through the rear doors. And a tray (or mat) in the trunk for the Lada Largus will protect the luggage itself from contamination.
Many car owners believe that it is pointless to install plastic lockers on the Lada Largus.
And yet it is worth mentioning the fender liners from PETROLPAST, developed specifically for this brand of car; they perfectly protect the wheel arches from sand and stones while driving, and in winter from the effects of salts.
To reduce noise, sealing rubber is often installed on the rear doors of a Lada Largus car; car enthusiasts like to protect the hood with sealing rubber.
The radiator grille can be decorated with a protective mesh (black or chrome); its edging is made of black soft plastic and equipped with hooks.
The mesh cells allow air to pass through perfectly, but protect the radiator from dirt, stones and insects.
Before settling on any type of tuning, it would be good to decide what you want as a result? Do you want to see a futuristic, brutal or expressive car?
Anything can be achieved, but the appearance of your beloved Lada Largus, as well as the cost of improvements, will depend on the final goal.
Illumination of the heater unit and instrument cluster
We remove the block. First you need to remove the center console trim (held on by clips), remove it from the bottom (I used a knife) to the top...
Next, unscrew the two screws on top (TORX 20) and, pressing the two latches on the sides, first take the block inward, then pull it out.
Then we disconnect the recirculation damper cable from above...
A connector in the middle and two cables (temperature control and air flow direction) at the bottom...
Then press out the plastic clips to remove the scale. Three from the bottom...
And three on top, under the recirculation flap slider...
To remove the recirculation lever, you need to separate its outer and inner parts
To do this, carefully press inward and push out the three latches.... After removing the heater unit, it is necessary to remove the skin
Proceed with caution, the skin is easily scratched. I slowly peeled it off, trimming the layer of glue. Then it sticks back without any glue. The numbers and human figures were covered with white electrical tape. The air flow arrows are yellow, and the outlines of the machine, the fan icon and the letters AC are blue...
After removing the heater unit, it is necessary to remove the skin
Proceed with caution, the skin is easily scratched. I slowly peeled it off, trimming the layer of glue
Then it sticks back without any glue. The numbers and human figures were covered with white electrical tape. The air flow arrows are yellow, and the outlines of the machine, the fan icon and the letters AC are blue...
I would like to warn you against using a solvent; I spoiled the number 3 myself. Then I quietly took cologne and cotton swabs from my wife (alcohol wipes are ideal!) and removed all the rest of the paint easily and without consequences. In addition, I removed all sorts of strange partitions on the scale body, since they interfered with the normal illumination of the symbols...
As a result of simplifying and, accordingly, reducing the cost of the design, the recirculation damper is adjusted mechanically, using a cable (as well as the temperature damper and the air flow distributor). Of course, there is no indication of the operating mode of the recirculation system. And if you turned on recirculation to quickly warm up or cut off exhaust gases, and then forgot, then after a while you will see how much the glass is covered in evaporation.
It was never possible to take a photo with real flowers in the dark with an ordinary soap dish, but that’s how it happened...
Later I redid the illumination of the heater block. And the way the Christmas tree is beautiful, but not serious...
To do this, you just need to change the electrical tape on the skin to another, white one.
I won’t describe in detail how I redesigned the instrument cluster; there are examples on the Internet.
We remove the instrument cluster and solder the LEDs indicated by the arrow on the board, observing the polarity. LEDs of standard size 3528, white, or whatever you want.
1 and 2 – two LEDs each for backlighting the hands and scales, 3 – four LEDs for display backlighting (photo not mine)…
The results of the work are visible at night... The illumination of the heater unit and instrument cluster was a success!
Modification of the rear wiper
Unfortunately, the rear wiper operating mode on the Lada Largus does not have an intermittent mode - when turned on, it works constantly.
To switch the wiper to work with a variable pause, use:
- wiper relay marked 723.3777;
- standard 4 or 5-pin connector for automotive relay;
- round terminals;
- terminals 3 mm wide (“male + female”);
- pieces of wire;
- heat shrink tubing for insulating connections.
To connect an additional relay, ground wires are used that have black markings on the steering column switch block (third from the right on the side of the wires), as well as turning on the rear wiper (white, second from the right) and turning on the rear washer (gray, far right).
The rear wiper of Lada Largus can be modified by installing an additional relay
An additional relay is installed in the gap between the block and the wire route. At the same time, in order for the electrical circuit to be returned to its original state without any problems, standard connectors and terminals are used to connect an additional relay.
The principle of the modification is that when the rear wiper is turned on, the voltage previously supplied to it directly is now supplied to an additional relay, which, after modernization, controls the operation of the wiper, providing the necessary pause between strokes.
An additional advantage of using this relay is that when the rear washer is turned on, the wiper automatically switches to continuous operation mode, and after 3-4 cycles it again switches to pause mode.
The entire structure is mounted next to the steering column switch and secured with plastic clamps.
Engine modernization
The main task of tuning Largus is to reduce fuel consumption, as well as increase the power of the power unit. All Largus modifications are subject to re-flashing of the control complex, regardless of the degree of wear and the tests undergone. It is possible to achieve high-quality chipping only if no faults were found in the engine during diagnostics.
If the sensor readings are normal, the “brain” of the Lada Largus is reflashed with a new software setting that can change the main parameters that affect the engine power and the overall dynamics of the car. To allow a reverse “rollback”, the previous settings are saved in the “brains” of the machine. Thanks to this modification, the inherent problems of cars with insufficient engine power - short gears - are eliminated. Reflashing makes traveling on the Lada Largus more comfortable.
By eliminating the manufacturer's shortcomings in software control, chip tuning actively increases the car's power, improving the elasticity of the engine and reducing fuel consumption by 1.5 liters. The chipped Largus performs well when overtaking when fully loaded. The performance of the air conditioner is significantly improved, which stops “choking” the engine.
Chip tuning
You can increase engine power (for both 8 and 16 valves) and at the same time reduce fuel consumption of the Lada Largus model by flashing the control software. This procedure can be applied to both a new car and a car with high mileage.
It is worth noting that high-quality chip tuning can only be carried out if the engine is in good condition. If the computer detects instability of the parameters, chipping should be postponed. If the engine sensors are normal, a new setting is “poured” into the software package of the Lada Largus car. In this case, the original firmware is automatically saved in the computer’s memory in case it needs to be returned.
You can change the settings of the on-board computer yourself using a special program. However, this procedure is quite complicated. Ordering chip tuning
from specialists, you don’t have to delve into all the technical details yourself. In this case, it is enough to simply voice your requirements to the master. High-quality chip tuning will provide your car with:
- Reduced fuel consumption.
- Confident pickup.
- Smooth acceleration without jerking.
- Stabilization of idle speed.
After such a flashing, driving a Lada Largus will become much more comfortable. However, it is difficult to say how durable the piston group will be after this. Although most VAZ engines easily tolerate this procedure. A similar change in settings can be applied to the Lada Largus Cross model.
Test drive Lada Largus Cross (video)
The lack of normal reviews of the Lada Largus Cross makes the crossover very secretive and incomprehensible to the future buyer. Based on the data we received, the manufacturer could have better changed the appearance of the Cross project to make it more like a cross-country vehicle.
The big disadvantage of the Cross is the lack of technical changes that could be considered as improvements. But perhaps we want too much from a domestic concern - development will be gradual and will delight drivers with pleasant surprises.
Chip tuning Largus Cross - small adjustments for grandiose changes
Despite its complex design and a huge number of new products in the field of automotive electronics, everyone can perform chip tuning of the Largus engine with their own hands. All you need is a little patience, computer hardware and licensed software. The latter includes:
- Combiloader loader, updated to the latest version;
- Firmware purchased strictly from the official website. For chip tuning the Lada Largus Cross, the Bosch 7.9.7 utility or the latest version January 7.2 is perfect;
- editor for configuring and calibrating firmware;
Programs and equipment for chip tuning Lada Largus
As for the equipment, for effective work on flashing the engine ECU, you need a K-Line adapter and a laptop exclusively with Windows XP. Other software will not find the firmware, which is why you will not be able to even start chip tuning.
First in line are the loader and editor. After their successful installation, we begin to work with the firmware. To do this, install it on your computer, indicating the final location address in the previously installed bootloader. When the latter finds the firmware, you need to configure it. In the “Settings” window you will find a lot of graphs that will help you choose the optimal characteristics for your station wagon.
Lada Largus ECU firmware
Having calibrated the firmware to your liking, turn on the ignition and proceed to the most important stage of chip tuning - installing the firmware on the engine ECU. To do this, click on the “Run” window and wait for the utility installation to complete.
Once the download line reaches the end and you see the “Download Complete” window, turn the ignition back on and close the installer. Next, close the bootloader and editor and turn off the ignition. After this, disconnect the adapter from the laptop and ECU.
At the last stage, you can check the operation of your car. Provided that the characteristics are properly calibrated and chip tuning is performed correctly, you will immediately notice an improvement in car dynamics, a reduction in fuel consumption by about 20%! and more stable operation of the engine and transmission.
We recommend: How to recognize a damaged car?
About technical improvements
All-wheel drive Lada-Largus appearance, when it will appear, technical characteristics
Lada Largus are cars that were released recently, so they absolutely cannot be called those that need global technical alterations.
Technical tuning of the Lada Largus, aimed at improving the factory characteristics: increasing the efficiency and power of the engine, improving the suspension and increasing the efficiency of the brakes, seems somewhat impractical for a recently purchased car.
But some car owners practice chip tuning of the Lada Largus, assuring that replacing the ECU software gives them a car with completely different characteristics, different from being faster, the acceleration dynamics increase by 7 percent
The so-called electrical tuning of Lada Largus may include installation of:
- pause relay (front wipers);
- pause relay (rear wiper);
- bend extender;
- LED running lights control module;
- high beam control module (halogen lamps).
How to install thresholds on Largus?
Regardless of the purchased accessory option, installing thresholds cannot take more than 40 minutes of time and does not require the presence of a specialized tool.
- On the lower surface of the “original” thresholds we find three holes that are closed with plastic plugs.
- We remove these protective plugs using a suitable screwdriver. We must be extremely careful here, since damaged coating on the thresholds will immediately provoke the development of pockets of corrosion.
- Sometimes manufacturers include embedded platforms in the kit, which must be installed inside the designated holes. If they are missing, then fasteners are made from a sheet of metal, no thicker than 1 mm.
- We weld a pin in the center of these fasteners and check the quality of the seam.
- Now we attach a pre-prepared bracket to the stud (can be made from a metal corner). It is made in the form of a part with a pair of holes, and their diameters vary. This eliminates the possibility of error.
- We install the thresholds, making sure to align them with the bracket. Now you can tighten the nut. Do not overdo the tightening torque, otherwise the fastener may break.
- The final step is to process the brackets and threaded connections. We use an anti-corrosion agent, for example, mastic.
This scheme is well suited for installing various types of overlays. It is guaranteed to ensure reliable retention of the accessory.
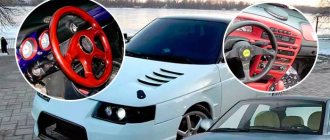
Aesthetic direction of tuning
Largus's appearance is his main drawback. Aesthetics does not affect the functions of the vehicle, but it radically changes its appearance, improving the exterior and making the car “special.” Doing such tuning with your own hands will not be a problem if you have an idea about the design of the car.
By installing stylish lensed headlights on the Lada Largus, you will not only increase safety, but also significantly improve the appearance of your “horse”. It would also be a good idea to buy fog lights and install frames for them to match the body color, which would be a good solution for tuning the front of the car.
With the help of a carbon film it will be possible not only to eliminate the continuous gloss on the lacquered body of the Lada Largus, but also to give an original look, protecting it from scratches. True, when gluing carbon fiber you should not be fanatical, since the result will be the opposite of what was expected. To create a visual contrast, just cover the hood and body pillars.
To give Largus some solidity with your own hands, you can change the radiator grille and also decorate the front bumper with an original tuning trim. Covers for the rear bumper, in addition to aesthetic purposes, also serve practical purposes; they protect the paintwork from chips and various cracks.
If you want to carry out all the improvements yourself, you should use a special kit containing chrome body kits containing rubber inserts. Installation of overlays does not require special knowledge or the use of special tools.
Roof rails are provided on the roofs of luxury versions of the Lada Largus. If desired, you can install them yourself for any car model. It is enough to buy a quality kit. A characteristic feature of F1 cars are spoilers, which can increase the force of pressing the wheels to the road. For the Lada Largus van it will be an excellent aerodynamic protector that protects the rear window from dirt. However, being an additional source of resistance to air flow, the spoiler forces increased fuel consumption.
External tuning will be complemented by alloy wheels, which are distinguished by their strength, attractiveness and durability. Fans of night car extravaganzas can add neon lighting to their rims. To do this, you will have to remove the Largus wheels in order to attach the LED strip to the brake drum protective casing. If you are confident in the appropriateness of such an improvement, it is worth experimenting.
Aesthetic tuning Lada Largus
Tuning can also come down to “simple aesthetics”, which does not particularly affect the performance of the car, but changes the appearance of its interior, making the interior comfortable, improves the exterior of the car, turning the car into “special”.
In this case, the desire to “pump up” the car is just a desire to stand out, be atypical and show individuality.
Aesthetic tuning of Lada Largus, aimed at creating an individual style, provides comfort and influences perception. It may consist of:
- tuning the interior of a Lada Largus car
- changes in the appearance of the car
- installation of audio systems
It is worth noting that the Lada Largus first underwent an “official” modification at the manufacturer in 2013, the car was given alloy wheels, and changes took place in the interior.
The easiest and most affordable way to change the aesthetic characteristics of the Lada Largus is to replace the wheels, equip the car with LED optics, redo the interior and install original bumpers.
It is possible to cover the fog lights in body color, as well as cover the bumper
The aesthetics of the appearance and some of the aerodynamic characteristics of the model will change when replacing the radiator grille, after inserting a new front bumper, installing thresholds, organizing covers on the mirrors and taillights, installing a spoiler and diffuser.
Improvement of the Lada Largus interior may include:
in replacing door panels with similar, but better quality ones; in the modification or installation of a new instrument panel; in replacing or modifying the instrument panel; in improving sound insulation performance; in stopping the additional illumination.
Lada Largus 7 seats price, photos, equipment and technical specifications
Impressive interior dimensions, modern body architecture, high-quality interior are the distinctive features of the Lada Largus 7 seats 2018.
Convenient sizes
The domestic auto industry giant took into account all the wishes of the station wagon owners when determining the parameters of the new Lada Largus 7-seater 2018 road car:
- comfortable seating for seven adults inside the cabin.
- practical transformation of the second and third row seats, allowing you to quickly convert the passenger compartment into a voluminous cargo compartment for business needs.
- The comfortable dimensions of the rear tailgates allow loading large items without problems.
All-round worker
Lada Largus 7 seats 2021 was created for the middle stratum of the population with budgetary opportunities and real needs:
- The ground clearance of the Lada Largus 7 seats 2021 was increased to 181 mm, improving the vehicle's off-road capability.
- The 105 horsepower engine ensures quick acceleration and smooth movement of the station wagon at full load on bad roads.
- The metal mudguard reliably protects the space under the hood of the car.
- The chassis of the Lada Largus 7 seats 2021 ensures smooth movement over uneven domestic roads, especially the excellent stability of the family station wagon on unpaved country roads.
Passengers ─ comfort and silence
The increased capacity of the Lada Largus 7 seats 2021 is only the first advantage noted by the new owners.
The driver's seat is equipped with a special lumbar support and can be easily adjusted to the height of the person sitting behind the wheel. The steering column is easy to install in position. Convenient for driving the machine.
Comfortable changes affected not only the driver’s area:
- wide, strong chairs are convenient not only for younger family members. A country trip in the company of trusted friends is quite acceptable for the new model Lada Largus 7 seats 2021.
- the cold winter outside the car window turns into a beautiful landscape, since the Lada Largus 7 seats 2021 is equipped with air ducts that supply a warm air flow to the feet of each traveler, which, in combination with climate control, allows you to feel in a cozy home environment while traveling.
Compliance with European requirements involves ensuring traffic safety. Automatically deployed airbags for the driver and first-line passenger, soft headrests and reliable seat belt fastenings, a seatbelt indicator in combination with ABC and reinforced station wagon frame provide the full range of necessary protection. During trips, there was no noise or squeaks. What makes your trip comfortable?
Increased luggage space
The design solution of the AVTOVAZ engineering team regarding the equipment of the luggage compartment brought the Lada Largus 7 seats 2018 to a completely new level of operation:
- the second and third row seats are equipped with a simple transformation and installation system, which allows you to compactly fold the seats when not needed, or completely remove the third row seats, turning the car into a cargo model.
- a convenient side door of non-standard sizes, a European system for swinging rear cargo doors, equipped with an additional mechanism that opens the opening all the way, making it possible to load and unload large items.
- Lada Largus 7 seats 2021 received powerful roof rails, which further increase the vehicle's carrying capacity if necessary.
Technical excellence
- The sixteen-valve engine with a power of 105 hp, adapted to run on domestic gasoline in compliance with environmental standards defined by Euro5, is planned to be replaced in subsequent releases with a domestic eight-valve, more economical one.
- Driven front axle.
- The five-speed manual transmission shifts gears smoothly thanks to the correct arrangement of gear ratios.
- Hydraulic semi-independent suspension with telescopic shock absorbers on the rear axle of the car.
- Spring independent front suspension with transverse stabilizing mechanism.
- Alloy tires 16 millimeters of the European leader Continental.
Lada Largus 7 seats 2021 fully justifies the title of first place holder in the segment of station wagons that consistently maintain a price-quality balance aimed at the domestic budget consumer. Improvements to the versatile car have allowed it to maintain good maneuverability on city streets. Increasing the possibilities for traveling on country roads and dirt roads.
Say a word about Largus Cross
The Cross version is the case where changes can be kept to a minimum. If I had a choice between Largus and Largus Cross, I would without a doubt take the second one. And I would recommend this to everyone.
The car initially, if taken in a good configuration, minimizes the need for tuning. Everything I said before applies here.
But in practice, only some of the improvements are really useful in this case. I explain my position. The Cross version initially offers:
- original body kits;
- wheels with a diameter of up to 16 inches with beautiful designs;
- roof rails, regardless of configuration;
- rear parking sensors, regardless of configuration;
- improved suspension struts (with them it’s not so scary to drive off-road);
- modified seats with good lateral support and increased comfort compared to the regular Largus;
- beautiful door cards and panels;
- interesting dashboard along with the dashboard;
- leather steering wheel;
- The standard audio system already has 6 speakers (but I would still install multimedia).
Yes, most car owners don’t need more. The main thing is to initially buy a car with a rich configuration. Then tuning your Largus Cross comes down to a minimum set of modifications.
Don’t forget that AvtoVAZ offers several features for Cross from the factory. Namely:
- tourist roof box for 10 thousand rubles (excellent quality and appearance);
- off-road tires (approximately 3-6 thousand rubles);
- standard tinting (complies with GOST, does not raise questions from the traffic police, costs about 10 thousand rubles).
By paying about 30 thousand extra, you get a car in full combat readiness. This is not an exemplary SUV, but an all-terrain station wagon. But considering the price of the car, its technical characteristics and level of comfort, it completely justifies itself. What do you think, is it worth doing tuning in the case of the Lada Largus and what changes are you ready for?
(6 ratings, average: 4.67 out of 5)
Subscribe to updates and receive articles by email!
We guarantee: no spam, only new articles once a week!
Tuning is a technical improvement of the external or internal equipment of a car, including interior parts. Considering the Lada Largus Cross from the point of view of the need to improve comfort or functionality, we can say that this unit is lucky. The all-terrain vehicle is based on the fully equipped version of the Lada Largus and boasts luxury equipment in the basic configuration.
However, this does not mean at all that the new owner will not want to make his own adjustments. Will these be major changes or will they affect only cosmetics, it’s up to you to decide. But you must remember that making changes to the design of the car may require legal registration. In the meantime, let’s figure out how the Lada Largus Cross can be modernized “without consequences” within the framework of Russian legislation.
Upgrade the gearbox or pump it to full capacity.
| Author: Yusanych Published: 1947 days ago (March 20, 2016) Logbook: Installing the handle in the trunk curtain Category: Uncategorized Edited: 16 times - last April 16, 2016 | +36↑ Votes: 36 |
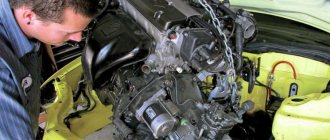
Good health to all teammates! Report on the conversion of the JR5 549 gearbox of our beloved Largus. Having analyzed the data on the gear ratios available for the LL gearbox varieties, the thought arose about whether to remake it. To do this, theoretically, it was necessary to replace our stock parts - the input shaft and gears of the 3rd and 4th gears with those that are on the LL van marked with a JR5 517 gearbox, and in addition, replace the previously changed fifth gear 0.795 with 0.738. This was done in order to lengthen not only the 5th gear, but also the 3rd and 4th, and then the operation of the gearbox with the fifth 0.738 will be without a failure in revolutions from 4th to 5th, as can be seen from the graph after the modification there is no failure, the engine speed is at 4000 rpm. when switching, they drop to 3050, and not to 2690 as before the alteration, this is very important when the car has an LPG, where it is not advisable to turn more than 3800 rpm. After the modification, the gearbox functions like a nine-speed gearbox, with its longer gears. Here is the operating schedule for the stock gearbox that comes from the factory with a 0.738 gearbox installed and the same 5th gearbox but with a rebuilt gearbox. Stock in black. If you click on the picture it will enlarge and you can see the speed and revolutions in the gears.
The image has been reduced. Click to see original.
Since no one had done this before, I decided to take a risk because I was confident in the end result. For the conversion (replacing standard parts with those listed below) you needed: Primary shaft 8200988274 3rd gear gear 7701715369 4th gear gear 7701715364 5th gear gear 0.738 8200607983 5th gear gear 0.738 8200611303 Gasket 5th gear covers 8200117602 Something can be seen in the video at the link, https:/ /www.youtube.com/watch?v=W4iA9PooOPE but don’t take out the fixing balls of the fork axles, they stay there normally. There is no need to remove the plastic oil supply line for 5th gear. The reverse gear shaft retainer can only be knocked out if you first pull out the fork axles, as this is done in this video at 8:34 minutes, otherwise it will rest against the axle. So let's go. We disconnect the contacts and fasteners of the battery, unscrew the nut of the left drive and wheels, hang the front end, remove the wheels, unscrew the subframe protection, the ball joint bolts, in the cabin we unscrew the bolt securing the steering shaft, it pleased us with its shape; it is not possible to make a mistake during assembly, be sure to fix the steering wheel from turning , otherwise, if it turns uncontrollably in any direction, you can hit the steering column spring of the airbag, you can use all available means. We lower the subframe with the steering rack assembly, disconnect the left drive completely, the right drive only from the gearbox. We unscrew all the gearbox fasteners, control the disconnection of all sensors, the crankshaft sensor connector is located in the top center under the wiring harness, to disconnect it, it will be convenient to move the gearbox 5-7 cm and it will appear in the line of sight. We disconnect the clutch release tube, brake fluid will flow from there, I had a dowel and nail on hand, I plugged it with it. We disconnect the gear drive cables, for this you do not need to snap off the daisy, it is better to use a washer cut on one side, put it on the hinge and through it push the cable boss away from the gear selector rocker. We remove the gearbox, unscrew it, remove the 4th gear stock gear from the secondary shaft, behind it there is an engagement clutch, take a photo of the position of the 3 springs and barrels, remove it, then to remove the bushing you will need a hair dryer, heat the bushing and remove it with a puller, remove the 3rd gear gear and install a new one. We assemble in the reverse order, warming the bushing with a hairdryer before inserting it. Now, to replace the input shaft, you need to pull out the reverse gear shaft; to do this, pull out the fork axles and knock out the lock. We put everything back in place, check the gears, if everything is fine, we set the middle axis of the forks down, which corresponds to the engaged 3rd gear. We put on the half of the gearbox, having first moved the gearshift rocker in the middle, away from ourselves, which corresponds to the engaged 3rd gear, the upper gearbox casing should rest within 7 mm, the rocker at this moment needs to be turned, simultaneously squeezing the gearbox halves, when assembled correctly, the gears are switched. We tighten everything, install the 5th gear, put the gearbox in place, and put everything back together as it was. How to pump a clutch - pour a full barrel of fluid, one person presses the pedal, the second person, while pumping, holds the tube in the maximum position and instead of unscrewing the fitting as we usually do, we move this tube a little to a position not all the way to the “end” , after the air comes out, insert it all the way and so on until the clutch appears, the clutch should appear after 5-10 cycles. Fill the gearbox with oil and collect the rest. I’ll add what I remember.
The image has been reduced. Click to see original.
The image has been reduced. Click to see original.
The image has been reduced. Click to see original.
The image has been reduced. Click to see original.
The image has been reduced. Click to see original.
The image has been reduced. Click to see original.
Speed and revolutions in 4th gear, in fact 4th became fifth in the stock version, and noticeably longer.
The image has been reduced. Click to see original.
The image has been reduced. Click to see original.
The image has been reduced. Click to see original.
I would like to thank everyone who supported me in this difficult task, showed patience and endurance, who was freezing with me in the garage, and Serj was doubly “lucky”, inside the garage I think it was no higher than +5*C. All of them are in the photo that Molchan74 will add. Special thanks to Fedor Fuad for those. support on tricky issues.
The image has been reduced. Click to see original.
The image has been reduced. Click to see original.
The image has been reduced. Click to see original.
The image has been reduced. Click to see original.
The image has been reduced. Click to see original.
← Largus interior soundproofing | Leather steering wheel →
Create your own logbook, and you will be able to share with forum members your opinion about Largus, useful developments, installed additional information. equipment and tuning, trips and travel! To create a logbook, you must register on the site.
Tags: gearbox tuning, gearbox modification, replacement of the input shaft and gears of 3rd and 4th gears Largus, replacement of 5th gear, gearbox upgrade, 5th gear
Popular in in-flight magazines
DRL Traveling on Largus Fuel consumption Armrest Mileage Discs Radio To1 First impressions Buying Largus Electrics Covers for Largus Bumper net Modifications HBO Speakers Rear view camera Wipers Interior lighting Brake light Tuning Tires and wheels Check valve Tuning lights Noise insulation Winter tires Rugs Largus DVR Rki-19 Winter operation Roof box PTF Tail lights Izhevsk Car audio Injectors Mudguards Washer reservoir Hood stops Low beam lamp Installing a cabin filter Parking sensors Thresholds Lada Largus LED Carpet covers Floating idle speed Trunk lighting Tinting Trunk shelf Trip to the sea Hood seal Accident Owner's review Fender liners Walkie Talkie Additional Socket Eyeglass case Replacement 5th gear
Comments (42)
| Andrey65 March 20, 2021 at 5:54 pm 0 | |
|
| Yusanych March 20, 2021 at 07:27 pm +1 | |
|
| LarqusMen585 March 20, 2021 at 5:58 pm 0 | |
|
| Yusanych March 20, 2021 at 6:20 pm +1 | |
|
| Willi March 20, 2021 at 6:01 pm +2 | |
|
| BazzALT♑ March 20, 2021 at 6:40 pm +1 | |
|
| Yusanych March 20, 2021 at 6:51 pm 0 | |
|
| orlik March 20, 2021 at 7:37 pm 0 | |
|
| Yusanych March 20, 2021 at 7:48 pm 0 | |
|
| North77 March 20, 2021 at 6:51 pm +1 | |
|
| alv73 March 20, 2021 at 07:09 pm +2 | |
|
| Rough VBH March 20, 2021 at 07:53 pm +4 | |
|
| TIMA32 March 20, 2021 at 20:00 +1 | |
|
| rdv69 March 20, 2021 at 08:55 pm +1 | |
|
| LarqusMen585 March 21, 2021 at 02:41 0 | |
|
| Nikolay March 21, 2021 at 06:17 0 | |
|
| Yusanych March 21, 2021 at 04:42 pm +3 | |
|
| Nikolay March 21, 2021 at 5:09 pm 0 | |
|
| Yusanych March 21, 2021 at 5:37 pm +2 | |
|
| orlik March 21, 2021 at 6:03 pm 0 | |
|
| LarqusMen585 March 21, 2021 at 6:02 pm 0 | |
|
| Yusanych March 21, 2021 at 6:11 pm +1 | |
|
| LarqusMen585 March 21, 2021 at 6:35 pm 0 | |
|
| Yusanych March 21, 2021 at 6:46 pm 0 | |
|
| LarqusMen585 March 21, 2021 at 7:05 pm 0 | |
|
| Yusanych March 21, 2021 at 7:08 pm 0 | |
|
| LarqusMen585 March 21, 2021 at 7:15 pm 0 | |
|
| LarqusMen585 March 21, 2021 at 7:20 pm 0 | |
|
| Yusanych March 21, 2021 at 07:28 pm +2 | |
|
| LarqusMen585 March 21, 2021 at 7:31 pm 0 | |
|
| LarqusMen585 March 21, 2021 at 6:11 pm 0 | |
|
| Yusanych March 21, 2021 at 06:13 pm +4 | |
|
| Molchan March 22, 2021 at 09:35 pm +2 | |
|
| Moksha March 30, 2021 at 08:25 pm +3 | |
|
| Dima April 5, 2021 at 04:23 pm +2 | |
|
| Tigress April 12, 2021 at 10:29 am +2 | |
|
| Yusanych April 13, 2021 at 08:51 pm 0 | |
|
| Ray May 1, 2021 at 12:27 pm 0 | |
|
| Admin May 1, 2021 at 01:17 pm 0 | |
|
| Ray May 1, 2021 at 02:15 pm 0 | |
|
| Yusanych May 27, 2021 at 08:16 pm 0 | |
|
| Mykola June 30, 2021 at 12:27 pm 0 | |
|
| Add a comment | RSS comments feed |
Additional comments:
Ignition switch illumination
Illumination of the ignition switch is a rather convenient “feature” when the car is frequently used at night in poorly or unlit places.
To modify the ignition switch and install the backlight, a minimum of parts are required, and all the work, including the connection, takes about an hour.
After some simple manipulations with the ignition switch, you will not experience any difficulties when using the car in the dark.
To work you need:
- LED of small diameter, for example, 2.5–3 mm;
- resistance 1–1.5 kOhm;
- the wire.
To install the backlight, you need to remove the lock cover. It is removed together with the immobilizer antenna, and then remove the top cover of the casing.
At the second stage, the LED is installed inside the lock housing. To ensure uniform illumination, small slits can be made in the housing, after which the casing is assembled and installed in place. The wires coming from the LED are pulled to the CEBCS unit and connected to the white connector. To connect the wires, you can use gray or white wires - this is a “minus”. For “plus”, either of the two red wires is used.
Connecting to the CEBKS unit allows you to get the lighting to work similar to turning on the interior lamp - it lights up when the Lada Largus is disarmed, when the doors are opened, and goes out either after the doors are closed or after the ignition is turned on.
Chip tuning of Lada Largus car
This practice is quite common and most owners use it successfully. The essence of the transformation is as follows: by changing the settings of the electronic unit, we achieve adjustments to the characteristics of the motor. With proper calibration of certain parameters, you can get a very decent result, after which the car will drive noticeably more vigorously.
Chip tuning is performed by specialized workshops. They reprogram the standard firmware version to another one. Depending on the needs of the owner, you can install a program that will provide the motor with a specific set of modified characteristics. So using the firmware you can achieve the following results:
- reducing fuel consumption;
- reduction of exhaust toxicity;
- increasing acceleration dynamics.
Carrying out this procedure with your own hands is undesirable even for an experienced owner, since it can lead to a lot of side effects. Here you should entrust your car to professionals. If the modification is carried out efficiently, then the owner will say goodbye to a sum of approximately 4-10 thousand rubles, which is not a catastrophic waste.
As a result of chipping, the characteristics of the motor change, however, by an insignificant amount.
Tuning Lada Largus with your own hands
The Lada Largus and Largus Cross cars are based on the development of the Renault company, therefore this model is characterized by reliable and efficient operation of components and assemblies. However, some components still need improvement, which can be done even with your own hands.
Mechanical conversions
If the owner is interested in global improvements to the unit, then he should resort to the mechanical upgrade option. Such a modification can significantly improve the characteristics, and this is a “plus” of 10-40% over the standard parameters.
This transformation is carried out by replacing some parts in the unit. As a rule, the following components are subject to modification:
- fuel supply system;
- elements of the gas distribution mechanism;
- injection components;
- parts of the cylinder-piston group and the block head.
Here we recommend taking into account an important aspect: components should be replaced only with analogues that are structurally compatible with this unit. Otherwise, there is a risk of motor damage.
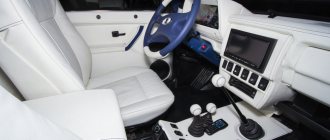
Largus interior tuning
Interior tuning here has the goal of the event, which comes down to improving the interior not only from an aesthetic, but also from a functional perspective. The following areas of activity are available to each owner:
- replacing covers with more modern models or installing new seats instead of standard seats;
- covering interior panels with new materials (leather, Alcantara, etc.);
- replacing the steering wheel with a sports-style analogue is also a kind of tuning of the interior;
- installation of more aesthetic regulators, switches, overlays, lighting sources, including additional ones (for example, for legs);
- armrest installation;
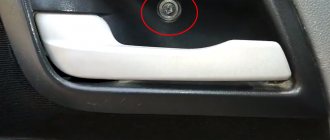
- replacing door handles with analogues and installing backlighting;
- soundproofing of the cabin space.
Such interior tuning should be done carefully and slowly, which will allow, upon completion of all manipulations, to acquire a stylish and beautiful interior, also made with high quality.
How to tune the interior of a domestic Lada Largus?
Let's take a closer look at tuning the gear knob in the Lada Largus. This activity is quite simple, but requires extreme care and scrupulousness. Otherwise, you risk being left without the pen itself. The thing is that you need to make holes in it into which the wires will be pulled.
We recommend: The best cars from China on the Russian market in 2019
In order to carry out these actions, first we remove the handle itself and get rid of the casing. This is quite simple to do; you need to unscrew several screws that are hidden under plastic tabs. When the handle remains in its original form without casing, we proceed to attaching four LEDs.
The wires from them need to be inserted into the holes; we drill holes in the handle at a certain angle. This is where you show all your caution and restraint. After the holes are ready, we hide the wires in them. The next step is connecting the connectors. Before connecting them, do we assemble the handle and pass the wire through the resistor? which has a positive polarity, and at the output we have a current of 20 mA.
Use sealant for more secure fastenings, this way you will protect yourself from doing double work. Now it's time to connect the microswitches. In this case, we need the switch itself so that when the lock is closed, the backlight goes out and only works when the headlights or side lights are on.
To achieve this effect, it is necessary to ensure its stable operation. We take a wire, which must be multi-core, and attach it to the free end of the microswitch, then use zip ties to attach its free end to the lock rod. Next, wrap the loose wire with electrical tape. That's all, the gear knob illumination is ready.
Tuning the Lada Largus can consist not only of reworking and improving the interior, but also of changing the suspension, clutch, and engine as a whole. Alloy wheels are often installed on it. All this only adds sophistication and comfort to this car.