Location and operation of the fuel pump
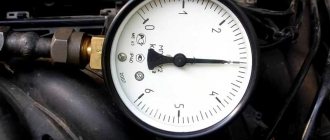
The fuel pump in the Lada Priora car operates from an electric drive, which is turned on after turning the key to the ignition position. Within a few seconds, it pumps fuel into the fuel system so that the pressure in it reaches 3.7 bar, while a characteristic low buzzing sound is heard inside the cabin. When the pressure mark is reached, you can start the engine.
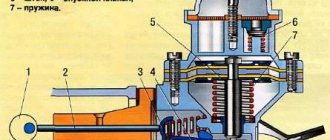
The unit works continuously, just because of the noise of the motor, the sound made by the pump is no longer audible. A special RTD regulator with a bypass valve maintains the required pressure in the fuel line.
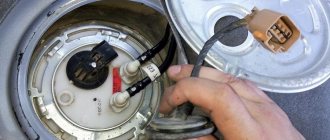
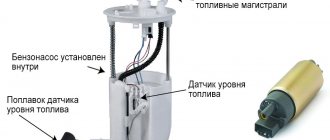
The whirring of the fuel pump can be heard inside the car because it is located inside the fuel tank, located under the rear seat of the Priora. There is also a built-in fuel coarse strainer and a level sensor with a float. Gasoline pumped by the pump is supplied to the injectors through a fuel line tube made of thick-walled copper tube.
Repair of fuel pump VAZ 2170 Priora
- Repair manuals
- Repair manual for VAZ 2170 (Priora) 2004+.
- Fuel pump repair
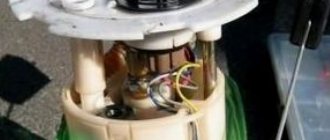
The fuel pump includes a fuel level sensor, a fuel filter, the electric pump itself and a pressure regulator.
All these elements are installed in the bracket and fuel pump housing (in the fuel pump module). Main faults of the fuel pump:
– failure or incorrect operation of the fuel level indicator sensor;
– clogged or damaged fuel filter of the pump;
– failure of the electric pump;
– failure of the pressure regulator.
In most cases, malfunction of the fuel level sensor is caused by contamination or oxidation of its contact group.
You will need: flat blade screwdriver, pliers.
| 1. Disconnect the drain tube from the pump module body by prying it up with a screwdriver. | 2. Overcoming the spring force, move the module body slightly up along the guides and, using a screwdriver, remove the locking ring from one of the guides. After this, the module body can be moved slightly away from the bracket. |
| 3. Disconnect the ground wire from the fuel pressure regulator. | 4. Using a screwdriver, press out the clamp of the wiring harness block... |
| 5. ...and disconnect it from the intermediate block. | 6. Disconnect the wiring harness connector from the electric pump. |
| 7. Unclench the two clamps of the fuel level sensor and, moving it up along the grooves of the fuel pump housing... | 8. ...remove the sensor from the housing. |
9. Wash the sensor rheostat contacts and its slider plate with gasoline, and then wipe with a lint-free rag soaked in alcohol.
| 10. Using a screwdriver, pry the spring clamp of the fuel pressure regulator... | 11. ...remove the clamp from the bracket... |
| 12. ...and remove the regulator. | 13. Inspect the pressure regulator O-rings. Replace heavily compressed, hardened or torn rings by removing them by prying them off with a screwdriver. |
| Note Lubricate the fuel pressure regulator O-rings with a thin layer of grease or engine oil before installation. |
| 14. Press out the plastic clips... | 15. ...and remove the lower part of the fuel pump housing from the bracket guides. |
| 16. To replace or clean the fuel filter, pry up its base with a pointed tool... | 17. ...and remove the filter from the pump housing, overcoming the resistance of the spring lock washer. |
18. Before reinstalling the filter, remove the lock washer, straighten it with pliers and install it in the filter housing.
19. Install the filter in the reverse order of removal.
| 20. To replace the electric pump, press out the plastic clamp... | 21. ...and remove the electric pump from the housing. |
22. Assemble the fuel pump in the reverse order of disassembly.
↓ Comments ↓
1. Car structure
1.0 Car structure 1.1 General information about the car 1.2 Passport data 1.3 Car keys 1.4. Controls 1.5. Heating and ventilation of the cabin 1.6 Ensuring a comfortable air temperature in the cabin 1.7. Doors 1.8. Passive safety equipment on the car 1.9. Seats
2. Recommendations for use
2.0 Recommendations for use 2.1. Safety rules and recommendations 2.2 Running in the car 2.3 Operating the car during the warranty period 2.4. Preparing the car for departure
3. Problems along the way
3.0 Malfunctions along the way 3.1. The engine does not start 3.2 Malfunctions of the fuel injection system 3.3 Idle speed has disappeared 3.4. Interruptions in the operation of the 3.5 engine. The car moves jerkily 3.6 The car accelerates poorly 3.7 The engine stalled while driving 3.8. Oil pressure dropped to 3.9. Engine overheating 3.10. The battery does not recharge 3.13. Knocks in the engine 3.16. Wheel puncture
4. Maintenance
4.0 Maintenance 4.1. General provisions 4.2. Inspection work 4.3. Lubrication and filling works 4.4. Diagnostic work 4.5. Repair and adjustment work
5. Engine
5.0 Engine 5.1 Design features 5.2 Possible engine malfunctions, their causes and solutions 5.3 Useful tips 5.4 Checking compression in the cylinders 5.5 Removing and installing the decorative engine casing 5.6 Removing and installing the engine splash guard 5.7 Installing the piston of the first cylinder to the TDC position of the compression stroke 5.8 Replacing the drive belt gas distribution mechanism and tension roller 5.9 Replacing the power unit supports 5.11. Replacing engine seals 5.13. Engine cylinder head 5.15. Engine repair 5.16. Lubrication system 5.17. Cooling system 5.18. Power supply system 5.19. Design Features
6. Transmission
6.0 Transmission 6.1. Clutch 6.2. Gearbox 6.3. Front wheel drives
7. Chassis
7.0 Chassis 7.1. Front suspension 7.2. Rear suspension
8. Steering
8.0 Steering 8.1 Design features 8.2 Possible steering malfunctions, their causes and solutions 8.3. Steering column 8.4. Steering linkage 8.5. Steering gear
9. Brake system
9.0 Brake system 9.1 Design features 9.2 Possible malfunctions of the brake system, their causes and solutions 9.3 Bleeding the brake system hydraulic drive 9.4 Removing and installing the vacuum brake booster 9.5 Replacing the brake pedal axle bushings 9.6. Main brake cylinder 9.7. Front wheel brakes 9.8. Braking mechanisms of the rear wheels 9.9. Pressure regulator 9.10. Brake hoses and tubes 9.11. Parking brake
10. Electrical equipment
10.0 Electrical equipment 10.1 Design features 10.2. Battery 10.3. Mounting block (relays and fuses) 10.4. Generator 10.5. Starter 10.6. Ignition switch (lock) 10.7. Electronic engine control system (ECM) 10.8. Ignition system 10.9. Lighting, light and sound signaling 10.10. Windshield cleaner 10.11. Washer reservoir 10.12. Electric fan of the engine cooling system 10.13. Electric motor of the heating and ventilation system fan 10.15. Cigarette lighter 10.16. Instrument cluster 10.18. Electronic anti-theft remote control system 10.19. Immobilizer 10.21. Replacing sensors and switches
11. Body
11.0 Body 11.1 Design features 11.2 Possible body malfunctions, their causes and solutions 11.3 Removing and installing windshield frame lining 11.4 Removing and installing soundproofing upholstery in the engine compartment 11.5. Removing and installing bumpers 11.6 Removing and installing the fender liner and protective wing cover 11.7 Removing and installing the front fender 11.8 Removing and installing decorative sill trims 11.9. Hood 11.10. Trunk lid 11.11. Doors 11.12. Seats 11.13. Seat belts 11.14. Rear view mirrors 11.15. Interior fittings 11.16. Instrument panel 11.17. Heater 11.20. Body care
12. Applications
12.0 Appendix 12.1 Appendix 1. Tightening torques of threaded connections, Nm 12.2 Appendix 2. Fuels, lubricants and operating fluids 12.3 Appendix 3. Nominal filling volumes 12.4 Appendix 4. Basic data for adjustments and monitoring 12.5 Appendix 5. Spark plugs used on vehicles 12.6 Appendix 6. Lamps used on a car 12.7 Appendix 7. What you need to have in a car 12.8 Appendix 8. Tools used when repairing a car
13. Electrical diagrams
13.0 Electrical Diagrams 13.1 Diagram 1. Instrument Panel Harness Connections 13.2 Diagram 2. Vehicle Front Wire Harness Connections 13.3 Diagram 3. Engine Electronic Control System (ECM) Harness Connections 13.4 Diagram 4. Vehicle Rear Wire Harness Connections 13.5 Diagram 5. Light Harness Connections license plate light 13.6 Diagram 6. Left front door wiring harness connections 13.7 Diagram 7. Right front door wiring harness connections 13.8 Diagram 8. Rear door wiring harness connections
Standard fuel pump for Priora - article number and price
The components catalog for Priora calls the entire system “Fuel Supply System”. It consists of several parts:
- Front tube for flammable substances 1119-01104013-00 - about 250 rubles.
- Front hose 2110-11104218-00 – 600 rubles.
- Fuel filter tube 2110-1110422205 – 800 rub.
- Gasoline pipe 2110-11104056-00, price - 400 rubles.
Pipelines: they are connected directly to a flat container - the gas tank - and then extend from it towards the engine.
Vapor recovery system
- Canister purge valve 2170-01164042-00, price - 1,200 rubles.
- Hose 90 cm long 2110-31164109-10 – 450 rubles.
- Steam pipe 2170-01164084-00 – 120 rubles.
- Middle steam pipe 2170-0116424800 – 600 rubles.
- Front steam pipe 2170-01164244-02 – 200 rubles.
- Adsorber tube 2170-01164282-02 – 350 rub.
- Adsorber 2170-01164010-01 – 750 rub.
- Separator 2170-01164005-02 – 1700 rub.
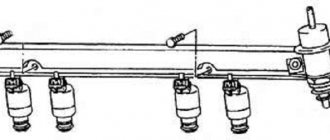
Ramps and injectors
- Ramp assembly 118-01144010-00, price – 10,000 rubles.
- O-ring 2112-01104252-00, price – 400 rubles.
- Nozzle (one) 1118-01132010-00, price – 1500 rubles.
Finally, the most important thing is the fuel pump system unit for Priora (16 valves), manufactured by Bosch: 2110-11139009-00, price - from 2,000 rubles, its service life is up to 200,000 km. Fuel pump filter for a Priora car - 1118-11392-00, price - 50 rubles.
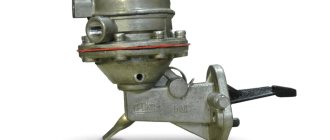
Gasoline pump
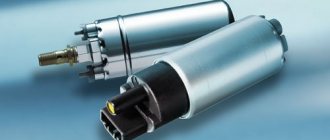
The Prior gasoline pump is a kind of electric DC motor in the form of a cylinder. Inside the pump there is a shaft on which is rigidly mounted an impeller that pumps fuel into the system and a check valve that does not allow the fuel to lose pressure in the system after the pump stops.
The operating pressure in the system that the pump must maintain is in the range of 3.6-4.0 bar. If there is a loss of pressure in the system, the engine will operate unstably, losing speed and detonating.
The fuel pump cannot work alone, so it is part of the fuel cup of the fuel pump. This glass contains all the necessary elements for pressurizing the fuel system.
The performance of the fuel pump according to the manufacturer's requests is from 60 l/hour.
Reasons for failure of the fuel pump fuse on Lada Priora
Let's take a closer look at the reasons why the fuel pump fuse fails. The performance of the fuel pump is associated with the following elements of the fuel system:
- on-board computer;
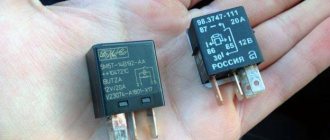
- the relay is designed to adapt high currents at the moment of starting the fuel pump, protecting against combustion, thus, a malfunction of the relay leads to a malfunction of the fuel supply;
- fuse located next to the relay.
The relay is easy to change. To do this, you need to unscrew its fastening in the additional compartment and replace the part with a new one.
So, on the Priora we found out where the fuel pump fuse is located - in the additional compartment near the fuel pump relay. The main function of a fuse is to protect an electrical circuit. When high currents occur, the fuse trips and the circuit opens.
Thus, the functionality of all other elements of the system is maintained. Protection can work at any time. The reason is usually current surges or overheating. In general, if the fuel pump fuse fails on a Priora, it protects the on-board computer from power surges.
Replacing the fuel pump in detail with a description of each step
The algorithm of actions is as follows:
- Remove the negative terminal from the battery. A mandatory requirement if you carry out any work that affects the electrical system of your car.
- The fuel pump is located under the rear seat. The rear seats need to be raised, I remove them altogether. It comes off easily. You need to “pull the string” in the center of the seat and remove it.
Pull the loop and pull it up
Relieving pressure from the fuel rail using a screwdriver
4 bolts securing the plastic fuel pump cover
Removing hoses from the fuel pump
An alternative option for relieving pressure in the fuel rail
The main method is a little inconvenient and dangerous. Since gasoline can ignite, and if the muffler pants have not yet cooled down, it can cause a fire in the engine compartment. Therefore, there is an easier way.
- Disconnect the power supply from the fuel pump.
- Start the car and let it run until it stalls on its own.
This method also relieves pressure in the fuel rail. Its advantage is that if you have a 16-valve engine, you do not have to remove the cover from it to get to the nipple!
Wiring
If the fuel pump fails, first of all, you need to make sure that the circuit was installed correctly. Three wires lead to its electric drive:
- one - to the fuel sensor;
- two - to the contacts of the motor itself.
A regular 12 volt light bulb will help you figure this out. It is connected to the power wires. When you turn on the ignition, it will light up - this means that the electrics are supplied correctly.
The lamp also checks the performance of the motor itself. In this case, it is connected to the protruding terminals of the drive, and its short-term flashing will indicate in this case a malfunction of this element.
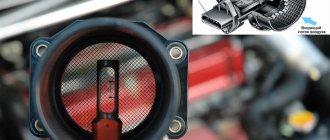
Causes of clogged strainer on Grant
It is not necessary to change the grid so often, since when refueling with normal fuel, it can easily travel more than 100,000 km. But symptoms may appear that indicate a clogged fuel pump mesh:
- poor engine start
- insufficient pressure in the fuel system
- dips when pressing the gas pedal
- the engine began to slowly gain speed
If you begin to notice the problems described above, then the first thing you should do is look at the mesh filter and, if necessary, replace it.
Checking the fuel pump relay
The fuel pump activation relay is located in the relay box located in the right rear of the engine compartment. It is used to control the operation of the electric fuel pump.
In particular, the relay breaks the pump power circuit if the engine stops with the ignition on. To turn on the fuel pump when the engine is stopped, you need to remove the relay and close contacts 30 and 87 on the connector with a short wire with a diameter of 1.5 mm. The fuel pump relay is brown on the 520i/525i/524td and orange on the 530i/535i.
Attention: when checking the fuel pump activation relay, the battery must be charged.
• Check fuse No. 23.
• Connect a voltmeter to pins 30 (*) and 85 (-) on the relay connector. The voltage should be around 12V.
• If this is not the case. connect a voltmeter to pin 30 and ground. If the voltage is about 12 V, check the electrical diagram to see if the brown-green wire is broken. If it is intact, check the red wire and replace if necessary.
• Turn on the ignition. Connect a voltmeter to pin 86 (+) and ground. The reading should be around 12V Otherwise, check the electrical diagram to see if the red/white wire is broken and replace it if necessary.
• Check the presence of a signal at the output of the crankshaft speed/angular position sensor (to do this, contact a service station).
• Connect a short jumper to pins 30 and 87. If the pump starts, replace the relay. Otherwise, check for an open and replace the green-violet wire if necessary.
• If the wire is OK, replace the fuel pump.
Hi all! Quite a long time ago, when I went for diagnostics, the technicians said that my Priora had low pressure in the ramp. I didn’t do it because... the breakdown was not fatal, and there were no funds at that time. And literally, in the last three days my car has barely started, about the 7th time. I turn on the power, the fuel pump runs for a second and turns off, I start to start it - whoosh! Once again - the same bullshit! The third time the fuel pump doesn’t turn on at all... the sixth time I help with the gas pedal and the seventh time it starts! I rushed to the garage, removed the fuel pump, shook the wiring, washed the filter, installed it... nothing has changed!
I got into the fuses and relays.
Then, I noticed that the fuel pump works perfectly when the car is running; as soon as I turn it off and turn on the power, there is zero response. And yet, the immobilizer (yellow car with a key) starts flashing on the instrument panel.
I went online on my phone... I came across a lot of articles where people write that a bolt on a key with buttons may be overtightened. What the hell is this? Could the car not start because of a bolt on the key?! I decided to try...I loosened the bolt and...OH GODS! The pump hummed and the car started! Coincidence? Believe it or not! They write that the soldering is bad and over time something jams and the immobilizer does not see the key. Unscrewed it, cleaned it. Now I’m thinking about cutting out the rubber gasket so as not to snap the two halves of the key together. Or just buy a new key.
Symptoms of unit malfunction
Malfunctions of the Priora fuel supply pump can manifest themselves in different ways.
Sometimes it fails completely, in other cases it maintains too low pressure in the system. Symptoms of problems are:
- after turning the key in the ignition switch, the characteristic sound of the fuel pump is absent, and the engine does not start;
- when the ignition is turned on, the pump pumps, the power unit starts, but when you try to move away, the engine stalls and starts with difficulty;
- The car jerks while driving, stalls and does not want to start.
The first symptom indicates a malfunction in the electrical circuit that supplies power to the unit. Also, a complete failure may be the result of a breakdown of the pumping device itself, and it has to be replaced. Fortunately, such breakdowns are quite rare. Electric fuel pumps installed on VAZ cars are considered quite reliable devices and operate without problems for 150-200 thousand km.
The remaining 2 symptoms indicate that the amount of fuel supplied to the injectors is not enough for normal driving. If the car somehow starts and idles, then there is no longer enough fuel to move. Since the characteristic symptoms of low pressure in the line are similar to the symptoms of problems with other units and systems, it is necessary to carry out diagnostics and more accurately determine the cause.
Replacing the fuel pump grid of a Priora car
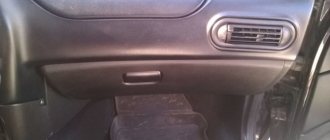
The fuel pump fuse for a Priora car is located like this: if you remove the protective shield under the passenger’s left foot, they are attached to the board on the right. As below in the picture. His number is F3 (15). Fuel pump relay - K2.
and here is a video on how to get there
To replace the grid of the device for supplying fuel to the engine, you will have to continue disassembling the fuel module. The fuel pump mesh is not that expensive, but it is a rather important element - replacing it can save you from buying a new fuel filter and extend the service life of the old device.
In Lada Priora cars, the fuel pump fuse is the most vulnerable element. This part needs to be changed quite often, and due to circumstances, car owners do this without outside help. Domestic cars are classified in the category where car enthusiasts carry out repairs themselves.
One of the main parts is the relay and fuse block, which is also known as the “mounting block”. This component of the automotive system encloses all electrical equipment.
A malfunction of one of the electrical components of the system requires an inspection and then repair of the Priora car. First of all, you will need to diagnose the relay and fuse box.
Priora cars have their own peculiarity, which is that the relay block is divided into three parts. If you are looking for where the fuel pump relay is located in a Lada Priora car, you can find them in the following places on the car:
- you will find the main mounting block on the left near the driver’s foot. To open the drawer, you need to rotate the three latches 90 degrees;
- the second block, located under the hood, can be seen near the expansion tank;
- You can find the additional unit on the left side of the passenger side.
In search of the fuel pump fuse, you need to look into the additional mounting block. It is usually designated F3 (15A) on the fuse and relay box diagram. The location of the fuel pump relay is indicated in diagrams K2. Now you can easily find the location of the fuse yourself.
The Priora fuse box is an element of the car that you can not only study, but also repair yourself in case of a number of simple faults. Every car owner has at least once tried to repair something with his own hands.
Modern cars can no longer be imagined without the use of electronics. And electronics, like any equipment, can fail and, as a rule, at the most inopportune moment. To protect electrical circuits, a well-known element - a fuse - has long been used. The main task of any fuse is to protect the electrical circuit. Automotive fuses are no exception.
The Priora series of domestic cars uses fusible elements. If the current in the electrical circuit exceeds the permissible value, the fuse element burns out and opens the circuit.
To make fusible elements, an alloy or one type of metal is used. The body in which the fusible elements are placed is made of a special type of glass. Typically, the housing is a system of fastenings, between which a fusible element is fixed.
This arrangement of elements is typical for Lada Priora fuses.
The fuses in the Priora are located where the battery is, that is, under the hood. This placement is primarily related to safety. The marking of the elements is indicated by the Latin letter F, which indicates that they belong to devices with low power.
The marking of fuses and relays, their location in the Priora mounting blocks depends on the configuration. For example, F9 indicates the heater fan fuse, and F3 or F15 may indicate where the fuel pump fuses are located on a Priora.
The electrical circuit of the VAZ-2170, as well as other Prior modifications, is characterized by the use of three types of relays. The main relay block (or the first, main relay) is located on the left side of the driver. There is also a mounting block and an additional block, they are located near the passenger seat.
On Priors with air conditioning, a fuse and relay block is additionally built in to carry out monitoring functions for devices that regulate the state of the climate. In cars with light sensors, the low beam lamps are powered through a relay, which is usually designated K1 in the diagrams, but there may be other designations.
The engine compartment of the VAZ-2170 contains the main unit, next to which there is a battery and an expansion tank. This block contains 6 fuses that serve the main electrical circuits. To protect the main unit, a plastic casing is used on top, which can be removed if necessary.
To the question of how to remove the fuse box, you can give the following answer: replacing fuses in the main block occurs in 3 stages: disconnecting the battery mass, removing the cover, replacing the faulty part.
The fuse and relay mounting block often hides various breakdowns under its cover.
All professionals recommend starting troubleshooting in the Priora's electrical system with the mounting block, which is located on the left under the dashboard.
The block is protected by a panel made of plastic and attached to the dashboard with three latches. To remove the panel, you need to rotate each latch 90°.
The operation of the car's generator, especially the malfunction of the signal light when turned on, also depends on the condition of the fuse that makes up the mounting block.
The fuses located in the mounting block are responsible for the operation of the wipers. There are cases when it is not possible to operate the wipers only in intermittent mode - this is already a malfunction of the relay, and it is responsible for performing this mode. In case of malfunction, replacement is carried out.
For Priora cars, the mounting block where the starter relay is located plays an important role. If it fails, you must first check that the battery is working properly.
Fans consider the Priora fuel pump fuse to be one of the most vulnerable points. When the ignition key is turned, an electrical signal is sent to turn on the main relay and the fuel pump relay. At this moment, the main task of the fuel pump is to create the necessary pressure to ensure a constant supply of fuel to the engine.
The voltage at the fuel pump that supplies fuel is 12 V. In a Priora car, the fuel pump fuse controls the operation of the system that supplies fuel.
Therefore, experts recommend that if problems arise with the engine, first of all, pay attention to the fuel supply fuse.
The use of window lifters in Priora cars depends on electric motors, the main task of which is to raise and lower the windows. A typical window regulator includes: glass, motors (or regulators), and switches. Regulators and switches are connected using a wire.
The connection of the controls is designed so that the windows can be raised and lowered using the main switch block, or using switches located on the doors. Each door is equipped with a separate motor.
In which direction the starter will work (polarity) is determined by the switch, or more precisely, its position. To control the electric current going to the window motors, a special relay is provided.
If the window regulator does not work, this does not affect the entire system in any way, since there is an additional fuse in it that protects the entire circuit with a separate circuit breaker.
There is a lockout switch in the main switch box that can lock out all door switches when the ignition is turned on. Therefore, you should always check the state of this switch at a given time if you are diagnosing the system.
Changing the cigarette lighter
Most drivers do not use the cigarette lighter for its intended purpose, forgetting that many devices that use current are connected through the cigarette lighter. As a result, a common problem arises - the cigarette lighter does not work.
The composition of the cigarette lighter on VAZ-2170 cars is the same as that of many other models - it is a metal spiral, which is covered with a plastic casing. A special connector is used to heat the coil.
Repairing the cigarette lighter connector for minor faults is often carried out without dismantling.
It may be that replacing the fuse will not bring the expected result. Then, first of all, it is recommended to conduct a thorough check of the wire. The insulation coating on it may be damaged. You also need to check how tightly the connection terminals are inserted. It also happens that the wire that powers the device is disconnected.
Buying a cigarette lighter fuse for a Priora is not a problem today. Domestic stores offer a large selection of auto parts for various models. At the same time, it is important to take into account the advice of experts and buy factory-quality spare parts produced in Russia.
The fuel pump on a car is designed to supply fuel to the combustion chamber. Its operation is controlled using a relay. On a VAZ (depending on the model), the fuel supply unit can be electrical or mechanical - it all depends on the fuel supply system. On a fuel-injected car, the fuel pump is located in the tank.
When the ignition is turned on, the relay creates pressure in the fuel lines by turning on the fuel pump (BN) for a couple of seconds. After this, the BN will work either when the engine is cranked by the starter, or when the engine is running.
Weight
The fuel pump mass is located under the steering wheel, not far from the handbrake handle. It is its use that most often leads to wire breakage. In this case you will need:
- remove the cover;
- clean the ground contacts;
- attach it to its original place.
There is also a relay that controls the operation of the fuel pump. It is necessary so that when the ignition is turned on, operating pressure is immediately formed in the fuel supply system. It is important not to get confused, because there are three relays, and only one of them is related to the pump.
This element cannot be repaired and is simply replaced with a working one.
Relay and fuse box Lada Priora
If we are talking about the failure of some element of the electrical equipment of the system, the inspection and repair of the car begins with diagnosing the relay and fuse box. This block in Priora is divided into three functional parts, which can be found in the following places of the car:
- The main mounting block is located on the left side near the driver's foot. The drawer opens by turning three locks 90 degrees;
- another fuse box is located near the expansion tank under the hood;
- the additional unit is located on the passenger side near his left foot.
The Priora fuel pump fuse is located in the additional mounting block on the passenger side; on the diagrams of the fuse and relay box it can be found under the designation F3 (15 A). K2 marks the location where the fuel pump relay is located. So, we figured out where the Priora fuel pump fuse is located. Now let's look at its functions.
Manufacturers and prices of analogues
What car owners expect from analogues is maintaining normal pressure in the fuel supply system. If the electrical system is quite weak, there is no point in installing it. There is a list of proven devices for supplying fuel to the engine, which have been well rated by other owners and are suitable in their parameters for replacing the standard device:
- Soate 21101-1139-01, price – 1,600 rubles.
- Bosch 0580-453-453, cost – 4,500 rubles.
- Pekar 2110-11139009-00, price 3,100 rubles.
- Stellox 10-01202-SX, cost – 1,000 rubles.
- Stellox 10-01680-SX, cost – 3,000 rubles.
- STARNER 2112-11390-09, cost – 1000 rubles.
- Masuma MPU-103, cost – 2,800 rubles.
- Denso DFP-0105, priced at RUB 3,200.
How to remove and change the fuel pump on a Priora
To remove the fuel pump on a Priora car, you will have to do a lot of preparation. Since the system is quite complex, when dismantling it you will have to interact with many parts of the machine. You should start by disconnecting the negative terminal from the battery. Replacing the device for supplying fuel to the engine is carried out as part of dismantling the fuel module:
- Open the back door. Look under the sofa cushion for plastic plugs. Remove them by pressing lightly. You will see the sofa fasteners.
- Unscrew the nut with a “10” socket wrench.
- Pull the fastener towards you. Do the same action on the other side.
- Pull out the sofa cushion.
- If necessary, remove the backrests, although they will not interfere much.
- Place a basin or other container on the floor of the body.
- Find a black square metal hatch that is covered with sound insulation. Fold back the fabric and begin dismantling the hatch.
- Use a Phillips screwdriver to unscrew the screws. Remove the hatch.
- You will see the top of the fuel module and some wires on top of it. Press the latch that holds the harness and disconnect the wires from the module. There are also two small hoses connected to the fuel supply system cover. One is responsible for supplying gasoline, the other for shipping.
- Hold the hose directly near the place where it is attached to the module, and then turn it until you see the green inserts on top - these are the clamps. Clamping them, pull the hose towards you. Drain the fuel into a container.
- Unscrew the fastening nuts that hold the pressure plate using a “10” socket wrench. Remove the pressure plate.
- Now comes the careful process of dismantling the module. Please note that in the immediate vicinity there is a part of the fuel sensor that should not be touched. Therefore, when removing the fuel supply system assembly, try to make your movements as smooth as possible.
- Immediately point the module over the container - gasoline will drain from it.
Next, in order to release the fuel module, do the following:
- Disconnect the negative wire from the fuel pressure regulator. Disconnect the harness by pressing the latch.
- Disconnect the wires from the pump.
- Press out the clamps that hold the fuel sensor in one position.
- Slide the flammable substance sensor along the grooves and then remove it.
Before replacing, you should check the fuel supply system assembly.
How to check the fuel pump on a Priora car
According to AvtoVAZ, a standard pump for a VAZ-2170 should pump 60 liters of gasoline per hour. To check it on your car, do the following:
- Turn the key in the lock, turning on the ignition.
- Remove the fuel pump relay using a gentle movement.
- Place a jumper between pins 30 and 87.
- Listen for the familiar sound of fuel pumping. If you hear that pumping is proceeding normally, you can turn the key back. To “fix” the car, change the fuse.
If the engine fuel supply does not stop, do the following:
- Check the voltage at the pump connector using a multimeter.
- Check the ground supply to the pump chip.
- Clean the fuel module from gasoline (it’s even worth wiping it with a rag!), then apply +12 V to it. This is a “direct” test of its performance.
Fuel pump fuse and its functions
The functionality of the gasoline supply system in the Priora hatchback is ensured by the fuel pump fuse. This component is responsible for the fuel injection function through the injection feed. The pump operates under a voltage of 12 V and with its help fuel is supplied. If the fuse breaks, the Priora car will not be able to start.
What is the function of a fuel pump?
This component is responsible for suctioning fuel and supplying gasoline to the intake injection manifold. In the event of a breakdown, gasoline is not supplied and it becomes impossible to start the engine. When problems arise with the engine, Priora car owners should first check the pump fuse.
The operation of the fuel pump is fully controlled by an electronic control system. The signal is transmitted to the fuel pump upon ignition, after which it begins to move. Thus, a pressure of a certain power is created to regularly deliver gasoline to the engine.
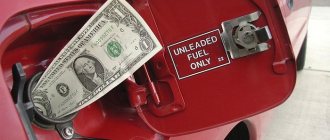
The fuel supply starts with the ignition key brought to the active position.
Operating principle of the fuel pump fuse
The fuse operates using a simple design, which includes two aluminum contacts and a fire-resistant plastic cover. High voltage disables it and its shell melts. This is the best signal to replace the fuse.
The normalized current between two contacts is carried by a contact thread located between them. The marking should be taken into account, for example, when designated as “15A”, the constant current voltage cannot exceed this value. If more voltage passes through, the thread will break and the body will melt.
Similar symptoms not related to the fuel pump
The symptoms that appear due to a lack of fuel in the supply line are quite typical and are very similar to problems with other systems. How to eliminate possible problems using the elimination method:
- Unscrew and inspect the spark plug skirts. When there is not enough fuel, the electrodes remain clean or become covered with a white coating. This is further evidence of a malfunction in the power system.
- Replace spark plugs. If they wear out, they create a similar effect - failures, difficult starting, and a drop in engine power.
- Check the functionality of the throttle position sensor (TPS) and idle air control.
- Measure the compression in all engine cylinders. Due to excessive wear, the naturally aspirated engine is unable to create the required pressure and vacuum; the mixture burns poorly, which is why identical symptoms occur.
When troubleshooting, take into account one important factor - the service life of the fuel pump, which is at least 100 thousand kilometers. The longer the operating period of the unit, the lower the fuel pressure it creates at the outlet. The reason is wear of the membrane and other internal parts. If the pump has served 150 thousand km or more, you should think about purchasing and installing a new spare part.