Where is the fuel pump located on Ford Focus 2
Ford Focus 2 is one of the best-selling city hatchbacks. And despite the fact that the third generation of this car has already been released, the popularity of the 2nd Focus is not falling.
One of the advantages of this car is a wide range of power units, which includes 6 modifications of gasoline engines, and this is not counting diesel engines. All gasoline engines have a modern design and are equipped with injection power systems.
The most structurally complex part of the injector mechanical part is the electric fuel pump.
The unit is installed directly in the fuel tank, from which the entire power system is filled with gasoline under pressure.
The exact location is on the top of the tank, so getting to the unit is not so easy.
What if the fuel pump doesn't work?
Let us repeat that the fuel supply pump does not like counterfeit gasoline and does not forgive the driver’s negligence. Dismantling of old electric fuel pumps showed that most of the units failed due to clogging of the fine filter, which causes overheating of the device, followed by breakdown of the fuel pump. In such a situation, only repair or replacement of this element will allow the normal operation of the car to continue.
By the way, it is unlikely that you will be able to disassemble and repair the pump yourself without certain skills and understanding of how it works. Therefore, in order not to overpay again, you should take the faulty device to a specialized repair shop.
Signs of problems with the electric pump
Since the design of the fuel pump is quite complex, its service life is limited. And any interruptions in the functioning of this unit affect the performance of the power plant.
Symptoms of device malfunction are:
- Noticeable jerking of the car when accelerating;
- Difficulty starting the power plant (both cold and hot);
- Instability of crankshaft speed at idle (they “float”);
- Change in engine fuel consumption (decrease or increase);
- Increased noise level of the fuel pump.
Such symptoms, except for the last one, are a signal of malfunctions in other components of the engine, so before making an accurate diagnosis of interruptions in the operation of the engine, it is necessary to carry out diagnostics.
The most accurate method for determining the performance of a fuel pump on an injection engine is to check its performance.
By measuring the pressure in the car’s fuel system while the pump is running, it is determined whether everything is in order with the unit.
So, if the gasoline pressure created by the unit is lower than 3.6 kgf/cm. sq., the pump does not pump fuel in the required volume and requires replacement.
Checking the fuel pump activation circuit
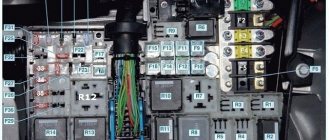
If the fuel pump does not turn on when the ignition is turned on (its operation can be checked by ear), there may be a malfunction of both the fuel pump itself and its activation circuit. We begin checking the fuel pump activation circuit by assessing the integrity of fuse F111 (15 A), located in the mounting block in the passenger compartment.
We replace the faulty fuel pump fuse with a new one, first checking to see if one of the terminals of the fuse socket is shorted to ground. A malfunction in the fuel pump switching circuit may be caused by damage to the pump relay R19 in the mounting block. To check the relay...
...remove it from the mounting block and replace it with a known good one. For this purpose, you can use the horn relay R2. If the fuel pump turns on with the newly installed relay, the fuel pump relay has failed and must be replaced. However, the most likely reason for the fuel pump to turn off is the activation of the fuel supply system emergency switch. Under operating conditions, if a wheel (especially the front left one) gets into a pothole on the roadway or hits an obstacle, as well as even a slight collision with another vehicle, the negative wire of the fuel pump is disconnected.
The switch is located behind the driver's door sill trim. It can be switched to a closed state by pressing it with a finger through a hole in the lining.
By removing the upholstery, you can check the functionality of the switch
Having disconnected the connector, we close the contacts of the wire block with a piece of wire. If power supply to the fuel pump is restored, the switch is faulty and must be replaced.
Source
Methods for replacing a node
The fuel pump for Ford Focus 2, both in pre-restyling and restyled versions, is considered unrepairable and cannot be restored, therefore, when a malfunction is determined, it is simply replaced with a new one.
But many car owners get out of the situation by changing only the lower flask-filter assembly and installing analogues from other cars instead of the failed original pump (fuel pumping unit). But more on that later.
One of the manufacturer’s not very successful decisions is the absence of a technological hole in the bottom of the Focus 2, providing access to the unit.
Therefore, the “official” method of replacing a Ford Focus 2 fuel pump involves completely dismantling the tank.
This method of work is quite labor-intensive, so car enthusiasts often replace the unit without removing the fuel tank.
How to check the fuel pump?
Before pronouncing a death sentence on a device, experts recommend testing it. Testing or diagnostics will include checking the electrical supply as well as the pressure. The first thing you need to pay attention to is the fuel pump fuse. "Ford Focus 2" is equipped with this in any configuration. It is located in close proximity to the control unit.
Tank removal method
First, let's look at how the fuel pump on a Focus 2 is changed according to the automaker's recommendation, that is, by dismantling the fuel tank.
To carry out the work, no special equipment is required; a standard set of tools and an inspection hole are sufficient.
It is better to perform the replacement operation with an assistant. In this case, you should make sure that there is less than half the tank of fuel.
The work algorithm is as follows:
- We put the car in the pit;
- We remove the fuse responsible for the operation of the pump, start the engine and wait for it to stop. This way we simply relieve the pressure in the fuel system;
- We climb under the car and find a plastic tank in the back of the car;
- We unscrew the bolts securing the heat shield from the tank, and move the shield itself down;
- An adsorber is fixed near the rear beam, to which two pipelines are connected. We disconnect these tubes from the adsorber (use a screwdriver to press the clamps and pull off the pipelines);
- In front of the tank we find two lines, one moves fuel, the other is an adsorber tube.
We disconnect the pipelines coming from the tank from these lines. On one of the tubes there is a double clamp, one part of which is pryed up with a screwdriver and pulled out, the second is clamped with a finger, after which the pipeline can be pulled off.
On the second tube there is a regular clamp - we clamp the tab on it and pull off the pipeline.
We disconnect the tubes carefully, since a little gasoline may leak out of them; - We find the clamp securing the filler pipe to the tank. We loosen it and take it up the pipe. Carefully pull the pipeline from the outlet pipe of the tank. Please note that there should be less than half of the fuel in the tank, otherwise everything will flood;
- A little to the side of the pipe there is another pipeline for vapor removal. We press the button on it and pull off the handset. If the button does not press, gently tap the entire mounting assembly;
- We put a special support under the tank or use a wooden post or a piece of pipe;
- Using a 13mm socket, unscrew the three bolts securing the metal bands holding the tank (two in the back, and one in front of the tank);
- Holding the tank with an assistant, remove the support and lower the tank a little down;
- If there is a lot of fuel, you can pump it into the canister using a fuel pump hose with a “bulb” (after lowering the tank, it will be easy to insert the hose into the outlet pipe of the filler neck pipeline);
- We get there and disconnect the wiring from the fuel pump (to do this, press the latch on the wire chip with a screwdriver);
- By positioning it correctly (by moving it forward and to the sides so that the pipe can fit through), we lower the tank even lower. Note that another thin tube runs near the inlet hose. It is secured with a clamp. We remove the latter using a screwdriver and dismantle the tube. We recommend using a regular clamp instead of the old clamp. Next, unfasten another canister tube; it is located in the rear of the tank. Remove the gas tank. The remaining work is carried out on the dismantled tank;
- We carefully clean the upper surface of the fuel container from dust and dirt, and also blow it well with compressed air;
- The fuel pump is fixed with a plastic unscrewing clamping ring. A special tool is used to unscrew the fasteners, although you can do without it. Using a hammer through a wooden guide, we strike the protrusions on the ring to tear it out of place;
- After removing the ring, carefully remove the pump;
- Before installing a new unit, we assess the degree of contamination of the tank and, if necessary, wash it;
- When installing a new pump, it is important to position it correctly. To do this, there is an upward arrow on the body, which we combine with the mark made on the tank near the hole for the electric pump;
- We fix the assembly with a fastening ring. Treat the ring threads with WD-40. You need to tighten it well, but keep in mind that the ring is plastic, so you shouldn’t use excessive force. For reliable fixation, use a wooden adapter and a hammer;
- We put the reservoir with the new pump in place on the car, fix it with bolts and connect all the elements back.
During installation, special attention should be paid to the tightening of the clamps and the correct position of the clamps. All connections must be tightly tightened to prevent fuel leaks.
We recommend that, at first, after replacing the fuel pump, you periodically inspect the connections of all pipes, so that if there is a fuel leak, you can notice it in a timely manner and fix it by tightening the clamps.
Replacement without removing the tank
As you can see, the “official” method of replacing the fuel pump on a Ford Focus 2 is not very convenient, so car enthusiasts have found a different method of carrying out the work, and for this it is necessary to slightly modify the bottom at the location of the tank.
Therefore, to carry out the work, in addition to a set of keys and screwdrivers, you will need:
- Metal scissors (you can use a drill with an attachment for cutting metal);
- Drill with drills of small diameters;
- File;
- Rags;
- Metal plate;
- A piece of rubber;
- Self-tapping screws.
Using the “amateur” replacement method, an inspection hole will not be required, and it is better to do the work outside, with all the doors in the car open.
We begin the operation by relieving pressure in the fuel system by pulling out the pump fuse and producing gasoline with the engine running.
And then:
- Remove the rear seat and floor covering;
- We take out the plug of the technological hole;
- To gain access, it is necessary to cut out a section with a diameter of approximately 25 cm in the bottom, guided by the location of the pump (see the entry points for the pump power wires);
- We first make markings;
- To facilitate work along the perimeter of the applied marking, we make holes with a drill, while making sure that the drill does not go down too much (so as not to accidentally damage the pipes or tank);
- Using metal scissors, cut out a section of the bottom. There are alternative ways to cut metal;
- We clean the edges of the resulting hole with a file to remove burrs;
- We thoroughly blow the surface of the tank with compressed air and wipe it with rags;
- We disconnect the fuel line from the pump, after placing rags under them, as well as a chip with wiring;
- Using a hammer with a wooden handle, we tear off the fixing ring of the pump and twist it completely;
- We remove the faulty pump and install a new one in its place, fixing the unit with a ring;
- Reconnect the fuel line and wiring.
After replacement, the edges of the hole should be treated with anti-corrosion agents, paint and that’s it, but it’s better to seal the hole. And for this we use a metal plate with dimensions slightly larger than the hole and a piece of rubber - 30 by 30 cm.
In this case, the rubber will be a gasket between the body and the plate. All that remains is to secure the improvised cover with self-tapping screws.
The method that does not require removing the tank is convenient in that it is enough to make a technological hole once and then constantly use it when replacing the fuel pump on a Ford Focus 2.
Replacing the fine and coarse filter of the fuel pump in a Ford Focus 2
Tools:
- Large flat screwdriver
Parts and consumables:
- Coarse fuel filter
- Fuel flask (housing)
- Container for draining gasoline
- Rags
- Hairdryer
Notes:
The whole epic began with the fact that I was driving along highway 110, and when I pressed the shoe to the floor, the revolutions did not rise above 3k and the car jerked. Somehow I got home and started looking through the Internet. Good people immediately said, change the fuel pump filters. After reading more than one BZ, I decided that I had nowhere to remove the tank, and the tank was full at that time.
It was decided to cut a hole under the passenger seat.
1. I was glad that I didn’t have to wait, I reached under the seat, took it off, removed the pockets, began to move the carpet and was a little dumbfounded. Everything was already cut out!
The car's mileage is currently 136,668 km. I bought it a year and a half ago with a mileage of 116 km. Before that, I went to MSC for 6 years and in my city for a year. And at that moment I didn’t know whether to be happy or sad. But then, thinking that my conscience was clear, I realized that the hole saved me about 40–50 minutes of time. Having prepared the car, I went home. The next morning my father and I came to the parking lot.
2. I read that when you remove the pipe that supplies gasoline to the main line, almost half a liter pours out of it. They covered everything with rags, began to move the hose, and, lo and behold, a couple of drops dripped from it. Probably because the car sat overnight.
3. We began to unscrew the pump cover. Many people hit it with a hammer, but it was difficult for us, but it came from our hands.
4. Then they carefully began to remove the pump, for fear of bending the float. The float can be easily removed, there is a clamp there, we snap it off and slide it out of the groove.
5. We drained the gasoline from the sump. I shined a flashlight into the tank, there are no rags and it seems clean.
6. Arriving home, we began to disassemble it. Having removed the sump, we saw dirt and sand. Accordingly, the coarse mesh was no longer suitable.
7. I ran to the store for spare parts. I came, and right before I arrived the man took 2 flasks at once. Well, I ordered a flask, bought a coarse filter and went to install it. We changed the filter, installed everything, the car became easier to drive in the heat, but the light brake remained.
8. After 2 days the flask arrived. Both a flask and a coarse filter are ordered. They come included.
9. They started removing the pump again, but the car had not been parked overnight. And yes, about 150-200 ml actually spilled out of the line. gasoline.
10. I came home with my father and started taking it apart again. The sump was removed and there was a bit of dirt again. The mesh is still clean after 2 days. The original flask and the Chinese flask are one to one.
11. I read how the pump is disassembled, but it’s one thing to read and another to disassemble it yourself. The fuel pump itself is simply carefully pulled out of the flask, with a slight force; a plug with a black and red wire is inserted into it; whoever removes it, do not pull it sharply!
12. After removing the pump, you need to unclip the 2 hooks that hold the rest of the structure. Well, you also need to remove the fuel sensor itself, it is on a latch, after it is released, it simply slides forward.
13. The tube that was put on was simply cut off. I didn’t really want to boil the hose in water, so I borrowed a hairdryer from a neighbor. We started heating the pipe. We set it to 200 degrees. I will say one thing: the material is specific. You warm it up and the tip begins to curl. Well, no problem, we handed it out a little with a pencil and started putting it back in place. We screwed it up a little, and when we installed the pump, it was me or it, or something else, but the sound seemed to be sucking air somewhere. Although this may be how the pump works now, the filter is clean. Although, if there was an air leak, it would affect the car.
14. We assemble the structure and do everything in reverse order. But when we put the pump back in, we try not to press those same 2 wires. While pushing the pump, we slowly pull these 2 wires out, because there is no room for them there, and that’s it, the pump is assembled.
15. We put it in the car. Since we bent the new tube slightly wrong, the tube prevented us from installing the pump properly, the tube rested against the wall of the gas tank, with grief in half, but we installed it. I started it up 2 times, but all the gasoline poured out. Let's go, make a couple of sharp turns to make sure that gasoline doesn't splash out of the neck, you never know... What can I say, it started working a little louder, but that's how I looked at it, everyone notices it.
When the seats were installed, it was almost inaudible, but I will still glue it with noise, or rather with another layer. It's 23.20, we just installed it and went to test it. By 3 times it started to pull as before, and in general the acceleration became much better. Let's travel and see what happens next. In a couple of days, I want to cut open the old cleaning filter and see what's inside it.
The article is missing:
- Repair descriptions
- High-quality photos of repairs
2. I read that when you remove the pipe that supplies gasoline to the main line, almost half a liter pours out of it. They covered everything with rags, began to move the hose, and, lo and behold, a couple of drops dripped from it. Probably because the car sat overnight.
"Folk" methods of repairing a fuel pump
In order to replace the fuel pump on a Ford Focus 2, you need to purchase a new unit, and it is not cheap.
It is also worth noting the fact that the manufacturer did not provide for the use of a fine filter in the design of the power system, so the main filter element in the Focus 2 fuel system is a fine mesh installed in the lower part of the pump housing.
If the filter mesh is clogged, the same problems in engine operation appear as if the fuel pump malfunctions.
Moreover, the original mesh filters for Focus 2 are not sold, since they are considered an integral component of the unit and in case of severe contamination of the filter element, the pump is completely replaced.
But there are analogues, but the price for this consumable is too high.
Car enthusiasts have found a way out of this situation. You can find many options for mesh filters on the car market.
For Focus 2, for example, a filter element from Toyota, Mazda 3, Volvo S40 (ST 11P 202 - F07) that is located laterally relative to the seat is suitable. The diameter of the seat should be 11 mm.
When the housing cover is seated, such a filter simply bends a little, so it does not interfere with the assembly of the unit.
It is also not necessary to replace the assembly if the pump itself turns out to be inoperative.
In general, this fuel element includes a filter mesh, the pump itself, as well as a pressure regulator, housed in one housing. And of all the component parts, only the pump breaks.
In order not to spend money on a new unit, you can replace only the faulty component. The Bosch pump used on VAZ cars of the tenth family (2110-2112) is quite suitable for replacement.
But simply removing one element and installing another in its place will not work; you will have to slightly modernize the pump from Bosch.
The difference between the “native” unit from Focus 2 and the part from “Ten” comes down to a different method of connecting the pump to the wiring. In the Bosch pump, the contacts are routed into a plug, which prevents the element from being installed in the fuel pump housing.
To install a pump from a VAZ-2110, you need to cut off this plug and simply solder the power wires to the terminals.
During the work, a problem arises with the length of the “negative” wire, since it is not enough to reach the terminal when the pump is pulled out of the housing.
There is no need to extend the wire, since you just need to pull it out of the housing and route it directly.
After such manipulations, the pump from the VAZ-2110 will fall into place and, after assembling the unit, will perform its function perfectly.
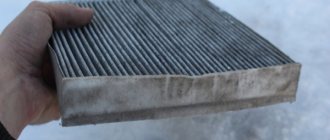
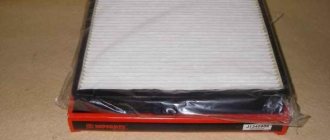
Part numbers of the fuel pump and its parameters
Old and new fuel pump element.
To replace the fuel pump, we buy a module from one of the following manufacturers:
The average price of a fuel pump is about 17,000 rubles , and the nominal pressure generated should be in the range of 3.9-4.2 bar. Clean gasoline to everyone and successful replacement!
Source