Methods for troubleshooting the electrical circuit of the fuel pump
A faulty relay or fuse is replaced with a new one, but first the cause of its failure must be eliminated. If there is a break or short circuit in the circuit, then this part of the wiring is replaced entirely. Poor contact in the connectors can be corrected by crimping or soldering the wires. The cost of a new relay in a store averages 200-400 rubles. At the same time, expensive does not always mean high quality.
First of all, pay attention to the appearance of the relay and workmanship, as well as reviews from sellers
The fuse can only be replaced with the same rated 15A. Chevrolet Niva is equipped with modern blade fuses that never lose contact due to vibrations and last quite a long time.
Relay - what is it?
And if all the reasons seem to be easy to diagnose, then a relay malfunction most often remains a mystery to car enthusiasts, because few people have any idea about its location and functions. Below we will tell you about why this device is needed and how to replace it.
A relay is a special electromagnetic switch that operates when there is a sudden change in current or voltage in the circuit. Simply put, the device closes the circuit when voltage is applied to it in the form of a special signal and breaks it when there is no voltage.
Relay design
Relays in a car come in different types, shapes and with different numbers of contacts, but their functions and design are generally identical. Inside it is a coil of copper wire, a return spring, contacts and an armature. All these elements are collected in a certain sequence. The relay for the fuel pump is clearly visible in the photo below:
The relay has a value of 30 Amps.
Operating principle
Since the fuel pump relay is designed only for an injection engine, it is powered from a 12-volt network. And after the key has been turned in the ignition, the relay closes the circuit, activating the contacts on the fuel pump, and turning it on. The buzzing sound that occurs after turning the key is the correct operation of the pump.
Where to find the fuel pump relay on a Chevrolet Niva
The block with the fuel pump relay is located directly under the glove compartment.
To understand where the relay is located, you need to know a little about the design of the car. On the right side of the dash, just under the glove compartment, is the first part of the car's accessible electronics, and the second part is right on the driver's side. The device we need is located in the second part, right under the cover of which there are four relays. It is not difficult to find the one that is responsible for the operation of the gas pump; its number is “3”. In order to better identify it, next to it you can see a fuse with a rating of 15 Amps, which is responsible for the safety of the fuel supply circuit.
The location of the relay is clearly visible in the photo.
Designation and electrical diagram of the main and additional power supply
The designations and explanations of the fuses of the main and additional units are printed on the surfaces of the covers.
Diagram of the main and additional blocks
Description of the fuses in the upper main section of the VAZ 212214 Niva injector .
| Number on the diagram | Rated current, A | Purpose |
| PR01 | 16 | Heater fan motor, front glass fluid supply system, rear wiper motor |
| PR02 | 8 | Front wiper, direction indicators (with relay), switch block under the steering wheel, instrument cluster instruments and lamps, reverse indicator lamps |
| PR03 | 8 | High beam in the left headlight and high beam indicator lamp in the instrument cluster |
| PR04 | 8 | High beam for right headlight |
| PR05 | 8 | Low beam left |
| PR06 | 8 | Same as on the right |
| PR07 | 8 | Left side dimensions, registration plate illumination, dimensions indication on the instrument cluster |
| PR08 | 8 | Right dimensions and illumination of control devices |
| PR09 | 8 | Hazard warning relay circuit and activation button, rear defogger system |
| PR10 | 8 | Horn, interior lighting and brake lights (all three) |
Overview of the fuses of the small additional block located under the main one.
| Number on the diagram | Rated current, A | Purpose |
| PR11 and 12 | Positions are reserved | To store two 8 amp inserts |
| PR13 | 8 | Turning on the rear fog lamps |
| PR14 | 16 | Cigarette lighter |
| PR15 and 16 | Positions are reserved | For storing two inserts - 16 and 8 amps |
On Niva Urban 4x4 the fuse ratings have been slightly changed. The changed positions are listed below, the remaining chains and denominations remain the same.
| Number on the diagram | Rated current, A | Purpose |
| PR01 | 16 | Heater fan, start of heated rear window, drives for all windshield wipers and washer. Additionally (optional), this insert displays circuits for electric drives of windows and mirrors. |
| PR02 | 8 or 16 | Higher rating - heater fan and compressor (optional change - only for cars with air conditioning) |
| PR09 | 16 | Heated glass (there may be an additional option - heated mirrors) |
| PR10 | 16 | Horn, brake lights and interior lighting |
| PR11 | 8 | Alarm |
| PR12 | 8 | Daytime running light system |
| PR15 | 16 | Heater fan (not on all cars - only with air conditioning) |
The video by Vladimir Zhupikov shows a Niva 21214 Urban with a heater fuse in position PR15.
Removing and replacing the fuel pump on a Niva Chevrolet
- The negative terminal is removed from the battery.
- It is necessary to reduce the pressure level in the power system. One way to unscrew the valve on the fuel rail.
- You need to get to the back seat and fold back the cushion on it on the right side - the fuel pump is located there.
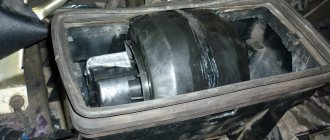
- Having discovered the sound insulation, with a special cutout for the fuel tank hatch cover, you need to bend it.
- Disconnect this cover by first removing the screws. Location of screws securing the decorative fuel pump cover
- After such small operations, you will have direct access to the fuel pump. The decorative hatch is removed and the fuel pump is visible
- You need to disconnect the block with the power wires on the pump.
- Remove the fuel hoses by releasing the spring clips. At this point, it should be taken into account that gasoline vapors create pressure in the fuel tank, which, after removing the fuel hoses, will displace gasoline. To prevent this from happening, it is recommended to remove the fuel filler cap before removing the fuel pump. Hose clamps nearby
- The pump is secured with eight nuts that must be unscrewed. The fuel pump mounting nuts are marked with arrows
- After this, you need to remove the pump, lifting it up, then tilt it so that the fuel level sensor comes out of the hatch. Next, the pump is finally removed.
Installing a new or repaired fuel pump is done in the reverse order.
Removal and installation of the electric fuel pump of the VAZ-21214 car
The fuel module is usually removed to replace the fuel coarse filter, repair or replace the fuel level sensor, or to replace the electric fuel pump.
The fuel module of the Niva car is submersible and is located in the fuel tank
Before removing the fuel module, you need to make sure that the fuel level in the tank is half or less.
To remove the fuel module you need to remove the rear seat, to do this:
Using a 13mm socket, unscrew the four bolts securing the rear seat hinges to the body.
Having released the seat back locks, lift the seat and take it out into the tailgate opening.
The hatch in the fuel tank cover does not allow removal of the fuel module, so the fuel tank cover must be removed.
Bend the trunk trim forward.
Using the “7” head, unscrew two self-tapping screws securing the fuel tank cover on the right and left (they simultaneously press the side panel trims)
Using the “7” head, unscrew five screws along the front edge of the cover and three along the back
Slide forward and remove the fuel tank cover.
Disconnect the electric fuel pump connector
We mark the electric fuel pump tubes and fuel drain hoses with paint
Holding the hose fitting with a 17mm wrench, unscrew the nut of the electric fuel pump drain pipe using a wrench of the same size.
The connection is sealed with a rubber ring, which is replaced with a new one during assembly.
Similarly, disconnect the hose from the fuel supply tube of the electric fuel pump.
Using the “7” socket, unscrew the eight nuts securing the electric fuel pump to the fuel tank.
Lift the electric fuel pump and turn it clockwise
remove it from the tank, being careful not to damage the fuel level indicator float
The connection is sealed with a rubber gasket.
We install the electric fuel pump in the reverse order. We connect the tubes and hoses according to the marks.
Typical faults and methods for their elimination
Failure of the fuel pump can be judged by the following symptoms:
- The engine has stopped and will not start;
- The internal combustion engine operates at idle and low speeds, but does not gain speed above a certain value;
- The engine operates throughout the entire speed range, but does not develop the required power;
- The engine is unstable at idle.
If the fuel pump completely fails, you need to check the power circuit, starting from the relay and fuse (Located in the front passenger's feet, under the panel).
Problems often arise at the junction of the wire blocks on the module, since the contacts burn out in this place. If, with a working circuit, the motor does not work (there is no characteristic noise when the ignition is turned on), then it will have to be replaced.
In other cases, two outcomes are possible. The first involves replacing the filter (mesh). Its condition can be assessed visually. The presence of brown deposits indicates severe contamination. Fuel cannot fully enter the pump.
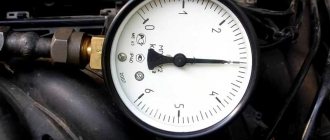
If the condition of the filter is satisfactory, then the reason may lie in improper operation of the regulator. Note that such a breakdown occurs much less frequently, but it does occur. The fact is that the bypass valve may operate ahead of time, and therefore the pressure in the line is less than the nominal one. Measuring pressure is easy. It is necessary to connect the pressure gauge to the fuel rail and turn on the ignition.
Maintenance of the Chevrolet Niva fuel pump is not provided, although some repair work is specified. Experienced owners try not to let things go to the point of complete failure, as this may not happen at the most opportune moment. They try to refuel only at gas stations that have proven themselves to be of good quality, and after a certain mileage change the mesh filter.
Replacing the fuel pump mesh
Let's look at how to change the coarse filter yourself.
- Raise the right rear seat cushion.
- Unscrew the two screws securing the service hole plug.
- Disconnect the power connector.
- Clean the top cover and the contact areas of the thrust plate as thoroughly as possible from dirt and dust.
- Disconnect the clamps and remove the fuel hoses.
- Unscrew the 8 x 10 bolts and remove the metal plate holding the fuel module housing.
- When removing the module, try not only to drain the gasoline from the glass as carefully as possible, but also not to damage the FLS float.
- Assess the condition of the rubber gasket. A seal in satisfactory condition can be turned over during installation. If necessary, replace the gasket with a new one so that there is no depressurization of the tank in this place.
- To begin disassembling the fuel module, disconnect the power supply chips.
- Pull the fuel return pipe out of the groove.
- Unclip the 4 plastic latches around the perimeter of the glass, then detach the glass from the top lid.
Signs of malfunction.
First of all, you need to try turning the ignition key and listen to whether the pump starts pumping fuel. If it is working properly, then when you turn the key you should hear a characteristic buzzing sound from the trunk. If there is a malfunction, the motor is silent and does not create the pressure in the system necessary for operation.
You can try to revive a faulty fuel pump. First of all, you need to remove the terminal from the battery. In some cases, the problem may be caused by a fault in the electronic control unit and a system reset will help get it working.
But such a development of events is quite rare. In most cases, resetting a terminal does not produce the desired results. And then you need to look for a fault. First you need to check the pump terminals. To do this, you will need a tester or test lamp. To check the fuel pump, you need to connect one probe of the tester to the car body - ground, and attach it to the terminals of the fuel pump. If the tester shows voltage, the pump is faulty and needs to be replaced. If there is no voltage, you need to look for a problem in the car's electrical wiring.
If the electric motor of the fuel pump is working properly, you need to check the relay responsible for its operation and the fuse. They are located under the glove compartment on the front panel. To check, you can use an adjacent relay on the board that has similar parameters. The fuse is used with a rating of 15 Amps. It is not recommended to use a part with a lower rating for testing, otherwise it will most likely burn out. Sometimes the contacts can simply become loose, so you can try rocking it and bending the legs.
In some cases, a faulty alarm relay can turn off the pump. It blocks the circuit, preventing thieves from stealing the car, but if it malfunctions, it can cause a shutdown.
Location of the fuel pump relay in the car
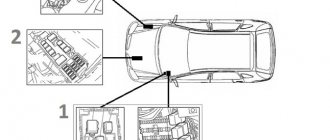
The Chevrolet Niva compares favorably with its predecessor primarily in its layout and convenient access to all parts. The designers have provided the most reliable place for the relay and fuse box in this SUV - in the cabin under the dashboard. In total, 2 mounting blocks are installed in Niva Chevrolet. The first is located to the left of the steering column under the hinged lid, the second under the glove compartment on the front passenger side.
We are interested in the second block. It combines the engine control unit and 4 power relays on a metal strip. From the outside, this unit is covered with a decorative plastic cover. The device we are interested in is located third on the left. The Chevy Niva fuel pump fuse is located on the left edge of this block. The fuse rating is 15 A. For easy access to it, it is recommended to remove the glove box cover.
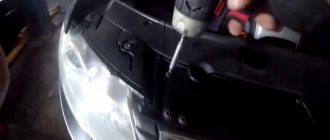
The procedure for disassembling the glove compartment of a Chevy Niva:
- remove the terminal from the battery;
- use a screwdriver to unscrew the screws securing the glove compartment (1 on the right, 2 on the left and a pair in the upper and lower parts);
- tilt the glove compartment body forward and carefully pull it out, disconnect the backlight;
- remove the protective cover of the mounting block.
The exact location is shown in the photo. You can clearly see the factory markings of each connector and what it is responsible for. Changes in the restyled car since 2009 from the pre-restyling car affected only the main mounting block with relays and fuses. Now several electrical circuits are connected to one relay. The location of the relays and fuses under the glove compartment has not changed.
Engine control system fuses
Purpose and parameters of fuses in the block (from left to right):
- 1 — ensuring the start of the electric motor of the right fan (rated 30 A);
- 2 — similar fuse-link for the left fan;
- 3 - fan relay, as well as the injection system control unit, control of injection nozzles and ignition coil (rated 15 A);
- 4 - system for reducing gas toxicity - heating of lambda probes, fuel vapor trap valve and sensor for measuring the volume of air entering the engine (rated 15 A);
- 5 - diagnostic connector for monitoring the operating parameters of the injection system.
Some VAZ 21214 with ABS system have a fuse block with 7 inserts.
Assignment of fuses (numbering starts from the door opening).
| Number | Rated current, A | Purpose |
| PR01 | 15 | Sensors on the engine, gasoline vapor trap, starter |
| PR02 | 15 | Fans, engine operation systems (control unit, ignition, injectors) |
| PR03 | 30 | Fan starting system |
| PR04 | 15 | Gasoline pump |
| PR05 | 5 | ABS block |
| PR06 | 40 | Likewise |
| PR07 | 25 | Likewise |
Purpose of the fuel pump
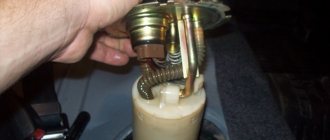
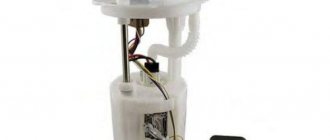
The very name of the part indicates that it is needed to pump fuel from the tank to the vehicle line. A submersible fuel pump is installed on a Chevrolet Niva car. It is a commutator motor, where two magnets play the role of a stator. But most often, a fuel pump means not only the motor itself, but a whole module, which includes:
- frame;
- filter;
- sensor;
- float
- pressure regulator.
The body is made of plastic. It performs a load-bearing function, since the main elements of the module are attached to it. Usually it does not cause problems during the entire period of operation of the car, unless it is subject to mechanical stress.
The filter is considered a consumable item. It has to be changed when it gets dirty. It is impossible to accurately indicate the resource, since it depends on the quality of the fuel used.
The level sensor is designed to supply a signal, which, after conversion, is sent to the dashboard. The ability to control the amount of fuel today is an integral function of any car. In addition, the on-board computer can calculate the consumption or remaining amount of gasoline.
The pressure regulator is a bypass valve. The pressure in the line cannot increase indefinitely, and the injection system is not always capable of consuming the amount of gasoline that comes from the fuel pump.
To get to the module, you just need to fold down the rear seat, so you don’t have to remove the gas tank. The purpose of the pump is not only to pump fuel, but also to create a certain pressure in the entire system. And if there is excess pressure, the valve is activated and gasoline is poured back into the tank.
Replacing (removing) the fuel pump and fuel level sensor
The tank should be no more than half full of fuel.
We carry out the work to clean the strainer, replace the fuel level indicator sensor, fuel pump and fuel module assembly.
Relieve the fuel pressure (see here).
Disconnect the negative cable from the battery.
The hatch in the fuel tank compartment lid does not allow removing the electric fuel pump...
. Therefore, it is necessary to remove the fuel tank cover.
Remove the rear seat (see here).
Using the “7” head, we unscrew two self-tapping screws securing the fuel tank cover on the right and left (they simultaneously press the side trim).
. five screws along the front edge of the cover.
. and three at the back.
Slide forward and remove the fuel tank cover.
Disconnect the electric fuel pump connector by releasing the clamps
We mark the electric fuel pump tubes and fuel drain hoses with paint.
Holding the hose fitting with a 17mm wrench, unscrew the nut of the electric fuel pump drain pipe using a wrench of the same size.
Or (with a different design).
Press the hose tip lock.
. and remove the drain line hose from the fuel module cover tube. In this case, you must be prepared for the fact that a small amount of fuel will leak out of the hose.
First unscrew the nut at a small angle, releasing the fuel pressure.
We remove the hose.
The connection is sealed with a rubber ring, which we replace with a new one during assembly.
Similarly, disconnect the hose from the fuel supply tube of the electric fuel pump.
Using the “7” socket, unscrew the eight nuts securing the electric fuel pump to the fuel tank.
Lift the electric fuel pump and turn it clockwise.
. remove it from the tank, being careful not to damage the fuel level indicator float.
The connection is sealed with a rubber gasket.
We take out the centering plastic ring.
Fuel module assembly
We install the electric fuel pump (module) in the reverse order. We connect the tubes and hoses according to the marks.
To replace the pump itself, the pump strainer or the fuel sensor, we disassemble the fuel module
Video
Relay diagnostic methods
In order to understand whether the device is working properly, you can use two proven methods:
First way
It consists of replacing a faulty relay with a known good one. After this, check the above fuse for integrity. If after such a check, the fuel supply is restored and the engine starts, then the work can be considered completed.
Second way
If you don’t have a new relay at hand, you can carry out diagnostics using a small piece of wire. A wire with even a small cross-section is suitable for this, since the current in this circuit is small. So, in order to diagnose the relay, it is necessary to close contacts “30” and “87” on the relay with a wire. Their location can be easily determined by visual inspection of the device.
These contacts should be closed with wire.
After the contacts are closed, you need to turn on the ignition and check the operation of the pump. If after such work the pump starts working, then it is necessary to replace the relay, because its operation with a jumper is prohibited.
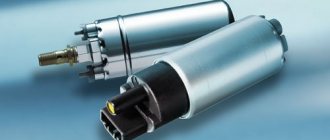
How does a Chevrolet Niva fuel pump work?
After dismantling the module, it is necessary to begin disassembling it, since the motor itself is located inside the housing. The disassembly algorithm is intuitive. The electric motor is inserted into a special housing, held by a cotter pin on the guides. An impeller with blades is attached to the rotor. When it rotates, a swirl of fuel is formed, as a result of which gasoline acquires kinetic energy and enters the highway. When a unit fails, the entire unit is replaced, as it is considered non-separable.
The float lever is connected to the rheostat slider. When the fuel level in the tank changes, the resistance of the sensor resistor changes.
It is located under the glove compartment on the passenger side and is closed with a decorative lid. A circuit fuse is installed in the same block
These two details need to be paid attention to, as they often cause malfunctions.
Fuel enters the fuel pump through a filter element made in the form of a fine mesh. This protects the assembly from large foreign particles getting inside. It is forbidden to “dry” the tank, that is, to use up the fuel completely, since the pump must remain submerged for partial lubrication and cooling. When the impeller operates, pressure builds up in the line, which varies from 3.6 to 4 bar if the ignition is turned on and the engine is not running. When the maximum pressure is reached, the regulator valve is activated.
Chevrolet Niva fuel pump fuse
The operation of a Chevrolet Niva car engine is impossible without a fuel pump. If one day the car simply does not start, then do not rush to get upset, perhaps the breakdown is minor and it takes five minutes to fix it. The main thing is to determine the cause and try to eliminate it. The reasons for the failure of the fuel pump will be discussed in this article.
If earlier Niva cars were produced with carburetor engines, then the modern Shniva is equipped with a fuel injection system. This means that fuel is supplied from the tank to the injector via a fuel pump, which operates on a 12V DC voltage. On carburetor engines, fuel pumps operate through mechanical action. But since the Chevrolet Niva is equipped only with an electrical device, then we will talk about it accordingly.
Location of the fuel pump in Shniva
Features of DIY replacement
Before you begin replacing or repairing fuel lines, you must relieve the pressure in the gasoline supply system to the engine. To do this you will have to perform the following steps.
- It is necessary to de-energize the fuel pump, which supplies gasoline to the engine injectors. The fuel pump power relay is located in the passenger compartment on the driver's side. When you remove the front dashboard cover, a block consisting of four relays opens. The fuel pump relay is the third in a row.
- After turning off the fuel pump, you need to “burn” the fuel remaining in the system. To do this, you need to start the engine and leave it running until it stalls due to lack of gasoline.
- For a final check, try to start the engine again by turning the starter for a few seconds.
Then they proceed to dismantling and replacing faulty elements of the fuel system. Before this, you need to de-energize the car by disconnecting the negative terminal of the battery.
Removal of flexible hoses is carried out from the engine compartment.
- The location where the hoses are attached to the inlet tube is indicated by a yellow warning mark. You need to remove the hose from the tube by disconnecting the plastic clip and pulling the hose in the opposite direction.
- The second end of the hose is connected to the fuel filter with a fastening nut. You can unscrew it with a 10 key.
- After inspecting the fastening points, they begin installing a new hose. It is attached in a similar way - the end connected to the fuel line is attached to the fixing nut, the other end is attached to the plastic retainer.
In the same way, change the hose connecting the outlet tube and the fuel line of the gas tank.
Replacing metal elements may require the use of a lift or inspection pit. The fuel lines are located underneath the vehicle, so you will need a flashlight to inspect for damage.
As already mentioned, if the damaged area is small (no more than 15 cm), then it can be cut off with a grinder and replaced with a hose. Only reinforced hoses made of petrol-resistant rubber, marked Fluroelastomer (fluoroelastomer), are suitable. The hose fits over the fuel line, so its inner diameter must be equal to the outer diameter of the pipe.
If the size of the removed damaged area exceeds 15 cm, a metal tube is used for replacement. The connecting elements are pieces of reinforced hose, which are placed on the metal ends of the pipeline and connecting tube. The length of each hose section should not exceed 10 cm.
If the damage to the fuel pipes of the Chevrolet Niva is larger, then their repair is impractical. In this case, you will have to replace the fuel lines with new ones.
The outlet and inlet pipes of the fuel line are removed quite simply. To do this, you do not need to use a lift or inspection hole - all work is performed from the engine compartment.
- De-energize the vehicle by disconnecting the negative terminal of the battery.
- Disconnect the rubber hose attached to the tube with a clamp.
- Unscrew the second end of the tube from the fuel filter using a 10 mm wrench.
The main fuel lines connecting the gas tank to the fuel filter are removed after installing the Chevy Niva on the inspection hole.
- Lower the gas tank slightly so that it does not interfere with dismantling. To do this, use a mounting tool, which is used to press the gas tank until it comes slightly off the mounting hinges.
- Disconnect the flexible hose connecting the line to the fuel filter. If the outlet line is changed, disconnect the hose connecting it to the outlet pipe.
- The line is connected to the gas tank using spring clamps. To disconnect, pull the tube in the opposite direction. After the clamp has been released, pull the line out by hand.
- Install a new handset. If the fuel supply line is changed, then its long end is inserted into the engine compartment and attached to the connection hose with the fuel filter. The other end is connected to the gas tank using spring clips.
- When replacing the outlet line, one end of it is attached to the gas tank with clamps, the other is screwed to the hose connecting the line to the gasoline outlet tube.
Replacing the Chevrolet Niva fuel filter
- Using a 10mm socket, unscrew the plastic TF protection.
- Disconnect the fuel inlet and outlet hoses (there will be 2 clips on the sides of the snap connections that need to be pressed into the connector when removed). Despite the lack of pressure in the line, some gasoline will flow out of the hoses.
- Loosen the nut of the metal clamp tightening the bolt (if the nut is stuck, the bolt will most likely turn while turning, so in addition to a 10mm socket, you will also need a 10mm spanner).
Read more: Toyota CVT owner reviews
- Remove the old fuel pump from the clamp and pour the remaining gasoline in it into a container prepared in advance.
- Install a new filter. Remember that the arrow on the filter housing indicates the direction of fuel flow. All that remains is to install the hoses until the connectors click and assemble the remaining elements in the reverse order of removal.
After replacing the fuel filter on your Chevrolet Niva yourself, turn on the ignition several times for 5-8 seconds so that the fuel pump fills the system with fuel before starting the engine for the first time.
Video:
Power system in Chevrolet Niva
Niva's electrical network operates with a nominal voltage of 12 Volts. The design of the fuel system consists of an electric motor with a pump in the car tank, from which a fuel line is extended to the ramp.
The electrical circuit of the power system consists of:
- electric motor;
- power cables with connectors;
- fuel level sensor;
- relay;
- fuse.
The ends of the wires are powered to the central lock. When we insert the key into the ignition switch and turn it, the relay control connectors close, which causes the power contacts to close. A characteristic click is heard from under the instrument panel, indicating that the fuel pump is ready.
How to reduce pressure in the engine power supply system?
Method No. 1
- Unscrew the nut securing the cover of the engine control unit - it is located inside the passenger compartment.
- Remove the cover.
- Remove the fuse for the electric gasoline pump.
- Turn on the engine, it should run until all the fuel in the fuel line is exhausted. When this happens, the engine will stall on its own.
- Reinstall the fuse.
Method number 2
You can reduce the pressure using the control valve, which is located behind the fuel rail; it is closed with a cap (usually made of plastic). The design of the valve is similar to a wheel spool.
Unscrew the cap and drain excess fuel by simply pressing the valve.
Disconnection of the fuel wires is possible only after this procedure. Be extremely careful! Gasoline will come out under pressure.
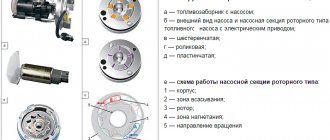
Relay structure and its purpose in a car
The principle of operation of any standard relay in a car is the closure or switching of two contacts on a power electrical circuit using an electromagnetic field. Closing the contacts directly through the switch will require the use of thick wires and will lead to a voltage drop in the entire on-board network. A switch with an electromagnetic coil inside allows a low current to close the desired contact and apply voltage to a section of the circuit. Through it, headlights, heating and cooling fans, power windows, a starter and other components are powered in a Chevy Niva car.
A typical fuel pump relay 75.3777-10 has 4 contacts, a coil with an armature, and a spring for opening the contact. When voltage is applied to the control contacts, the rod is drawn into the winding and another pair of contacts is closed. It turns off automatically as soon as the low-current connectors are de-energized.
Advantages of using relays in Niva Chevrolet cars:
- spontaneous leakage current in the on-board system is eliminated;
- reliable control of all electric motors;
- quick and guaranteed start of electrical mechanisms;
- Network overload protection.
The fuel pump relay has appeared on cars of the Chevrolet Niva family since 2003, when an injection engine was installed. The engines of the VAZ 21213 family are equipped with a carburetor and do not have a relay in the fuel supply system.
Chevrolet Niva fuel pump does not pump
It is very annoying when the fuel pump stops working on a busy highway or at an intersection. The problem is aggravated by the fact that the car is completely immobilized and even removing it so as not to disturb other road users becomes a problem. At this moment, you should not hope for a quick solution to the problem; you need to remove the car from the road and try to carry out several measures to repair it.
Why might it fail? There are several reasons that can significantly reduce its service life:
- The filter is clogged. In this case, problems begin to appear gradually. At first, the engine starts hard, there are jerks while driving, and you feel a lack of power when you press the gas pedal. The reason is poor quality fuel or damage to the gas tank.
- Contacts burning. Occurs when the vehicle is frequently used with a low fuel level in the tank. In this case, the pump may entrain air and create a pressure difference in the system. The element is not designed for this mode of operation and can fail quite quickly.
How to remove an electric fuel pump with a fuel level sensor VAZ 2121 Niva 2131
The electric fuel pump and fuel level sensor on the VAZ 2121 and Niva 2131 are removed for repair or replacement in case of failure or when performing other work in which its presence will interfere with the progress of their work. Prepare a standard set of tools and perform the following sequence of actions:
At this point, the repair work to remove the electric fuel pump and fuel level sensor on the VAZ 2121 and Niva 2131 has been completed. Carry out the necessary repairs, then reassemble and install in the reverse order.
See also: How to get from Avtovo to Kupchino
Replacing the fuel pump mesh on the injector with your own hands
Replacing the fuel pump grid Chevrolet NIVA, Chevrolet NIVA, VAZ 2123
I made it from a polythene bag, stuffing rags into it to fit the diameter of the pump. At the right rear wheel, under the bottom of the car, unscrew 2 nuts and 1 bolt, which hold the plastic casing. Set of socket heads with a wrench.
The car's operating instructions recommend changing the filter every 30 thousand.
It is a mesh that traps impurities and coarse particles up to 0.1 mm in size.
Burnt contacts on the gas pump The main reason for this malfunction is the inexperience of the driver who does not monitor the fuel level in the gas tank, that is, when the fuel is almost completely gone.
Gasoline pumps extremely do not like to work in the absence of fuel. Fuses and relays So, having made sure that the electric motor of the fuel pump itself is fully operational, the second thing you need to do is check the fuse and relay that are responsible for turning on the fuel pump.
Location of the fuse and fuel pump relay Unfortunately, getting to them is not so easy: Having dismantled it, you can find the relay block and the fuse itself in the depths.
You can replace the faulty relay with a neighboring one. You should also take spare relays and fuses with you; they will be very useful on the road.
Replacing the fuel pump grid Chevrolet NIVA, Chevrolet NIVA, VAZ 2123
After checking the fuse, you can bend its legs. It decreases automatically hours after the last activation of the ignition. In modifications up to a year, the fuel filter is located under the hood in the engine block.
Replacing the fuel pump mesh on a Chevrolet Niva
Updated, so-called restyled models are equipped with a filter element under the bottom, and its replacement is carried out at a pit or overpass. After completing the work, you should start the engine and check the unit for possible leaks.
It is not a fact that the car will start the first time. This is due to the fact that the fuel does not immediately have time to get into all elements of the fuel system. Reviews and recommendations Owners of domestic SUVs recommend that they strictly follow safety precautions. Before starting work, be sure to check the pressure in the system; it must be zero. Also, judging by the reviews, car enthusiasts disagree on which filter configuration to install.
You should pull it out carefully, as they say that the bottom part of the glass often falls into the gas tank and then it’s not always easy to fish it out from there.
By the way, hoses and electrical connectors can also roll somewhere if precautions are not taken. In my case, snapping it off turned out to be not entirely simple.
I had to use some force and take care not to damage the plastic cup in which the gas pump lives.
At times it seemed that it would not be possible without damaging the glass, but nothing happened.
Causes of failure
The fuel pump mesh really turned out to be a bit dirty. On the left, as you might guess, is the new mesh, and on the right is the old fuel pump mesh. Sequence of actions The car is installed on the inspection hole.
The interior opens and the right rear seat rises to an upright position. Underneath there is a layer of soundproofing material.
He leans to the side. The rear seat is raised, the sound insulation is removed, there is access to the cover. Access to the square fuel pump cover, which is attached to the floor with four self-tapping screws, opens.
These screws are unscrewed using a Phillips screwdriver. The cover is attached to 4 self-tapping screws, which are unscrewed with a Phillips screwdriver. A block with wires is attached to the pump, which is held in place by a metal retainer.
The fuel pump is broken, what should I do?
It is a very unpleasant moment when a fuel pump failure occurs, for example, on a highway or near a traffic light.
The situation becomes most tense at times of heavy traffic. If such a nuisance happens and there is no one to help, then the first thing you should do is roll the car off the roadway and try to “reanimate” the fuel pump.
Symptoms of a problem
In the arsenal of automotive tools of any caring driver there should be, along with the keys, a tester, even if in the form of a simple warning lamp and two wires.
The first sign of a malfunction on an injection engine is that the fuel pump motor is “silent” when the ignition is turned on. Accordingly, all attempts to start the engine in this case will not be successful.
In any unclear situation, remove the terminal. Very useful advice, by the way!
The driver will be very lucky if a very simple method helps, which should be taken first. To do this, remove the terminal from the battery for a while, and then put it back in and secure it. Perhaps the fuel pump will start working again.
Checking the power supply at the fuel pump terminals
Well, if this does not happen, continue to look for the problem. Here you should tinker and try to get to the pump itself, and use a tester or test lamp to check whether there is power at its terminals.
One end of the tester wire is installed on the car body - this will be “ground”, and the other - on the terminal connector of the fuel pump. If there is voltage, then, unfortunately, it is impossible to avoid replacing the electric motor, and if there is no voltage, the troubleshooting should be continued, already in the electrical circuit of the car.
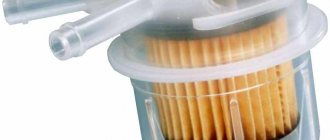
The fuel pump screen is clogged
Not severe contamination of the filter mesh. It could be worse!
In this case, the engine starts, but does not develop full power.
Troubleshooting in an electrical circuit
The electric motor of the fuel pump rarely fails during normal operation.
Burnt contacts on the fuel pump
The main reason for this malfunction is the inexperience of the driver who does not monitor the fuel level in the gas tank, that is, when the fuel is almost completely gone. Gasoline pumps extremely do not like to work in the absence of fuel.