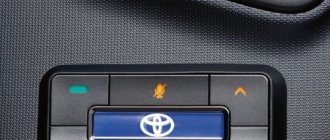
Chevrolet Niva is a five-door compact SUV (SUV class) with permanent all-wheel drive. Produced from 2002 to the present. In 1998, AvtoVAZ presented at the Moscow Motor Show a concept car that was supposed to replace the familiar Niva. The concept received the VAZ-2123 index. In 2006, the rights to the Niva brand were transferred to General Motors. Chevrolet Niva has permanent all-wheel drive - unlike its main “rival” - Renault Duster. The main disadvantages of the Chevrolet Niva are its weak 80-horsepower engine, which provides very modest dynamics, the absence of ABS and a high noise level in the cabin. In 2009, the car was restyled. I would like to add that the restyled version of the car has no mechanical changes, only the exterior and interior have been updated.
- Page navigation
- Mounting block – restyl
- Mounting block – dorestayl
- Fuses and relays KSUD
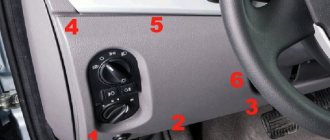
Fuse box - located to the left of the steering column under the instrument panel. To access the block, you need to unscrew two screws and press down the decorative cover (held in rubber bushings). This car is equipped with two types of mounting block, respectively the doreystyle and restyle versions (see information below).
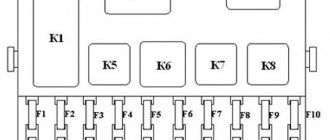
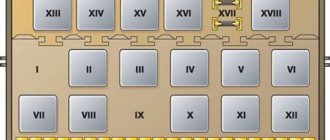
Chevrolet Niva mounting block (Restyle - model from 2009)
Location of fuses and relays
| F1(5A) | License plate lights, dimensions - left side, engine compartment lamp, side light indicator lamp. Add. brake signal. |
| F2(7.5A) | Low beam (left headlight). |
| F3(10A) | High beam (left headlight), indicator lamp for turning on the high beam headlights. |
| F4(10A) | Left fog lamp. |
| F5(30A) | Power window relay, front door power windows. |
| F6(15A) | Cigarette lighter fuse. |
| F7(20A) | Horn relay, horn, trunk light. |
| F8(25A) | Heated tailgate glass element, heated tailgate glass relay, heated outside rear view mirrors. |
| F9(20A) | Heated tailgate switch, windshield wiper relay, windshield wiper motor, windshield washer pump, right steering column switch, glove box light, reverse light bulbs. |
| F10(20A) | Remote control unit for electrical accessories (door locking) |
| F11(5A) | Side light lamps in the right headlight and right rear lamp, instrument illumination brightness control. |
| F12(7.5A) | Low beam (right headlight), gear motors for the headlight beam controller (electric headlight correctors). |
| F13(10A) | High beam (right headlight). |
| F14(10A) | Right fog lamp. |
| F15(20A) | External mirror control unit, electric drives of external rear-view mirrors, heated seat control unit. |
| F16(10A) | Relay-breaker for direction indicators and hazard warning lights (in hazard warning mode). |
| F17(7.5A) | Interior lamps, anti-theft system status indicator lamp, brake signals, additional brake signal. |
| F18(25A) | Heater fan, heater fuse. |
| F19(10A) | Relay-breaker for direction indicators and hazard warning lights (in turn signal mode), instrument cluster (except for the engine management system malfunction warning lamp), starter relay, air conditioning switch. |
| F20(7.5A) | Rear fog lights, immobilizer, buzzer. |
| K1 | not used |
| K2 | Windshield wiper motor relay |
| K3 | Relay-breaker for direction indicators and hazard warning lights |
| K4 | Low beam relay |
| K5 | High beam relay |
| K6 | Auxiliary relay (Tailgate defroster relay coil, heater fan, windshield wiper and washer, tailgate wiper and washer) |
| K7 | Tailgate glass heated relay |
| K8 | Reserve |
Remote relays (under the mounting block)
| K1 | Fog light relay |
| K2 | Power window relay |
| K3 | Seat heating relay |
| K4 | Horn relay |
| K5 | Starter relay |
Chevrolet Niva mounting block (Dorestayl - produced before 2009. Block from VAZ 2110)
| F1(5A) | License plate lighting. Instrument lighting. Exterior lighting indicator lamp in the instrument cluster. Engine compartment lamp. Additional brake signal lamp. Front dimensions. |
| F2(7.5A) | Low beam (left headlight). Electric headlight corrector (left side). |
| F3(10A) | High beam (left headlight). |
| F4(10A) | Left fog light. |
| F5(30A) | Power window relay and front door power windows. |
| F6(15A) | Door lock control unit. |
| F7(20A) | Horn relay. Sound signal. Cigarette lighter. |
| F8(20A) | Tailgate heated glass relay (power circuit). |
| F9(20A) | Tailgate heated glass switch. Windshield wiper relay. Windshield wiper motor. Windshield and tailgate wiper and washer switch. |
| F10(20A) | Reserve. |
| F11(5A) | Rear dimensions. Instrument lighting regulator. |
| F12(7.5A) | Low beam (right headlight). Electrical headlight adjustment (right side). |
| F13(10A) | High beam (right headlight). |
| F14(10A) | Right fog light. |
| F15(20A) | External mirror control unit. Mirror motors. Heated seats. |
| F16(10A) | Relay breaker for direction indicators and hazard warning lights (in emergency mode). |
| F17(7.5A) | Stop signals. Add. brake lights. Check Engine Light. Interior lighting and individual lighting. |
| F18(25A) | Reversing lamps. Tailgate glass heating relay (winding). Windshield and tailgate washer. Tailgate glass cleaner. Heater electric motor. |
| F19(10A) | Relay breaker for direction indicators and hazard warning lights (in turn mode). Direction indicators in the instrument panel. Direction indicators. Instrument cluster. Indicator lamp on center differential locks. |
| F20(7.5A) | Reserve. |
Connection diagram for heated mirrors via relay
A post about blue tomatoes The “ time of wet mirrors
” is coming.
Too often I began to remember the function of heating the mirrors, namely in the rain and on cold autumn mornings. It's time to connect. As I said, there will be no relay
!
I'll tell you why there is no relay. Having measured the consumption of two mirrors
I got
2.25A
at 13V, with a lower voltage the current will be higher (even if it’s 2.5A).
The rear window heating button (and other similar ones) can withstand 5A.
Then I started looking at the car’s wiring diagram and figuring out where to get the + from the ignition. Then I realized why people install a relay, as you understand, there is nothing to unload there - the load is not the same, but in order not to load the ignition - yes.
Let's start practicing
I want to say a few words about wiring. I did not take the easy route and did not insert the wires from below into the technological hole (near the bottom loop). I ran the wires through the standard entry points into the door and interior. The easiest part, it seemed to me, was the left side; the dashboard didn’t interfere like the right side. But a bunch of wires and circuits get in the way.
The heated mirror function is present on most new car models. But on earlier or budget versions this option may not be provided. In this case, owners wonder whether it is possible to assemble heated rear-view mirrors with their own hands. After all, the system allows you to effectively remove ice, snow, and raindrops that impair visibility while driving.
You can install heating on any car, the main thing is to select suitable heating elements and connect the circuit correctly.
Phased renovation
First, diagnostics are carried out to determine the reason why the glass heating does not function. If it is a relay or fuse, then further actions are already clear. A repair kit is purchased depending on the manufacturing technology of the device. It is important to determine the place where the current does not pass to the heating strips, and then consider repairs.
Finding a Cliff
Visual diagnostics help when the rear window is foggy. Once you turn on the heater, you will see exactly where the stripes have broken. Other techniques:
- The ignition and heating system must be turned on. One voltmeter probe is applied to the ground (any metal part of the body), and the second, pre-wrapped with foil, near the center of the heating strip. A break will be detected at the point where the voltage rises to 12 V or becomes close to zero. Ideally it should be 5 V.
- The probe of the device is applied to the positive contact of the heater, the other is moved along the strip of the negative terminal. When the voltage is zero, the location of the break has been found.
- The ohmmeter is switched to “kilo” mode. The probes are applied to the opposite terminals of the heater. A piece of cotton wool is soaked in distilled water and the strips are processed. When the instrument needle twitches, a defect has been detected.
If you do not have special equipment, it is better to contact a mechanic.
Repair with conductive glue
You can restore the functionality of the threads using glue. There are repair kits on sale with instructions that include this composition. This type of glue can withstand a serious temperature range from – 60 °C to + 100 °C. Sequencing:
- The problem area is being prepared. It is wiped with a rag soaked in alcohol.
- The edges of the strip are cleaned with zero grade sandpaper. Two careful movements are enough to remove plaque and carbon deposits.
- The area with the torn strip is covered with tape.
- Conductive glue is applied to the prepared area with a brush or syringe with a thickness of no more than 1 cm.
- The tape is removed after a day of waiting.
Repair thread kit
A special repair kit will help correct defects in large areas - from 10 cm or more. The kit consists of the heating tapes themselves, polymer resin (in a can) and stencils. Instructions:
- Find where the thread breaks.
- Prepare a strip of the required size.
- Remove the protective film.
- Fix the element in the problem area with resin.
- Give time to dry.
It is recommended to carry out repeated manipulation after drying.
Alternative method
You can restore the heating function not only using traditional methods. For this, a combination of copper or brass filings and paint is possible. They can be obtained by filing the corresponding bars. The paint should be selected to match the shade of the threads or use BF-2 glue. Instructions:
- Mix the ingredients in equal proportions until the consistency of a soft dough is formed.
- Turn on the heating.
- Determine the contact by the hissing sound it makes.
It is practiced to solder the broken area using zinc chloride. Here you should choose solder that contains a minimum amount of tin (POSS-4-6, POS-18). A copper or silver wire can be used to repair a large damaged area.
Solving the problem with side mirrors
Heated mirrors are an additional option that is not available on all cars. These systems consist of the same conductive strips that are applied to the substrate of the front glass sheet from the inside. Heated positions are switched on simultaneously. Finding and fixing the breakdown occurs in a similar way as described above. If only one of the heaters does not work, then the wiring or heating filaments are repaired.
Megapolis-Auto provides warranty and post-warranty support for professional anti-theft and security systems and AlarmTrade .
The company was awarded the status of "Industry Leader 2014"
Design of the mirror heating system
Before you begin installation, you need to understand the system design. You can install ready-made heated mirrors on your car. Then it is enough to connect new elements. Or you can do the tuning yourself. The second method is more labor-intensive and takes more time, but is the most attractive in price.
Heating scheme:
The system is connected to the on-board network via a separate button or connected to the heated rear window. When assembled correctly, the structure ensures rapid heating of the mirrors and removal of moisture from their surface when required.
Preparing for work
To design heated mirrors with your own hands, you need to select suitable materials and tools.
What is needed for work:
Important:
When choosing a heater, you should choose the most reliable film models. Here, double-sided adhesive tape is used, where a conductive layer is provided. The advantage of this option is uniform heating and quick cleaning of the surface.
Is it possible to install heated mirrors yourself?
When thinking about how to make heated mirrors with your own hands, you should start by dismantling the existing mirror.
Each driver can remove it himself:
It is noteworthy that self-adhesive heating of rear-view mirrors on film is not the only option. It is allowed to use one or two weaker car bulbs that can quickly heat the structure.
Subtleties of connecting the device
Connection is an important stage that determines the effectiveness of the entire heating system. When thinking about how to connect heated mirrors, it is worth exploring two options. It can be connected to the glass heating or a button or a separate circuit is used. The latter option is better, as it reduces the load on the on-board network, since simultaneous heating of glass and mirrors is not always required.
If you have not installed a heated mirror system before, you will need to make a hole for the wires during assembly. The wiring is laid under the car door trim and then under the panel.
Let's get started:
Communities › Kulibin Club › Blog › Installing a time relay with a control signal for heated mirrors
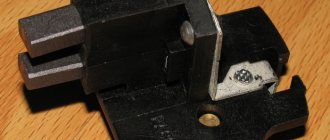
Background: My car has a burnt-out circuit board in the mirror heating button; the original plug costs 1,800 rubles. Which is not affordable for the family budget. On the Internet, mountains of information have been studied about how car owners solve the problem of heated windows and mirrors on their cars. Some people put a simple four-contact relay in the heating circuit, others put a Russian-made time relay, I installed a time relay with a control signal from a Daewoo Nexia car. I displayed the installation process on my Drive2 page, which aroused considerable interest, so I decided to duplicate it in the Kulibin community, since this design can be used in almost any car with an on-board 12V network. The idea is not mine. In the magazine Behind the Wheel, but I don’t know for what year, it was reported that this relay was installed on the heated rear window of a Chevrolet Niva.
Now why is this relay installed: It allows you to control the heated windows or mirrors without driver participation. That is, I pressed it once. Then the heating will automatically turn off after 20 minutes. Or it will automatically turn off when the ignition is turned off. Then you need to give a control signal again by pressing the button to turn it on again. Thus, you never forget that this button must be turned off at the end of heating.
Installation process and cost: — A button for turning on the heated rear window of a VAZ 2108 article (number) 376.3710M was purchased at the VAZ auto parts store, contact diagram for it No. 04 (see the manufacturer’s website). Contacts 9-10 – network closure. 7-6 button illumination. When disassembling the button, I took out a latch (a wire), and now the button is constantly open. Additionally, I bought a connector with wires for this button. The price of the button is 100 rubles, the connector is 30 rubles. Since the original button is larger in size than the VAZ button, I put the new button inside the original one, having previously trimmed off the excess. — During disassembly, I purchased a time relay for heating the rear window of a Daewoo Nexia car, article number (number) 96116223 and a four-pin connector for the VAZ relay. For a separate fifth contact (15) I made a separate wiring with a chip (female). The relay costs 100 rubles for disassembly, the connector in the store costs 36 rubles.
Other causes of malfunction
Despite the simplicity of the design of the heating system, it includes a number of elements that can break over time. The power button, wiring, heating filaments, pres and relays - all these parts, if broken, do not allow you to use heating. If after checking the fuse and relay box you still cannot find the cause, check out the list of other possible faults:
- Oxidation of contacts in the installation compartment;
- Broken wiring;
- Breakage or partial damage of threads on the plane;
- Mechanical failure of the system.
The reason, invisible during a cursory diagnosis, is a broken wiring. Without a multimeter, it is difficult to determine the exact location of the break. The heating filaments are quite fragile, so you should be careful when interacting with the inside of the glass. Often when tinting a car, these threads are damaged. Resoldering and restoration takes a long time, so this function does not work in many “fours”. Minor faults are not critical and are repaired when the exact location of the breakdown is identified. The design does not require any maintenance, but you should be careful when interacting with the heating filaments.