Back
We hide the wires of the element in a thermal tube, thus creating a protected cable. Now the cable needs to be removed. The difficulty is that the back of the VAZ-2108 seat not only tilts back and forth, but also leans forward. This requires large cable runs - up to 10 cm. Therefore, it is necessary to provide an option for free movement of the cable. We will achieve this by running the cable in a ring at the inner end of the backrest under the upholstery: as the backrest moves, the cable ring will decrease or increase.
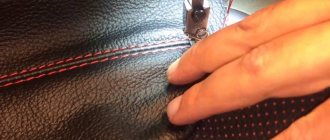
To fix and guide the cable, we sew a piece of fabric (sling, lace, etc.) under the upholstery with two “ears” through which the cable will be passed: a smaller “ear” - the cable from the element to the loop, a larger one - from the loop to the outlet further . We lay the cable, tilt the backrest completely back, pull out the cable, leaving a small loop - this will be the maximum length of the cable and the minimum loop. By tilting the backrest forward, we check the free movement of the cable and the change in the loop. Now you can close the upholstery.
Next, we prepare the lining of the back support. The cladding is normally secured with a screw at the bottom and a plastic clip at the top, which easily breaks and does not hold well. Here we will replace the clip with a regular screw and nut (it is more convenient to tighten them in the middle position of the backrest), for which it is enough to drill a hole in the lining, and there is already one in the support. Now we guide the cable along the stamping in the seat back support and turn it horizontally forward. We install a facing that securely fixes the cable, but leaves it free to move in the loop.
That's it with the backrest, let's put it aside for now and move on to the seat.
https://youtube.com/watch?v=VUbl0jy2rqw
What types of heated seats are there?
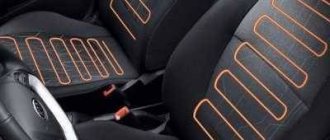
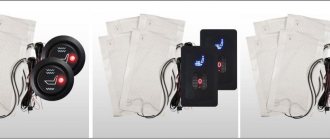
There are 2 types of seat heating kits: with a copper heating element and with a carbon fiber heating element (carbon fiber/carbon thread).
Seat heating kits are available in 12V and 24V versions.
Seat heating kit with copper wire heating element
A seat heater with a copper heating element is one long zigzag wire where one end has a positive polarity and the other end has a negative polarity, similar to the filament in a light bulb, which also gets hot.
Heated seats with a copper heating element have the following advantages:
- The copper heating element heats up quickly.
- Heated seats with a copper wire heating element reach a higher temperature than carbon fiber ones.
Disadvantages of heating with a copper heating element:
- The disadvantage is that the rapid heating and cooling cycles will thin the wire and eventually it will burn out.
- Since the copper wire heating element cannot be cut to fit any seat, there are no universal kits that will fit all vehicles. Various sets with a copper heating element are sold for specific car models, or for specific seat sizes. If you are going to install a seat warmer kit with a wire heating element, it must be designed specifically for your car model (to fit), or be smaller than the car seats.
Seat heating kit with carbon fiber heating element (carbon fiber/carbon thread)
The carbon fiber (carbon fiber) heating element has a honeycomb structure. Electrodes (positive and negative) are located at the edges of the heating pad, cells made of carbon fiber are located between these electrodes.
Sets with a carbon heating element have many advantages:
- The heating element of such heating is a carbon (carbon fiber) thread, which is much stronger than copper wire.
- The honeycomb structure makes the heating substrate very reliable. Damage to a single cell does not disable the functionality of the entire heating system.
- Heating elements in the form of carbon fiber can be trimmed with scissors to reduce the size and fit it to a specific seat. This makes the seat heating kit with carbon heating element universal.
Disadvantages of sets with a carbon heating element:
- Carbon filament takes longer to heat up (about 1-2 minutes longer than a copper wire heating element).
- The carbon heating element heats up to a lower temperature (about 5 degrees lower than the copper heating element).
- Heating with carbon wire reaches the highest temperature of 50-57 degrees and the lowest 43-51 degrees Celsius, which is slightly lower than the copper wire element.
As can be seen from the listed advantages and disadvantages, heated seats with a carbon heating element are more preferable, as they are a universal and reliable option. In addition to universal kits, you can also find a seat heating kit specifically for your car on sale. It will fully match the seat configuration of your car, and will have detailed instructions for connecting to your vehicle. The universal kit may need to be adjusted to the location by trimming the lining with heating elements.
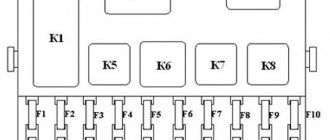
Location of additional fuses and relays
In the figure below we see how to get to the additional fuses of the car. Located to the right of the central panel, the screws are twisted and the cover is easily removed.
Removing the cover for diagnostics and replacement of additional fuses and relays
Below we see the fuses themselves, there are 6 of them, 15 Amps each.
Location of additional fuses
- Ignition controller,
- Sensors for oxygen, air flow, speed calculation,
- Fuel pump and relay, injectors,
- Fan,
- Gasoline pump,
- Ignition.
We remind you that F1-F20 are so-called fuses. This means that jumpers and other “tricks” are not acceptable when working. If you replace such a fuse with a jumper yourself, you risk system failure.
Dismantling works
To install heating elements, you first need to carry out a dismantling procedure. It includes the following activities.
- Unscrew the plastic fasteners that connect the seats to the body of your car.
- Remove the skids. Two pieces are located in front, and two more are located in the back.
- Remove the chairs from the interior, otherwise it will be extremely uncomfortable to work.
- Separate the back from the chair. To do this, there are bolts on the sides, which can be removed with a 10 mm wrench.
- On the back there is a plug for the headrests, which can be removed.
- The upholstery is removed from the hooks below. To do this, the hooks are slightly unbent.
- Now you can completely remove all the trim.
- Carry out a similar procedure with the second seat if you plan to install heating on it too.
While you are installing the heating, throw the upholstery into the washing machine. This will not harm her, and the interior will look newer and nicer.
Installation of heating elements
Many people forget about the need to securely fix the elements responsible for heating the seats. As a result, over time they can shift, thereby disrupting the performance of the system.
To avoid such situations, experts advise sewing heating elements directly to the inside of the upholstery. Although today some car owners prefer another option, which uses double-sided tape. The elements are held on it quite reliably, and the tape is attached to the foam rubber itself.
Connection process
Regardless of the chosen fixation method, reverse assembly looks the same for all options. This is the most difficult stage, so strictly adhere to the specified sequence of operations.
Pull the covering back onto the back, where the heating was already fixed. Using a mallet, the plugs are driven into place. We are talking about plugs for headrests. Next, the fabric is stretched. The front one is pushed through the hole, and the back one is straightened down. The fabric from the front is draped over the hooks and then stretched
Just watch the degree of tension so that the fabric does not tear. Now you can put the rear trim element on the hooks. The next step is to insert the wire into the front and tension the sheathing. If you plan to change the foam rubber, cut out the new elements in strict accordance with the dimensions of the old material. Pay attention to the areas where the spring contacts the body and seat ties. To avoid squeaks, use pieces from the washer tube, or simply wrap several layers of electrical tape. Heating for the lower part of a car seat is often mounted using double-sided tape or sewn to the trim on the inside.
You can use plastic clamps or wire brackets, which will prevent the heating elements from moving from their installation locations. After this, the plastic fasteners are tightened. Connect the backrest and seat. A wire is pulled through the hole in the frame and the foam rubber, with which the heating will be connected to the on-board network. The wiring connection is carried out strictly according to the diagram. It is necessarily included with the set of heating elements, so you don’t have to look for anything additional. The standard location for installing heating on and off buttons is the area near the handbrake. Although you can place them as you wish. It’s not uncommon for car owners to take an alternative route, installing a standard heating system on top of the seats, after which they put car covers on top.
There is a modern and very simple solution - heated capes that can be put on in winter and removed during warm periods. Their disadvantage is that the wire runs freely, which can interfere with the driver. Plus the capes do not fit tightly to the chairs.
Option with capes
Health issue
Today, medical professionals are still actively arguing about the harm of heating seats inside cars. Some believe that heating is harmful to men's health. Others, on the contrary, consider this a normal and even useful addition to the car.
The decision is yours in any case. But we recommend not to get carried away with high temperatures. Just warm up the seat a little before you hit the road. And then turn off the system.
Loading …
How to connect heated seats?
As a result, over time they can shift, thereby disrupting the performance of the system. Then the upholstery is removed.
Therefore, as they say, everything should be in moderation.
The variable resistor is soldered tightly, there is a special thread there, but go and find a nut for it! You can, of course, use a splitter, but the current consumption will be too high, and the fuse in the splitter will not withstand it. Instructions for connecting the heating Before connecting the heating, it is necessary to dismantle the seats and remove the upholstery and, if necessary, remove the old heating systems. The installation of seat heating begins with the installation of heating elements under the seat trim. We recommend not removing the seat trim completely. Assembly Well, here you will have to be patient and arm yourself with an awl to find holes for all the screws that have been turned out under standard or not very sound insulation. In addition to their considerable cost, heaters in the form of covers have a second drawback - the complexity of installation. That is, if necessary, you can easily remove them.
Heated seats and rear window
These two systems are very similar to each other, as they consist of the same components:
- Fuse to protect the circuit.
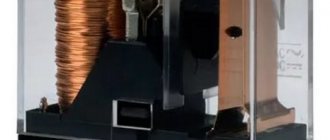
- Electromagnetic relay for switching a power circuit.
- Illuminated power button.
- Wire harnesses.
- Heating elements.
It is imperative to use electromagnetic relays. They are available in the electrical circuit for heated seats of the VAZ-2110. With their help, you can get rid of switching with a high current button.
As a result, the button on the dashboard switches only the low-current control circuits of the electromagnetic relay windings. The rear window heater has a similar design. If the car has heated rear view mirrors, then a similar scheme is used.
Connection of heating elements for seat heating diagram
Now about the electrical connection. Everything seems simple here. I took a switch of the required current and voltage rating, and connected everything in series. But you would be warned against this option. The whole point is that human essence sometimes manifests itself in forgetfulness. This means that leaving the heated seats on once while the car is parked can completely drain the battery. Here it is best to ensure dependence on turning off the ignition switch. That is, if the ignition switch turns off, then so does the heated seats. This is easy to do using a relay. The winding of which will be triggered by turning on the ignition switch, and from the sequentially installed heating switch button. Such a scheme will have two advantages. The first is, as we have already said, turning off the ignition in the car. Second, independent connection for power currents after the ignition switch. That is, the switching current of the relay will not significantly affect the currents after the ignition switch, and therefore will not cause the fuses to blow in the mounting block.
So, we offer you the following scheme.
Yes, there is a minus here. This means that it is generally better to make the circuit switch off after some time, but this will complicate it. This means that not all car enthusiasts will be able to repeat it. However, what is most important is that, in general, the scheme is quite workable.
If, after all, you make a circuit with a timed shutdown, then about this in the article “Do-it-yourself timer in a car.” And even a video on this topic.
Injection injection system
For VAZ-2110 cars (8-valve injector), the electrical circuit differs slightly from that used in carburetor cars. Injection engines are much more complex, since they have an electronic control unit and a system of sensors and actuators. It is also worth noting that injection engines come with 8 and 16 valves. There are no carburetor engines with 16 valves. All wiring can be divided into engine compartment and interior wiring.
Their purpose is clear from the name. The engine compartment connects elements such as the starter, generator, sensors on the engine, etc. Interior wiring is necessary to connect the instrument panel, backlights, and various switches.
How to make your own built-in heated rear seats in a car?
This option is quite rare on budget class cars. For some motorists it is not of interest, but for those who have a large family, a warm rear sofa will not be superfluous. The technology for installing and connecting equipment is identical to that described above.
To implement built-in heated rear seats, you will need two heating kits. Despite the fact that the installation process is carried out by analogy with the front seats, it is worth briefly considering the main transitions:
- choose a location for installing control buttons;
- remove the trim from the back, it is not necessary to do this completely - it is enough to release only the front and side parts;
- fix the heating mats and remove the wires;
- remove the upholstery from the sofa using the same principle;
- secure the sensors and heating fabric, remove the power wires;
- lay the wires in the tunnel between the chairs under the cover;
- install the buttons and connect according to the diagram.
Some car enthusiasts recommend using seat belts as a “ground”; the contact is quite reliable. Each person places the power buttons at their own discretion. For example, this could be the back of the front armrest or door. This option allows passengers to adjust the temperature at their discretion.
Good day to all!
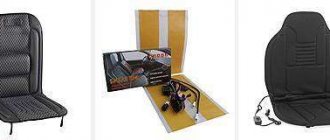
Today we have a Lada Kalina car. This is not the first time this car has visited us. The steering has already been repaired, suspension 2190-51 SAAZ has been installed, and electric heated mirrors have been installed (unfortunately, there was no time for a photo of it, so it was not included in the blog). Today we will add another useful option to it - electric heated seats. The owner of the car purchased an “Emelya” heating kit for Kalina-2, which, as it turned out, fits Kalina-1 with the replacement of buttons. The kit includes heating elements for seats and backrests, wiring, buttons and relays. The kit is installed with minimal modification, the wires are long enough.
We start with disassembling the seats - the most time-consuming part of the work. It is necessary to disengage the steel spokes and seats. They are fastened with wire rings that need to be opened with a screwdriver.
Simple universal heated seats and a diagram of connecting it to the car
Installation over the seat
We place the heating cloth on the seat and secure it with straps. We connect it to the cigarette lighter.
If desired, heating can be connected via buttons. Having purchased seat heating buttons with a built-in relay, we cut a hole for them in the selected location.
From the fuse block we pull the positive wire to the location where the buttons are installed. We also connect the heating wires there, having previously cut off the cigarette lighter plug from them. We pull the ground wire from any convenient place. We strip the wires and attach terminals to them. Connect the wires to the buttons. Minus and plus coming from the fuse block, to the button contacts on one side and the heating contacts on the other. Insert the buttons into the cut holes.
Installation inside the seat
To install the heating, you must remove the seat from the car. We push it all the way back and unscrew the front fastenings. After this, move the seat all the way forward and unscrew the rear fastenings.
Remove the seat from the car. Turning it upside down, bend the hooks of the upholstery holder from the front side. We fold back the upholstery and carefully insert the heating sheet and bring the wire under the seat. Having pulled the upholstery, we fasten it back. We install the chair in place.
We make the connection as indicated above.
Here we looked at the simplest connection diagram for heated seats, which you can do yourself without resorting to the services of a car service.
More complex types of heaters are best installed at service stations. Since this involves the installation of additional elements into the vehicle’s electrical system.
The best opportunity for self-installation of heating elements remains in cars that already have a system installed, but not installed by the manufacturer. On such machines, as a rule, there is already all the wiring for connection. It is enough to install the heating sheet and the relay in their original places.
The main reasons for poor operation of an electric furnace
VAZ 2110 stove diagram
Before you can directly begin to find a solution to a problem, you need to be able to identify it quickly and effectively. First, it is advisable to consider the general structure of the furnace. So, the heater furnace consists of the following components:
- mounting block fuse;
- incendiary lock;
- ignition switch together with its unloading relay;
- a special switch that regulates the operating mode of the furnace electric motor;
- additionally built-in resistor;
- stove motor;
- heated rear window of the car, which contains a heater adjustment button with a light indicator;
- a special functional element for heating glass.
VAZ 2110 stove wiring diagram
One of the reasons for the malfunction of the electronic circuit of the furnace may be the lack of functional activity of the heater electric motor at both low and high speeds. In this situation, you must proceed as follows:
- First you should make sure that the fuse has not accidentally blown;
- If a blown fuse is detected, it will urgently need to be replaced with a new one.
Note. Before proceeding directly to replacing the old fuse with a new one, it is necessary to first and without fail establish the cause of the burnout. If this is not done, the service life of the new fuse will most likely be short.
- There may also be a break or damage to the wiring at the point of its connection;
- to eliminate the above reason, it is necessary to check the electrical circuit according to the furnace diagram;
- after which, it is necessary to eliminate the impulse, if it took place;
- if the heating switch does not function, then the most likely cause is a stuck pusher or burnt contacts;
- to accurately diagnose a switch malfunction, you need to check the voltage level at the side terminals while changing the position of the switch in space (to do this, it is enough to apply current to the main terminal);
- if during diagnostics a change in voltage is not detected when changing the position of the switch knob, then it must be urgently replaced;
- there are a huge number of possible reasons for the electric motor to fail to operate: broken electrical connections or armature winding, immobilized cleaning brush, oxidation and/or contamination of the armature commutator;
VAZ 2110 heater radiator diagram
- It’s not difficult to revive the movements of the brush again; just disassemble it and then clean it;
- restoring the wires will also not be difficult, because the main thing is to find the location of the defect;
- if several of the above provisions do not produce results, then there is only one way out - a complete replacement of the heater electric motor;
VAZ 2110 stove electrical diagram
- sometimes, which is extremely rare, the cause of the malfunction may be the mounting block;
- There are many reasons for the faulty state of the mounting block, but the main ones are: at the soldering site, a complete or partial break in the electrical circuit, fire of current-carrying paths;
- The circuit should be checked according to the furnace diagram, otherwise it will simply be impossible to detect breaks and faults;
- the final practically probable cause may be an internal break in the circuit of the auxiliary (additional) resistor (see How to replace the heater resistor on a VAZ 2110);
VAZ 2110 stove wiring diagram
To eliminate a malfunction associated with the operation of the resistor, it is necessary to check its circuits.
A decrease in armature rotation in the electric motor is one of the reasons for the malfunction in the general circuit of the furnace. In this case, it is necessary to be able to find and eliminate micro-causes, and in particular:
- in case of clogging or oxidation of the collector system armature, the number of rotations of the electric motor will also be reduced;
- to eliminate the above problem, you will need to perform a general cleaning of the collector system;
- sometimes a short circuit may occur in the area between the turns of the armature winding, and to eliminate this cause, it is necessary to check the amount of incoming current;
- everything is very simple, if there is a short circuit of the turns, then the input current will exceed 4.5A;
Note. It is necessary to measure the incoming current only after a preliminary check of the objectivity of the ammeter readings.
What is needed for this?
The first thing you need to figure out is what elements, materials and tools will be useful to you during the heating installation process.
| Element | Explanation |
| Heating elements | They are required for backs and seats. Experts recommend choosing the standard ones provided for the VAZ 2110. They are sold in sets for two seats. Their cost ranges from 1000 to 1400 rubles. The kit also includes wiring and buttons to turn the heating on and off. |
| Buttons | They are not always included. They are used to turn the seat heating system on and off. |
| Wiring | It serves to connect the heating to the vehicle’s on-board network |
| Foam rubber | If the seats are already quite worn, it would not hurt to replace the foam rubber, which is short-lived |
Choose only high-quality materials, purchase kits from trusted retail outlets. Heating is carried out by electricity, which is always dangerous to human life and health.
On/off buttons
Dismantling works
To install heating elements, you first need to carry out a dismantling procedure. It includes the following activities.
- Unscrew the plastic fasteners that connect the seats to the body of your car.
- Remove the skids. Two pieces are located in front, and two more are located in the back.
- Remove the chairs from the interior, otherwise it will be extremely uncomfortable to work.
- Separate the back from the chair. To do this, there are bolts on the sides, which can be removed with a 10 mm wrench.
- On the back there is a plug for the headrests, which can be removed.
- The upholstery is removed from the hooks below. To do this, the hooks are slightly unbent.
- Now you can completely remove all the trim.
- Carry out a similar procedure with the second seat if you plan to install heating on it too.
While you are installing the heating, throw the upholstery into the washing machine. This will not harm her, and the interior will look newer and nicer.
Installation of heating elements
Many people forget about the need to securely fix the elements responsible for heating the seats. As a result, over time they can shift, thereby disrupting the performance of the system.
To avoid such situations, experts advise sewing heating elements directly to the inside of the upholstery. Although today some car owners prefer another option, which uses double-sided tape. The elements are held on it quite reliably, and the tape is attached to the foam rubber itself.
Connection process
Regardless of the chosen fixation method, reverse assembly looks the same for all options. This is the most difficult stage, so strictly adhere to the specified sequence of operations.
Pull the covering back onto the back, where the heating was already fixed. Using a mallet, the plugs are driven into place. We are talking about plugs for headrests. Next, the fabric is stretched. The front one is pushed through the hole, and the back one is straightened down. The fabric from the front is draped over the hooks and then stretched
Just watch the degree of tension so that the fabric does not tear. Now you can put the rear trim element on the hooks. The next step is to insert the wire into the front and tension the sheathing. If you plan to change the foam rubber, cut out the new elements in strict accordance with the dimensions of the old material. Pay attention to the areas where the spring contacts the body and seat ties. To avoid squeaks, use pieces from the washer tube, or simply wrap several layers of electrical tape. Heating for the lower part of a car seat is often mounted using double-sided tape or sewn to the trim on the inside.
You can use plastic clamps or wire brackets, which will prevent the heating elements from moving from their installation locations. After this, the plastic fasteners are tightened. Connect the backrest and seat. A wire is pulled through the hole in the frame and the foam rubber, with which the heating will be connected to the on-board network. The wiring connection is carried out strictly according to the diagram. It is necessarily included with the set of heating elements, so you don’t have to look for anything additional. The standard location for installing heating on and off buttons is the area near the handbrake. Although you can place them as you wish. It’s not uncommon for car owners to take an alternative route, installing a standard heating system on top of the seats, after which they put car covers on top.
There is a modern and very simple solution - heated capes that can be put on in winter and removed during warm periods. Their disadvantage is that the wire runs freely, which can interfere with the driver. Plus the capes do not fit tightly to the chairs.
Option with capes
Installation of heating elements for heated seats
First, let's look at the mechanical part, that is, what needs to be done to install heating elements in the seats of the car, and then we'll look at the electrical connection of the heated seats. First you need to remove the seats. Everything is simple here. Just before unscrewing the driver's seat, look under it and pull out the seat belt indicator connector. To do this, press the connector latch and pull it towards you.
The seats are attached to the body with four bolts. The head of the bolts on Grant is a so-called “euro” head (E10). If you have a different one, take the corresponding key. Unscrew these bolts and remove the seats.
For convenience, we bring the removed seats home and start working with them at home. We disassemble the seats. We need to remove the backrest. To do this, turn the chair on its side. Take two flat screwdrivers. We insert them on both sides under the backrest angle adjustment knob and remove it by prying it up.
After that, using a flat screwdriver, we separate the two halves of the plastic caps. We do this very carefully, as you can accidentally break the guides.
Unscrew the screw holding the decorative trim. Let's take it off.
Take a 13 mm wrench. and unscrew the two M8 mm bolts securing the seat back to the base.
After this, we carry out similar work on the opposite side. Then we separate the halves of the chairs. Now you need to remove the factory seat covers. Let's start with the lower frame of the chair. We turn it upside down. The cover is attached to the frame with factory fasteners made of rigid wire.
They are easily released with pliers. To unclamp, you need to pinch the edge of the wire with pliers and twist it in a circular motion. The photo shows the places where you need to disconnect these same clamps.
After all the latches marked in the photo are released, we move the cover to the side and see the foam casting.
Now you need to release the seat back cover. There is a plastic lock at the bottom of the backrest. We disconnect it along the perimeter and lift up part of the cover. Turn the back over to the back side up. Under the cover you will see the same latches. It is necessary to remove four pieces, as in the photo.
After the foam casting is exposed, we take our warmers, try them on and attach them. Let's start from the back. The backrest heating pad has a trapezoidal shape, just like the space on the backrest for heating our chair. But it matches the chair only upside down, with the wire facing up.
Popular
Since the relay is open, turning the ignition on again leaves the heating off and you must press the button again to turn it on. I didn’t take photographs of this process - everything is done locally anyway.
When they are inserted, a toothed metal plate is clamped on top with pliers and cuts through the insulation.
How to install heated seats in a car yourself? By the way, don’t be lazy and install other heating units.
Now you can put the rear trim element on the hooks. In this case, the on-board network will not be affected if the heating fails. Experts recommend choosing the standard ones provided for the VAZ. The connection of control, indication and button illumination was carried out with a two-core wire.
We recommend: Pue frequency of grounding checks
Simple universal heated seats and a diagram of connecting it to the car
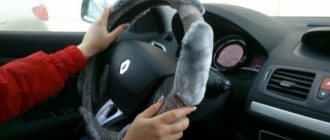
I plopped down on the icy seat for a couple of seconds, started the car, pressed the heating button, and within a couple of minutes the seat was already warm. Element Explanation Heating elements These are required for the backrests and seats.
Do you use heated seats? This arrangement of switches will be the most successful from the point of view of ergonomics and comfort. The best opportunity for self-installation of heating elements remains in cars that already have a system installed, but not installed by the manufacturer.
With a correctly assembled circuit, the heating will function only when the ignition is on. Didn't find the information you are looking for?
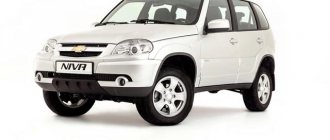
Bend back the cover at the passenger's feet and remove the cover of the ECU box. The ideal option is either the center console if there is space for installing buttons, or in the space between the gearbox rocker and the handbrake. This option is quite rare on budget class cars. Unclip the trim on the dashboard where the various buttons are located. INSTALLING HEATED SEATS ON A CHEVROLET NIVA WITH YOUR OWN HANDS. HOW TO CONNECT SEAT HEATING.
Composition of a seat heating kit and how to install heaters on Granta with your own hands
Preparation for installation of heating elements
Before connecting the heated seats on the Grant, you need to secure the heaters under the upholstery of the seats. Of course, it is more convenient to do this on dismantled “seats”, previously disassembled into two parts: the back and the support. Creating acceptable conditions for installing heating elements is the goal of the preparatory stage. By the way, when determining the reasons for the knocking of hydraulic compensators, there is a slightly different logic.
Preliminary activities are carried out according to the following scenario:
- Disconnect the power supply to the seat belt sensor located under the seat. In many trim levels, this option is available only to the driver.
- Using an E10 head mounted on the knob, unscrew the four bolts connecting the base of the seat frame to the body and remove the seat. For ease of access to fastening elements, move the seat to the farthest or closest position. Similarly, remove and pull out the second front “seat” from the passenger compartment.
- Remove the backrest angle adjustment knob by prying it off with two flat-head screwdrivers.
- At the junction of the backrest and seat, remove the plastic covers on the left and right sides by unscrewing one screw each.
- Unscrew 2 bolts on each side securing the backrest frame to the metal base.
- Detach the backrest from the seat.
- Repeat steps 3-6 for the second chair.
Factory covers are attached to the frame with four clips. On the reverse side, the fixing elements are clamped with wires. Having untwisted the latter, we tighten the fabric. Before removing the backrest cover, disconnect the plastic lock at the bottom of the structure. When assembling, it is advisable to replace the wire with plastic clamps.
Installation of heaters
The purpose of preliminary positioning is to achieve such an arrangement of the heaters that the wires exit into the joint of the backrest and seat. You won't be able to play with the longitudinal base - the standard kit is designed strictly according to the dimensions of the depressions. After removing the protective tape, glue the element to the frame. If necessary, the foam is trimmed to allow the wire to exit unnoticed.
Dismantling works
To install heating elements, you first need to carry out a dismantling procedure. It includes the following activities.
- Unscrew the plastic fasteners that connect the seats to the body of your car.
- Remove the skids. Two pieces are located in front, and two more are located in the back.
- Remove the chairs from the interior, otherwise it will be extremely uncomfortable to work.
- Separate the back from the chair. To do this, there are bolts on the sides, which can be removed with a 10 mm wrench.
- On the back there is a plug for the headrests, which can be removed.
- The upholstery is removed from the hooks below. To do this, the hooks are slightly unbent.
- Now you can completely remove all the trim.
- Carry out a similar procedure with the second seat if you plan to install heating on it too.
Read more: Car tinting with llumar film
While you are installing the heating, throw the upholstery into the washing machine. This will not harm her, and the interior will look newer and nicer.
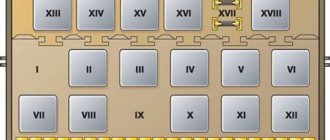
Location of fuses on the diagram for VAZ 2110, 2111, 2112
Today we will look at the location of fuses in VAZ cars of the tenth family, namely models 2110, 21102, 21103, 2111, 2112. We will also show where the fuses and relays are located on the diagram and talk about the purpose of each of them and how to replace the fuses with your own hands. We will also touch on the most common problems with fuses among owners of these cars, diagnostic methods and replacement.
I would like to say that car electrical systems, in particular fuses and relays in the VAZ 2110, 21102, 21103, 2111, 2112, are quite reliable. The service life depends on operating conditions and timely diagnosis and replacement with high-quality components.
Let's figure out why fuses are needed in a car. First of all, they are responsible for the safety of the wiring and other systems of the machine.
It is important to understand that each specific fuse is responsible only for its task and in the event of a short circuit or failure, a fire is practically excluded. A specific fuse blows and this does not cause a chain failure of other systems
Depending on the problem of failure of any component or part of the car for which the electrician is responsible, you need to understand whether the car can be operated with this malfunction or not. The traffic rules contain a list of faults that you cannot operate a car with. If you discover, for example, that the headlights have failed or the wipers are not working at all, you should immediately correct the problem. Well, you can drive a car with non-working power windows. So…
Standard heating, installed on your car in high trim levels
This is probably the most optimal option, for example, in some foreign cars there is no heating in the “base”, although in the “high” trim levels it is. You just need to purchase and install it yourself; this can be easily done either from an official dealer or from sellers of original spare parts. I want to warn you right away - as a rule, no complicated dances with a tambourine are required, because both the fuse box and the wiring will already be installed from the factory, you just have to connect the elements themselves and thermostats.
Of course, the only difficulty will be removing the seat trim, but now you will find a lot of instructions on the forums, I think this is not a problem at all.
Next, we simply glue it onto the foam rubber and put the standard covers back on – we cut in the buttons – we run the necessary wires, and the heating is all ready. The procedure is done by hand in half a day. If you look at the money, it turns out that for two front seats, two elements cost about 3,000 – 5,000 rubles, it all depends on the class of the car + wires and buttons, that’s about another 2,000 – 3,000 rubles. Total for an ordinary foreign car of class “B – C” is about 5,000 – 8,000 rubles.
How does heated seats work?
- The technology used to operate heated seats is not too complicated. Heated seats work by placing heating elements under the car seat upholstery. Electricity is passed through the heating element. A heating element can be thought of as a resistor because electricity flowing through it receives resistance and produces heat.
- Like many systems in a car, heated seats are activated using a relay switch. A relay switch is a relatively simple mechanical trigger that allows a device to begin receiving power. A relay allows electricity to switch circuits from less power to more power.
- A thermostat is included in the heated seats as a precaution against overheating. If there is no thermostat, then after starting the heating element will continue to heat up indefinitely. This will cause overheating, which may cause fire, injury or damage to the vehicle. As a safety precaution, the thermostat serves as a heat limiter. Once the heating reaches the temperature set on the thermostat, power to the relay is turned off until the seats have cooled to a certain temperature. The thermostat controls both overheating and underheating. The control unit in the form of a mode switch controls the thermostat settings.
Location of fuses on the diagram for VAZ 2110, 2111, 2112
Today we will look at the location of fuses in VAZ cars of the tenth family, namely models 2110, 21102, 21103, 2111, 2112. We will also show where the fuses and relays are located on the diagram and talk about the purpose of each of them and how to replace the fuses with your own hands. We will also touch on the most common problems with fuses among owners of these cars, diagnostic methods and replacement.
I would like to say that car electrical systems, in particular fuses and relays in the VAZ 2110, 21102, 21103, 2111, 2112, are quite reliable. The service life depends on operating conditions and timely diagnosis and replacement with high-quality components.
Let's figure out why fuses are needed in a car. First of all, they are responsible for the safety of the wiring and other systems of the machine.
It is important to understand that each specific fuse is responsible only for its task and in the event of a short circuit or failure, a fire is practically excluded. A specific fuse blows and this does not cause a chain failure of other systems
Depending on the problem of failure of any component or part of the car for which the electrician is responsible, you need to understand whether the car can be operated with this malfunction or not. The traffic rules contain a list of faults that you cannot operate a car with. If you discover, for example, that the headlights have failed or the wipers are not working at all, you should immediately correct the problem. Well, you can drive a car with non-working power windows. So…