Every car owner strives to keep their car in optimal technical condition. And the more modern the car, the more difficult it is to maintain it yourself.
But many continue to actively drive cars with a carburetor engine under the hood. And the K126G can easily be considered among the popular and sought-after carburetor systems.
Moreover, the K126 has many modifications. And each of them is installed on certain vehicles. In this case we are talking about UAZ cars.
Device Features
The carburetor of the model in question has a fairly simple adjustment, as well as the ability to configure it yourself.
It’s not for nothing that the K126G began to be actively installed on cars from the UAZ family. In total, they can have 3 types of carburetors:
- K151;
- DAAZ Solex;
- K126G.
Moreover, the latter option is most often found on cars of this brand. K126G is included in the basic package of the UAZ Bukhanka. It is also actively installed on the UAZ Hunter, as well as the UAZ Patriot.
This carburetor is ideal for two UAZ engines. These are UMZ 417819 and UMZ 421810.
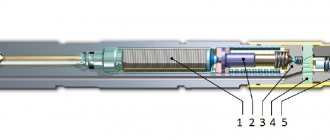
Structurally, the carburetor under consideration consists of:
- accelerator pump;
- devices for dosing hot food in the first chamber;
- dosing devices in the second chamber;
- economizer;
- air damper;
- idle mechanism.
The device also has a number of additional and small elements. But each of them is aimed at maintaining and improving the operation of the entire system.
Modifications of K126 carburetors
Carburetors of the 126th series have been produced for decades; the first models were manufactured at the Leningrad plant (Lenkarz), later renamed PEKAR. They began to be used on GAZ-53 and GAZ-66 trucks starting in 1964 (K126B), in 1977 the GAZ-52-03 was equipped with the K126I model, and the “Gazonchik” 52-04 began to be equipped with the K126E. The K126D version was also developed for Lawns and PAZ buses; later GAZ trucks began to be equipped with a K135 carburetor, which, in fact, is an analogue of the “one hundred and twenty-sixth”.
The K126P modification was intended for four-cylinder MZMA engines, used on Moskvich-408 cars, production began in 1965. The K126N modification was already used on Moskvich-412, for the Volga 24 and 24-10 the K126G and K126GM (the modernized version of G) were intended, and for cars with gas equipment - the K126S. The model used regularly on UAZs is the K126GU version (UMZ-417 engine), often UAZ owners install a Volgov carburetor “G” or “GM”.
In fact, many variants of the “126” are interchangeable, differing mainly in the lower part of the body (“sole”) and the top cover (different mounts for the air filter housing). Of course, each of the carburetor units is equipped with its own jets, but they can be easily changed. The only thing that cannot be done is to install a carburetor from a truck to a passenger car, and also in the reverse order, here they have significant differences.
Related articles:
- Adjusting valves on GAZ car engines The engines of Volga passenger cars GAZ 21, GAZ 24 (or 2410), GAZ 3110, as well as trucks GAZ 53 and GAZ 3307 need valve adjustment. If the valves are not adjusted in time, they […]
- Carburetor K-151: design, repair, adjustment In the fuel system, the carburetor model Carburetor K-151 performs the function of preparing the air-fuel mixture in the composition necessary for the operation of a car engine at various […]
- Carburetor DAAZ 2107 1107010 design and adjustment At the Dimitrovograd Automotive Unit Plant, the DAAZ carburetor is manufactured in three modifications: Ozone, Oka, Solex. In modern conditions, few people produce cars with carburetor […]
How it works
In the case of the K126G carburetor, there are 2 chambers at once, where the processes of mixing the working air-fuel mixture take place. These are certain proportions of fuel and oxygen.
When the key is turned in the ignition switch, fuel begins to flow into the first of the chambers. Then, as the torque increases, it is formed in the second chamber.
The structural elements of the carburetor system allow a strictly dosed amount of fuel and air to pass into the chambers. This allows you to form a mixture with optimal proportions.
If an engine that operates under high load and at high speeds needs a rich mixture, then the economizer has its say.
The solenoid valve increases the air flow through the air damper, which is constantly open. This enriches the mixture.
Signs of a carburetor malfunction
Like any other mechanical device, a carburetor cannot operate without failure all the time. The reasons for this may be:
- clogging of jets and channels;
- wear of gaskets or seals;
- violation of regulations of systems and mechanisms.
Symptoms that the carburetor is operating in emergency mode include:
- unstable idling (floating speed);
- inability to start or complicated starting of the power unit;
- reduction in engine power;
- jerks when starting from a standstill, as well as failures during acceleration;
- increased fuel consumption;
- detonation.
Naturally, the above signs may indicate other problems in the fuel system or ignition system, but flushing, cleaning and adjusting the carburetor will not harm it in any way.
Table: main malfunctions of the K-126G carburetor
| Signs | Possible faults |
| The power unit does not start at all. Gasoline is observed to leak from under the float chamber gasket. | The engine starting system is not adjusted. The carburetor overflows fuel due to a maladjustment of the float mechanism (the level is too high). |
| The engine starts after several attempts, but periodically stalls. | The carburetor filter is clogged. The quality of the mixture is not adjusted. |
| The engine shoots or "sneezes" into the carburetor. | The adjustment of the float mechanism is incorrect (level is too low). The quality of the fuel mixture is incorrectly adjusted (lean mixture). |
| The power unit is unstable only at idle, while the speed “floats”. | The fuel jet of the idle system is clogged. The adjustment of the mixture quality is disrupted (lean mixture). |
| There is a decrease in the power qualities of the power plant. Detonation occurs under load. | The fuel jets are clogged. The accelerator pump is malfunctioning. The fuel mixture is too lean. |
| There are jerks at start, dips when pressing the gas pedal. | The accelerator pump is faulty. The carburetor strainer is clogged. The quality of the fuel mixture is not adjusted (too lean). |
| Increased fuel consumption. | The fuel level in the float chamber is incorrectly adjusted (too high). The adjustment of the cold start system is broken (the air damper does not open completely). The air jets are clogged. The amount of incoming fuel is incorrectly adjusted. |
How to set up
Now we can move on to the issue of adjusting the K126G carburetor.
The task is not the most difficult. Especially for those who have already dealt with other carburetors.
Before you set up this K 126 series carburetor marked G on your own, you need to know why this is being done at all. Adjustment is used in situations where it is necessary to eliminate a malfunction in the system. The event is also held with the aim of increasing the productivity of the device.
Self-adjustment of the K126G carburetor under study can be carried out according to various parameters, including fuel consumption:
- stabilize the operation of the accelerator pump;
- set the minimum parameters for idle speed;
- check the quality of connections in the carburetor unit;
- reduce fuel consumption depending on the operating mode;
- raise or lower the maintained constant fuel level inside the float chamber;
- check the efficiency and effectiveness of the response when activating the economizer;
- adjust the throughput on the jet side.
It is important to consider that adjustments to any of these parameters are always carried out only when the engine is turned off.
Depending on the situation, you may need to wait until the engine cools down completely. In other cases, on the contrary, work on a warm engine and check that the settings are correct.
Most often it is necessary to regulate the flow of a mixture consisting of fuel and air.
One of the key advantages of the K126G carburetor is that it is not necessary to disassemble the entire structure for adjustment. All necessary activities can be performed by simply lifting the hood.
Flow adjustment
Since in the case of the K126G it is mainly necessary to adjust fuel consumption, it would be logical to start studying the carburetor and its settings from this point.
There are 2 small screws on the device body. Each of these screws is responsible for controlling the supply of mixture to the engine cylinders. And these are quality screws.
If you look from the side near the throttle valve drive, there will be another screw installed there. This is already a quantity screw. Its main task is to provide the required volume of fuel that enters the engine for subsequent mixing and combustion.
If you need to adjust fuel consumption and there is a K126G model carburetor in front of you, then you will need to perform the following manipulations:
- Turn off the engine and wait for it to cool completely. You need to work with a cold engine. When it cools down, tighten the quality screws. Do this all the way.
- Now each of the screws must be unscrewed. Exactly 3 turns.
- Start the engine and wait for the internal combustion engine to reach its normal operating temperature.
- Using the quantity screw, you need to set the engine speed to approximately 600 rpm. This is done by gradually tightening the adjusting screw.
- Now the quality screw is tightened on the side of the first camera. This must be done until obvious signs of unstable operation of the power plant appear. That is, there will be a shortage of fuel.
- After waiting for the first malfunction, the quality screw should be turned back literally 1/8 of a full turn. At the same time, make sure that the engine functions smoothly.
- A similar adjustment should be made using the quality screw, but from the second camera.
- Then, holding the quantity screw, set the idle speed to normal. This is about 900-1000 revolutions per minute.
As you can see, adjusting the carburetor in terms of normalizing fuel consumption on the K126G model is not difficult.
But it is important for the driver to understand what and why he is doing at each stage. Only in this case the adjustment will provide the desired result.
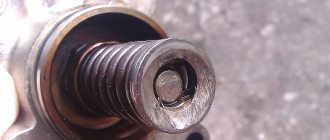
Fuel level in carburetor K126
On 126 old-style models, the float chamber housing was equipped with an inspection window, through which it was very easy to determine the gasoline level (visually - 2/3 filled with gasoline).
The carburetor units of the new model do not have this window, and since the fuel level mark in the K126 carburetor is located outside the body, and the fuel is inside the chamber, it is almost impossible to verify whether the float mechanism is adjusted correctly without dismantling the top cover. But there is a fairly simple way to determine the level without disassembling the carburetor, and it is also not necessary to remove the unit.
Let's look at how you can find out the gasoline level using the example of the K135 model (a complete analogue of the K126, which is installed on GAZ-53/3307/66 trucks):
- take a plug (plug) from any old 126th or 135th carburetor, drill a hole in it so that you can attach a piece of the rod from a gel pen;
- the structure must be made airtight, for example, the joint must be treated with epoxy resin;
- We place a piece of transparent tube from the windshield washer onto the rod;
- unscrew one of the plugs on the main body of the carburetor, having previously placed a jar under it so as not to spill gasoline;
- instead of the factory plug, we install a homemade design, while lifting the tube upward, we manually pump gasoline into the chamber with a gas pump;
- Now fuel has appeared in the transparent tube, and its level in the float chamber can be seen clearly.
If the level is more or less than the required norm, it must be changed. To do this, dismantle the air filter assembly with the housing, unscrew the screws and remove the carburetor cover, bend the float tongue in the desired direction and check again how much fuel is in the chamber, repeat the operation if necessary.
What indicates a malfunction
The carburetor of the K126G model in question has its own faults that are specific to this device.
Basically, they all have to do with reducing the throughput of the nozzles, depleting the pump's life, as well as the clearances in the throttle valves. Therefore, from time to time, car owners are faced with unbalanced idle speed. As a result, the engine floods, or it experiences an acute shortage of fuel. The mixture turns out to be lean.
There are several signs that indicate your carburetor needs repair or adjustment:
- the amount of fuel consumed increases sharply;
- at high speeds, interruptions appear, the car moves jerkily;
- the engine does not start the first time, it is uncertain and unstable;
- when driving, noise appears that is uncharacteristic of a normally tuned engine;
- during trips, vibrations are felt that were not there before;
- When braking, or when accelerating sharply, thick black smoke actively comes out of the exhaust pipe.
In the operation of any carburetor, including the K126G, the installed jets play a huge role. In fact, these are plugs in which there are several holes of a specific diameter. Due to these holes, air or fuel passes through. This allows you to form the air-fuel mixture in a timely manner.
But when low-quality fuel is poured, the nozzles begin to become dirty. Due to clogging, the engine does not receive the required amount of fuel.
Therefore, one of the tasks is to clean these same jets. The advantage of the system is that there is no need to disassemble the unit. Each of the jets can be separately removed from the body without complex dismantling work.
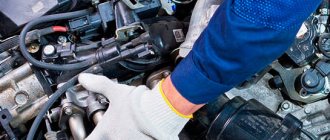
UAZ carburetor repair
Owners of UAZ cars, if they have the necessary experience and knowledge, can carry out some types of repair work on the carburetor themselves. After the carburetor has been removed and disassembled, you can repair its parts without going to specialized auto repair shops.
Many UAZ car owners are faced with the problem of carburetor flooding. That is, the device produces too much air-fuel mixture, which does not have time to get into the engine.
If the carburetor is flooded, it will be necessary to check the functionality of the economizer needle, and also make sure that the calibrated holes of the jets have not enlarged.
If the engine starts to twitch at high speeds or idles unstably, it is recommended to check the solenoid valve or economizer.
Repair of the UAZ K126G carburetor is entirely based on washing the components and replacing worn parts. At the same time, only three factors can be considered the key to quality repairs:
- careful disassembly of the device;
- fault determination;
- assembly taking into account all the nuances of the K126G design.
Video instruction: modernization and repair of K126G
Troubleshooting
The K126G carburetor has its own characteristic faults. As a rule, they are all related to the fact that, for a number of reasons, the throughput of the jets is reduced, the life of the accelerator pump is exhausted, or gaps appear when the throttle valves operate. In addition, as with any other carburetor, the K126G may also experience an unbalanced idle speed, due to which the engine may flood or experience a lack of fuel.
The obvious reasons that certain malfunctions have appeared in the carburetor are:
- a sharp increase in the amount of liquid fuel consumed;
- at high speeds the engine operates jerkily and intermittently;
- there were difficulties starting the engine;
- uneven operating noise and increased vibrations during movement;
- black exhaust smoke with a sharp increase in speed or during braking.
In carburetor mechanisms of any type, jets play an important role. According to their function, jets are plugs with several holes of clearly defined diameter. Air or liquid fuel enters through these holes, which guarantees the timely formation of the air-fuel mixture. Due to the use of low-quality gasoline, the jets can become clogged, causing the engine to lack fuel.
The main feature of the K126G carburetor is that all jets, regardless of their installation location, can be cleaned without dismantling. That is, in order to eliminate blockages in the holes, you will not need to completely disassemble the carburetor, since the jets are removed individually from the body of the device.
Table: performance characteristics of jets in different carburetor systems
| Carburetor elements | Nozzle capacity. cm3/min | Nozzle hole diameter, mm |
| Primary chamber | ||
| Main fuel jet | 240 ±3 | 1,05 |
| Main air jet | 195±4 | 0,94 |
| Idle fuel jet | 50 ±1,5 | 0,45 |
| Idle air jet | 285±7 | 1,15 |
| Acceleration pump nozzle | — | 0,6±0,06 |
| Accelerator pump with a capacity of at least 10 strokes | 5 | — |
| Secondary camera | ||
| Main fuel jet | 280 ±3,5 | 1,14 |
| Main air jet | 390 ±9 | 1,36 |
| Main jet of the transition system | 95±2 | 0,64 |
| Air jet of transition system | 285 ±7 | 1,15 |
| Economizer jet | — | 1,7 ± 0,06 |
| Economizer Sprayer | — | 3±0,06 |
Car owners of UAZ “Loaves” respond to the factory jets of the K126G carburetor:
It is better not to replace the jets with jets from repair kits. They won’t do anything for a hundred years, unless of course you scratch them with a nail) look at: opening of the dampers (are they fully open), accelerator pump (injector, pump itself), economizer, and of course the main dosing system
Mich
https://forum.ykt.ru/viewmsg.jsp?id=22148342
Disassembly
Alas, it is not always possible to adjust the carburetor system just by rotating the screws.
In some cases, when the carburetor is seriously contaminated, it will have to be dismantled and then cleaned and adjusted.
In general, removing the K126G from the car is not so difficult. It is enough to disconnect all connectors, hoses and lines, unscrew the nuts and from the studs, grabbing the gasket, and remove the assembly.
It is much more difficult to disassemble the carburetor into its individual components.
The main task for which disassembly is carried out is washing all internal cavities. Often, due to their contamination, it is not possible to adjust the system in the usual way and return the carburetor to stable operation.
Such measures relate to adjustment and are not repair work.
You need to start disassembling only if the case and external elements have been thoroughly cleaned of dirt before doing this. In this situation, carburetor cleaner will be an excellent assistant.
K126G is disassembled according to the following algorithm:
- first you need to undo the tie rod fastenings of the existing lever;
- then you should remove the end of the rod responsible for low speeds from the hole that appears;
- 7 small screws are also unscrewed, with the help of which the cover is held from the float chamber;
- the lid is carefully lifted and then removed;
- there will be a gasket under the cover, and it is important not to damage it during dismantling;
- Now you can remove the float axis and the float itself from the cavity of the chamber itself;
- Grabbing the spring, the needle is simultaneously removed from the fuel valve;
- to remove the air damper, you will need to unscrew a couple of mounting screws;
- then the screw securing the drive lever bushing is unscrewed;
- the damper should be pulled out without separating it from the lever and return spring;
- You also need to unscrew the filter cap and also remove the mesh;
- at the next stage, the float chamber is disassembled;
- all components must be carefully separated from each other and pulled out strictly in a vertical position;
- on the outside of the carburetor body, the plugs are turned off to get to the jets in the first and second chambers;
- this will now allow you to get the jets themselves and the economizer valve;
- inside the carburetor only a diffuser with a mixing section remains;
- It is absolutely forbidden to touch small diffusers, since you will not be able to return them to their place on your own.
This completes the disassembly.
Adjusting the carburetor gas 3307
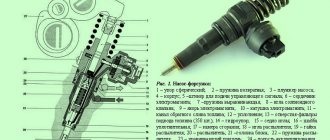
1. Setting the fuel level. Take the carburetor cover, insert a needle with a good sealing washer on it into the valve body of the float mechanism, place the float and insert its axis (Figure 1). Holding the cap upside down as shown in the figure, measure the distance from the edge of the float to the plane of the cap. Distance A should be 40 mm. The adjustment is made by bending the tongue 4, which rests against the end of the needle 5. Old carburetors have an inspection window through which the level is visible. In the latest modifications there is no window, but only a mark on the outside of the case. To control, it is necessary to screw in, instead of one of the plugs blocking access to the main fuel jets, a fitting with the appropriate thread, and put a piece of transparent tube on it (Figure 2). The free end of the tube should be raised above the parting line of the housings. Using the manual pump lever, fill the float chamber with gasoline. According to the law of communicating vessels, the level of gasoline in the tube and in the float chamber itself will be the same. By placing the tube against the wall of the float chamber, you can assess whether the level matches the mark on the body. After taking the measurement, drain the fuel from the float chamber through a tube into a small container, preventing it from getting on the engine, unscrew the fitting and screw the plug back into place. Simultaneously with checking the level, the absence of leaks through gaskets, plugs and plugs is checked.
2. Adjustment of the starting device. It is carried out on a fully assembled carburetor. Turn the choke control lever all the way. The throttle should now be slightly open to a certain angle, which is estimated by the size of the gap between the edge of the throttle valve and the chamber wall (Figure 3). In the “start” position it should be approximately 1.2 mm. The gap is adjusted as follows. Having loosened the fastening of the adjusting bar 3, located on the lever 4 of the accelerator pump drive, use the lever 5 to completely close the carburetor air damper.
Next, use lever 1 to open the throttle valves slightly so that the gap between the wall of the mixing chamber and the edge of the valve is 1.2 mm. You can insert a wire with a diameter of 1.2 mm into the gap between the edge of the throttle and the mixing chamber body and release the throttle so that it is pinched in the gap. Next, move the adjusting bar 3 until it rests against the protrusion of the lever, after which it is secured. By opening and closing the air damper several times, check that the specified gap is set correctly. Considering that the starting device on the K-126 has practically no automation, keeping the throttle slightly open is fundamentally important when starting a cold engine.
3. Adjusting the engine idle speed. Adjustment of the idle speed in the carburetor is carried out using two mixture quality screws 2 (one for each chamber) and one thrust screw 1 of the throttle valves (mixture quantity screw), and when each screw 2 is tightened, the mixture becomes leaner, and when unscrewed, it becomes richer . (Figure 4). The mixture quantity adjusting screw 1 regulates the minimum throttle opening at which the engine runs stably without load. The idle speed adjustment must be made with the engine warmed up to a temperature of 80-90 degrees and with a completely serviceable ignition system. First you need to tighten screws 2 as far as possible, but not too tightly, and then unscrew each three turns. After this, it is necessary to start the engine and set the throttle opening with thrust screw 1 to such a minimum that the engine operates quite stably. Next, each chamber is adjusted individually, screwing or unscrewing one of the screws 2, and finding the best position for it. The most advantageous position of the screw corresponds to the highest engine speeds with a constant opening of the throttle valves. Next, repeat the same operations with the second screw. Having previously adjusted the composition of the mixture, it is necessary to unscrew the thrust screw 1 and reduce the speed to 500-600 rpm.
https://gaz3307.ru/remont/remont-i-regulirovka-karbyuratora.htmlhttps://prokarbyrator.ru/regulirovka-karbyuratora/regulirovka-karbyuratora-k-135-na-gaz-53.htmlhttps://avtomobilgaz. ru/gruzovye/gaz3307/karbyurator.htmlhttps://autochauffeur.ru/sovety-avtomobilistam/regulirovka-karbyuratora-gaz-3307-samostoyatelno/https://vk.com/topic-137668626_34665364
Cleaning procedure
Since adjusting the quality and quantity screws turned out to be ineffective due to contamination of the carburetor, it had to be disassembled and then cleaned.
Basically, carbon deposits and contaminants are formed in the jets, air dampers, as well as in the tank of the chamber with a float.
Each listed element should be washed, cleaned and blown after removal.
There is a special approach to jets. If you even slightly change the surface or damage the elements, the engine will not operate stably. The surface of the plugs must not be washed. Copper wires and toothpicks should be used for cleaning. Try to clean so as to minimize contact with the metal surface.
After finishing cleaning, blow out the jets with compressed air. You can take a regular can or a compressor.
Such a delicate attitude is not required for the air damper. It is usually placed with other metal elements in a container, filled with solvent and soaked for 2-3 hours. Then it is important to thoroughly dry and blow everything.
The float chamber can be cleaned of all contaminants fairly quickly. To do this, carburetor cleaner is poured inside. Let it brew and perform its functions. Usually 1.5-2 hours is enough. Then take a lint-free rag and wipe down all the cavities. It would be a good idea to blow out the assembly using compressed air.
Now the entire system is assembled in reverse order. The gasket may need to be replaced.
After assembly, a test run of the engine is performed. There is a high probability that after disassembling and reassembling the carburetor will not work perfectly. Therefore, it will be necessary to make adjustments using the quality screws and the quantity screw.
Setting up the K126 carburetor, tuning
Models of the 126th series are characterized by fairly high reliability and unpretentiousness, but they have their own typical “diseases” and often require modification (tuning). One of the main problems of this type of CU is its high “gluttony”; if nothing is done to the carburetor, it can consume a lot of fuel; failures when accelerating the vehicle are also common, and the dampers get stuck when pressing the gas pedal.
One of the settings of the K126 carburetor is the modification of the throttle block; the accelerator pedal sticks due to inaccurate processing in the connection of the primary and secondary chamber rods (important for passenger cars). To prevent the rods from jamming, burrs and irregularities at the point of their connection are removed, and then the dampers begin to rotate smoothly, without any jerks.
Other modifications used for the “126s” are the replacement of the accelerator pump cuff, which is taken from a repair kit for a Japanese carburetor of this type, the idle needle (quality screw) is replaced with a Weber. The imported cuff fits more tightly to the walls of the accelerator pump cylinder, thereby ensuring high injection performance, and the replacement of the XX needle with an imported one allows for more precise adjustment of the minimum engine speed.
Japanese-made jets, suitable in size and parameters, compare favorably with domestic parts due to their high manufacturing precision, and imported shut-off valve needles guarantee a stable fuel level in the float chamber, protecting against overflow, sticking and other troubles (suitable for some Mercedes models). If significant air leaks are observed, the upper and lower surfaces of the main body are processed (polished).
Adjusting the GAZ-53 carburetor
The GAZ 53 carburetor has a two-chamber system, each of which operates on 4 cylinders. The throttle valve is equipped with a drive for both chambers at once, so fuel is dosed synchronously to all cylinders. To ensure rational fuel consumption at different engine modes, the carburetor is equipped with several systems for regulating the composition of the fuel mixture (FM).
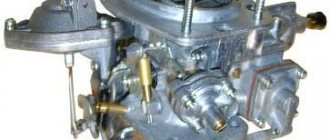
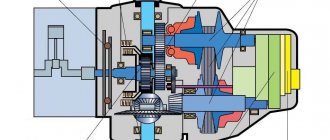
This is what the carburetor installed on a GAZ 53 looks like
The carburetor was originally brand K126B, and its subsequent modification was K135 (K135M). Fundamentally, the models are almost no different, only the control scheme of the device has changed, and on the latest releases a convenient viewing window was removed from the float chamber. Now it has become impossible to see the gasoline level.