Why is the front panel of a car called a dashboard?
Car owners often hear the word torpedo, which does not mean a combat projectile at all, but the front instrument panel of a vehicle. Why did the torpedo become synonymous with the front panel of the car? Today, if you ask a modern driver why he calls the panel a torpedo, you probably won’t hear another answer other than a shrug.
To understand what a car panel and a dashboard have in common, you need to plunge into the past. The word dashboard was first used in a car in 1947, when a car with an unusually shaped front panel was released. All controls were located around the steering wheel. This arrangement of instruments got its name due to the fact that the company that produced the panel was called “Torpedo”. It was due to this company that the name of the front panel was established.
The Torpedo company was engaged in the production of front panels for cars, and was located in Germany. Since the emergence of the company, most car brands began to be equipped with front panels from this particular manufacturer. Since then, the name torpedo has stuck. This is how modern copying machines are called copiers, which comes from the name of the company Xerox.
How to remove the steering column on Continue
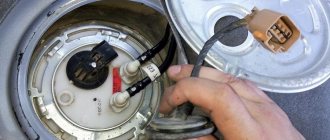
Lanos dismantling the front panel on Chevrolet now, and Lanos needs to remove the steering column. This process is performed in the following sequence:
- Initially, the chips are turned off from the turn signals, the ignition switch, and we mark them
As a result, after completing the steps we have the following interior picture of Lanos.
The final stage remains - the base dismantling of the torpedo. After a short break, we continue removing the front panel, especially since there is not much left.
Why remove the torpedo from Lanos Sens and Chance
You may need to remove the Lanos, Sense and Chance torpedo for various reasons. To begin with, it should be noted that dismantling the front panel is not only the most labor-intensive part of the work, but also not the most pleasant. Most car owners prefer to take the car to a car service center to carry out work on dismantling the dashboard, rather than bother with removing it themselves.
Dismantling a torpedo on Lanos may be necessary in the following cases:
- To replace the heater radiator or clean it. Replacing the heater radiator on a Lanos can be done without dismantling the device, but this will require a fair amount of sweat
- When denoising the car. In particular, to apply noise-reducing materials to the body part between the engine and the passenger compartment (engine shield)
- If it is necessary to reupholster the panel when tuning the interior
- When replacing a torpedo on a Lanos, Sense and Chance car
The need to dismantle the torpedo on Lanos arises infrequently, but when it is impossible to carry out work without removing the panel, then the question arises - try to remove it yourself or contact a car service center. By contacting the service, you will save your nerves, but you will need to shell out a lot of money. Many people recommend going straight to a car service center, as this process is very labor-intensive. Whether this is true, you can judge for yourself, but if you want to save money (the cost is at least a couple of thousand rubles), then step-by-step instructions are offered for removing the torpedo on Lanos, Sense and Chance.
Instructions on how to remove the front instrument panel on a Chevrolet and Daewoo Lanos
Before starting work, it is necessary to prepare the place for work, as well as the appropriate tools. It is recommended to carry out the work in a garage, since the duration of the work when performing it for the first time takes at least 2-3 hours. Similarly, the same amount of time will be required for assembly. To this time we need to add the work that caused the removal of the torpedo on the Chevrolet and Daewoo Lanos. Having decided on the location, you should also prepare the necessary set of tools:
- A set of open-end and ratchet wrenches for easy unscrewing of fasteners in hard-to-reach places
- Set of screwdrivers - slotted and Phillips
- Electrical tape - to stick on wires that are disconnected
- Marker - to label wires on which electrical tape is glued
Using electrical tape and a marker can greatly facilitate and speed up assembly work, so if this is your first time removing a torpedo, be sure to use this method. When everything is ready to dismantle the torpedo on Lanos, Sense or Chance, you should remove the negative terminal from the battery and get down to business. Next, the process of removing the instrument panel on Lanos is described step by step with photos. If you follow the sequence, you will be able to do it yourself.
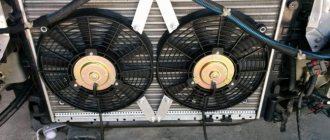
Causes of breakdown of car air conditioner radiators
Lanos air conditioner radiator
- This is the weakest link in the design of the system. It is considered weak because it is located directly in front of the engine cooling radiator, that is, falling stones and other objects remain directly in the condenser honeycombs. This was done on purpose, since, firstly, when moving, reliable cooling is ensured by the flow of oncoming air. Secondly, damage to the condenser does not affect the operation of the engine, unlike damage to the integrity of the cooling radiator.
One of the reasons for condenser failures on Lanos is the use of a high-pressure washer. When hit by a jet of water under high pressure, the honeycomb is damaged, which causes freon to leak out. A radiator malfunction can be identified by such signs as a decrease in the efficiency of the installation, that is, when the air conditioner
slightly cold. This means that the refrigerant level in the system is low and it needs to be replenished by first fixing the leak.
If you are wondering why fuel consumption increases in a Lanos, Sens or Chance with air conditioning, then the reason may be an insufficient amount of refrigerant in the system. A refrigerant leak causes the compressor to run longer (without shutting down), thereby placing additional stress on the engine. In addition, the fans operate at maximum speed, also putting a load on the car’s engine, which actually causes the increased fuel consumption of Lanos.
How to repair a condenser yourself
The Lanos air conditioner radiator has a similar design to the engine heat exchanger. It is made of aluminum and has a tubular-belt device. Aluminum tubes are interconnected by aluminum strips, honeycombs or fins, through which the refrigerant circulates, thereby cooling it. Often, hitting a hard object is enough to damage such a device. However, not only mechanical damage can occur on condensers. More malfunctions occur in case of untimely maintenance in the form of cleaning.
It is possible to determine the possibility of repairing the Lanos air conditioner radiator only after dismantling the device. There are no problems with removing it on Lanos, Sense and Chance. Below are detailed instructions on how to remove the radiator of a Lanos air conditioner, and if it cannot be repaired, replace it. An aluminum radiator can be repaired, but to do this you will need to first identify the location of the damage. How to repair the air conditioner and engine cooling radiator is described in this material (link).
Practice shows that if mechanical damage to the radiator fins of a Lanos air conditioner occurs, the device should be replaced completely. This will ensure a 100% chance that in a couple of months there will be no need to repair the device again.
Removing a Lanos 1.6 torpedo with air conditioning.
Removing and installing a new heater radiator
The second part, performed in the salon:
- Unscrew the screws in the front part of the plastic tunnel located between the seats.
- Push the seats forward as far as they will go and unscrew 2 more screws.
- Lift the front part and disconnect the rear plastic.
- Move the chairs back and unscrew the screw.
- Disconnect the cigarette lighter connections.
- Pull out the front part of the tunnel. If the seat gets in the way, then don’t worry, you can bend the part slightly.
- Remove the 2 side parts by unscrewing the screws. Be sure to disconnect the ground wire from one of them.
- Unscrew the 4 bolts, move the gear shift unit to the right of the driver's seat and remove the entire mechanism from the passenger compartment.
- Also, for convenience, you can remove the storage compartment by unscrewing 2 screws from the bottom.
- Using an extended socket 7 and a ratchet, unscrew the cap, which is located at the bottom of the heater radiator.
- The protective casing of the heat exchanger is removed. Self-tapping screws that are unscrewed should be fixed in relation to how they are located.
- After unscrewing all the fasteners, you can remove the radiator. Pull the front down and press the back to the floor.
- Remove the latch, bend the brackets and remove the device. The actions must be careful, since the latch is attached to a fragile plastic crossbar.
IMPORTANT! If you have difficulty with a latch that is not visible, you can use a mirror.
Interesting on the topic: Our Lanos: how to increase ground clearance
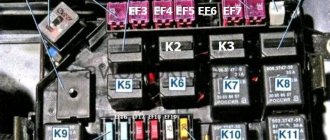
Chevrolet Lanos fuses and relay blocks with a description of the circuits. Lanos cigarette lighter fuse
Chevrolet Lanos - a sedan designed on the basis of Daewoo Lanos, began being delivered to Russia in 2005. Produced in 2006, 2007, 2008 and 2009. Further known under the brand Chance. We provide information about Chevrolet Lanos fuses and relay blocks with a detailed description of the circuits, and we will also note the fuse responsible for the cigarette lighter.
Fuse and relay box under the hood
It is located near the battery and is closed with a protective cover, which is held on by two side latches.
Block diagram
Description of fuses and relays Chevrolet Lanos
Circuit breakers
| EF1 | 80A Fuse circuits EF15 - EF20 and F1 - F7 |
| EF2 | 30A Ignition switch (power supply circuit for instrument cluster and fuel pump) |
| EF3 | 30A Ignition switch (starter, heater fan, power windows) |
| EF4 | 30A Electric motors of the main and additional fans |
| EF5 | 30A Electric window motors |
| EF6 | 50A Not used |
| EF7 | 30A Rear window heating element |
| EF8 | 30A Heater fan motor (4th speed) |
| D9 (diode) | Air conditioning compressor electromagnetic clutch |
| EF10 | 20A Headlight bulbs (high beam) |
| EF11 | 10A Lamp for the left headlight (low beam), motor-reducer for adjusting the direction of the light beam of the left headlight |
| EF12 | 10A Lamp for the right headlight (low beam), motor-reducer for adjusting the direction of the light beam of the right headlight |
| EF13 | 10A Brake signal/side light lamp in the left rear light (side light), instrument cluster illumination, melodic signal, side light lamp in the left headlight, headlight beam adjustment switch, fog light switch in the rear light, clock, switch hazard warning lights, ashtray lights, audio system, chevrolet lanos air conditioning switch |
| EF14 | 10A Brake/side light lamp in the right rear light (side light), side light lamp in the right headlight, license plate lights |
| EF15 | 15A Chevrolet Lanos fog lamps |
| EF16 | 15AT fuel pump |
| EF17 | 10A Horn |
| EF18 | 10A Electromagnetic clutch of the air conditioning compressor |
| EF19 | 25A Contact “30” headlight relay |
| EF20 | 20A Contact “30” side light and interior lighting relay |
Relay
| Name | |
| K1 | Sound signal |
| K2 | Headlight bulbs |
| short circuit | Air conditioning compressor electromagnetic clutch |
| K4 | Additional cooling fan motor |
| K5 | Fog lamps |
| K6 | Side light lamps in the headlights, brake signal/side light lamps in the rear lights (side light), instrument cluster illumination lamps, interior courtesy lamp |
| K7 | Power window motors |
| K8 | Main cooling fan motor |
| K9 | Fuel pump motor |
| K10 | Rear window heating element |
| K11 | Relay for the electric motors of the main and additional cooling system fans |
Fuse box
It is located on the left pillar, near the door.
The back of the protective cover provides the exact fuse locations for your vehicle.
Scheme
Decoding
F1 (10A) - Luggage lamp, interior lamp, fog lamp in the left rear light, antenna drive motor.
F2 (10A) - Light switch in the left steering column switch, fog light switch in the left rear lamp, headlight beam direction control, open door indicator.
F3 (15A) - Alarm.
F4 (15A) - Central locking.
F5 (10A) - Power supply circuits for the Chevrolet Lanos engine control unit from the battery.
F6 (10A) - Audio system power supply circuit from the battery.
F7 (15A) - Brake signal/side light lamps in the rear lights (brake signals) of a Chevrolet Lanos.
D8 (diode) - Door open warning switch (driver's door).
F9 (10A) - Audio system power supply circuit from the ignition switch.
F10 (15A) - Cigarette lighter.
F11 (10A) - Instruments and signaling devices in the instrument cluster (except for fog lights, direction indicators and open door), clock, glove box lighting lamp.
F12 (10A) - Reversing lamp in the right rear lamp.
F13 (15A) - Airbag.
F14 (15A) - Excitation of the generator, injectors, vehicle speed sensor, canister purge valve, exhaust gas recirculation valve, phase sensor.
F15 (15A) - Ignition coil for Chevrolet Lanos.
F16 (15A) - Direction indicator lamps in the headlights, direction indicator lamps in the rear lights, electric drive of the right outside rear view mirror.
F17 (15A) - Power supply circuits of the engine control unit and fuel pump relay from the ignition switch.
F18 (20A) - Windshield wiper electric motor, windshield washer pump electric motor.
F19 (10A) - Windings of the rear window defroster relay, air conditioning compressor relay, power window relay, relays (K4, K8, K11) of the cooling system fan motors.
F20 (20A) - Heater fan electric motor (1st, 2nd and 3rd speeds).
Fuse number 10 is responsible for the cigarette lighter.
Relay block
In the cabin there is a relay unit consisting of four elements. It is located behind the headlight dimmer cover.
Scheme
Designation
- Fog lamp;
- Heater fan speed relay 4;
- Windshield wiper intermittent relay;
- Alarm.
Additional Information
In this video you can clearly see how to repair a fuel pump by replacing the fuse.
Manual
Want more information? Here are the operating instructions for the Chevrolet Lanos: “download”.
Functions, structure and principle of operation of the stove radiator
The radiator (convector, heat exchanger) of the stove is the most important component of the interior heating system of any car. The stove ensures the creation and maintenance of a comfortable temperature for the driver. This is especially true during the cold season. In addition, the heater prevents fogging of car windows.
The heating system consists of the following components and parts:
- frame;
- stove radiator;
- heat exchanger pipes;
- control valve;
- fan;
- electric fan motor;
- air ducts and distribution dampers.
The heating system heats the air entering the cabin
The role of coolant is played by antifreeze circulating through the cooling system. When the power unit is warmed up and the coolant temperature reaches 50 °C, it can be used to heat the passenger compartment. Depending on the position of the tap, a certain amount of hot antifreeze enters the radiator. The fan directs air flow from the engine compartment into the passenger compartment. This air passes through the radiator honeycombs, receiving heat from the heated antifreeze. The more antifreeze passes through the heat exchanger, the more heat is transferred to the air. The flow of heated coolant in the radiator can be adjusted using a tap.
The Chevrolet Lanos heater radiator has a fairly simple design
Depending on the car model, the air temperature in the cabin is regulated in various ways - by a control valve, fan rotation speed and the position of the air dampers. The heated air flow is regulated and distributed in different directions. By directing warm air onto the windshield and front side windows, you can prevent them from fogging up. Using the flaps, you can direct air to the area of the legs, face and certain places on the side windows. Blowing the windshield is also necessary to create slightly increased pressure so that dust and dirt from the street do not enter the cabin. This ensures the most comfortable microclimate for the driver and passengers.
The design features of the heater somewhat limit its operation. So, the stove cannot be turned on when the engine is cold. You need to wait until the coolant heats up to 50–60 °C. Otherwise, the engine will take much longer to warm up, especially in severe frost. In addition, due to the increased humidity in the cabin, the windows will begin to fog up. Therefore, water and air heaters are sometimes installed as additional ones. This depends on the design features of the heating system of a particular car model.
Instructions for replacing the air conditioning radiator on Chevrolet and DAEWOO Lanos
If the air conditioner radiator is damaged, then the freon has already leaked out of it, so we automatically skip the stage of bleeding the refrigerant. Bleeding refrigerant from the Lanos, Sense and Chance air conditioning system is performed if it is necessary to repair the compressor, replace the evaporator and dryer. The dehumidifier is located next to the radiator and acts as a kind of filter. When replacing a condenser, it is necessary to simultaneously install a new dryer or clean it (depending on the condition).
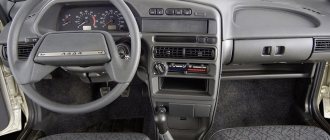
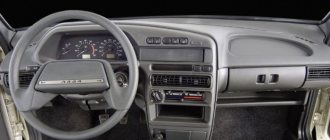
Chevrolet Lanos dashboard Chevrolet Lanos removal replacement repair buy price
Chevrolet Lanos Manual > Car repair > Body > Removing the instrument panel We carry out work to replace the instrument panel, panel wiring harness and elements of the heating, ventilation and air conditioning system.
Disconnect the wire terminal from the negative terminal of the battery. Remove the steering wheel (see Removing the steering wheel).
We remove the steering column switches and their connector (see Removing the steering column switches, spiral cable drum device and switch connector). When performing subsequent operations, be careful not to scratch or otherwise damage the plastic parts.
Using a Phillips screwdriver, unscrew the four self-tapping screws securing the lower trim of the instrument panel...
...and remove it.
By pressing the lock of the airbag wire block, we disconnect the airbag wire block and the instrument panel wiring harness.
By pressing the lock of the horn wire block, we disconnect the horn wire blocks and the instrument panel harness wires.
We remove the plastic holders of the instrument panel wiring harnesses from the holes in the steering column bracket. Disconnect the wiring harness block from the ignition switch (see Removing the steering column). We unscrew the nuts securing the steering column brackets to the front panel and lower the column (see Removing the steering column). Remove the front part of the floor tunnel lining (see Removing the floor tunnel lining).
Use a screwdriver to pry off the piston securing the left side of the body...
...and remove it.
Remove the antenna wire plug from the socket...
...and the instrument panel wiring harness blocks - from the relay and fuse mounting block.
Place a rag under the screwdriver, pry up the side cover on the left side of the instrument panel and, overcoming the resistance of the latches...
...let's take it off. Similarly, remove the cover on the right side of the instrument panel.
Using a 8" head, unscrew the two screws securing the base of the hood release handle...
...and place the handle with its base inside the instrument panel.
Using a Phillips screwdriver, unscrew the two screws securing the glove box to the instrument panel...
...and remove it.
Using a screwdriver, pry off the piston and remove the lining of the right side of the body.
Press the latch on the instrument panel wiring harness...
...and disconnect the wiring harness block from the heater fan motor connector.
Disconnect the wiring harness block from the additional heater fan resistor (the connection point of the block is not visible in the photo).
By pressing the block latch, disconnect the instrument panel wiring harness block from the wiring harness block located under the right body side trim. We remove the heating, ventilation and air conditioning control unit (see Removing the heating, ventilation and air conditioning control unit). Using a “7” socket with an extension or a Phillips screwdriver, unscrew the seven screws securing the instrument panel to the heater housing...
...two self-tapping screws on the right side...
...two self-tapping screws - through the niche under the glove box...
...and three screws - through the niche in the central part of the instrument panel.
Using a 10mm socket with an extension, unscrew the bolt and two nuts of the left bracket securing the instrument panel to the floor...
...and remove the bracket.
Using a 10mm socket with an extension, unscrew the two nuts on the right bracket that secures the instrument panel to the floor...
...and remove the three ground wires from the panel studs.
Using a 10mm socket with an extension, unscrew the bolt securing the right bracket to the floor and remove the bracket.
Remove the left front door seal in the area of the left front pillar upholstery...
...and, overcoming the resistance of the pistons, we remove the upholstery. Similarly, remove the upholstery of the right front pillar.
By turning the locking bracket of the instrument panel wiring harness...
...disconnect the block from the airbag control unit.
On the left side of the instrument panel, using a 12mm socket with an extension, unscrew the three bolts of the lower panel mounting to the body...
...and the “8” head - the upper fastening bolt. Similarly, unscrew the instrument panel mounting bolts on the right side...
...and remove the instrument panel.
Install the instrument panel in reverse order.
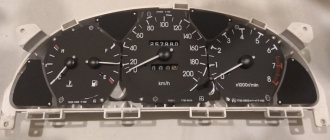
Instrument panel (front view)
Instrument panel mounting points (rear view)
We dismantle the dashboard from a Chevrolet Lanos
There are no situations when you need to remove the dashboard on a car, and they do happen. Today I will tell you how to do this on a Chevrolet Lanos. I read the information myself on the Internet. There are so many elements and parts on the panel that it’s even scary to start disassembling, you frankly don’t know where to start. The entire disassembly can be divided into four stages: preparation for work, dismantling the instrument panel, dismantling the steering column, removing the dashboard.
Let's start with preparation. We remove the minus from the battery, then unscrew the tunnel, which is located in the middle, everything is simple here. After this, we remove the racks from the front; they are held in place by clips, so you will need to apply a little force.
We remove the plastic housing of the mounting block and the electronic control unit. We take out the glove compartment: unscrew a couple of screws securing the hinges, then pull the glove compartment handle towards you. We remove the plastic cover on the steering shaft, then turn the steering wheel 90 degrees to the right and unscrew the screw. After this, turn the steering wheel 180 degrees to the left and unscrew the next screw. Remove the top trim. We unscrew a pair of self-tapping screws and one screw located at the bottom of the lining. We pull out the bottom trim by unscrewing the next four screws.
Let's start removing the Lanos dashboard. On the left and right of the torpedo, remove the oval cover, then put your hand in and push through the front optics corrector unit, pull out the electrical connector from there. After this, we get rid of the edging of the radio. Pull out the cup holder and pull it towards you. Unscrew the screws securing the eyeglass case. Don't forget about the heater control unit, you also need to unscrew all the screws from there and pull it out. We remove the decorative trims and proceed to unscrewing the screws securing the instrument panel directly.
We even got to the point of removing the steering column. We pull out the steering wheel connector, then unscrew the steering column bolt and pull it out.
Next we have the dashboard. We pull out all the connectors, unscrew all the screws and carefully pull out the dashboard through the door. Yes, it’s difficult, especially alone, but still real.
Preparing to remove a torpedo on Lanos
This is the first stage of work from which dismantling manipulations begin. Preparatory work includes the following actions:
- The first thing you need to do is move the front seats back for easier work.
- After this, you need to dismantle the central tunnel, which is attached with self-tapping screws. The first part of the tunnel, covering the handbrake, is fixed with two screws on the sides. To unscrew them, the seats need to be pushed forward. After unscrewing, you should squeeze the handbrake to remove the casing. We are returning the chairs
- The trim from the gear shift lever is removed, after which the second part of the central tunnel is dismantled, which is also fixed with two screws in the front part and one screw in the area where the handbrake is located. When removing the front part of the tunnel, it is necessary to disconnect the cigarette lighter mounting chip. It is not necessary to sign the chip
- There is no need to remove the gear shift lever, since it will not interfere with the work. It is necessary to remove it when replacing the heater radiator without removing the dashboard
- Next, we move to the top of the car and dismantle the front side pillars near the windshield. They are attached using clips. First remove the rubber seal from the part where it covers the rack trim, and then, using a screwdriver, remove the plastic trim on both sides.
- The protective covers of fuses and ECUs on Lanos, Sense and Chance vehicles are being dismantled. The casings are located in the area of the driver's left foot - the fuse box, and under the passenger's right foot - the ECU
- It is also necessary to dismantle the glove compartment, which is attached using hinges at the bottom. To remove it you will need to unscrew two screws and pull the handle to dismantle it.
- Next we move on to the more important part of the work. It is necessary to remove the cover on the steering shaft
- Using a Phillips screwdriver, you need to unscrew the two screws behind the steering wheel
- There are 3 more screws under the steering wheel that should also be unscrewed.
- Unscrew 4 self-tapping screws that secure the steering column trim
This completes the first part of the work on dismantling the front panel on Lanos. We take a short break and proceed to a more in-depth process of dismantling work.
How to remove the dashboard on a Chevrolet Lanos according to instructions
If there are no difficulties with the preparatory part of the work, then we continue the work of removing the torpedo on Lanos.
- On the driver's side of the end of the dashboard, you need to remove the cover. To remove it, use a flat-head screwdriver or by pressing it with your finger. After snapping the cover, you must watch carefully so as not to lose the steel brackets
- Through the resulting hole, you need to squeeze out the block, which is responsible for adjusting the headlights, by hand. It is attached using protrusions in the form of latches
- There is a plug connected to the unit that should be disconnected. In this case, you immediately need to tape a piece of electrical tape to the plug and make the corresponding entry “on the headlight range control unit”
- Next, we move to the central part of the dashboard, and using a slotted screwdriver, you should pry off the “U-shaped” casing of the radio. To do this, you should initially snap it off at the top, and then pull it towards you and down. It is attached at the bottom with latches
- The fastening screws are located under the latch. Use a Phillips screwdriver to unscrew the bottom screws securing the document shelf
- The screws securing the retractable cup holder are also unscrewed.
- At the top of the niche there are two fastening screws that secure the radio. It is recommended to label all unscrewed screws so that you do not have to select them during assembly.
- After this, the radio is removed, behind which there are wires with connection chips. After turning them off, you need to mark the chip, although it will be difficult to confuse it
- Next you need to dismantle the stove panel. It is secured with two self-tapping screws, which are shown in the photo. After unscrewing the screws, you need to pull the control panel towards you. It will not be possible to remove it completely, since you will also need to disconnect the power connectors and cables
- Next, you should disconnect the heater damper adjustment cables. One of them is located on the driver's side under the right foot, where it needs to be disconnected. To do this, it is removed from the ring and the latch is snapped off. After this, it is recommended to sign it
- Being on the left side, you need to disconnect the “frog” for turning on the brake lights. To remove it, you need to turn it to the side 45 degrees and remove it.
- Two more cables are located in the hole in the removed glove compartment. Initially, the cable for adjusting the flow of air from the passenger compartment or outside is dismantled
- After this, another cable is disconnected, which is responsible for regulating the air supply - cold and hot
- To remove the PCU mounting panel (heater control unit), you need to disconnect two connectors, remembering to label them
- Now the screws securing the decorative trim of the control panel are unscrewed. Two fastening screws are located under the removed heater control panel panel. Shown in the photo below
- Next, unscrew the two mounting screws at the top of the instrument panel
- The screws securing the panel at the location of the headlight adjustment unit are also unscrewed.
- After this, you will need to move the instrument panel, and having access to the connection chips for the emergency lights and fog lights, disconnect them and then mark them
- The panel trim is removed from the vehicle. Under the dismantled panel, unscrew the 4 fixing screws of the tidy. Two of them are located on the right and 2 on the left
- After this, you can dismantle the dashboard by disconnecting 3 chips. Don't forget to label the chips
How to Remove a Torpedo on Lanos ~ VESKO-TRANS.RU
How to take a torpedo to Lanos
Motorists are often interested in: How to change the stove radiator on a Lanos without removing the dashboard? There really is no lift or pit to do this. But few people know that you can completely control it without them.
Thus, replacing the Lanos stove radiator without removing the dashboard begins with the need to disconnect the injectors from the stove radiator and disconnect the transmission lever from the gearbox. This process does not take much time and is very convenient if done from below the machine. It is often believed that it is extremely important to dismantle one or both places, but this is not the case. Of course, if you remove the chairs, there will be more room to maneuver, making it easier to remove the tunnel in the center. Is it simply necessary? We offer you a more convenient work scheme.
Replacement photo for Chevrolet Lanos radiator
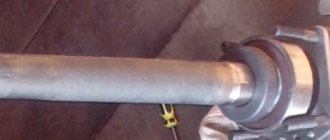
The first thing to do is remove the heater core hoses and drain the antifreeze or coolant. When draining, prepare a suitable container in advance to prevent the liquid from spilling onto the garage floor. This container will be useful to us later. They further weaken the grip of the clamp that holds the shift rod in place. The bolt must be completely unscrewed.
You can then remove the shift shaft from the link. To avoid guessing at a meeting where the connection point was, mark it with something. We remove the mounting clip completely. If there is an air conditioner, the radiator condensate drain valve is installed within the boundaries of the heater housing. The fittings can be found in the area to the left of the radiator pipes. It can usually be identified as the bottom of an L-shaped rubber hose.
Let's jump a few steps forward. problem with removing the cover
To remove the housing protecting the radiator, you need to lightly press on it so that the fastening protrusions fall out of the grooves. The device can prevent this, but to remove it you need to pull the casing towards you, which will be unrealistic, since fastening with grooves and spikes will not work.
There is a vicious circle. What should I do?
Use force periodically, but this may result in repeated damage to the housing. Even if you seal it later, you will still have to break it when installing. Fortunately, the ingenuity of motorists helped the craftsmen find a way out of this controversial situation.
You can take an iron saw or a grinder and cut off as much of the attachment as possible. To do this, it is better to be under the car. Then it remains to take off we wrap and cut the rest of the root vegetable. This operation is absolutely harmless, since normal condensate flows out of the nozzle without pressure.
When all the work is done, insert any hole of the desired size into the hole to drain the engine.
Heated oven Daewoo Lanos-Sens (part 1)
I think all Lanos will get this at some point and I will tell you how to cure it. You can do all this yourself.
Chevrolet Lanos (chance zaz). Removing the front panel
Chevrolet Lanos (chance zaz). When removing the front panel, weak warm air blows onto the windshield, looking for the cause.
Let's return to the continuation of the main work
We did everything we needed to do on the bottom of the car. Future work will be in the salon.
You need to remove the plastic tunnel. We unscrew a couple of screws in the front on both sides, move the seat forward as much as possible, there are a couple more screws. Lift the stern and detach the hull half. We push the seat back throughout the course.
It is necessary to unscrew the remaining screw, then you need to remove the front end, after first disconnecting the cigarette lighter. The seats can be a bit of a nuisance, but they're soft and squeezable, and the plastic shell is flexible enough to bend safely.
Carefully remove the two sides at the bottom of the console. Don't forget that the mounting bolt covers the ground terminal. When assembling them, be sure to secure them in place.
Remove the four small bolts, then move the entire shift lever toward the passenger side and slowly pull the entire assembly out of the passenger compartment. To make this procedure more convenient, you need to increase the view. To do this, simply remove the glove by unscrewing a couple of bolts.
Replacement without removing panel
The traditional method is only suitable if we are only changing the radiator. If you decide to carry out a complete inspection of the heater, and in addition to the heat exchanger itself, check and adjust the dampers, change the seals, then in this case you will have to remove the front panel to provide full access to the housing for disassembling it.
Instructions for replacing the heater radiator on a Lanos with your own hands in two ways
Remove carefully so as not to break the insert. The plastic may become deformed due to the weight of the device.
The metal clip remains on the plastic. The damper requires minor repairs. Press out the fixing elements. Remove the part that holds the damper axis. Unhook the cable and pull out the damper.
Replacing a Lanos stove with air conditioning
Apply self-adhesive sealant to the damper using liquid nails. We clean the surfaces from dirt, take a new stove and assemble it in the reverse order. From this moment the replacement of the heater radiator begins. Make sure that the elements fit tightly into their grooves, otherwise you will have to compact them. The Lanos heater radiator is copper or aluminum, depending on which one is installed by the manufacturer.
Replacing the Chevrolet Lanos heater radiator and attaching the Lanos heater radiator?
We install a new radiator. For ease of assembly, pre-attach the brace. Then insert the heater pipes and snap the steel clip into place.
Screw the screw onto the bracket. We remove the pipeline hoses and drain the working fluid into a previously prepared container. We remove the pipe and drain the working fluid from the heating system. Loosen the clamp that holds the gearbox lever and completely unscrew the mounting bolt.
Unscrew the bolt and replace the Chevrolet Lanos
clamp for subsequent dismantling of the lever Pull the gearbox lever axis out of the traction unit.
Now we have free space to work. But in order to remove
the radiator itself, you will need to dismantle the side metal elements that connect the floor and the console. We remove the side fasteners that connect the console to the floor. Now you can remove the lower casing: Unscrew the 8 screws of the heater casing.
This is not easy to do; you will need a special ratchet wrench and an extended 7 socket, since you will have to work from below.
How to remove a Chevrolet Lanos dashboard. How to get to the heater radiator. ✅
The Lanos stove does not heat well. Unsuccessful attempt at self-repair.
Next, we go back to the interior and unscrew the bolts securing the gearbox lever. As a result, you will be able to completely pull out the entire mechanism. The front part moves down, and the back part is pressed to the floor. This way the casing can be pulled out from under the radiator.
Let's jump ahead a little.
In order to remove
the casing covering the radiator, the casing must be lowered downwards (it is connected to the heater body using a “groove and tenon” method). But the fitting does not allow this to be done. To pull the fitting out of the engine shield, you need to pull the casing towards you, but the “groove-tenon” connection does not allow this to be done.
We have to use force. Sometimes it is possible to accomplish this feat, but usually the casing breaks, sometimes even in several places. Of course, it can be glued together, but during installation it will break again.
But Russian “craftsmen” will find a way out of any situation. Using a hacksaw blade, or even a grinder, this fitting is cut off as much as possible. This is of course best done from below the car. Then, with the casing removed, cut off the remains almost flush.
As already mentioned, condensate drains through this fitting, i.e. there is no pressure. Then, after complete assembly, we select a tube of suitable diameter (fountain pen body, felt-tip pen), insert it into the hole, thereby diverting the drain from the engine shield. The connection can be sealed using any sealant.
I was probably lucky, the fitting had already been broken off as a result of the accident, and the radiator itself was damaged. One of the pipes was clearly not round, but rather oval, and leaked at the junction with the radiator.
This is what a “perfect” round pipe hole looks like
how I changed the heater radiator on a ZAZ Chance
So that during reassembly it is worth setting the gear lever to the neutral position. The relative position of the rod and the rod must be marked in advance with chalk or paint. Features of operation on cars with air conditioning If the car has air conditioning
, then the heater housing has a drain fitting for condensate.
Work performed under the vehicle
It is located on the left side of the radiator pipes of the stove. As a rule, it can be recognized by the L-shaped rubber hose going to the bottom. It is this that creates the greatest problems when removing the heater radiator without dismantling the dashboard. The fact is that it interferes with the removal of the casing, and the latter prevents the dismantling of the radiator, since it does not allow it to be moved back.
This cannot be done by force either. The casing will inevitably be broken when removed. And then, after gluing, it will be broken a second time during installation. To solve this vicious circle, you can do the following. From below the machine, shorten the fitting as much as possible using a hacksaw or grinder, and then, since it no longer interferes, remove
casing
After this, the fitting itself can be replaced with a suitable hose, since simple condensate water drains through it outside the cabin. All other work is carried out inside the car.
Between the seats there is a decorative plastic tunnel that needs to be removed
. To do this, you need to unscrew a couple of screws in the front on both sides and move the chairs forward. This will free up access to the two screws in the back. You can then lift up the back of the trim and remove it completely. The seats are then moved back as far as possible. The best solution would be to completely dismantle them, but this is not necessary. After this, you need to unscrew another screw and disconnect the front part of the tunnel, after first removing the cigarette lighter.
But their cushions can be compressed during dismantling. The plastic itself is soft enough and can be bent without breaking. How can the heater radiator be changed on a Lanos car? After this you need to remove
two side parts at the bottom. One of the mounting screws secures the ground terminal.
Sources:
https://lanosovod.ru/kak-snyat-i-zamenit-radiator-kondiczionera-lanos-podrobnoe-opisanie.html https://adaptsport.ru/remont/kak-snyat-pechku-na-lanose.html
Nuances of the work
The heating system can be restored by a car enthusiast by replacing the radiator. But here an additional problem arises - the designers did not take care to provide convenient access to the heat exchanger and facilitate maintenance of the heater.
The difficulty lies in the fact that the stove body with a radiator installed inside it is located under the front panel. Therefore, according to the official technical According to the manufacturer's documentation, it is possible to replace the radiator of the Lanos stove only by first dismantling the front panel, and for this you still need to disassemble almost half of the interior. Replacing a Lanos radiator is not a particularly complicated operation, but it is labor-intensive and time-consuming. But car enthusiasts have already developed a method for removing the heater on a Chevrolet Lanos without dismantling the front panel. This method reduces the time for replacing the heat exchanger, but it is not easy to implement (half the interior will still have to be disassembled), and you will have to work in a cramped space, and even with not very convenient visibility.
How to change without removing the dashboard
The main difficulty encountered when repairing a stove is access to the lower casing. To classically dismantle this element, you will need to remove the entire torpedo, which will take quite a lot of time. You can pull out the radiator easier and faster if you work from the bottom side. First, let's do the preparatory work:
- For ease of work, remove both front seats.
- We remove the pipeline hoses and drain the working fluid into a previously prepared container.
We remove the pipe and drain the working fluid from the heating system.
Loosen the clamp that holds the gearbox lever and completely unscrew the mounting bolt.
Unscrew the bolt and remove the clamp for subsequent dismantling of the lever
- Pull the gear lever shaft out of the rod assembly.
How to install LEDs in the Daewoo Lanos dashboard
The readability of the dashboard plays a huge role in the safety and ability of the driver to communicate with his car. Daewoo Lanos was not particularly driver-friendly, including providing him with the necessary information about the parameters and status of on-board equipment in real time. Therefore, many owners of Lanos and Sens decide to switch the instrument panel to LED lighting.
Why do you need LED lighting?
Monitoring the fuel level in the tank, the operating temperature of the engine, the number of revolutions and, of course, the speed of movement should always be under the control of the driver. The standard lighting of the Daewoo Lanos instrument panel does not always cope with its responsibilities. Faded, inexpressive, blurry lighting can play a cruel joke on the driver. For example, when the coolant temperature is outside the acceptable range at night.
The standard dashboard lighting is implemented using incandescent lamps. In addition to the fact that they tend to burn out, they do not perform their duties in the best way. However, LEDs also have different characteristics and may work satisfactorily or not work at all.
LED instrument panel lighting elements are small in size and high in power. Thus, they provide effective illumination of vital devices. However, you should take into account the fact that LEDs come in different types. For example, practice shows that you should not get carried away with multi-colored LED elements. Their power and service life, as a rule, leave much to be desired.
Changing lamps to LEDs
LEDs consume much less energy than classic lamps. Under the operating conditions of our generator, this factor can be decisive at certain moments. For example, when the fog lights are connected, snow falls and the voltage on the on-board network drops. It would be great if no one felt this.
And yet, there are two options for changing the backlight on Lanos. The first is T10 type LEDs. Diodes of lower ratings are strictly not recommended. For the reason that they do not illuminate a given area. The second option is to use an LED strip, but there are some nuances here too.
Using low-power LEDs, we doom ourselves to contemplating the dark zone between the speedometer and tachometer (in Lanos). To avoid this, you should not buy LEDs from the inexpensive T5 5SMD series. Yes, they are inexpensive, but they work just as well as they cost. At the same time, it is advisable to remember that in Lanos of different years of production, the dashboard backlight lamps will be located differently.