Briefly about the drive design
To change the chain and related elements yourself, you need to know the structure of this part of the power unit. The mechanism that drives the camshaft of the VAZ 2106 engine includes the following parts:
- a small drive sprocket is mounted on the crankshaft;
- large idler gear;
- the upper large gear is bolted to the end of the camshaft;
- double-row timing chain;
- tensioner shoe supported by a plunger rod;
- damper - a metal plate with a wear-resistant lining;
- pin - the chain runout limiter is installed next to the lower sprocket.
When rotating, the chain is held on both sides by the guide and tensioner pads
In older versions of the “six”, a mechanical tensioner plunger was installed, where the rod extends under the influence of a spring. The updated modification of the car is equipped with a hydraulic plunger device.
While the engine is running, the timing chain must be kept in tension, otherwise there will be beating, accelerated wear and the links jumping over the gear teeth. A semicircular shoe supporting the part on the left side is responsible for the tension.
Find out more about tensioning the timing chain: https://bumper.guru/klassicheskie-modeli-vaz/grm/kak-natyanut-tsep-na-vaz-2106.html
After the camshaft sprocket (in the direction of rotation), a damper plate is installed, pressed against the chain drive. To prevent the element from jumping off the lower gear as a result of strong stretching, a limiter is installed nearby - a metal rod screwed into the cylinder block.
In the updated versions of the “six”, automatic tensioning devices were installed, powered by oil pressure
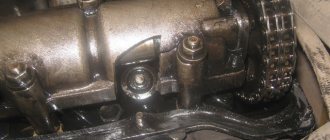
The drive mechanism is located at the front end of the engine and is covered by an aluminum cover in which the front crankshaft oil seal is installed. The lower plane of the cover is adjacent to the oil pan - this feature must be taken into account when disassembling the unit.
Adjustment or how to set timing marks on a VAZ 2106 yourself
Decoding notes
Without pre-basing the pistons and valves, installing the timing chain on the VAZ 2106 according to the marks is impossible. Therefore, the significance of the marks is not at all conditionally decorative. The signs give an understanding of the position of parts inside the motor:
- The mark on the KV pulley, which coincides with the long line on the front cover, means that the pistons of cylinders 1 and 4 have reached TDC.
- The mark on the RV sprocket, combined with the tide on the bed, informs about the closed valves in cylinder 4 - this is where the compression stroke occurs.
For your information. The numbering of the “pots” starts from the radiator side.
When the marks coincide, the ignition distributor slider is turned towards cylinder 4, and the valves of the latter are closed. By analogy with setting the clutch on a “classic”, the unambiguity of the relative position of the crankshaft and camshaft serves as the basis for adjusting the clearances in the valve mechanism and the ignition setting procedure.
How to restore tag matches
When the chain is pulled out, the marks will go away. The main difficulty is to return them to a position of mutual coincidence. This work is combined with dismantling the old chain. However, there is no need to rush to remove it - misalignment of all factory markers is fraught with danger.
The base is the position of the crankshaft at which the pulley mark coincides with the long line on the front cover. In this case, the drilling hole for the camshaft star should be closer to the high tide. This must be achieved first. It is worth remembering that the transmission is made with a 2:1 ratio - two revolutions of the crankshaft correspond to one revolution of the camshaft.
- Remove the camshaft sprocket, remove all other gears and the chain stopper.
- Take out the chain.
- Put the camshaft sprocket back (without the chain), tighten the bolt, tighten it, securing the part by the teeth with a screwdriver.
- Rotate the camshaft until the marks on the sprocket and bed coincide.
- After fixing the sprocket with a screwdriver, unscrew the bolt and remove it.
- Install a new chain, sprockets, tensioner shoe and damper plate.
Unnecessary fears when dismantling the RV sprocket are not appropriate. The shaft design includes a pin. In addition to transmitting torque, it serves as a fixator of a certain position.
How to put on a chain
Installation of a new chain begins with its attachment to a new crankshaft sprocket. Next, the damper, tensioner shoe, and limiter are mounted. The chain is passed through the drive shaft gear and secured along the way. Afterwards it is mounted on the camshaft sprocket, and its position is adjusted according to the cycle:
- Put it on the shaft.
- Look at the relative position of the drill bit and boss.
- Take off.
- Move one tooth in the desired direction.
The final procedure is to tighten the chain, during which the tensioner is twisted all the way with good force. After rotating the HF key, the final check of the coincidence of the signs is carried out.
Purpose of the sedative
The damper is designed to dampen vibrations and jerks that occur during startup on the timing chain. Without this device, the chain would easily break off the guide gears and break at the most inopportune moments.
Most often, the timing chain breaks at the moment when the crankshaft rotation speed reaches its maximum. The break occurs so quickly that the driver has no chance to react in time and turn off the engine. As a result, all engine valves fail.
After the valves, problems begin in the cylinders. It is almost impossible to restore the engine after such a breakdown. Especially when it comes to seven. After all, the cost of repair work can significantly exceed the cost of the entire car. And it’s easier to sell a car for spare parts than to restore the engine.
Therefore, we can conclude that the timing chain guide is one of those parts that needs constant monitoring. This is the most important protection of your engine from major breakdown.
Checking the chain for suitability
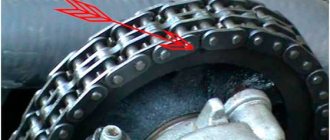
Every element of the car is subject to wear and tear. In order to avoid troubles on the road, especially when traveling long distances, it is recommended to regularly check car parts for wear. The same applies to the timing chain. How do you know if the chain is worn out or not? A worn and stretched timing chain is extremely difficult to distinguish from a new chain in appearance. The chain may not be mechanically damaged, but it may have worn pins - this is almost impossible to determine by visual inspection.
To check chain wear, it’s time to use a proven method. To do this, you need to take 20 cm of chain - place one side parallel to the horizon, then turn it in your hand so that the pin is perpendicular to the surface. Next, evaluate the hanging angle of the chain. On an unworn chain, the angle of inclination to the horizontal surface will be no more than 20 degrees; on an old worn chain, the angle will be more than 45 degrees. This indicates that the timing chain needs replacement.
You can also use another method to determine the degree of chain wear. To do this you need to take a caliper. Count out 8 links and determine the distance between the outer pins - it should be within 122.6 mm. Thus, it is necessary to measure at least three arbitrary sections of the chain; if in any section the distance exceeds the maximum permissible value, the timing chain needs urgent replacement.
Installing a new timing chain
We install new sprockets on the crankshaft and the drive of auxiliary units. Lubricate the new timing chain and install it in place.
New timing chain.
We place any tool under the chain on top so that it does not fall down.
We install the camshaft sprocket in the chain in such a way that when installed on the camshaft, the descending branch of the chain is tensioned and all marks coincide. We turn the camshaft counterclockwise at a small angle and return it back by the crankshaft, this way the chain is tensioned and you can evaluate the correct installation of the marks. If the marks do not match, transfer the chain to the tooth and repeat the procedure again.
We install the chain tensioner in place and activate it. Tighten all the sprocket mounting bolts and lock them. We turn the crankshaft two turns and if the valves do not meet the pistons and all the marks fall into place, we congratulate ourselves on completing the most important operation.
Lubricate the crankshaft cover gasket with sealant and install it in place.
We install the pulley, tighten it and turn the crankshaft again and check all the marks. It’s better to play it safe than to tear your hair out all over the place and look for the mechanic’s phone number.
We unscrew the nut 13 of the distributor and, having taken it out, turn the slider so that it faces the contact of the fourth cylinder. We put the distributor in place, but remember that after final assembly we will have to turn on the ignition. We will not dwell on this, since the setup procedure for the VAZ 2106 can be found on the Internet.
If you are interested, there is a video about installing the ignition at the end of the article.
We put back everything that was removed, in the reverse order of removal. Fill with antifreeze, start, adjust the ignition. Your first timing chain replacement has come to an end.
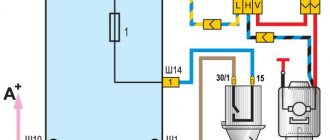
Purpose and characteristics of the circuit
The timing drive mechanism of the VAZ 2106 engine solves 3 problems:
- Rotates the camshaft, which opens the intake and exhaust valves in the cylinder head.
- The oil pump is driven by an intermediate sprocket.
- Transmits rotation to the ignition distributor shaft - distributor.
The length and number of links of the main drive element - the chain - depends on the type of power unit. The manufacturer installed 3 types of engines with a displacement of 1.3, 1.5 and 1.6 liters on the “sixth” Zhiguli models. In the VAZ 21063 (1.3 l) engine, the piston stroke length is 66 mm, on modifications 21061 (1.5 l) and 2106 (1.6 l) - 80 mm.
Many manufacturers indicate information about the number of links directly on the packaging
Accordingly, on power units with different displacements, chains of two sizes are used:
- 1.3 l engine (VAZ 21063) – 114 links;
- engines 1.5-1.6 l (VAZ 21061, 2106) - 116 links.
How to check the length of a chain when purchasing without counting the links? Pull it out to its full length, placing both parts close to each other. If both ends look the same, you have a 116 link part for long stroke engines (1.5-1.6L). On a short chain for VAZ 21063, one end link will rotate at a different angle.
If the ends of the stretched chain look the same, there are 116 sections.
How the timing chain drive of the VAZ 2106 car works: review and replacement
The popular car VAZ 2106 , whose production began during the Soviet era, was equipped with three types of engines - with a displacement of 1300, 1500 and 1600 cm3. The design of the listed motors is the same, the difference is only in the sizes of the cylinder-piston group, crankshaft and connecting rods. On all power units, the timing gears are driven by a double-row chain. The latter gradually stretches out and needs periodic tightening; the minimum service life of the part is 100 thousand kilometers. When tensioning does not produce results, the entire chain drive is changed - along with the gears.
Pre-disassembly stage
It is impossible to immediately get to the timing assembly - the generator drive belt, crankshaft pulley and electric fan are in the way. In older VAZ 2106 , the impeller is attached to the pump shaft, so it is not necessary to remove it. To remove the chain drive, follow these steps:
- Drive the car into the pit, brake and wait 20–60 minutes until the engine cools to a comfortable temperature of 40–50 °C. Otherwise, you will burn your hands when disassembling.
- Go under the car and remove the grille protecting the oil pan of the power unit. Using a 10 mm wrench, remove the 3 screws securing the timing case to the sump cover, then loosen the 19 mm nut on the generator axle.
During disassembly, check the condition of the valve cover gasket - it may be swollen and leaking oil. Then buy and install a new seal.
Before removing the aluminum cover that hides the timing assembly, it is recommended to remove all dirt from the front end of the engine. When you remove the cover, a small gap will open between the block and the oil pan. You should not allow foreign particles to get in there, especially after a recent oil change.
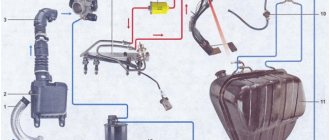
On a car equipped with an electronic fuel injection system (injector), disassembly is carried out in the same order. Only here the adsorber hose is disconnected, and the air filter box is removed along with the corrugation connected to the throttle valve block.
Sources:
https://24premier.ru/raznoe/kak-vystavit-metki-na-vaz-2106-nastrojka-faz-ili-kak-vystavit-metki-grm-na-vaz-2106-svoimi-rukami.html https:/ /bumper.guru/klassicheskie-modeli-vaz/grm/kak-vystavit-metki-grm-na-vaz-2106.html
Which timing chain and tensioner should I install on the VAZ 2106, VAZ 2107?
timing chain number is 2103-1006040, the average price is 380 rubles.
Analogues:
- Fenox PC2103C3 — 519 rub.
- Kraft KT 017736 — 620 rub.
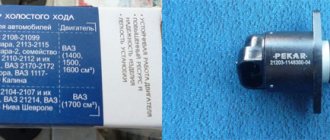
The original number of the timing chain tensioner is 2101-1006060, the average price is 364 rubles.
Analogues:
- TSN 671 — 254 rub.
- Riginal RG2101-1006060 — 230 rub.
- Trialli MT 151 — 407 rub.
Prices are current for 2021, although the cost has not changed much in three years.
Replacing the VAZ 2106 timing chain without disassembling
Replacing the timing chain without disassembling
There is a simple way to replace the timing chain of a VAZ 2106 without removing the front cover. To do this, you only need to remove the valve covers and prepare a new chain.
The principle of how to change the timing chain on a VAZ 2106 is as follows: you need to disconnect one link of the old chain, as well as one link of the new one. After this, the edges of the old and new chains must be connected by making a corresponding mark at the junction with chalk or a corrector. Then you need to take the second end of the old chain and pull it out of the mechanism, while the new chain will gradually be put on the sprockets.
When the old chain comes out completely, it must be disconnected from the new one, and carefully rivet the links of the replaced chain.
How to change the timing chain on a VAZ 2107 with an injector
Replacing the timing chain on a VAZ 2107 injector is carried out according to the same principle as on a Zhiguli 2106. Moreover, you can install a new element either in the standard way by removing the front cover, or in a simpler way.
Checking the timing chain quality
Before changing the timing chain on a VAZ-2107, you should decide on the manufacturer and quality of the chain.
The reliability of a new product can be roughly checked by taking the chain by one end and lifting it horizontally. Holding the chain edge up, its second end will bend down slightly - the smoother this bend is, the stronger and more reliable the product!
Prepare the necessary keys and be sure to put proofreader or chalk somewhere nearby.
Timing marks on a VAZ 2107 car injector
Both on the carburetor engine of the VAZ 2107 car and on the injection engine, the gas distribution mechanism along with the drive remained the same, that is, chain. With excessive wear and stretching of the chain, a number of the following negative consequences are observed:
- Problem starting the engine.
- Significant increase in fuel mixture consumption.
- The appearance of carbon deposits on valve seats.
- Abnormal motor operation in all modes.
- Malfunction of the injection control sensor.
To avoid such negative consequences, it is necessary to carry out preventive work in a timely manner. We will learn more about how to set timing marks on a VAZ 2107 Lada family car with an injector power system.
View under the hood.
Engine VAZ 2106
Remove the air filter housing from the carburetor. Unscrew the three 10mm and four 8mm nuts securing the housing to the carburetor.
Be careful not to drop anything into the carburetor, otherwise you will have to remove it, and maybe the intake manifold too. Because if, with the car running, they get under the intake valve, then you can go straight to repair the head.
Carburetor.
Remove the fuel line and distributor cap. Unscrew the eight nuts 10 securing the valve cover and remove the washers with the plates.
Throttle drive.
Remove the choke cable and throttle valve drive. Then remove the valve cover along with the gasket; it is also better to replace it.
Camshaft bed.
Remove the protection from below.
Protection.
Loosen the nut 19 securing the generator.
Generator mounting.
Unscrew the clamps on the pipes and remove the latter.
Loosen the clamp on the lower pipe of the pump and remove it with a slight movement of your hand.
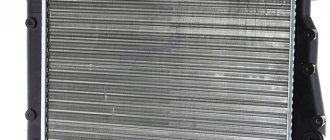
Disconnect the power wires for the cooling fan and the temperature sensor on the radiator. We remove the radiator along with the pipes and thermostat.
Loosen the generator tensioner nut and use a pry bar to move it forward. Remove the generator belt.
Setting Top Dead Center
Now we rotate the crankshaft by the pulley with a magic wrench of 36 and ensure that the marks on the pulley and the cover match, as well as on the camshaft sprocket and the ebb of the latter bed.
TDC marks.
Camshaft mark.
Now comes the fun part. Unscrew the nut 36 holding the crankshaft pulley. We lock the pulley with a special key and unscrew it. If there is no such thing, you can turn on the fifth speed, ask a friend to press the brake and lightly turn the key to unscrew it.
Crankshaft pulley nut.
We remove the pulley. We unscrew the six bolts and three nuts 10 on the side, three bolts from the bottom of the camshaft drive cover. Let's take the last one.
Unscrew the two nuts securing the chain tensioner and remove it.
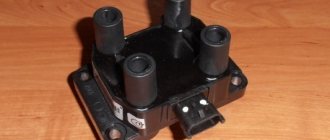
Timing chain tensioner.
This machine was equipped with an automatic tensioner. Finally someone got it!
We unscrew the bolt securing the camshaft sprocket and, having removed it, remember or mark the hole for alignment.
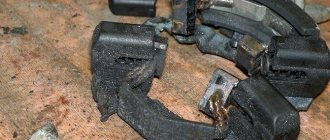
An amazing picture appeared before us.
Old timing chain.
- a fuse that prevents the circuit from jumping.
- securing the timing chain tensioner shoe.
- crankshaft sprocket.
We unscrew the fuse using a 10mm wrench and the tensioner fastening, as well as the bolt securing the auxiliary drive sprocket (pig).
How to replace a dampener
To work you will need:
- new part (cost approximately 500 rubles);
- 20 centimeters of one and a half millimeter steel wire;
- open-end and socket wrenches;
- flat screwdriver.
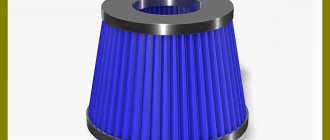
- Remove the air filter.
- Using a 13mm socket wrench, unscrew the mounting bolts on the cover. Remove the cover.
- Loosen the cap nut that secures the chain tensioner.
- Using a screwdriver, carefully press out the shoe and hold it in this position.
- Tighten the loose cap nut.
- Insert the wire hook into the eye of the damper.
- Unscrew the mounting bolts, holding the device itself with a hook so as not to drop it into the motor.
- After the mounting bolts have been removed, use a spanner to turn the timing shaft a third of a turn. This will release the chain tension.
- Using a steel hook, carefully remove the damper.
- Put a new one in its place.
- Follow steps 1 to 9 in reverse order.
So in a short time you can easily replace the damper in your garage, saving about 700 rubles. Usually this amount is asked to the service station for similar work.
How to set the ignition of a VAZ 2106 with your own hands - step-by-step instructions
1. Unscrew the spark plug of the 1st cylinder, then use a finger or a rubber plug to close the spark plug hole.
2. Using a special key, rotate the crankshaft until the compression stroke begins in the first cylinder, that is, when the piston begins to move upward. You can tell by the way the rubber plug flies out; if you hold it with your finger, you will feel it being squeezed out.
3. Turn until the mark on the crankshaft pulley matches the mark on the timing cover. If you drive on “92” or “95” gasoline, combine with the middle mark, but if on “72” or lower, combine with the long mark, which corresponds to the “0” advance angle.
4. Unfasten the latches, then remove the ignition distributor cap.
5. After turning the crankshaft, the distributor rotor should rotate to a position in which its outer contact will be directed towards the 1st cylinder on the distributor cap.
6
When the marks are aligned, pay attention to the distributor, try to draw an imaginary line through the cover latches, it should be parallel to the axis of the engine, if this is not the case for you, then do the following:. 7
Unscrew the distributor fastening nut, then turn the distributor upward. Rotating the rotor axis, align it parallel to the engine axis
7. Unscrew the distributor fastening nut, then turn the distributor up. Rotating the rotor axis, align it parallel to the engine axis.
8. Place the distributor, tighten the fastening nut without tightening it completely.
9. After this preparation, you can proceed directly to the ignition adjustment procedure.
10. Connect the “control” as follows: one end to the terminal of the ignition coil connected to the low-voltage wire of the distributor, the other end is connected to ground.
11. Turn on the ignition. Slowly turn the distributor clockwise until the control lamp goes out. If it doesn’t burn anyway, then you don’t need to do anything.
12. Next, you need to rotate the distributor counterclockwise, at the moment the control lamp lights up, fix the position of the distributor, then tighten its fastening nut.
13. Now you can turn off the ignition and put the distributor cap back in place.
After the ignition is set, it is necessary to check the correctness.
1. To do this, start the engine and start driving.
2. Accelerate the car to 45 km per hour, then turn on the fourth gear and sharply press the gas.
3. After this, after about 2-3 seconds, detonation will occur (popping, ringing of “fingers”), disappearing as the car accelerates.
4. If detonation occurs and does not disappear as the car accelerates, we can assume that the ignition is “early.” If you do not experience detonation at all, the ignition is “later”. In case of early ignition, turn the distributor clockwise by approximately 0.5-1 division. If you have the opposite later, turn it 0.5-1 division counterclockwise. When the ignition adjustment is completed, mark with paint on the distributor body the position of the middle mark of the scale relative to the block.
Now that the ignition timing of the VAZ 2106 has been set, you can collect everything and rejoice at the job successfully completed.