Why is it necessary to bleed the clutch? The fact is that it will work well only if there is no air in the system itself. Otherwise, the gears will be difficult to shift. Newbies in the world of motor transport ask the question: how to properly bleed the clutch on a VAZ-2107? There are still millions of owners of this car, and therefore the issue is still considered relevant.
Fortunately, such work can be done with your own hands - it is by no means necessary to take the car to a workshop, where you will have to spend a lot of money. After work, such as replacing the working fluid or any manipulations with the hydraulic drive, air can enter the system. To get rid of it, the clutch is pumped. A brief step-by-step instruction will help you understand the pumping process.
How to bleed the clutch on a VAZ 2101-VAZ 2107?
Always remember that you need to bleed the clutch together in a car, because it’s difficult to do this without the help of an outsider, but there is still a way out, so if you are going to bleed the clutch alone, then first read the entire article to at least visually understand how it’s done , and then run the video clip located at the very end of the article, and this video shows a visual process of bleeding the clutch, performed by just one person!
And it’s best to do all the work in a pit, because it’s much simpler and more convenient, but if it’s not there, then you can do the work without it, it’ll just be a little problematic!
1) At the very beginning of the operation, pour new brake fluid into the clutch reservoir, and then close the reservoir with a plug.
The liquid must be filled strictly to the very top edge! (For more information on how to fill the brake fluid into the reservoir, and why you need to fill the brake fluid at all, see the article entitled: “Replacing clutch fluid on a VAZ”)
How to bleed the clutch on a VAZ 2107
- 93 0 73k
- 157 11 164k
Bleeding the clutch of the VAZ 2107, like other cars of the classic family (starting from 2101), is necessary after any operation to repair parts of its drive. It is necessary to bleed the circuit after replacing the master or working cylinder, hose or tube, as well as when changing the fluid. The task of the manipulation is to ensure that there is no air in the clutch hydraulic drive.
How to perform this procedure on a carburetor or injection car and what difficulties there may be - see the instructions.
In what situations should you pump
Any repair of the hydraulic drive that causes its depressurization, as well as changing the working fluid, is a direct indication for pumping. But, even if the parts or fluid have not been changed, the clutch is bled when air enters, disrupting the operation of the hydraulic drive.
Signs that the circuit is airy and the clutch needs bleeding on a VAZ 2107 are:
- pedal travel is too soft;
- howling or vibration when holding the clutch pedal in gear.
difficulties and crunching when shifting gears, up to the impossibility of shifting and/or moving;
How to bleed the clutch on a VAZ 2107: preparation
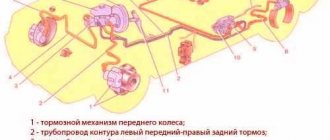
Clutch slave cylinder and its bleeder fitting
Before bleeding the clutch on a VAZ 2107, you need to prepare tools and consumables:
- wrench 8;
- dry rags;
- a thin transparent hose (a medical dropper works well);
- container for draining the working fluid;
- liter bottle of fresh brake fluid.
As a key that will be used to open the bleeder fitting, it is better to take a socket, clamping, or deep socket 8, since open-end wrenches lick the edges. The length of the hose should be about 0.5-1 meter. Brake fluid of the VAZ 2107 can be used as a working fluid, grade DOT-4 (more often used on injection cars) or DOT-3 (usually filled in older carburetor models). A container of 0.5 liters is enough, even if a complete replacement is needed, so taking more makes sense only when it is also necessary to bleed the brake system.
How to bleed the clutch on a VAZ 2107: injector and carburetor
All Zhiguli cars use the same type of hydraulic clutch, so the type of power supply to the VAZ 2107 engine (injector or carburetor) and its model (2101, 2103, 2104, 2105, 2106) do not play a decisive role. The only nuances can be in the features of access to the drive cylinder, since the carburetor allows you to bleed the clutch on a VAZ 2107 a little faster than an injector. Below we will look at detailed instructions on what methods you can pump up and why you may not succeed.
How to properly bleed the clutch on a VAZ 2107: step-by-step instructions
Bleeding the clutch on a VAZ 2107 should be done in a pit, overpass or lift, but in this case it may be necessary to dismantle the sub-engine protection (if installed). It is also possible to bleed from above by simply placing the machine on a level surface, but this is a little more difficult. The easiest way to pump the clutch of a VAZ 2107 is with an assistant, in which case the order of work will be as follows:
Video instructions on how to bleed the clutch on a classic VAZ in several ways
- Open the hood and remove the cover from the clutch expansion tank, located on the left on the engine shield, you need to add fluid there to the maximum.
- You need to get to the clutch slave cylinder, located to the left of the gearbox bell.
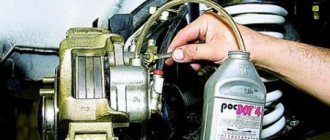
- Remove the rubber cap from the bleeder fitting, put a 8mm wrench on it and put on the hose.
- Pour 100 grams of fresh DOT 3/4 fluid into a container for draining and dip the end of the hose into it (to prevent air leaks).
- Ask an assistant to pump the clutch pedal about 5 times at intervals of 1-3 seconds and leave it depressed.
- Open the fitting of the clutch slave cylinder 0.5-1 turn of the key so that liquid flows through the hose.
- Close the fitting when the liquid stops flowing.
- Check the fuel fluid level in the tank, and if it drops, add more.
- Repeat steps 5-8 until the liquid begins to flow in an even stream without bubbles.
- Tighten the fitting, wipe the parts with a rag to remove any leaks and put the rubber cap back on.
- Check the fluid level in the tank (if it’s low, add it again) and screw on the cap.
By following these simple procedures, you will bleed the clutch drive system on a classic and achieve smooth operation.
How to pump the clutch of a VAZ 2107 yourself: alternative methods
If asking someone to pump the pedal is not possible, you need to bleed the VAZ 2107 clutch without an assistant. There is nothing complicated in this procedure either. You can bleed the clutch on a VAZ 2107 yourself in the following ways:
How to bleed the clutch on a classic yourself
- pedal fixation;
- pressure;
- vacuum;
- by gravity.
Bleeding the VAZ 2107 clutch with pedal fixation
Since it is impossible to bleed the clutch pedal of a VAZ 2107 and at the same time work with the fitting yourself, you can try using a gas lift of a suitable length with a force of 100 N instead of an assistant. A board, a piece of pipe or another oblong object that can be used to support the pedal in the depressed position will also do. The further procedure for bleeding the Zhiguli clutch is the same as with an assistant. The only difference is that you will have to pump the pedal and fix it when depressed yourself.
Bleeding the VAZ 2107 clutch under pressure
The second option on how to bleed the clutch of a VAZ 2107 yourself is under pressure. To do this, you need to take a large syringe (preferably 20 cubic meters or more), some kind of container for collecting liquid and perform the following manipulations:
- Draw up a full syringe of TJ.
- Connect the syringe and the fitting with a hose from the dropper.
- Open the hydraulic clutch expansion tank.
- Open the bleeder fitting with a size 8 key and start pumping liquid into the cylinder with a syringe, creating pressure.
- Press fresh fluid into the cylinder until there are no more bubbles in the reservoir.
- Tighten the fitting, wipe everything with a rag, put on the cap and close the tank.
Bleeding the VAZ 2107 clutch with vacuum
You can create a vacuum in the system and bleed the clutch slave cylinder using a large medical syringe.
Another way to quickly pump the clutch on a VAZ 2107 alone is to pump it with vacuum (vacuum). It occurs on the same principle as under pressure, but the liquid does not need to be supplied, but rather pumped out. The general procedure for bleeding the clutch cylinders on the seven is as follows:
- Open the reservoir and add liquid up to the neck.
- We put the key on the fitting, put the hose on it, and the other end on the syringe.
- We open the fitting and use a syringe to draw liquid from the cylinder, controlling the level in the tank.
- Periodically add DOT-4, not allowing it to fall below 1.5-2 cm from the bottom of the tank.
- We stop drawing the liquid after it flows into the syringe in a stream without bubbles, and tighten the fitting.
- We remove the device, wipe the cylinder of liquid, put on the cap and close the reservoir lid.
Bleeding the clutch on a VAZ classic by gravity
You can bleed the clutch on a VAZ 2107 with your own hands by gravity, but it will take a little longer. To do this you need:
- Open the tank cap.
- Place the hose onto the fitting, dipping the end into the drain container, and open the fitting.
- Start adding liquid to the tank, watching the stream flow down the hose.
- Stop adding when the stream becomes smooth and free of bubbles.
- Tighten the fitting, remove the hose, wipe away any leaks, put on the cap and close the tank cap.
Why is it impossible to bleed the clutch of a VAZ-2107
The reason why you cannot bleed the clutch on a VAZ 2107 may be:
This condition of the clutch cylinders can cause unsuccessful bleeding. It will block the fluid supplied to the working cylinder installed on the gearbox
- clogging of the hydraulic circuit;
- malfunction of the hydraulic drive cylinders;
- bending of the hose or circuit tube;
- air intake from outside.
To solve the problem, you need to inspect the circuit for kinks and/or leaks. If they are, the hose or tube should be corrected/replaced. If not, try to blow out the circuit and change the fluid. To do this, you need to open the fitting, drain the old fuel fluid by pumping or pressure, unscrew the fitting completely and blow out the circuit with a pump or compressor.
To make the connection, you can use a tank plug with a hole into which the tubeless tire nipple is inserted. This cap must be screwed on instead of the original one, connected to a pump or compressor and supplied with air pressure. It will blow out all deposits through the fitting hole.
Then you need to screw in the fitting, fill in fresh fluid and pump the circuit according to the instructions. Bleeding the clutch on a VAZ 2107 should be done using one of the methods described above. If this does not help, you need to diagnose the cylinders and replace the faulty part with a new one.
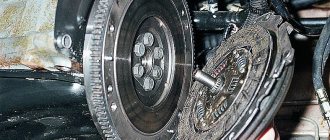
Design and principle of operation of the clutch
The clutch pedal is connected to the clutch master cylinder through a rod. The same rod acts as a piston in this cylinder. There is also a working cylinder - it is installed on the clutch housing. The piston of this cylinder is connected to the release fork.
The force from the driver's foot is transmitted through fluid, so the clutch cylinders are connected to each other by a pipeline.
Fluid is supplied to the master cylinder from the reservoir. The working element is ordinary brake fluid.
It all works like this: the driver presses the clutch pedal, the rod enters the master cylinder and pushes the fluid out of it.
To prevent the liquid from flowing back into the tank, the piston closes the supply fitting from the tank.
Since the fluid is not compressed, it moves through the pipeline and begins to press on the piston in the working cylinder. This piston comes out and pushes the fork, which acts on the release bearing.
When the pedal is released, the fork spring pushes the piston back into the slave cylinder and the fluid returns to the master cylinder.
This scheme seems simple, but may not always be reliable. If air gets inside the drive system, the efficiency of the clutch will decrease.
Air bubbles in the system will be compressed when pressure arises, this will lead to the fact that the full force will not be transmitted.
Because of this, even with the pedal fully depressed, the output of the working cylinder rod will be incomplete, the fork will not fully depress the bearing - as a result, the clutch “drives”.
Necessary tool
Then you can proceed directly to the pumping process. To do this you will need:
- Open-end wrench or socket wrench 8;
- Container for draining (with a small amount of liquid);
- New fluid;
- Silicone transparent tube;
- Rags.
This is all the required equipment.
An interesting fact is that with identically used drives on different “Classic” models, the bleeding process is different, so methods for pumping a hydraulic drive on VAZ-2106 and VAZ-2107 vehicles will be described below.
Bleeding the clutch on a VAZ-2106
First, let's bleed the clutch on the VAZ-2106.
For ease of work, it is better to drive the car into a pit or overpass. Additionally, outside assistance will be required.
Before starting work, you need to clean the reservoir from dust, check the fluid level and add it if necessary.
The clutch bleeder located on the slave cylinder should be cleaned. Then the protective cap is removed from this fitting and the tube is put on it. The other end must be lowered into the drain container.
Before starting pumping, it is advisable to immediately check the possibility of unscrewing the fitting; often it becomes very sour in its seat, and it is quite difficult to tear it out of place.
If you manage to tear the fitting out of place, you need to tighten it back. After this, the assistant inflates the system by sharply pressing the pedal 4-5 times, after which he holds it.
The fitting is unscrewed half a turn, after which liquid with air bubbles will flow down the tube. As soon as the fluid stops flowing, the fitting must be tightened.
Afterwards, you need to repeat the process of pumping and draining the liquid several times, periodically checking the level in the tank.
It is important to ensure that liquid begins to flow through the tube without bubbles, after which the fitting is finally tightened and the cap is put on it.
It's simple: how to properly adjust the clutch on a VAZ 2107 without the help of specialists?
The procedure for fully setting up the friction clutch control system consists of two parts, one is performed in the cabin, and the other is performed under the car from the inspection pit. To work you will need a set of tools:
- Set of keys.
- Set of screwdrivers and pliers.
- Ruler or square.
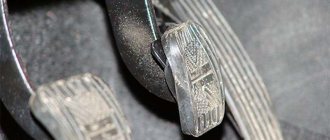
Adjusting the initial travel of the clutch pedal
A bracket with a pusher is installed under the steering column in the cabin. By rotating the nuts, you can achieve the desired clearance between the pusher and the clutch master cylinder piston. It is this parameter that is responsible for the initial free play of the pedal; the adjustment technology is quite simple:
- Use a wrench (no. 1 in the photo) to hold the travel stop, and use a second wrench to unscrew the lock nut two turns.
- Rotate the limiting pin with the first key (screw in or unscrew), set the desired initial free play of the pedal - 0.4-2.0 mm.
- Check the free play using a straight edge and, if necessary, repeat the adjustment operation.
- Tighten the locknut with a wrench.
How to adjust the free play of the release fork?
Before you bleed the clutch on a classic VAZ 2107, you need to perform the second adjustment stage, which is done on an overpass or inspection hole. The technology for checking and adjusting the free play of the clutch release fork is as follows:
- Using pliers, remove the spring from the fork and then from the working cylinder. The check can be done without dismantling the spring, but when checking the free play, you will have to apply force to overcome its resistance.
- Check the stroke of the fork with a ruler, pressing it all the way. The readings should be within 4-5 mm; if there are deviations, then the following points should be followed.
- Clean the cylinder of dirt and spray the nuts with WD-40.
Bleeding the clutch on a VAZ-2107
On the VAZ-2107, the preparatory work is identical - the system is checked for leaks, the tank and fitting are cleaned.
It may be necessary to remove the dust shield to access the working cylinder fitting (on injection VAZ-2107 models).
Next, the tube is put on the fitting; first it must be “torn” out of place.
The bleeding process on this car is carried out as follows: the fitting is unscrewed half a turn, the assistant sharply presses the pedal, and then gradually releases it, while the fitting does not need to be tightened back.
The assistant must press the pedal sharply until liquid without air begins to flow through the tube, after which the pedal must be pressed and held, and the fitting must be tightened.
How to bleed the clutch on a VAZ 2107
- home
- Blog
- Repair and service
- Transmission
- How to bleed a clutch: preparation and stages
- New items in the world of cars
- Automotive market news
- Popular
- Engine
- Body
- Salon
- Cooling system
- Transmission
- Filters
- Tires and wheels
- Electrical equipment
How to bleed a clutch: preparation and stages
Clutch “diseases” can lead to problems at the start and when braking. Unfortunately, it is impossible to diagnose system problems based on external signs. Monitor its operation, pay attention to your own sensations when pressing the pedal, and if you notice jerks when starting the engine and switching the gearbox, go for diagnostics.
Car clutch system
When is clutch bleeding required?
The operation of the clutch system is based on the laws of physics - the properties of hydraulic/brake fluid to compress/decompress under load. If air gets into the system, its properties change. As a result: the hydraulics stop responding to pressure or react late, which leads to jerks and jolts when pressing the pedal.
Signs of “airing” of the system
If the following symptoms appear, it's time to change the hydraulic fluid:
- the pedal is depressed too easily, but the gear does not change;
- the pedal moves normally, but the gear engages with vibration or delay;
- the clutch pedal “sticks” to the floor, slowly returning to the top position.
Even one of these signs is enough to check the system.
“Sinking” can also be caused by a broken return spring.
Before bleeding the clutch, find out that the spring mechanism is not the cause of the malfunction.
In what cases is the clutch hydraulic drive pumped?
Bleeding of the clutch and braking systems is mandatory if:
- The liquid used has already served its purpose
. Changes in physical and mechanical properties over time are the norm. The recommended period of use for hydraulics is 1-2 years (as a rule, the period is indicated on the container).
The liquid loses its properties, even if stored in an airtight container.
the clutch or brake system is being repaired
. When cuffs, seals, seals are changed, leaks are eliminated, depressurization occurs. Result: leakage of working fluid and airing. Needs replacement.
It is easy to speed up new bleeding if you loosely tighten the fastenings of the clutch mechanism units. Air leaks freely through the micro-holes.
Clutch/braking system components are severely worn
.
In case of wear of parts, only bleeding is not enough, because the cause of airing does not disappear. To fix the problem, you must first repair or change the functional elements, and then change the working fluid.
What is required for pumping?
- tools: keys, screwdrivers, pliers;
- elastic transparent hose for draining old fluid. Make sure that the diameter of the tube connection matches the drain fitting connector;
- a reservoir into which the liquid will be drained;
- new working fluid;
- personal protective equipment: gloves, sleeves, goggles. Technical fluids are chemically aggressive; if they come into contact with the skin and mucous membranes, they can cause burns.
Ideally, bleeding the clutch system should be carried out by two people. One person presses the pedal, the second drains the fluid and diagnoses faults. If necessary, you can do without an assistant. In this case, you will need a reliable means to secure the pedal. For example, a suitable size stone or brick.
Is it possible to cope with the procedure on your own?
Are you sure that you can quickly and efficiently bleed the clutch yourself? Even if you have the slightest doubt, contact a professional service center.
Without knowing the nuances, you may simply not notice the defect, so repairs will be pointless.
Preparing for pumping
Preparing to bleed the clutch
The fluid from the hydraulic system is not “poured out”, but is pushed out thanks to the cylinder piston pusher.
Preparation is carried out in stages:
- checking the volume of liquid in the expansion tank - the level should be within normal limits. If it reaches the desired level, you need to top it up;
- cleaning the valve cap on the cylinder from accumulated contaminants;
- removing the cap from the air inlet valve on the working cylinder;
- connecting the drain hose to the valve fitting.
The second end of the hose is lowered into a container into which fresh working fluid is poured. The end of the tube should be immersed 5-10 cm into it.
Do not remove the hose from the tank until work is completed.
After the preparatory work, the clutch is adjusted. This allows you to make sure that the movement is free and, in addition to airing the system, there are no other malfunctions.
Stages of pumping the system
After adjustment, bleeding the clutch is carried out in several stages:
- pressure is pumped into the system. To do this, the pedal is depressed 3-4 times sharply and all the way, with an interval of 2 seconds. In this way its maximum stroke is achieved.
- the pedal is fixed in the clamped position.
- The liquid is drained by turning the cylinder fitting (with the tube in place) half a turn. Air is “squeezed out” along with the technical fluid.
The amount of air is judged by the number of bubbles that form in the container. As the system is freed from air, the pedal lowers.
4. When the pedal falls to the floor, the fitting closes quickly. Do not release the pedal until the valve closes.
It is better to repeat the pumping procedure 3-4 times. When the system is cleared of air, there are no bubbles left in the drain tank.
To prevent the work from being ineffective, when pumping it is important to monitor the level of working fluid in the expansion tank. It should not fall below 3.5 cm.
5. Tighten the fitting, make sure the system is tight and remove the hose.
To check the system, the pedal is pressed all the way, and the stroke of the piston pusher is measured. The norm is 2.7 - 2.8 mm (for some cars the norms change; they are indicated in the operating manual).
Checking the quality of clutch bleeding
Regarding the pumping itself, it should be noted that the process itself should not be long: on a VAZ-2106 - 4-5 pumps followed by draining and 5-7 sharp presses on the pedal with a leisurely release - on a VAZ-2107.
If the process takes more steps, you need to look for where air got into the system, fix the problem, and then pump it again.
You can check the operation of the drive after bleeding while driving.
Start the car, move slowly and change gears. If there are no signs of hydraulic drive malfunction, we can assume that the pumping was done correctly.
The clutch is bled when air enters the system. Most often this occurs due to depressurization of the system hoses or loose tightening of threaded communications. This breakdown is one of the most unpleasant, which can take any motorist by surprise. The main problem is that the car will not be able to go further. To repair the vehicle, you will have to call a tow truck or look for a kind fellow traveler who will tow it to the garage. In the first case, such a trifle will lead to additional financial costs, and in the second, it may require a lot of time, since today on the road it is not often possible to meet an understanding motorist; everyone has their own problems and affairs. In this article we will talk about how to bleed the clutch, what is needed for this and what nuances arise in the process of implementing this activity.
How to bleed the clutch of a VAZ 2107
- Why bleed the clutch on VAZ cars and when to do it?
- What is needed to bleed the brake system?
- How to bleed the clutch of VAZ 2107 and 2106
- Is there a difference between a "six" and a "seven"?
Clutch bleeding is necessary after air enters the system and due to mechanical wear of the units. It is also necessary if, during system adjustment, it was not possible to achieve a good connection between the components.
Some time after the start of operation of the car, bleeding the VAZ 2107 clutch must be carried out. The point here is not in the features of the parts used, but in the principle of operation of the mechanism.
Why bleed the clutch on VAZ cars and when to do it?
Bleeding alone will not eliminate all car breakdowns. But if during diagnostics it is determined that liquid or dirt has entered the system, the problem must be solved immediately.
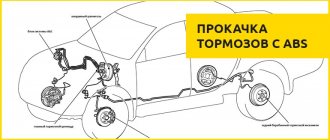
The “seven” clutch drive consists of:
- cylinder;
- piston;
- hoses;
- fastening components.
Without going into technical details, we can say that bleeding the clutch of VAZ 2106 and 2107 is necessary to remove air from the system, since there should not be any there at all.
The procedure must be carried out if the clutch stops turning off. For example, the car is in first gear, the pedal is depressed, and movement begins even before the pedal is released. If the pedal is released very easily, this is also a reason to remove air bubbles from the system.
What is needed to bleed the brake system?
The procedure must be carried out through a fitting located under the bottom of the working cylinder. This work does not require special training, but must be carried out with a partner. High-quality repairs can be carried out with standard parts and tools. By the way, you will definitely need to replace the old fittings, since the edges on them will probably soon be erased.
For pumping you will need the following components:
- brake fluid and a container for transferring it;
- balloon wrench, jack;
- wheel chock (2 pcs.);
- wooden supports;
- rubber hose, minimum length - 50 cm;
- wrenches “8” and “10”.
In addition, you will need penetrating lubricant, a liquid container and a tube made of transparent material. The diameter of the tube must match the diameter of the bleeder fitting.
How to bleed the clutch of VAZ 2107 and 2106
To carry out the procedure, you will need another person - he must press the brake pedal. All hoses and connections must be intact. Cracks and other defects are not allowed. You can only add brake fluid that is poured into the system. Regardless of what is located under the hood of the car - an injector or a carburetor - the sequence of actions will be the same.
“Sixes” and “sevens” are equipped with hydraulic drives. The hydraulic drive requires special attention. Before bleeding the VAZ 2107 clutch, it is worth inspecting the entire brake system to determine whether there is any fluid leakage. You can start the procedure only if there are no leaks. If pumping is carried out after replacing the working fluid, you will have to clean the main fluid pump drain from the dirt accumulated there with a metal brush.
- We put the prepared hose on the outlet of the fitting, which we first clean from dirt deposits. The hose must be pressed onto the fitting with force. We take its other end into the liquid collector. Now your partner needs to depress the clutch 5-6 times. The interval between presses should be 2-3 seconds. If after this the pedal does not return to its original position, it must be returned manually.
- Your partner pushes the clutch pedal to the floor and holds it in that position. At this time, it is necessary to unscrew the fitting to drain the working fluid. The brake fluid will come out along with air bubbles. After this, we tighten the fitting again, and give the command to the partner to depress the pedal. Then the procedure of unscrewing and tightening the fitting is repeated.
- After these actions, the pedal should “harden” and its movement will become elastic. These steps must be performed several times until air bubbles stop coming out of the hose.
Finally, we tighten the fitting until it stops, and remove the hose from it. Add working fluid to the required level. Screw on the tank cap. All that remains is to wipe off any fluid stains, test the hydraulic drive for leaks, and check the operation of the unit with the engine turned on.
Is there a difference between a "six" and a "seven"?
Here we talked about carrying out the procedure on the “Seven”, but we did not tell you how to bleed the clutch on a VAZ 2106. In fact, there is no difference - the procedure is carried out exactly the same. There are no fundamental differences between the models at all - they have the same engines and chassis. It is believed that the “six” is a little more reliable, and the “seven” has a more comfortable interior.
No special knowledge or skills are required to upgrade. But this simple procedure is very important to maintain good controllability of the car. All you need is a set of standard tools and one assistant.
Bleeding the clutch yourself
Like any other job, bleeding the clutch requires a number of preliminary steps. In addition to the tools and equipment, the list of which is listed below, you need to check the level of hydraulic fluid in the tank; it should not be below normal. Then you need to clean the clutch assembly from dirt. This will greatly facilitate the implementation of all subsequent stages. To work you need to prepare:
an empty small container for draining hydraulic fluid and a hose whose diameter must correspond to the drain fitting;
standard set of tools for a car;
a stop for fixing the clutch pedal, in the event that you did not have an assistant and had to perform the operations yourself.
Before proceeding with the immediate stages of bleeding on systems with hydraulic and mechanical clutches, you need to configure it. The need for adjustment is determined by the fact that the lack of free play for the main cylinder piston pusher (main cylinder) makes it impossible to carry out the bleeding operation. In fact, the piston and pusher is a shut-off valve.
Setting up the VAZ clutch
To make the adjustment, you will need two keys, and you will not have to spend a lot of time on all operations. The pedal travel for VAZ cars should be from 120 to 130 millimeters. The stroke is adjusted by turning the adjusting nut. The distance from the pusher rod to the end of the release fork should be within 5 mm. Before making adjustments, remove the spring from the bracket and fork. To increase the stroke, the fasteners need to be tightened; to decrease, on the contrary, they need to be unscrewed. The control bolt is tightened with the second wrench. After achieving the desired parameters, you need to press the pedal 3 times and measure the distance, repeat the procedure if necessary.
Fluid replacement
It is also recommended to replace the working fluid before bleeding. Remove the cap and place a pre-prepared hose on the fitting, the other end of which must be lowered into the drain container. Using a size 8 wrench, turn the fitting 3/4 of a full turn. Now you can remove the liquid. Pressing the pedal several times, repeat these actions until all the working fluid has flowed out, then tighten the fitting. If the clutch pedal does not rise on its own, pull it up by hand. Fill the hydraulic system with new brake fluid through the clutch reservoir.
Changing the brake fluid can be done gradually. To do this, liquid must be added to the tank in small doses in the intervals between pressing the pedal. When clean liquid flows from the working cylinder (WC), tighten the fitting and fill the barrel to a level no lower than 1.5-2 cm from the top edge. This is a fairly effective method, since the old medium, due to impurities and contaminants, settles and leaves the system first.
Clutch adjustment VAZ-2107
In order to set up the clutches, you need 2 keys, and with the right approach you won’t spend much time.
The pedal travel itself on the 2107 model must be 120-130 mm. The stroke is adjusted by turning the adjusting nut. The distance between the pusher rod and the end of the release fork should be 5 mm. First you need to remove the spring from the fork and bracket. In order to increase the stroke, the fastening components should be tightened; to decrease the stroke, they should be unscrewed. The second wrench is needed to tighten the control bolt. When the required parameters are achieved, you will need to press the pedal 3 times and then measure the distance. If necessary, the procedure can be repeated.
In addition, before pumping, it is advisable to replace the working fluid. To do this, you need to remove the cap and put it on the fitting (pre-prepared hose), the opposite end should be lowered into a container for draining. Using a size 8 wrench, turn the fitting approximately ¾ of a turn. The liquid is then removed. So, pressing the pedal, you need to repeat this process until everything flows out, then tighten the fitting. In the case when the clutch pedal does not rise on its own, you should pull it up by hand. Using the clutch reservoir, you need to fill the brake fluid into the system.
Bleeding the clutch VAZ-2107
The design of Soviet VAZ cars is largely similar; the clutch system is no exception. The method described below is suitable for models 2106, -07, -09. Bleeding the VAZ-2107 clutch is carried out in several stages. To perform this procedure, you do not need special skills, education or more years of experience working with domestic cars. It is enough to strictly follow the sequence of actions described below and understand a little about the design of your vehicle. To eliminate unclear situations, it is recommended to use the instructions in the technical documentation.
The car must be installed above an inspection hole or on an overpass. Clean the clutch reservoir from dirt and open the lid. If you have a VAZ-2107 model with an injector, you need to remove the additional mudguard. Now we remove all contaminants from the surface of the protective cap and the RC bleeder fitting (clutch slave cylinder).
Place one end of the hose in the container and put the other end on the fitting. Using a size 8 wrench, loosen the bleeder clamp bolt 3/4 turn. An assistant is needed to complete the next step. Press the clutch pedal sharply and release it smoothly, repeat the steps until the air bubbles displaced along with the fluid disappear. If air emission does not stop, tighten the fitting, fill the tank with liquid and repeat the procedure. When the bubbles stop coming out, sharply press the pedal and lock it in this position, then tighten the fitting.
Malfunctions of the VAZ 2107 clutch hydraulic drive
Incorrect operation of the hydraulic drive leads to disruption of the functioning of the entire clutch mechanism.
The clutch does not disengage completely (the clutch “drives”)
If it is difficult to engage the first speed, and the reverse gear does not engage or is also difficult to engage, it is necessary to adjust the working stroke of the pedal and the stroke of the control rod. Since the gaps are increased, they need to be reduced.
The clutch does not engage fully (the clutch “slips”)
If, when you sharply press the gas pedal, the car accelerates with difficulty, loses power on inclines, fuel consumption increases, and the engine overheats, you need to check and adjust the pedal stroke and the distance of movement of the working cylinder rod. In this case there are no gaps, so they need to be increased.
The clutch operates jerkily
If the car jerks when starting from a stop, the cause of this may be a malfunction of the return spring of the main circulation center or the control center. Saturation of the working fluid with air bubbles can lead to the same consequences. It is necessary to find the causes of unstable operation of the clutch control hydraulics and eliminate them.
The pedal falls and does not return
The cause of pedal failure is usually an insufficient volume of operating fluid in the reservoir due to its leakage in the working (usually) or master cylinder. The main reason for this is damage to the protective cap and penetration of moisture and dirt into the cylinder. The rubber seals wear out and gaps form between them and the cylinder walls. Through these cracks, liquid begins to flow out. The rubber elements should be replaced, fluid should be added to the tank to the required level and air should be removed from the system by bleeding.
Do not add used brake fluid to the hydraulic clutch control system, as it contains tiny air bubbles.
Adjusting the travel of the pedal and pusher of the working cylinder
The free play of the pedal is regulated by a limiting screw and should be 0.4–2.0 mm (the distance from the top position to the pusher stopping in the master cylinder piston). To set the required clearance, use a wrench to loosen the lock nut of the screw, and then rotate the screw itself. The pedal stroke should be 25–35 mm. It can be adjusted using the working cylinder pusher.
The length of the working cylinder pusher directly affects the gap between the end of the release bearing and the fifth basket, which should be 4–5 mm. To determine the size of the gap, you need to remove the return spring from the release bearing fork and move the fork itself by hand. The fork should move within 4–5 mm. To adjust the gap, use a 17 wrench to loosen the lock nut while holding the adjusting nut with a 13 wrench. During the adjustment, the pusher must be fixed. To do this, it has an 8 mm wrench flat, which is convenient to grab onto with pliers. After setting the required gap, the locknut is tightened.