Manual Transmission
This type requires mechanical, that is, manual gear shifting of the car and works in tandem with the clutch. In automotive terminology it is referred to as (manual transmission or manual transmission). Cars of this type of driver transmission are jokingly called “cars on a stick.” Despite the historical use of mechanics in transmissions, such cars are preferred by those who like to drive fast. What is the basis for competition with other types of transmission?
The discoverer of the manual transmission is considered to be the German engineer Karl Benz. In 1887, after an unsuccessful trip with his family over a distance of 80 km, due to the imperfections of the automobile design at that time, Karl was encouraged to improve the car by installing an auxiliary transmission. Initially, the gearbox consisted of 2 belt pulleys of different diameters. A similar type of torque enhancement is used on walk-behind tractors.
Pros of a manual transmission
- Less fuel consumption compared to automatic.
- The car is more “spirited”, that is, it accelerates faster. This is a plus when overtaking on the highway; you can always engage the desired gear in advance. Driving this way is actually considered safer. Of course, with the condition that the driver is an experienced driver.
- More reliable, easy to maintain, cheaper to repair. A car with a manual transmission is cheaper in price, since the gearbox costs less than other types of gearboxes.
- Large reserve of stamina, in other words, the resource is higher.
How much oil does a Lanos box need to change?
The amount of lubricant for the Lanos gearbox depends on the type of gearbox (manual or automatic). The volume of transmission fluid in the Lanos gearbox according to the type of transmission:
- the volume of fluid in the automatic transmission installed on Daewoo Lanos and ZAZ Lanos cars is 7 liters (cars with engines of 1.4 - 1.6 liters);
- the volume of fluid in the manual transmission installed on Lanos cars is 1.8 liters (cars with engines of 1.4 - 1.6 liters);
In this case, it is often impossible to drain all the oil from the box without disassembling the unit. This means that in reality the replacement volume may differ. It is usually possible to fill about 1.7 liters of oil into a manual transmission, while the amount for replacement in an automatic transmission will depend on the replacement method itself.
We also recommend reading the article on how to perform a partial oil change in an automatic transmission. From this article you will learn when this method is preferable, how a partial oil change in an automatic transmission differs from a complete one, and also what needs to be taken into account when partially changing the oil in an automatic transmission.
When partially changing the oil in an automatic transmission without removing the pan, 3-4 liters may be required, while a spill replacement will require about 7-8 liters or more. It is also important to prevent oil overflow, especially in the case of automatic transmissions. To do this, you need to know how to correctly set the oil level in the automatic transmission.
Automatic transmission
In automotive terminology it is referred to as automatic transmission. The popularity of automatic transmissions is constantly growing, mainly preferred by residents of large cities. The explanation for this trend is the absence of the need to constantly squeeze and “fire” the clutch in traffic jams and congestion - the “main disease” of large cities.
The initial use of the automatic transmission was mentioned in 1928, a fact that is little known. The championship of know-how belongs to the German professor Fettinger. The torque converter, patented in 1903, became the prototype of the automatic mechanism. For the first time used on buses of Swedish automakers. The first passenger car to use an automatic transmission was the famous Buick of the General Motors Corporation in 1947.
Pros of an automatic transmission
- Ease of use. The machine will not stall or roll back - a truth that does not require proof.
- The machine does not allow the engine to overload. All work is controlled by the ECU - electronic control without human intervention.
- Depending on the design features of individual models, “7”, “8” and “9” gear ranges are used. Accordingly, the more switching ranges the box uses, the better.
We will try to explain why this is so.
With a large number of bands available, the electronics are able to better select gears. This contributes to better acceleration dynamics of the car and increased fuel efficiency.
Disadvantages of an automatic transmission
- Compared to “mechanics”, fuel consumption is increased by 10-15%.
- Again, when compared with a manual transmission, the dynamics and speed indicators of the “automatic” are inferior to the latter.
- There are temporary delays when changing gears; this behavior is typical on automatic machines with a long service life.
- Great pricing policy for buying a machine and servicing.
- Does not have high reliability. Problems appear after 150 thousand kilometers. In defense, it is worth noting that the latest models of modern machines do not have this drawback; they are more durable than older models. Progress does not stand still.
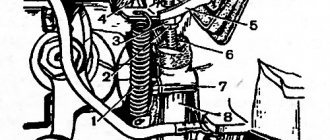
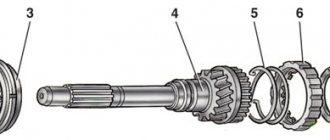
Disassembly and assembly of the gearbox and troubleshooting of its parts Deo Lanos
- Repair manuals
- Repair manual for Daewoo Lanos 1997+.
- Disassembling and assembling the gearbox and troubleshooting its parts
You will need: keys “10”, “13”, “19”, “24”, a set of hex keys, flat-blade screwdrivers (two), round nose pliers, snap ring puller, bearing puller, hammer, bit, chisel.
1. Remove the gearbox from the vehicle (see “Removing and installing the gearbox” ). Clean it from dirt and wash the outside.
| 2. Remove the spring clip... | 3. ...and remove the gear shift drive hinge shaft. Disconnect the hinge forks. |
| 4. Using a chisel, bend the edges of the locking plate of the bolts securing the rear support bracket of the power unit to the gearbox housing. | 5. Remove three bolts... |
| 6. ...remove the locking plate... | 7. ...and the rear support bracket of the power unit assembled with the gear shift drive hinges. |
| 8. Remove the clutch release bearing (see “Replacing the fork and clutch release bearing” ), the clutch release bearing guide sleeve (see “Replacing gearbox seals” ) and the rubber O-ring installed under the sleeve. | 9. Unscrew the vehicle speed sensor from the speedometer drive. |
| 10. Remove the fastening bolt and remove the speedometer drive. | 11. Turn off the reverse light switch. |
| 12. Remove the protective cap... | 13. ...and remove the oil filler plug. |
| 14. Remove the four bolts securing the gear shift mechanism housing... | 15. ...and remove the mechanism, as well as the gasket installed under it. |
| 16. Remove the eleven bolts securing the rear transmission cover... | 17. ...then remove the cover... |
| 18. ...and a gasket installed under the cover. | 19. Through the hole for installing the gear shift mechanism, engage 2nd gear by moving the fork for 1st and 2nd gears with a screwdriver. |
| 20. Remove the intermediate housing mounting bolts... | 21. ...and remove the crankcase complete with shafts. |
| 22. Please note that the reverse idler gear spacer is installed in the housing. | 23. Remove the two bolts securing the 5th gear shift fork bracket... |
| NOTE Apply anaerobic threadlocker to the threaded portion of the bolts before assembly. |
| 24. ...and remove the bracket and fork assembly. | 25. Remove the crackers from the fork. |
| NOTE Replace worn crackers with new ones during assembly. |
| 26. Using a special puller, remove the retaining ring of the 5th gear synchronizer. | 27. Install a three-legged universal puller on the 5th gear synchronizer clutch... |
| 28. ...and press the coupling assembly with the hub off the shaft. | 29. Remove the synchronizer blocking ring... |
| 30. ...5th gear driven gear... | 31. ...needle bearing... |
| 32. ...and the locking ring. | 33. Remove the two thrust half-rings. |
| 34. Remove the retaining ring of the 5th gear drive gear... | 35. ...and use two screwdrivers to compress the gear, using wooden blocks as spacers. |
| 36. Remove the two bolts securing the pawl bracket... | 37. ...install the fork rods sequentially in positions II, V and III gears and remove the bracket assembly with the pawl. |
| 38. Using a hammer using a chisel with a blunt tip, knock out the plugs of the gear shift fork rod clamps. Please note that the latch marked with an arrow... | 39. ...different from the other two. After pressing out the plugs, remove the springs and rod clamps from the intermediate housing sockets. |
| 40. Remove the two screws securing the fixing pin... | 41. ...remove the bracket... |
| 42. ...and remove the pin from the bracket. | 43. Remove the intermediate housing gasket. |
| 44. Leaning the free end of the rod on a wooden block, knock out the pin securing the reverse gear fork with a punch... | 45. ...and remove the stem and fork. |
| 46. From the holes in the intermediate housing, remove the locking pin for simultaneous engagement of two gears. | 47. Knock out the pin securing the shift fork for 3rd and 4th gears... |
48. ... remove the stem and remove the fork.
| NOTE: When removing the fork, the gear clutches must be in the neutral position. |
| 49. Remove the driver with the 5th gear shift rod. | 50. Remove the driver from the rod. |
| 51. Using a puller for internal retaining rings (operating in compression), compress the spring retaining ring of the secondary shaft and fix it in this position. | 52. Using the second puller for the external snap rings (working to unclamp), unclench the lock ring of the input shaft... |
| 53. ...and remove the input shaft shank from the intermediate housing. | 54. Remove the reverse idler gear. |
| 55. Remove the secondary shaft shank from the crankcase and remove the shaft assembly, as well as the rod and fork for shifting 1st and 2nd gears. | 56. Using a puller, remove the retaining ring of the input shaft bearing from the groove in the intermediate housing. |
| 57. Remove the magnet from the crankcase and clean it of wear debris. | 58. Press the reverse idler gear axle out of the idler housing by holding the axle in a vice with soft metal jaws and sliding the housing off the axle by lightly tapping the housing with a hammer through a wooden spacer. |
| 59. Remove ten bolts securing the lower gearbox cover... | 60. ...and remove the cover along with the gasket. |
| 61. Mark with paint the position of the differential bearing adjusting nut relative to the gearbox housing. | 62. Remove the bolt securing the adjusting nut... |
| 63. ...remove the clamp... | 64. ...and, counting the number of revolutions, unscrew the adjusting nut with a screwdriver, as shown in the photo. |
65. Remove the O-ring from the nut.
| NOTE Replace a heavily compressed, hardened or torn ring. |
| 66. Press the axle shaft seal out of the nut. | 67. If it is necessary to replace the differential bearings, turn over the adjusting nut, place a couple of wooden blocks and press the outer race of the differential bearing out of the nut. |
| 68. Remove the spacer ring from the adjusting nut. | 69. Unscrew the five bolts securing the right differential bearing cover, remove the cover, remove the sealing ring from it, then press the oil seal and, if necessary, the outer ring of the bearing out of the cover in the same way as they were pressed out of the adjusting nut. |
70. Remove the differential assembly from the gearbox housing.
71. Before inspection and troubleshooting, thoroughly wash and dry the gearbox parts.
72. Inspect the transmission housing, intermediate housing and rear cover. There should be no chips on them. There should be no nicks, scratches, dents, etc. on the mating surfaces. Remove minor damage with fine-grained sandpaper. In case of severe damage, replace the defective parts.
73. Check the bearing seats. These surfaces must show no signs of wear or damage. If there is damage, replace the crankcases.
74. Check the condition of the gear shift rods. If they are bent or have burrs, burrs, or holes for the clamps, replace the rods.
75. Check the condition of the gear shift forks. If the forks are bent or the tabs are worn, replace these parts.
76. If oil leaks through the seals are detected during operation and their working edges are worn, the seals must be replaced.
77. Check the condition of the bearings. If cavities are found on the running tracks and rolling elements, traces of indentation of the rolling bodies on the running tracks, or if the cages are damaged, the bearings must be replaced.
78. Replace damaged or severely compressed gaskets.
79. Clean the magnet from particles of wear parts. If the magnet appears cracked or its magnetic properties are weakened, replace the magnet.
Assemble the gearbox in the reverse order of disassembly, taking into account the following.
1. Before assembly, generously lubricate all rubbing parts with transmission oil.
| 2. Assemble all threaded connections... | 3. ...and install the seals using an anaerobic thread locker. |
4. Before installing the secondary shaft into the intermediate housing, compress the retaining ring with round pliers and secure it in a compressed state with wire. Remove the wire after installing the shaft into the crankcase, making sure that the ring fits into the grooves in the crankcase without distortion.
5. When installing the differential, if its bearings have not been changed, screw the bearing adjusting nut the same number of turns as when unscrewing, until the marks made during disassembly align.
6. If you replaced the differential bearings, after installing it, adjust the preload of the bearings according to the value of the moment of resistance to rotation of the bearings by tightening or unscrewing the adjusting nut. For new bearings, the resistance moment should be 2 Nm (0.2 kgf m) when the main drive driven gear rotates at a speed of 1 rps. If the bearings have not been changed, then the moment of resistance should be 1 N m (0.1 kgf m).
7. Before installing the lower transmission cover, lubricate its gasket with grease.
↓ Comments ↓
1. Car structure
1.0 Car structure 1.1 General information about the car 1.2 Passport data 1.3 Car keys 1.4. Controls 1.5 Heating (air conditioning) and interior ventilation 1.6. Doors 1.7 Seat belts 1.8. Seats 1.9 Rear view mirrors
2. Recommendations for use
2.0 Recommendations for use 2.1. Safety rules and recommendations 2.2. What you need to have in your car 2.3 Running in the car 2.4 Operating the car during the warranty period 2.5 Preparing the car for departure 2.6 Filling the car with gasoline 2.7 Using a jack 2.8 Towing the car 2.9 Adjusting the ignition timing depending on the quality of gasoline
3. Problems along the way
3.0 Malfunctions along the way 3.1. The engine does not start 3.2 Malfunctions of the fuel injection system 3.3 Idle speed has disappeared 3.6. The car moves jerkily 3.7 The car accelerates poorly 3.8 The engine stalled while driving 3.9. Oil pressure dropped 3.10. Engine overheating 3.11. The battery does not recharge 3.14. Extraneous knocking noises appeared 3.15. Problems with brakes 3.16. Wheel puncture
4. Maintenance
4.0 Maintenance 4.1. General provisions 4.2. Daily Maintenance (EO) 4.3. First maintenance (TO-1) 4.4. Second maintenance (TO-2)
5. Engine
5.0 Engine 5.1. Design features 5.2 Checking compression in the cylinders 5.3 Removing and installing engine mudguards 5.4 Replacing the power unit suspension mounts 5.5 Installing the piston of the first cylinder to the TDC position of the compression stroke 5.6 Removing, installing and troubleshooting the flywheel 5.7. Replacement of engine seal parts 5.8. Cylinder head 5.9 Removing and installing the engine 5.10. Engine repair 5.11. Lubrication system 5.12. Cooling system 5.13. Exhaust gas system 5.14. Engine power system 5.15. Fuel vapor recovery system 5.16. Exhaust gas recirculation system
6. Transmission
6.0 Transmission 6.1. Clutch 6.2. Gearbox 6.3. Front wheel drives
7. Chassis
7.0 Chassis 7.1. Front suspension 7.2. Rear suspension
8. Steering
8.0 Steering 8.1. Design features 8.2. Steering column 8.3. Steering rods 8.4. Steering gear
9. Brake system
9.0 Brake system 9.1 Design features 9.2 Possible malfunctions of the brake system, their causes and solutions 9.3 Bleeding the brake system hydraulic drive 9.4 Checking and adjusting the position of the brake pedal 9.5. Main brake cylinder 9.6. Vacuum brake booster 9.7. Replacing hoses and tubes of the hydraulic brake drive 9.8 Removing and installing the brake pedal 9.9. Brake mechanisms of the front wheels 9.10. Brake mechanisms of the rear wheels 9.11. Parking brake
10. Electrical equipment
10.0 Electrical equipment 10.1 Design features 10.2. Mounting blocks 10.3. Battery 10.4. Generator 10.5. Starter 10.6. Ignition switch (lock) 10.7. Engine management system 10.8. Lighting, light and sound alarms 10.9 Replacing the windshield wiper motor 10.15. Instrument cluster 10.16. Instrument panel switches 10.18. Car audio system 10.19. Replacing sensors and switches
11. Body
11.0 Body 11.1 Design features 11.2 Possible body malfunctions, their causes and solutions 11.3. Removing, disassembling and installing bumpers 11.4 Removing and installing radiator trim 11.5 Removing and installing wheel mudguards and wheel arch liners 11.6 Removing and installing the front wing 11.7 Removing and installing the air intake duct grille 11.8. Hood 11.9. Doors 11.10. Trunk lid 11.11. Fuel tank filler pipe hatch cover 11.12. Seats 11.14. Passive safety system (SRS) 11.15. Rear view mirrors 11.16. Instrument panel 11.17. Heater and air conditioner 11.18. Interior fittings 11.21. Windshield wiper 11.24. Body care
12. Wheels and tires
12.0 Wheels and tires 12.1 Technical specifications 12.2 Wheel rim markings 12.3 Tire markings 12.4 Wheel replacement 12.5 Tire break-in 12.6 Tire storage 12.7 Wheel balancing 12.8 Snow chains 12.9 Spare wheel
13. Purchase of spare parts
13.0 Purchasing spare parts 13.1 Engine oil 13.2 Greases 13.3 Coolants 13.4 Brake fluid 13.5 Fine fuel filter 13.6 Air filter 13.7 Engine lubrication system oil filter 13.8 Spark plugs
14. A trip to the service station
14.0 A trip to the service station
15. Winter operation of the car
15.0 Winter operation of a car 15.1 How to prepare a car for winter 15.2 Recommendations for starting the engine in severe frost 15.3 What is useful to buy for winter 15.4 Useful winter tips
16. Preparation for technical inspection
16.0 Preparation for technical inspection 16.1 Recommendations 16.2 List of malfunctions and conditions under which the operation of vehicles is prohibited 16.3 Changes to state standards regulating the maximum permissible content of harmful substances in the exhaust gases of vehicles
17. Tips for a novice auto mechanic
17.0 Tips for a novice auto mechanic 17.1. Safety precautions during repair work 17.2. Tools 17.3 Before you start 17.4. Restoration of threaded connections
18. Applications
18.0 Appendices 18.1 Appendix 1. Tightening torques of threaded connections, N m 18.2 Appendix 2. Lamps used on a car 18.3 Appendix 3. Spark plugs used on a car 18.4 Appendix 4. Recommended fuels and lubricants and operating fluids
19. Electrical diagrams
19.0 Electrical diagrams 19.1 Diagram 1. Connections of the generator set and engine starting system 19.2 Diagram 2a. Engine control system (start) 19.3 Scheme 2b. Engine control system (continued) 19.4 Scheme 2c. Engine control system (continued) 19.5 Scheme 2d. Engine control system (continued) 19.6 Scheme 2d. Engine control system (continued) 19.7 Diagram 2e. Engine control system (end) 19.8 Scheme 3a. Connections of lighting devices (beginning) 19.9 Scheme 3b. Lighting connections (continued)
Robotic gearbox
We can say that this type uses mechanics together with an automatic, but has some nuances. The robot box uses modes like a traditional automatic machine, but for example; If, when stopping at a traffic light, you do not put the lever in the neutral “N” position, the car will stand as if the clutch of a manual transmission is depressed. As with the first type of box, this is fraught with rapid wear of the clutch. To work in this type you need to adapt, otherwise the clutch often fails.
Advantages of a robotic manual transmission
- It has better efficiency compared to conventional mechanics, sometimes even more.
- Convenience. Electronics monitor engine speed, so driver errors are excluded.
- The pricing policy is in the middle range between automatic and manual.
Minuses
- A short stop requires moving the lever to the neutral position “N”.
- When changing gears, noticeable shocks occur, even on a new gearbox. Some kind of adaptation is required in use, you need to adapt very well to this box. To avoid a jolt, you must feel the moment when the car begins to change gear and release the gas. Manufacturers are actively fighting this phenomenon, and one might say, not unsuccessfully. For example, robotic gearboxes have been created; Audi manufacturers call them S-tronic, Volkswagen calls them dsg. The development has two clutches that eliminate pauses in gear shifting, without loss of torque.
The 6-speed dual-clutch DSG transmission is widely popular among drivers. You won't believe it, but this gearbox can be trained to suit your driving style. To do this, contact a good car service center where they will try to set up this box.
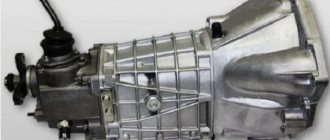
Chevrolet Lanos gearbox: repair and maintenance
The Chevrolet Lanos gearbox is one of the most important components of the car and is directly involved in the movement of the car. If the box breaks, you will not be able to continue driving, so you should always repair and service it in a timely manner, and in very unfortunate cases, change it. Today we will talk about the box of the Chevrolet Lanos.