The comparative cheapness, coupled with the spaciousness of this car, classified as a commercial vehicle, made it a real “workhorse”. It is in demand and is used throughout the CIS. Another sign of a classic work machine is the ease of finding spare parts. When you need to repair a Gazelle gearbox, and the gearbox is the worst of the components of this Russian light-duty car, you can safely go through everything, from bearings to synchronizers. These parts are available for sale at any auto store.
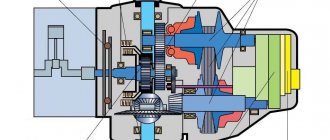
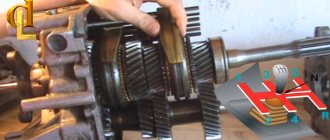
Longitudinal section of the gearbox of the GAZelle-3302 car
1 – 3302-1701022 input shaft; 2 – bearing cover 3302-1701040; 3 – input shaft cuff, catalog number 31029-1701043; 4 – primary bearing according to catalog B6-50307AKSh1; 5 – retaining ring; 6 – 20-1701182 secondary roller bearing; 7 – breather; 8 – blocking ring 24-1701036; 9 – GAZ 31029-1701116 clutch for engaging III–IV gears; 10 – synchronizer block 31029-1701171; 11 – 31029-1701119 clutch hub for 3rd–4th gears; 12 – third gear gear 31029-1701128; 13 – 3КК42х47х30Э needle bearing; 14 – retaining ring; 15 – half ring; 16 – 2nd gear gear 31029-1701122; 17 – needle bearing; 18 – switch rod; 19 – 3302-1701106 sixth 1st gear; 20 – secondary 33027-1701105; 21 – 31029-1701140 reverse gear; 22 – 5th gear and reverse fork 3302-1702092; 23 –01174-000 clutch hub for 5th gear and reverse; 24 – retaining ring; 25 – bolt securing the retainer plate; 26 – V gear gear catalog number 31029-1701152-10; 27 – thrust washer; 28 – V6-50706USH1 secondary bearing; 29 – protective seal 3302-5107090; 30 – GAZ 3302-1702140 lower shift lever; 31 – retaining ring; 32 – speedometer sensor drive 3302-3802033 GAZelle; 33 – 33021702240 shift lever housing; 34 – rear housing 31029-1701015-01; 35 – 1701209 / 02073 steel babbit bushing; 36 – rear crankcase extension cuffs 49073380; 37 – V6-50305А1К2Ш1 rear intermediate bearing; 38 – intermediate 3302-1701046; 39, 44, 45 – gears V, II, III of the intermediate shaft gearbox; 40 – bolt; 41 – crankcase gasket; 42 – drain plug; 43 – front crankcase 2705-1701014; 46 – filler plug; 47 – 66-1802090 sixth drive of the intermediate shaft; 48 – adjusting gasket; 49 – front intermediate bearing 42307E; 50 – GAZ 31029-1701096 reverse intermediate gear axis; 51 – reverse intermediate gear E202-1701082; 52 – roller bearing of the gear; 53 – bolt securing the bushing of the reverse gear axis.
Assembly and disassembly of the unit
How to repair a gazelle
gearbox The gearbox for a GAZ 3309 truck weighs about 75 kg without oil. If you have to disassemble this unit, you need to remove it from the car, after draining all the oil from the crankcases. It will take at least 2 people to remove the entire mechanism. It is recommended to use a special set of tools and a stand for further manipulations.
How to disassemble the gearbox yourself is described in detail in the user manual. If you follow the instructions, you can disassemble and reassemble the entire assembly within a few hours without much difficulty. Here is a brief description of the disassembly process:
- Disassemble the floor in the cabin.
- Remove the gearbox lever.
- Unscrew the cardan shaft.
- Disconnect the gearbox from the handbrake linkage.
- Unscrew the speedometer cable.
- Remove the screw fastenings to the main engine flywheel housing.
- Now you can remove the assembly from the seat.
Note: the oil is drained before disassembling the box. If you do not have a stand and a set of keys for disassembling such mechanisms, it is better to contact a service station for service. Incorrect assembly of the gearbox can lead to loss of control while driving. Another consequence of incorrect assembly of the gearbox is that the vehicle will stand still because it is impossible to change gears.
Transmission
| Designation | Name |
| 3302-1700010 or | Transmission |
| 3302-1700010-01 | Gearbox (with power take-off hatch) |
| 31029-1701010 | Rear housing |
| 31029-1701014 or | Front housing |
| 3302-1701014 | Front crankcase (with hatch for power take-off) |
| 3302-1701018 | Pad |
| 3302-1701020 | Lid |
| 31029-1701021 | Pad |
| 3302-1701022 | Primary shaft |
| 3302-1701025 | Primary shaft |
| 3105-1701029 | Centering pin |
| 20-1701034 | Retaining ring |
| 3105-1701034 | Retaining ring for 5th gear and reverse hub |
| 24-1701036 | Retaining ring |
| 31029-1701037 | Washer |
| 31029-1701040 | Lid |
| 31029-1701042 | Pad |
| 31029-1701043 | Cuff |
| 3302-1701046 | Intermediate shaft |
| 31029-1701075 | Pad |
| 31029-1701082 | Reverse intermediate gear |
| 31029-1701088 | Axis |
| 31029-1701090 | Axis |
| 31029-1701096 | Sleeve |
| 31029-1701098 | Magnetic plug |
| 3302-1701100 | Secondary shaft |
| 31029-1701105 | Secondary shaft |
| 3302-1701106 | 1st gear |
| 31029-1701115 | Spring washer for 3rd and 4th gear synchronizer hub |
| 31029-1701116 | Synchronizer clutch with hub 3, 4 gears |
| 31029-1701117 | Retaining ring for 3rd and 4th gear hubs |
| 31029-1701119 | 3rd and 4th gear synchronizer clutch hub |
| 31029-1701122 | Gear 2nd gear |
| 31029-1701128 | Gear 3rd gear |
| 31029-1701140 | Reverse gear |
| 2101-1701146 | Washer |
| 24-1701146 | 1st gear rear thrust washer |
| 31029-1701152-10 | Gear 5 of the secondary shaft transmission |
| 3105-1701159 | Retaining ring for 1st and 2nd gear hubs |
| 3105-1701170 | Synchronizer spring 1, 2, 3, 4 gears |
| 31029-1701171 | Synchronizer block |
| 31029-1701174 | Synchronizer clutch with hub |
| 31029-1701175 | Synchronizer clutch |
| 31029-1701177 | Synchronizer clutch hub for 1st, 2nd, 5th gears and reverse |
| 31029-1701179 | Ring |
| 20-1701182 | Video clip |
| 31029-1701183 | Retaining ring |
| 31029-1701184 | Secondary shaft thrust half ring |
| 31029-1701188 | Spacer sleeve |
| 24-1701192-10 | Retaining ring |
| 24-1701210-07 | Cuff |
| 31029-1702024 | Gear shift fork |
| 31029-1702040 | 1st and 2nd gear shift rod |
| 31029-1702041 | 3rd and 4th gear shift rod |
| 31029-1702042 | 5th gear and reverse shift rod |
| 31029-1702054 | Shift rod head for 1st, 2nd, 5th gears and reverse |
| 31029-1702075 | Finger |
| 31029-1702080 | Plunger |
| 31029-1702084 | Plate |
| 31029-1702085 | Pad |
| 31029-1702092 | 5th gear and reverse shift fork |
| 52-1702097 | Reverse fuse |
| 24-1702100 | 1st and 2nd gear fuse spring |
| 24-1702122 | Spring |
| 24-1702124 | Saddle |
| 24-1702126 | Cap |
| 24-1702128 | Top cover seal |
| 3302-1702140 | Gear shift lever - lower part |
| 3302-1702142 | Gear shift lever - upper part |
| 24-1702144-01 | Thrust cone |
| 24-1702146 | Spacer sleeve |
| 24-1702148 | Pillow |
| 24-1702150 | Locking sleeve |
| 31029-1702159 | Gear shift knob |
| 3302-1702240 | Shift Lever Housing |
| 3302-1702244 | Shift Lever Housing |
| 31029-1702246 | Pad |
| 31029-1702310 | Locking sleeve |
| 31029-1702314 | Spring |
| 3105-1729062 | Pin 4x30 |
Gazelle electrical circuits
How to repair a Gazelle gearbox. Gazelle box diagram
The Gazelle and Sobol cars are equipped with a mechanical, five-speed gearbox with a three-shaft design and a fifth overdrive gear. The gearbox on Gazelle GAZ-3302 and GAZ-2705, and Sable cars is the same. Most parts are unified with the gearbox installed on GAZ-3110 Volga vehicles. The differences between the gearboxes of the Gazelle and Sobol cars are large gear ratios in all gears except fourth. As well as a taller shift lever housing and an extended lower end of the lever.
Gearbox disassembly
How to change the oil in the rear axle gearbox of a gazelle yourself
1. Remove dirt and wash the outside of the gearbox. 2. Unscrew the oil filler and oil drain plugs and drain the oil from the gearbox, if this has not been done previously.
3. Remove the clutch release bearing and foam ring 1 from the guide sleeve.
4. Unscrew the bolts and remove the rear engine mount with bracket, if this was not done when removing the gearbox from the vehicle.
5. Unscrew the reverse light switch with the gasket.
6. Unscrew bolt 1 securing the speedometer drive stopper, remove stopper 2 and speedometer drive 3.
7. Unscrew the breather.
8. Unscrew the four bolts 1 and remove the gear shift lever housing 2 with the gasket.
9. Unscrew the three bolts 1 and remove the input shaft bearing cover with the guide sleeve 2 of the clutch release bearing with the gasket.
10. Unscrew the bolt securing the reverse idler gear axle on the front gearbox housing.
11. Remove the retaining ring of the input shaft bearing if it is necessary to replace it.
Be sure to remove the large retaining ring, otherwise you will not disconnect the box.
12. Remove ten bolts securing the front gearbox housing to the rear housing.
13. Separate the front and rear gearbox housings.
To do this, you can clamp the extension in a vice with soft jaws and hit the bosses with the holes for attaching the front housing to the clutch housing with a copper hammer.
At the same time, try not to tear the gasket.
14. Remove the adjusting rings from the seat under the front bearing of the intermediate shaft on the front gearbox housing, if they were installed.
15. Unscrew the two bolts 1 of the fastening and remove the plate 2 of the rod clamps with the gasket.
16. Remove the three retainer springs.
17. Set the 5th gear and reverse shift rod to the reverse position.
18. Unscrew the locking bolts securing the shift forks to the rods.
19. Mark the gear shift forks (their belonging to the rods and orientation). Knock out the rods with a hammer made of soft material and remove them.
The first to remove the rod 3 for engaging the 5th gear and reverse gear, the second is the rod 1 for engaging the 1st and 2nd gears, and the last is the rod 2 for engaging the 3rd and 4th gears.
When removing the 3rd and 4th gear selector rod, make sure that
so as not to lose the locking pin installed in the rod hole.
Remove the 1st and 2nd and 3rd and 4th gear shift forks from the synchronizer sliding clutches.
20. Remove the retainer balls by placing your hand and pushing them with a screwdriver through the holes inside the crankcase.
21. Remove the two locking plungers using a special tool or a hooked wire.
22. If it is necessary to disassemble the 5th gear and reverse gear rod, you must first unscrew the locking bolt 1, and then remove the head 2, locking sleeve 3 and spring 4 from the rod.
23. Unscrew the bolt securing the reverse intermediate gear axis on the rear gearbox housing.
24. Unclench the retaining ring of the rear bearing of the secondary shaft with pliers and, hitting the end with a drift of soft material, press out the secondary shaft.
25. At the same time remove the secondary shaft assembled with the primary shaft, the intermediate shaft and the axis of the reverse intermediate gear from the rear gearbox housing.
26. Check that the 3rd and 4th gear synchronizer is set to neutral.
27
Separate the primary and secondary shafts, paying attention to the fact that the bulk rollers (14 pcs.) of the front bearing of the secondary shaft may fall out of the input shaft housing
28. If during operation it is discovered that oil is leaking from the gearbox through the seals, the defective seals must be pressed out.
Design and principle of operation
As with any car, the Gazelle’s gearbox performs the most important transmission functions. It converts and transmits torque to the wheels from the engine. Therefore, a lot depends on the quality of operation of this unit. For example, the comfort and safety of people, because any malfunction of the gearbox carries the risk of accidents.
The small Russian car is equipped with a manual 5-speed gearbox. Despite the manufacturer's assurances that it is durable and unpretentious, most owners claim the opposite. The reliability of the unit is poor primarily due to constant excessive loads, since commercial vehicles can be operated for 24 hours straight.
Structurally, the Gazelle gearbox is not complicated: in most parts it is unified with the GAZ-3110 Volga gearbox. All Gazelle modification boxes are identical, except for the Gazelle-Business and Next manual transmissions. A 5-speed three-shaft gearbox is also used here, but it has different gear ratios. Some versions may also have a longer lower end of the lever and a taller lever housing.
The main elements of the checkpoint are:
- double crankcase;
- gears;
- main shafts and intermediate;
- synchronizers, balls, springs;
- gear shift mechanism.
The crankcase is made of aluminum alloy for lightweight purposes. It consists of two parts: front and rear with extension. They are securely connected with 10 bolts through a 0.33 mm paronite gasket. To ensure alignment of the shaft ends and rod holes of the switching mechanisms, they are centered with special bushings pressed into the crankcase.
There are quite a lot of gears in the box. The input shaft has its own gear, and so do the gearbox transmissions, including the rear one. Structurally complex helical sprockets, rotating on needle bearings, are protected by plastic separators. The reverse idler gear rotates on roller bearings.
The shafts are equipped with other unique parts. For example, the secondary shaft is limited from axial movements by retaining rings and special thrust half-rings. A collar is also provided. The input shaft is equipped with a drive gear for the speedometer drive. All shafts, including the intermediate one, have gears, and at the ends there are roller or ball bearings and retaining rings/half rings. A special place is occupied by bushings, fixing pins, spring washers and 0.2 mm shims. The drive and driven shafts are connected at their ends to the engine crankshaft and crankcase. The intermediate shaft is located inside the box body.
Inertial synchronizers are equipped with toothed rims that mesh with gears due to small splines. Since 2003, the 1st and 2nd gear synchronizer has been replaced on Gazelles 3302 and 2705. A double-acting double-cone version is now used. This was done in order to improve the clarity of gear shifting. This synchronizer has increased braking torque.
The gear shift mechanism, in addition to the lever, is equipped with springs, a seat, seals, a thrust cone, and bushings. There are a lot of washers, plugs, and dowel pins. Speeds are switched using forks - there is a separate one for fifth gear and reverse gear. The locking device or fuse consists of two plungers and a locking pin. To prevent accidental engagement of reverse gear, a separate bushing with a spring is provided.
Gearbox assembly
The manual transmission is assembled in the reverse order. Carefully, slowly, concentrated. If you make the slightest mistake you will have to do everything again.
Securing the rear of the transmission housing. It is better to attach this component with self-tapping screws to a wooden block. In this position it is most convenient to insert the shafts. The back will be fixed. Next, drill a hole with a diameter of 18 mm on the second wooden block. The secondary shaft is inserted into this niche and the bearing is pressed into place.
Gazelle NEXT gearbox repair buy | installation | replacement | GAZELLE NEXT gearbox of all modifications, clutch replacement, Moscow
Artem Vadim
Your gearbox will be overhauled within 2 hours, in your presence. The cost of the bulkhead is 4000 rubles. + spare parts due to wear. Removal and installation on a car – 2000 rubles.
ATTENTION: for your convenience, there is a service - express replacement of the NEXT Gazelle manual transmission. When there is no time to wait for your gearbox to be overhauled, or repair is impractical - the cost of spare parts exceeds the cost of the unit itself, we will offer to replace it with a similar one restored by our mechanics and fully prepared for operation
Prices for replacing NEKST gearboxes are fixed and are indicated for the entire housing, shafts and gear unit. In the event of a defect in one of the parts of the housing, drive shaft or gear unit, the cost of this part is added to the cost of exchange - 4,000 rubles. The work takes 1.5 - 2.5 hours.
Reasons for the bulkhead
The reason for disassembling the gearbox is increased noise. In the garage, when the clutch was depressed (when nothing was spinning in the gearbox), it became almost twice as quiet. There was also an extraneous grinding noise when braking with the engine; it had been there since the purchase; in general, it didn’t bother me, but eliminating it was one of the goals of the gearbox overhaul. Another goal is to increase acceleration dynamics. And this is no joke: 20-30 percent of the flywheel torque is lost in the transmission - this is both the gearbox and the differential with the main pair. So I expect to win one tenth, or even a few, by fixing the box. There are also complaints about the gearbox - in cold winter the first gear did not stick in while driving.
I didn’t take any spare parts in advance because I didn’t know the contents of the box. For disassembly, you will definitely need expanding bent pliers. Retaining rings are one of the most tedious parts of a transmission. I can’t help but mention the video from YouTube by Vasily Kharchishin, who examines Gas gearboxes in some detail.
Gearbox repair for GAZ 3302, GAZ 2705
The gearbox is a component of the transmission . It changes the gear ratio and torque transmitted from the engine to the vehicle's drive wheels. The gearbox has a very impressive service life and is capable of functioning flawlessly throughout the entire life of the vehicle. But this requires timely and high-quality checkpoint maintenance.
Today we will disassemble the gearbox of a Gazelle car. Let's add oil. To do this you will need a 12mm hexagon. If chips are found on the plug, it means there is wear in the gearbox.
Dismantling the box
The gearbox is one of those parts of the car whose repair begins with complete removal. For newcomers to the automotive business, the task may seem titanically difficult, but this is not entirely true. It is enough to thoroughly study the diagram of the box itself (in this case, the gazelle gearbox, consisting of 5 steps) and its connections with the rest of the vehicle in order to understand how to remove it. So, let's begin.
Stages of removing the gearbox from a Gazelle:
- First of all, you need to drain the oil from the crankcase.
- Next comes the dismantling of the driveshaft. There is one nuance here: before starting removal, you MUST mark with a file or other tool the locations and directions of the location of the hinge and the box extension. And in general all commutations (rear axle and flanges). Then, we proceed to removing the intermediate support fasteners. You can purchase the set of tools required for this yourself, or they can be included in the standard gearbox repair kit. Next you need to separate the shaft from the main gear flange. Left a little. You need to remove the shank of the box. To do this, you need to slightly pull it back and carefully pull it out. The resulting hole needs to be plugged with some rags or unnecessary old clothes.
- We take out the gear shift lever. Everything is simple here - remove the cover and the top of the lever from the cab, unlock the bushing and remove the rubber cushion along with the second bushing. All that remains is to remove the seal with the cover and, turning out the cap, remove the lever itself
- It remains to disconnect the remaining elements from the gearbox - the speedometer and the light switch (reverse). Now you can remove the box itself. To do this, you need to unscrew the receiving pipes and the bracket to the box using the appropriate fasteners. Then we separate our gearbox from the clutch housing by removing the necessary fasteners. But now we will need a medium block of wood, or a small log - this is needed to protect the block head. Now, having removed the transverse fastening, we remove the box itself. Given the significant weight, it is advisable to prepare in advance.
Problems when paying with bank cards
Sometimes difficulties may arise when paying with Visa/MasterCard bank cards. The most common of them:
- There is a restriction on the card for paying for online purchases
- A plastic card is not intended for making payments online.
- The plastic card is not activated for making payments online.
- There are not enough funds on the plastic card.
In order to solve these problems, you need to call or write to the technical support of the bank where you are served. Bank specialists will help you resolve them and make payments.
That's basically it. The entire process of paying for a book in PDF format on car repair on our website takes 1-2 minutes.
If you still have any questions, you can ask them using the feedback form, or write us an email at [email protected]
Disassembling the gearbox (“Gazelle Business and Next”)
This action is also performed in several stages
When performing work, remember that the gearbox weighs more than thirty kilograms, which requires taking additional precautions
- The bearing cover is removed and the sealing collar is changed.
- The rear axle bushing fasteners are dismantled.
- The retaining ring on the input shaft bearing is removed, as well as the breather.
- Using a hammer and a soft metal mandrel, the crankcases are separated.
- By turning the input shaft, reverse gear is engaged.
- The lever housings, the plate with the gasket, and the fastening of the front travel forks are dismantled.
- The springs and retainer balls are removed.
- The rods are removed in a certain order (first 1, 2, 5 reverse, then the rest).
Using a key, unscrew the fastening of the reverse axle, remove the locking ring, take out the shafts, which are then disassembled if necessary, not forgetting to first mark their relative positions. Disassembly of the box (Gazelle Business) is completed, you can begin repair and assembly.
The box turns off (the gear goes out)
If the speeds are off, the culprit may be the fork, clutch, or worn transmission gears. It happens that the spring that presses the fixation ball bursts. It is also possible that the input shaft splines may dry out. The reason may be the bronze crackers on the third and fourth gear forks - they break in half. It is also possible that burrs may form on the locking device.
Many defective parts are installed on the Gazelle gearbox right from the factory. For example, blocking rings, which must have a gap of at least 0.3 mm. In fact, there are many such elements with a gap of 0.1-2.5 mm.
It happens even worse when incorrect assembly is performed after repair. The unfortunate masters are capable of sorting out the crackers and springs so unsuccessfully that after a while certain gears will not turn on at all.
Transmission bulkhead
To make repairs and replace parts, you need to know how to disassemble the Gazelle box itself. Yes, you will have to disassemble it anyway.
There is a chain of actions here:
bearing cover – rear input axis (bushing) – breather – crankcase separation – fastening the gear shift fork (after putting the car in reverse mode) – lever body and gasket – clamp fittings – switch rods (order – 1, 2, 5, rear, 3, 4) – reverse axle and remove the rear shaft bearing retainer ring – remove the shafts themselves.
The diagram may seem complicated, but if you look at the box in person, everything will become clear. This is what self-removal or replacement of the Gazelle gearbox looks like.
Installation of the entire system is carried out in reverse order. The main thing is to remember to carefully lay out the removed parts so that you don’t get confused during the reverse process.
Gearbox disassembly
1. Remove dirt and wash the outside of the gearbox. 2. Unscrew the oil filler and oil drain plugs and drain the oil from the gearbox, if this has not been done previously.
3. Remove the clutch release bearing and foam ring 1 from the guide sleeve.
4. Unscrew the bolts and remove the rear engine mount with bracket, if this was not done when removing the gearbox from the vehicle.
5. Unscrew the reverse light switch with the gasket.
6. Unscrew bolt 1 securing the speedometer drive stopper, remove stopper 2 and speedometer drive 3.
7. Unscrew the breather.
8. Unscrew the four bolts 1 and remove the gear shift lever housing 2 with the gasket.
9. Unscrew the three bolts 1 and remove the input shaft bearing cover with the guide sleeve 2 of the clutch release bearing with the gasket.
10. Unscrew the bolt securing the reverse idler gear axle on the front gearbox housing.
11. Remove the retaining ring of the input shaft bearing if it is necessary to replace it.
Be sure to remove the large retaining ring, otherwise you will not disconnect the box.
12. Remove ten bolts securing the front gearbox housing to the rear housing.
13. Separate the front and rear gearbox housings.
To do this, you can clamp the extension in a vice with soft jaws and hit the bosses with the holes for attaching the front housing to the clutch housing with a copper hammer.
At the same time, try not to tear the gasket.
14. Remove the adjusting rings from the seat under the front bearing of the intermediate shaft on the front gearbox housing, if they were installed.
15. Unscrew the two bolts 1 of the fastening and remove the plate 2 of the rod clamps with the gasket.
16. Remove the three retainer springs.
17. Set the 5th gear and reverse shift rod to the reverse position.
18. Unscrew the locking bolts securing the shift forks to the rods.
19. Mark the gear shift forks (their belonging to the rods and orientation). Knock out the rods with a hammer made of soft material and remove them.
The first to remove the rod 3 for engaging the 5th gear and reverse gear, the second is the rod 1 for engaging the 1st and 2nd gears, and the last is the rod 2 for engaging the 3rd and 4th gears.
When removing the 3rd and 4th gear selector rod, make sure that
so as not to lose the locking pin installed in the rod hole.
Remove the 1st and 2nd and 3rd and 4th gear shift forks from the synchronizer sliding clutches.
20. Remove the retainer balls by placing your hand and pushing them with a screwdriver through the holes inside the crankcase.
21. Remove the two locking plungers using a special tool or a hooked wire.
22. If it is necessary to disassemble the 5th gear and reverse gear rod, you must first unscrew the locking bolt 1, and then remove the head 2, locking sleeve 3 and spring 4 from the rod.
23. Unscrew the bolt securing the reverse intermediate gear axis on the rear gearbox housing.
24. Unclench the retaining ring of the rear bearing of the secondary shaft with pliers and, hitting the end with a drift of soft material, press out the secondary shaft.
25. At the same time remove the secondary shaft assembled with the primary shaft, the intermediate shaft and the axis of the reverse intermediate gear from the rear gearbox housing.
26. Check that the 3rd and 4th gear synchronizer is set to neutral.
27
Separate the primary and secondary shafts, paying attention to the fact that the bulk rollers (14 pcs.) of the front bearing of the secondary shaft may fall out of the input shaft housing
28. If during operation it is discovered that oil is leaking from the gearbox through the seals, the defective seals must be pressed out.
How the box works
GAZelles are equipped with 4- or 5-speed manual transmissions. Components of the device:
- 2 aluminum crankcases connected by 100 bolts;
- speedometer drive gear;
- primary and secondary shafts connected to the cardan and crankshaft;
- an intermediate shaft on which the cut reverse and 1st stage teeth are located;
- pressed gear block;
- inertial synchronizers;
- reverse gear is provided by a gear block;
- clutch for engaging 3rd and 4th gears;
- system for blocking simultaneous launch of several speeds;
- spring-loaded balls for fastening different levels of the box;
- mechanism of the damper device of the lever and control elements.
The design of the unit allows for timely diagnosis of the first signs of malfunction to prevent more dangerous failures.
Specifications
Key characteristics of the gearbox of GAZelle cars:
- 4- or 5-speed transmission;
- 5 speeds - 1 reverse and 4 forward.
For the transmission, the following parameters can be noted:
- three-way lever located in the assembly;
- the mass of the part is 56 kg;
- oil tank capacity - 3 l;
- gear ratios for five stages - 6.55; 3.09; 1.71; 1; 7.77.
- The fourth stage in the gearbox is direct.
Basic models of the device assume the presence of synchronizers in the mechanism to ensure reliable operation.
Gear shift diagram
The gear scheme on the GAZelle is distinguished by the presence of a synchronizer. Moving the lever from the neutral position to the left side causes its lower part to move the shift rod and fork. This causes the first stage gear to move backward and come into contact with the first gear element located on the intermediate shaft. When the clutch is running, torque is transmitted through gears and intermediate elements to the secondary shaft.
The inclusion of the third speed is due to the movement of the lever from the neutral position, first to the right side, and then forward. Under the influence of the fork, the clutch begins to move backwards and the structure impacts the synchronizer. The torque follows in the direction of: the input shaft, the permanently meshed gears, the intermediate and secondary shaft of the gearbox.
To start the fourth speed, you will need to move the selector to the right and back relative to neutral. The forward movement of the clutch helps to engage the synchronizer locking ring with the input shaft. After balancing the speeds, gears are engaged. Reverse speed is started by moving the lever to the right after overcoming the resistance of the safety system.
The synchronizer is a mechanism in the form of a hub mounted on the secondary shaft of the box. The coupling moves along the splines located outside under the influence of the fork. Other key elements of the synchronizer:
- retaining springs;
- "blocking" parts;
- side bronze rings for locking the mechanism;
The work of the synchronizer is involved in engaging 3rd and 4th gears and is expressed in ensuring a smooth transition from one level to another.
How much oil to fill
Before changing the oil in the 5th mortar, it is necessary to check the current level. It is recommended to carry out such an action every 20,000 km. If there is enough oil in the gearbox, fluid is added to the crankcase.
The technical documentation does not contain data on the required amount of oil in the GAZelle box. The figure varies depending on the modification of the equipment, ranging from 1.2-1.6 liters. During work, the mixture is poured into the hole with a syringe until oil flows out of it.
GAZelle Next, GAZelle Business and other modifications of the car cannot be started with a low level of oil fluid. Small volume is the cause of air pockets, which have a negative impact on bearings and other elements of the gearbox.
How to repair a Gazelle gearbox with your own hands
If your Gazelle gearbox seals are leaking, don’t ring the bells. In this article we will tell you step by step how to repair a Gazelle gearbox with your own hands.
Repairing a Gazelle gearbox is an easy procedure and it is much cheaper to do it yourself than to have it repaired at a service station. To do this, you will need to acquire some parts and tools, read our instructions for repairing the gearbox yourself and learn how to disassemble the gearbox.
How to disassemble a gearbox
To handle this process you will need a set of wrenches and a screwdriver. Do-it-yourself disassembly and repair of the Gazelle gearbox involves completely draining the oil, unscrewing the bolts, and carefully removing the cover without damaging the gasket.
You will also need to remove the elastic coupling and the gear shift mechanism itself. Then remove the back cover and unscrew all the gears, remove the bearing and clutch fork. Next you need to tap the clutch housing and block the intermediate shaft. You will need to unscrew a bunch of balls and springs. And using an impact screwdriver, unscrew all the remaining screws and completely disassemble the box. This process, as you can see, requires experience and knowledge. But to replace the seals, fortunately, you need to go a little shorter.
Tools
- Socket wrench 30;
- screwdriver;
- mount;
- drain container;
- key to 17;
- hammer;
- mandrel for old oil seals.
You will also need to purchase a drive oil seal, but first make sure which one you need, left or right. How do they differ from each other:
- different directions of arrows on the inside;
- different numbers at the ends of catalog numbers;
- different color of the product.
Instructions
- We go into the hole.
- Pour out the oil (one liter is enough).
- We get rid of the wheel bolts and remove the nut from the bearing (front hub only).
- Where the lower ball joint is located, unscrew the two bolts.
- Now we direct the lower lever down. And pull out the end of the drive.
- Get under the car and pull in the drive.
- Using a screwdriver, remove the oil seal itself.
There is a new oil seal in your hand - Now we take a new part and insert it. There is no need to press all the way.
- Now everything is the other way around, push the box back, point the lever up, tighten the bolts, put on the bearing.
- And most importantly, don’t forget to pour the oil back in!
Done, the Gazelle gearbox repair was done with your own hands.
We wish you a smooth and problem-free ride! Remember that many problems can be solved on your own, without resorting to service centers and expensive procedures. You can learn everything even the first time.
Video “Removing the box”
Watch the video on our website about how to properly remove the gearbox in a garage.
We tried to provide you with more detailed information on how to properly replace the oil seal, in return for this we expect warm words from you in our comments.
Table: malfunctions of the Gazelle box according to the nature of the noise
| Position | Character of noise | Malfunction |
| Neutral speed, clutch depressed or when the clutch is released after changing any gear other than reverse or fifth | Howl | The cause of this in most cases is a worn input shaft bearing or drive gear bearing. |
| On the move when changing gears | Crunch | Most likely, wear of the clutch release bearing, but the reason may be hidden in the synchronizers - wear or destruction of the blocking rings on the shaft |
| When moving, the gear is knocked out | Knock, push | Problems with the gearbox fork |
| Cold engine, difficult to engage fifth gear | A hum that goes away after warming up | Too thick oil or poor quality lubricant |
| Speeds change while driving | Knocks | Oil starvation, insufficient MTF levels |
| Only when different gears are engaged | Howl | Problems with individual gears |
| In fourth or fifth gear | Crackling | The sump is shaking, needs adjustment |
| During acceleration and deceleration | Rattling | The synchronizer ring is displaced relative to the intermediate shaft |
Now you know how to remove and rebuild the Gazelle gearbox yourself.
The most common symptoms and troubleshooting methods
Despite the structural simplicity of the unit, repairing a Gazelle gearbox with your own hands involves serious work. Without the proper knowledge and skills, it is better not to touch the unit, so as not to make it worse. To replace damaged parts, the box must be dismantled and disassembled.
There is a noise in the box
Most often, a sign of a mechanical malfunction is a dull hum or crunch, indicating weak fixation or destruction of the bearings. An unpleasant cracking sound is also possible, indicating damage to the synchronizer rings. Often the box howls, and in completely different ways. The strength of the sound and its character depend on the speed of movement, the specific gear, and the duration of driving.
It is noteworthy that the characteristic noise does not always indicate a gearbox malfunction. Especially if the elements of the box have recently been replaced. In this case, the howling will only be a sign that the parts have not yet gotten used to it. Often, the crunching of the gearbox is confused with malfunctions of the clutch or other related units. And any experienced Gazelle driver will confirm that until you disassemble the box, the specific cause of the noise can only be determined with a 50 percent probability. But a competent bulkhead will help you immediately find the problem area. Before this, of course, you need to check the oil level. If it's ok, you need to disassemble the gearbox. Anything can turn up during the troubleshooting process. For example, there may be a mismatch in bearing markings, missing washers, or incorrect sizes.
Thus, noise in the Gazelle gearbox is caused by wear of bearings, gears, synchronizers or their destruction, breakdown, as well as a low level of MTF or its poor quality. The alignment of the crankshaft and crankcase is rarely disturbed, but it doesn’t hurt to check the runout of the mounting hole for the box.
Difficulty shifting gears
If it becomes difficult to change gears, this indicates one of the problems:
- synchronizers or gears of a certain gear are worn out;
- the lever or other switching mechanisms are damaged - most often the fork;
- problem with the clutch - it does not engage completely, the pedal drive cable is loose, the driven disc is damaged.
Often, poor gear engagement is due to design flaws in synchronizers. When the clutch plate is pressed against the flywheel or pressure plate, the bearing in the crankshaft creates resistance. This is enough to block the inclusion of speeds.
It also happens that it is difficult to change gears on a warm engine, but when it is cold everything goes like clockwork. The point here is that initially there is a thick layer of lubricant between the synchronizer thrust ring and the gear. After the temperature rises, the oil liquefies, the ring and gear are rubbed almost dry, and the coupling rests against the teeth of the ring. Either a high-quality grip, such as HOLA, or another MTF compound will help.
Speeds do not turn on
In this case, you need to urgently check the fluid level in the clutch reservoir. It is possible that a leak has occurred through a damaged main circulation center or control center. It is possible that air has entered the system, then you can get by with a little blood by expelling it through the fitting.
If the fluid is ok, then the problem is with the gearbox, or more precisely, with the switching mechanism. More often the fork breaks down - it bends or is pierced by the rod, and then it becomes impossible to engage a certain gear. It is not uncommon for the tide-limiter on the synchronizer to grind off.
Possible problems with the Gazelle gearbox
Disassembling and repairing a gearbox (5-speed), regardless of the make and model of a Gazelle car, is always a crucial moment, anticipating serious work. Owners of commercial vehicles encounter this problem most often, so they have replaced it more than once. But is it worth it, having seen an advertisement on the Internet for repair of a Gazelle gearbox, to run there, jingling your wallet? Not necessary. It is quite possible to get by with an assistant, diagrams of the gearbox design and instructions for the necessary work. This is enough to repair or replace worn parts yourself.
The presence of a huge experience base on problems with the Gazelle box allows you to almost accurately draw up a “problem-cause” diagram.
Most often, the problem list looks like this:
- If during operation you hear a dull hum from the side of the box, this is a sure symptom of loosening of the fixing fasteners. Also, such a sound can signal the death of the most worn parts;
- The characteristic “crunching” sound is most often produced by worn-out bearings. In general, to avoid such a problem, it is recommended to replace bearings after 90 - 100 thousand km. On your own, or as planned at a service – it’s up to you to decide what’s convenient for you
- If gear shifting is accompanied by an unpleasant crackling noise, then it makes sense to think about replacing the synchronizer rings;
- There can be many reasons for difficult gear shifting. Perhaps the box drive itself is jammed or jammed. But there may also be wear of a certain group of parts (gears, burrs, etc.). Only a bulkhead will tell you the exact reason.
- Oil leak. According to statistics, this is the most common problem that is addressed to workshops. As in the case of oil loss in the engine, the main culprit here is hardened or, on the contrary, worn out gaskets and seals. But it may turn out that much more serious cracks in the crankcases are to blame.
It may turn out that the indirect cause of the problems described above is incorrect clutch adjustment. Or simply working with it incorrectly. For example, a constant change of minibus drivers and their different qualifications can damage the gearbox up to the “fifth gear”.
Recommendations for extending the service life of the unit
Without proper care, the Gazelle gearbox quickly breaks down. Some explain this by the mismatch of the unit for a truck. As you know, the box used here, albeit modified, is from a passenger car. Therefore, the slightest overload or prolonged operation has an extremely negative effect on the resource. Already by the 80,000th mileage, gears begin to fly out, crackling and noise appear.
First of all, you need to change the oil correctly and promptly. The replacement interval is determined by the manufacturer at 50,000 mileage, but it is better to do this twice as often. You need to fill in not the lubricant that comes from the factory (cheap TAD 17), but higher quality analogues. For example, GL-4 or 5 with a viscosity of 75W-90.
Other recommendations:
- do not load the car above the norm of 1.5 tons;
- drive on good roads, avoiding gravel and complete off-road conditions;
- monitor the clutch, refill technical fluids on time.
Repairing and disassembling the Gazelle gearbox is not an easy task, but following the instructions, you can handle the operation yourself. If something doesn’t work out, you can always take the box to a service center or call a specialist to your home.
Breaking
If the manual transmission is noisy, there are reasons for this:
- the bearings performed their functions to the end;
- lack of oil.
The second problem is much easier to solve than the first. Check the amount of oil and “add” it.
We advise you to watch: how to repair a manual transmission on Gezali.
https://youtube.com/watch?v=TjbNGPDFJDk
The first option requires replacement of spare parts. This is done either in a service center by specialists (if the car is under warranty, this is a big plus for the owner), or manually (but not by yourself). Only a person who knows the business can disassemble and assemble the checkpoint. This procedure requires knowledge, patience and perseverance.
So, the first thing to do is drain the oil. After this, remove the cardan. Mark the hinge points and the box extension, remove the clamp. Unscrew the cardan mount and remove the shank (move it back and pull it out). The result will be a niche. Next, remove all the necessary parts in the cabin, turn off the speedometer and light elements. After these steps, the box is removed and disconnected.
Gearbox design for Gazelle Next
In order to begin disassembling the gearbox, it needs to be made clean (washed thoroughly). Disassembly is carried out step by step only by a knowledgeable person. At the slightest mistake, the gearbox may not work correctly on the Gazelle Next or, in general, show no signs of life. After disassembling the box into parts, they should also be washed from traces of oil.
The cause of the strange sound is being found. It could be:
- wear of the secondary shaft bearing.
- Bearing play.
- Bearing idling.
Watch the video: how to replace the rear axle gearbox.
Other problems with component parts may also occur. Worn and broken components are replaced with new ones.
Other gearboxes for GAZelle NEXT
Some Gazelle owners don’t want to bother with the “native” gearbox. Then the search for an alternative begins. If you take gearboxes like those from Ford, then you need to work hard with them to “fit” the box to Gazelle standards.
Manual gearbox from Getrag, made in Germany. This box is made for cars with a load capacity of 2400 kg, so it can easily work on the Gazelle Next. Torque 345 Nm. for a 150 l/s engine. The Gazelle's factory gearbox is made of aluminum, the Getrag gearbox is cast iron. It also has some characteristics that make the engine easier to operate during acceleration, and also reduces engine speed on the highway.
This is what the Getrag checkpoint looks like
The table provides comparative data.