Removal
Place the car over an inspection ditch or on a lift, put supports under the front wheels and hang the rear axle on one or both sides.
Release the parking brake and place the gearshift lever in neutral. Disconnect the battery cables. Remove the front floor mat and outer covers from the transfer case and transmission levers. Remove the lever hatch covers and seals. Unscrew the handles from the transfer case levers.
Press down on the lever rod 29 (Figure 3-12) and use a screwdriver or other pointed tool to remove the locking sleeve 33 from the groove on the lever rod; remove the rod.
Disconnect the pipe suspension and turn off; it in the rear of the car, and then the muffler pipe from the exhaust pipe. Disconnect the clamp securing the exhaust pipe to the gearbox. Using a spanner, unscrew the nuts securing the front muffler pipe to the exhaust manifold and remove the pipe downwards.
Unscrew the lower bolts securing the clutch housing cover. Disconnect the ground wire from the clutch housing and the wire from the reverse light switch.
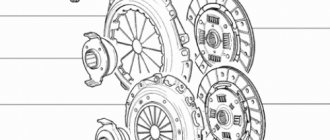
Unhook the release spring 1 from the clutch release fork 5 (Fig. 3-13) and remove the cotter pin 4 from the pusher 6. Disconnect the slave cylinder 8 from the clutch housing. In this case, cylinder 8, connected to the pipeline going to the clutch release drive master cylinder, remains on car, which eliminates the loss of brake fluid and the need for subsequent bleeding of the hydraulic clutch release drive.
Rice. 3-13. Clutch release drive:
1 – fork release spring; 2 – lock nut; 3 – adjusting nut; 4 – cotter pin; 5 – clutch release fork, 6 – pusher; 7 – bolt securing the working cylinder to the clutch housing; 8 – clutch release working cylinder
Place clamp 2 (A 70025) on elastic coupling 3 (Fig. 3-14) and tighten it. This will facilitate the removal and subsequent installation of the elastic coupling. Unscrew nuts 1 and, turning the intermediate propeller shaft, remove the bolts securing the elastic coupling 3 to the flange of the secondary shaft of the gearbox.
Rice. 3-14. Elastic coupling connecting the propeller shaft to the gearbox:
1 – nuts securing the propeller shaft flange to the elastic coupling; 2 – clamp a 70025; 3 – elastic coupling; 4 – cross member of the rear engine mount.
Note. You can remove the gearbox assembly with the intermediate shaft. In this case, disconnect the intermediate driveshaft flange from the transfer case shaft flange.
Disconnect the speedometer flex shaft from the speedometer drive on the transfer case.
Disconnect the transfer case driveshaft flanges. Lower and move the axle drive driveshafts to the side.
Unscrew the bolts securing the transfer case brackets to the body and remove it along with the driveshaft.
Using a hinged socket wrench 02.7812.9500, unscrew the bolts securing the starter to the clutch housing and loosen it. Unscrew the bolts securing the clutch housing cover.
Disconnect the rear engine mount from cross member 4 (Figure 3-14), and then remove the cross member while supporting the transmission from below.
How to remove the gearbox of a VAZ 2121 Niva 2131
The gearbox on a VAZ 2121 and Niva 2131 is removed for disassembly and repair, to replace the driven and driven clutch discs, as well as when performing other work in which its presence will interfere with their progress. Prepare a standard set of tools and perform the following sequence of actions:
- Drive the car into the inspection hole.
- Disconnect the minus terminal from the battery, thereby de-energizing the car.
- Next, we dismantle the transfer case along with the intermediate shaft.
- From the reversing light switch located on the gearbox, disconnect the connector with the power wires.
- Next, unscrew the bolts securing the clutch slave cylinder to the gearbox housing and, without disconnecting the hydraulic drive from it, move it to the side so that it does not interfere.
- Now we move into the car interior and disassemble the decorative elements of the clutch lever. Using a Phillips screwdriver, unscrew the two screws securing the plastic cover of the gear shift lever and remove it along with the rubber cover, after first removing the decorative handle from the lever rod.
- Remove the gear shift rod.
- Remove the support bracket. To do this, use a 13mm head to unscrew the bolt securing it to the intake pipe.
- Remove the front driveshaft.
- Next, we dismantle the clutch housing cover; to do this, use a ten key to unscrew the bolts securing it.
- Using a 13mm socket, unscrew the bolt securing the exhaust pipe clamp and remove it.
- Using a thirteen-size spanner, unscrew the two nuts securing the gearbox bracket and remove the mounting bolt.
- Remove the bracket.
- Using a 19mm socket and an extension, unscrew the bolts securing the gearbox to the engine block.
- Next, using a 13mm head, unscrew the two nuts securing the power unit support bracket to the box.
- Then, using a wrench of the same size, unscrew the nuts securing the cross member of the power unit support to the car body.
- Remove the cross member of the support.
- Together with an assistant, we carefully push the gearbox back a little and remove it from the car.
Problems with the box
The Niva Chevrolet car, and in particular its gearbox element, as they say, is good, but with its own “peculiarities”. Somewhere after the first 50 thousand km, the device begins to show its teeth. There may be a hum or unusual noise. Such “features” make it clear that the bearings or gears are worn out. If you watch the gearbox for some time, you can determine what exactly needs to be replaced. What other problems can occur with the gearbox?
- Noise, grinding or knocking when the car is moving, and sometimes when warming up.
- Shocks when changing gears.
- The gearbox may refuse to disengage a particular gear.
- Deformation of the lever, which promises complications during the gear shift process.
- Also, transmissions can simply be knocked out.
A knocking sound when the car is moving or when warming up indicates that the bearings, gears, shaft (primary) or axial ones in the gearbox have worn out. Actually, determining what exactly was the reason is sometimes very difficult. And if you do not have the opportunity to completely replace the gearbox, then your only option is to remove the device manually, disassemble it and carry out minor repairs.
How to remove the box on Niva 21213
To perform the simple but labor-intensive work of removing the gearbox from the VAZ-2121 (Niva) all-terrain vehicle, you must have an inspection hole, an overpass or a powerful lift. Before starting work, make sure that the battery is disconnected and removed from the car, one or both rear wheels of the car are lifted, the handbrake is released and the gearbox is in the neutral position.
We carry out work inside the cabin: Having removed the mats and boots from the gearbox levers and transfer case, we unscrew the lever handles. We remove the resonator and the “pants” of the exhaust gas exhaust system. Unscrew the two lower bolts securing the clutch housing to the engine block. We release the clutch slave cylinder (two “13” bolts and the clutch fork spring) and move it to the side. You can completely remove the cylinder by disconnecting the supply tube from it, but in this case, when installing it in place, you will have to “bleed” the system.
We move under the bottom of the car. We select a suitable size clamp for the elastic coupling and fix it to facilitate subsequent installation in place. We unscrew the nuts of the bolts securing the gearbox shank, the intermediate shaft and the elastic coupling one by one, gradually turning the “universal shaft” to facilitate access to them. We unscrew the fastening of the speedometer cable from the transfer case and move the flexible shaft to the side. Having disconnected the rear and front driveshafts from the transfer case, we also move them to the side. Next, having released the fastening of the transfer case to the body (4 nuts “13”), we remove it from the car. We unscrew the two bolts (upper) securing the clutch housing cover to the engine block. We remove the starter by unscrewing the 3 bolts securing it to the clutch housing cover. Supporting the gearbox from below, unscrew the nuts securing the gearbox bracket to the body. Now you need to place any support under the gearbox housing in order to carefully remove it from the car. Care is required here to prevent mechanical damage to the so-called “spider” when the gearbox input shaft exits the clutch driven disc. Finally, without sudden movements, we smoothly remove the gearbox from under the car.
Video on how to remove a VAZ Niva 21213 gearbox – free viewing. Articles about the design of car systems and do-it-yourself repairs. Reference materials. How to repair a car yourself at home. We will help you with repairs and repair the car yourself. We know how to restore a car with minimal investment. I have attached video instructions.
Category: Auto repair
Laughter on topic: - You’re a girl, and you swear like that. - And you’re a boy. And so you whine.
Published by Admin: at the request of Alfred
The car owner's reasoning: Power, high seating position, diesel consumption is not that high for such a large car.
The transfer case of the Niva car and some other SUVs is designed to distribute the torque of the wheels both between the axles and between different wheels of the same axle. This is done in order to increase cross-country ability on particularly difficult sections of the route. In the language of specialists, this device is called a “demultiplier.”
Replacing the clutch, not without consequences (93460). — Lada 4×4 5D, 1.7 l., 1998 on DRIVE2
I can’t say that the clutch ended unexpectedly, the first bells were already there, but as usual, at the wrong time. On Friday morning, after being on duty, Ivan’s car had to be towed due to dozens of his cars being temporarily incapacitated. It didn’t seem like there was much of a load, the vehicle was not torn apart. In general, during the day the clutch completely ran out. On Saturday I drove the SEVEN for my shift, fortunately my family didn’t have to go anywhere. After scouring the Internet and talking with experienced drivers about possible damage, either the plug broke off or the spider broke off. The same Internet said that you can replace the plug without removing the box, which was a little reassuring. Sunday morning, I went to the store, bought a fork and its boot (140 rubles). In the garage
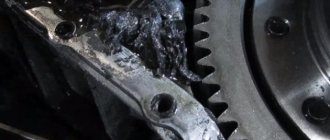
Having removed the boot, I realized that the fork was intact and I couldn’t get away with a slight fright. Having stuck my phone into the hole in the bell, I took a photo and realized that the spider was in trouble.
There he lies at the bottom. And since it is necessary to disassemble the floor of the car, then an assistant is needed in the person of my son-in-law, to whom I asked to go to the garage. There was a trip of ten kilometers ahead and everything would have been fine, but I had already pulled out the plug and also removed the cylinder. Insert the plug into place, contrary to the information from the network, it didn’t work, maybe I don’t have enough experience. In general, I covered these ten kilometers, turning off the engine at intersections and starting it in first gear. To get to the clutch on the Niva, you need to disassemble the floor of the car. The cardans, transfer case, and the floor tunnel in the cabin also had to be removed. And finally, the gearbox.
Spider
The clutch disc turned out to be worn down to rivets, and the release disc had noticeable play; the car's mileage, according to the speedometer, was 93,460 km. My son-in-law and I went to the store and bought a clutch kit (2400) Release with a plastic middle. And only then I noticed that the width of the clutch plate was narrower (2101) than on the existing one (2106), although in the store I asked what kind of clutch was on the Niva . Let's go change it to a six.
Metal release, spider-free basket
Compare the height of the baskets
The height of the baskets turned out to be approximately the same, due to the bending of the petals. The release valves are the same, both with and without the spider; they used to tell me that without the spider the bearing is thicker. I started the assembly by replacing the fork, since I bought a new one
At the same time, I decided to make an inspection of the CV joint, the boot of which had long been torn (since the purchase of the Niva). With grief, they halved the CV joint, as I had never dealt with them before.
The boot is a scribe, the lubricant has almost no dirt. After washing it in kerosene and filling it with new lubricant, I put a new boot on it. After assembling everything that was removed, I lifted the car onto stands to install the transfer case itself.
I accelerated the car, waited for the wheels to stop and tightened the transfer case. PS Well, a little about the sad thing, in our cars it is rare that repairs are made without breakdowns. Replacing the clutch turned out to be fatal for one of the studs for attaching the transfer case cushions
, which is currently attached to three studs. A subframe is required.
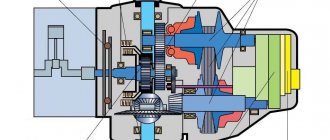
Transfer case location and functions
Location of the transfer case in the Niva 21213
The transfer case occupies an intermediate position in the vehicle transmission between the gearbox and the driveshaft. It has its own body in which its components are located.
The transfer case helps to implement such SUV capabilities as:
- Center differential lock.
- Disabling the drive axle.
- Increased torque of the drive wheels.
- Distribution of torque along the wheel axles.
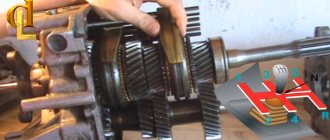
Self-repair of transfer case on Niva
There is nothing fundamentally complicated in the design of the multiplier, except that it itself is not attached to the main gearbox as on more modern all-terrain vehicles. Intermediate driveshafts extend from the transfer case to the manual transmission. The rest of the device is represented by gears, satellites and bearings. The design also includes a free differential with locking.
Tools
- Spanner 13.
- Flathead screwdriver.
- Key for 10.
How to remove a box from a car
- The machine must be installed on an inspection hole or lift.
- The transfer case levers are set to the neutral position.
- The lining of the central floor tunnel is removed.
The tunnel cover must be removed to gain access to the transfer lever hatch
The handles and covers of all levers can be carefully removed
We get access to the insides of the transfer case
Cardan shafts fit to the transfer case front and rear
When removing the box, the main thing is not to overdo it
Installation, centering and adjustment
- Install the engine mount brackets correctly.
- Install the transfer case without fully tightening the bolts of its fastenings.
- The flanges of the drive shaft of the box must coincide with the intermediate driveshaft.
- Install the transfer case supports and secure the fasteners.
- Connect the transfer case to the front and rear universal joints, and reinstall the differential lock sensor.
Centering the range multiplier can be done in different ways. The classic version of alignment is that the car is installed on a lift or inspection hole, and all operations are performed by two people, one of whom is sitting behind the wheel. The procedure is performed as follows:
Fines for crossing the stop line and speeding will no longer bother you!
- Fourth gear is engaged and the lock is disabled.
We put the transfer case in neutral position, engage the 4th gear of the manual transmission
To center the range-multiplier, use a 15mm wrench to loosen the fastenings
The assistant gets all the brunt of the alignment work; strength and dexterity are needed here.
Removing a box in a garage without a pit. — Chevrolet Niva, 1.7 l., 2004 on DRIVE2
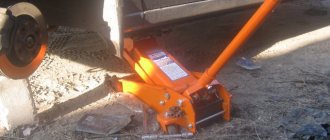
Good day! The crux of the matter. At first, from the fact that I started constantly (and it’s a shame not to start when it’s winter and underdrives are now resting. In short, pampering is short))) I caught the moment a couple of times and turned on the second with a crunch. as a result of the PPC synchronization of the second gear. Today (while driving calmly) out of the blue the first gear started to slip out. In short, we remove the box (it’s pinched, no less). What we have. Standard stsuko garage without a pit. a small heat gun and minus 16 outside the forest. (okay, at least 16, not 30). Today I took it off for now. In terms of time, it took me about 5 hours of quiet work. For convenience, to make it higher, I put more wheels under the wheels)) (it will be clearer in the photo) by the way. The jack didn't work. The car was constantly being pulled to the side. so I just went for them. . For those who are planning to remove the box for the first time, I will say this.
There is nothing particularly complicated. There is basically a lot of information on how to disassemble the box, both on the website and on the Internet... There are nuances, of course, but not critical. For example, did I miss something? I didn’t see anywhere that the boot (between the engine and the gearbox) on the bottom, a couple of bolts also need to be unscrewed (I thought it could all be removed together). The box bolts themselves (4 pieces) can be conveniently unscrewed using three extensions from regular tool kits. The intermediate shaft (or whatever it is, which is between the gearbox and the transfer case) came loose with the studs, which is also not ice. Otherwise, it’s essentially nothing to worry about. This is how I will put it in its place, apparently it will be a separate circus))) For now, I need to disassemble it correctly, make a list of parts that need to be changed, and I will assemble it.