Almost every car is equipped with floor mats. This element is an important and useful attribute that requires careful care. If you find defects in the carpet covering, you can fix them in the car yourself. Drivers will need to prepare a patch and means to attach it. The procedure is not difficult.
You can repair car mats in the garage with your own hands in a few hours (even if you have no experience in such procedures).
When to repair rugs
If you notice damaged or worn areas in time, it will be much easier to solve the problem. This will preserve not only the carpet, but also the car’s upholstery and its bottom. Torn options are practically useless. Carry out repairs in the following cases:
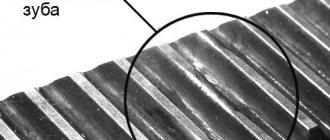
- The surface is severely abraded or a part is damaged. This happens especially often among girls who constantly wear shoes with thin heels. It digs into the surface and damages it in a small area.
- Natural wear and tear due to long use. Over time, both rubber and fabric wear out and in places where the foot constantly stands, deflections or even holes form if repairs are not carried out in time.
- Cuts, damage from sharp or heavy objects. Sometimes this option also happens; in this case, you need to seal the hole as quickly as possible so that it does not get bigger.
For your information!
The driver's mat wears out most often, since it bears the heaviest loads.
If damaged areas are not repaired, this will not only lead to their increase and damage to the product. Holey rugs provoke a number of other problems, which will be much more difficult to eliminate:
- Sand and debris penetrate the floor covering. You will have to constantly vacuum; over time, the surface deteriorates and looks untidy.
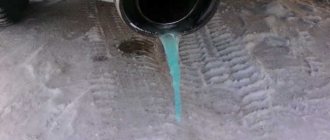
- Water gets under the rug. This is especially dangerous when using rubber coverings, since they do not allow evaporation to pass through and moisture accumulates from below. This causes the upholstery to become wet, causing an unpleasant odor and mold to appear. Moisture also affects the bottom; with constant dampness, the metal begins to rust, then through holes appear.
Assess the condition of the surface; if the wear is severe, then there is no point in repairing; it’s easier to replace. Some people use two sets - fabric options for the summer, and rubber ones for the winter, so that the melting snow collects and does not spread over the floor covering.
Glue Features
It is worth paying attention to polyurethane glue for several reasons. It is very easy to use, thanks to which even a beginner can carry out all the necessary work. The composition is quite practical, since it lies on the surface in a thin layer and at the same time fills all the voids. Different brands dry differently, but all dry fairly quickly.
The adhesive material has good adhesion. In addition, after final drying, the surface can be painted in the desired color. When hardened, the glue turns white. This feature allows you to conveniently glue sockets or baseboards during the repair process. An important advantage is that the glue is moisture-resistant and can easily withstand temperature changes.
Repair of rubber mats
To prevent severe damage, inspect the surfaces of all elements at least once a month. Take it out of the car and assess the condition on both sides. A cut or a through hole can be easily identified by moisture on the reverse side; it always accumulates there, since it does not evaporate when it gets on the reverse side.
Preparation
To repair a driver's or other carpet, you need to prepare everything necessary and ensure normal working conditions. A lot depends on the nature of the damage, so it’s worth assessing the condition in advance and understanding what work needs to be done. Remember the following:
- Take out the interior mat, shake it off any dirt and wash it well. This can be done with a hose or by pouring water and scrubbing off dirt with a brush. Clean both the outside and the inside, hang outdoors to dry.
- Inspect the damaged areas, measure their sizes, then select a patch. It should be a little larger to cover the problem area.
- When the hole is through, you will need twice as much materials for repairs. If you patch it on only one side, the patch will not hold up as well or even break after a short time.
- For small damaged areas, buy ready-made patches. They are sold in markets and automotive stores. The elements are already ready for use, which is very convenient. Most often they sell sets of several pieces; you need to choose the right one for your location.
- For large cuts, you won’t be able to find a repair kit. The easiest way is to find an old inner tube from a bicycle or car and cut a patch of the desired size and shape from it. Use thin rubber, otherwise the repair site will stick out strongly above the surface and will quickly be torn off by the sole of the shoe.
- Buy special glue for rubber if it is not included in the kit. It is best to choose an option that has everything you need, then you can be sure that the patch will be securely fixed to the car mat. Do not use cheap compounds; they do not adhere well and may peel off over time due to exposure to water.
- Carry out work in a well-ventilated area or under a canopy outdoors. Rubber glue has a strong odor, so it is not advisable to work in a residential area.
For your information! It is better to choose not a universal glue for rubber surfaces, but an option for repairing cameras.
Carefully study the instructions for using the adhesive. They vary in use, some need to be applied, left on for 5-10 minutes and only then pressed on the patch. If you don’t understand this aspect, the rubber simply won’t stick or won’t stick well.
Repairing damage
It is most convenient to do the work on a table or workbench, provide good lighting, this will help to accurately position the patch and efficiently process the repair area. It is advisable that the air humidity is low and the temperature is above 20 degrees; in a damp, cold room the glue sets much worse. Operating instructions:
- Dry the pre-cleaned and washed rubber well. It is advisable to heat it with a hairdryer, at least a household one, to remove all moisture from the structure of the material.
- Clean the repair area with sandpaper with P400 grit or finer. It is necessary to treat the surface over the entire gluing area, remove irregularities, burrs and minor damage. This will allow the glue to absorb better and hold the patch more firmly.
- Remove dust with a rag or brush. Degrease the surface with a solvent or special compound. Wipe with a lint-free cloth and wait until it is completely dry.
- Try on the repair element, make sure that it covers the damage with a margin and fits on the strong edges around it. If necessary, trim and give the desired shape; you should not use too large pieces.
- Apply glue. Maintain it according to the instructions; usually you need to wait until the composition has set a little and only then press the surfaces to be glued. It is important to position the patch evenly and press it.
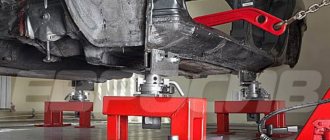
- To glue the rubber even more firmly, it is advisable to press the patch with a heavy object, simply place it on the floor or table and place a weight on top. You can also use a vice or a clamp if the size of the patch allows you to press it completely.
- When the damage is through, repeat all work on the reverse side. You can start them only after the glue has completely dried, usually this is done no earlier than a day later.
- When the patch protrudes strongly, it needs to be processed with a sanding machine to remove excess from the surface. Do this carefully, do not remove too much.
Select the repair material to match the color of the rubber. Most often, the carpets in the car are black, so after finishing the work the patch is almost invisible, especially since it is located under your feet and is not noticeable.
For your information! If the surface is perforated, you need to align it to the size of the patch. To do this, first carefully cut off the protrusions with a construction knife, and then sand the rubber with a machine or by hand.
Pasting method
The classic way is to seal a hole or cut with a patch. You can use different products depending on the size of the cut:
- Standard patches for wheel air chambers. Can be purchased at any car store or market. Bicycles and cars are allowed.
- You can use material from another unwanted rug as a source for the patch.
- Cut from a mudguard or tire.
Wheel patches have clear dimensions, so their scope of application is limited. If the hole or cut is of a non-standard size, it is recommended that you cut it out yourself. Please note that the layer of rubber is not too thick compared to the carpet being repaired.
First prepare acetone or solvent, sandpaper (minimal grit), and specialized glue for rubber.
You can use rubber glue models U425-3, 4NB-UV, 4508. The compositions do not have any strong odors, retain their properties in the range from –40 to +60 degrees Celsius, and are not susceptible to the destructive effects of chemically active compounds. The last characteristic will be relevant in winter, when the roads are actively sprinkled with chemicals.
Having selected the material, you can begin repairing rubber carpets:
- Take out the carpet and thoroughly wash it under running water (you can do it with your own hands or with various brushes). Try to remove absolutely all contaminants.
- Clean the problem area, removing burrs and other irregularities.
- Degrease the surface. Next, thoroughly dry the area with a hairdryer. The presence of moisture will significantly increase the “setting” time of the adhesive.
- Apply glue around the edges and attach the patch. Wait until completely dry. It is allowed to place a heavy object on top so that the patch is firmly fixed.
- Repeat the previous steps for the second side if the hole was through.
If the patch on the rugs sticks out too much and you feel discomfort, be sure to solve this problem, otherwise it will be very annoying later.
The relief can be removed with a grinder or grinder.
How to restore a fabric rug
You can repair car mats yourself even when they are made of pile material. But this option will differ from the first; in this case, you cannot glue the surface, since the composition will not adhere to the pile as it should. Do the work like this:
- Remove the damaged product and remove dirt. Then wash using a high-pressure unit or a brush and soapy water to remove stubborn dirt. Dry for a day or more until the moisture is completely gone from the material.
- Determine the size and shape of the patch. The easiest way is to cover not a small area, but the entire surface that is subject to heavy wear. In the case of the driver's mat, this is the strip under the pedals on which the feet rest.
- The easiest way to select carpet or other material is in carpet stores. Moreover, it is advisable to make a pattern from cardboard or paper. Then they will cut you a piece of the required size and overlock the edges, this will improve the appearance and protect the ends from wear. Select the color of the finishing according to the color of the main rug, use the same shade so that the repair area is not noticeable.
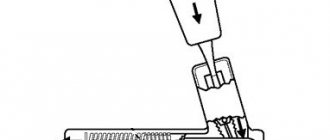
- It is best to sew on a patch using a special sewing machine that pierces a thick surface. There are these in every shoe workshop and they charge little for services. In extreme cases, you can use an awl, a large needle and do the work by hand. The main thing is to do everything carefully so that there are no crooked stitches.
- Check the integrity, pour a little water and leave the mat for a day. After this, look at the underside; if it is dry, then everything was done correctly.
- When the base is damaged, it must be repaired as described in the section on rubber mats. Use thin patches, make them of such a size that there is a margin of several centimeters around. After gluing, be sure to press down with a weight.
Most often, only the part where the shoes stand wears out. If it is repaired, its service life will increase by 3-4 years, as the thickness will become greater and the abrasion resistance will increase. Replacing the patch is easy, you just need to cut the threads and sew on a new one.
see also
Comments 15
Well done! beautiful and most importantly, everything is done with your own hands!
I'm in exactly the same situation now. The driver's is worn out, but the rest are alive. I'm still looking for where I can buy it separately.
The penultimate photo is absolutely bomb))
Yeah, the BMW haters weren’t enough for me, now the Mersovods will also join in))
They cost some DIASHINA. 6 years . it's just me. still like new)))
Cool, I'll keep that in mind.
The Norma rugs lasted the longest for me - almost two years. Only recently the driver's license started to tear. All others ended much faster
The crisis has put a lot of pressure on everyone, we have already seen that we are repairing the rugs...
It’s not so much a crisis as it is common sense; replacing 4 carpets every six months with only one torn one is wasteful)
I agree, it’s the same thing, and I couldn’t find it on sale separately.
It’s not so much a crisis as it is common sense; replacing 4 carpets every six months with only one torn one is wasteful)
it’s just that now on vases up to 2000-2500 rubles all the rubbish is made from waste, either torn or worn out, I encountered this when I was driving a viburnum, I worked for 2 years, I wound up 10-12 thousand a month, at the beginning the mats were not yet a consumable I took it once for 2300 rubles and forgot, but now due to the dollar))) it’s most likely more expensive))) but I don’t know how it concerns us when producing goods from our own raw materials and in our own country)
My first rugs, the most ordinary ones, factory ones, lasted more than 10 years. Still, the grass was greener before, but... parts are more reliable now that you don’t buy all the crap. Especially with regard to rubber products, for example, the caliper guide boots crumbled during the installation process. )
It’s not so much a crisis as it is common sense; replacing 4 carpets every six months with only one torn one is wasteful)
My wife’s relative also died in the Passat B5, I also think it would be more expedient to glue it.
The crisis has put a lot of pressure on everyone, we have already seen that we are repairing the rugs...
I also think that it was not the crisis that led to repairs, but progress to the point of degradation, almost a marathon to the store. The author may have done it a little collectively, of course, plus a blow to the pride of the Bavarians, but in general I don’t see anything shameful in such a repair]
How to care for products
To reduce wear and prolong service life, simple maintenance rules should be followed. This will help maintain the surface in good condition and restore the structure of the material. Depending on the type of rugs, the process may differ; you need to remember simple recommendations:
- Wash rubber options once a month. To do this, take them out of the car, hang them up or lay them down and brush them with a brush and a cleaning solution. Then rinse off the remaining product with clean water and let the liquid drain. Before placing it in the car, remove any remaining moisture with a cloth; do not place mats with wet spots.
- It is advisable to vacuum products with pile once every 2 weeks. If possible, take them out and process them separately in order to clean the floor covering in the car at the same time. Once every few months, the rugs should be washed; it is most convenient to do this with a high-pressure cleaner, but you can clean it with a brush and detergent.
- After washing, be sure to dry the material completely. Do not place wet items in the machine or step on wet material. It is best to hang it on a rope or place it under a canopy outdoors.
- Do not remove dust from the surface with a carpet beater. If you do this constantly, the structure of the material is disrupted.
- Remove stains with a suitable composition; products for cleaning car upholstery are well suited. If you need to use a solvent or other chemical composition, apply it to a small area in an inconspicuous place, make sure that it does not damage the surface or change its color.
For your information! Do not twist or squeeze the product under any circumstances. After washing, hang them so that the water drains naturally.
Caring for the mats is easy; it is enough to maintain basic cleanliness in the car and wash them from time to time to remove stubborn dirt. Rubber options are the easiest to use, as they do not absorb moisture and are easy to clean. Fabric ones require more attention, but look much better.
Sealing a rug or sewing a patch is not difficult if you understand the work and prepare the products well before repairing. It is important to use high-quality glue for rubber, and when you need to repair a version with a pile, then make a patch over the entire width or the area where the legs are located, then you will not have to repeat the work again.
Shoe polish
A rather unexpected but effective way to restore rugs. Although shoe polish was originally developed for the care of leather and its substitutes, if used correctly it is also suitable for treating rubber.
All you need to do for this is to pre-wash and dry the rugs. After this, you can take any sponge, apply a little cream on it and rub it into the surface of the rubber with careful circular movements.
To ensure that the color is rich and lasts as long as possible, it is recommended to purchase the highest quality shoe polish. Then, depending on the frequency of use, the products may look like new for several months. By the way, you can even use colorless cream. It will still saturate the rubber and make it darker.
Assembly adhesive
Mounting adhesive will allow you to glue the polyurethane coating efficiently and reliably. When using self-tapping screws, you should choose an adhesive putty for polyurethane. The advantages are as follows:
- after drying it becomes a shade similar to a primer;
- no film appears on top;
- the use of assembly adhesive allows you to attach polyurethane, as well as putty the joints.
Assembly adhesive is sold in various packages, which allows you to choose the most convenient volume. Thus, in construction stores it is easy to find the composition in a jar (weighing 1 kg) or bucket (weighing 5 kg), which involves applying it to the surface using a spatula. Glue for polyurethane is also presented in the form of a cartridge (weighing 0.5 kg), similar to a mounting gun.
Advice! According to consumer reviews, the best results are shown by adhesives for polyurethane of the following brands: NMC, Adefix P5 and Eco Dragon.
Joint adhesive
Another name for joint adhesive is “cold welding”. It has a unique effect on polyurethane: it “melts” it, merging with the coating. The result is a monolithic connection. The joint adhesive is resistant to temperature changes and moisture. Its packaging is similar to a tube of toothpaste. The composition is ideal for working with stucco molding and allows you to reliably glue the joints of moldings or cornices.
Advice! When purchasing joint adhesive, it is recommended to pay attention to the domestic brand Europlast or the Belgian Decomaster.