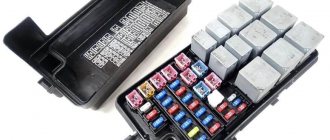
Repair of starter retractor relay
Have you ever heard a clicking noise under the hood when you turn the ignition key to start the engine?
If yes, this means that there is a serious defect in your starter relay. If it was not possible to determine by ear, then to check the functionality of the starter relay, we can recommend doing the following:
- Apply the parking brake.
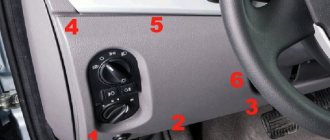
- Depress the clutch.
- Move the gearshift lever to the neutral position.
- Turn the ignition key to the position that corresponds to the engine starting mode.
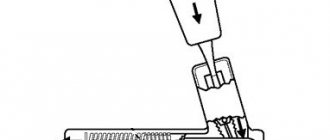
- Briefly short-circuit the operating contacts of the starter relay.
If this causes the engine to start, then the cause of all problems is a breakdown of the starter solenoid relay.
What to do if the car still fails to start, then another person should come to the rescue, it’s always easier with two people, and so, in order to revive our car, you need to cock the key to the start position, and the second person, if possible, get close to the retractor relay on the starter and simply knock on it with a hammer, in this case, be extremely careful, exclude all moments when starting the engine that hair and clothes get under the alternator belt and other moving parts of the engine.
If this does not help, then all that remains is to start the car from the pushrod, unless, of course, your vehicle has an automatic transmission.
Solenoid relay replacement process
Solenoid relay RDS 2110.
If the starter does not operate when the ignition is turned on or only works every once in a while, then most likely the reason lies in the solenoid relay.
replace it without removing it from the vehicle , but as practice shows, it is best to remove it.
Required Tools
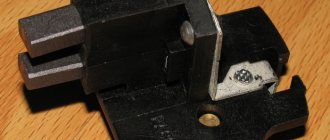
This is what a retractor looks like. You will need a tool.
To make a full replacement you will need some tools.
Namely: a flat screwdriver, a ratchet and a socket 8. Attention: if the car enthusiast is not sure that he will be able to carry out repair and restoration work on his own, then it is recommended to contact a car service center.
Algorithm
Let's consider the sequence of actions aimed at changing the solenoid relay on a VAZ-2110:
- First of all, you will need to turn off the power to the vehicle so as not to short-circuit the network and not burn anything.
- We remove the starter from the car.
- Remove the terminal from the starter and move it to the side.
We unscrew the housing where the solenoid relay is located.
We take out the solenoid relay.
The relay is pulled from the starter.
Relay diagnostics
I recommend checking the starter before checking the relay itself. This is necessary in order to disassemble each possible cause of the malfunction virtually piece by piece. This will ensure you don't miss anything.
To check the starter, you need to turn on the ignition and turn the key. If it fails, you will hear some clicks, which only indicate a faulty relay.
Then you should check the starter without removing it. To do this, you will need to get to its two contacts in the form of copper bolts on the back cover of the relay. They need to be bridged and if the mechanism itself starts to spin, then most likely it is the solenoid relay that is faulty. Checking the starter retractor relay requires compliance with all safety rules.
Otherwise, it is necessary to disconnect the starter if it was not possible to check it in place. It is necessary to understand that during testing the rotational force of the mechanism itself is quite high, so you cannot do without caution. After dismantling, place this part next to the battery or simply on the ground. Then, using a wire, you need to connect the relay contact terminal to the positive one, and with the second wire connect the starter ground to the battery ground. Having completed all these steps, you will see how the relay begins to operate with an accompanying sharp and quick click. If the rotation torque is too slow, then the fault may be in burnt contacts.
If the starter solenoid relay does not work, there may be several reasons. Failures are indicated by the reluctance of the last element to turn off after starting the engine. In this case, it continues to rotate at maximum speed, which confirms the buzzing sound. Another example of a breakdown is a situation when the key is turned in the ignition, a characteristic click is heard, but the starter does not function. Another example is its “idling” operation after turning the key, during which the engine itself does not turn on.
In order for the solenoid relay to work again, some mechanisms will most likely need to be disassembled. In no case should you forget to be careful when diagnosing on your own. In general, repairing the starter relay is not an easy task, which can not only lead to more problems, but also to injury.
How to remove the solenoid relay?
You should not try to find and fix the problem directly on the car. It is much easier to do this by completely dismantling the starter. To do this you will have to:
- Disconnect the battery by removing its terminals. Otherwise, a short circuit may occur during the work, as a result of which the battery and other electrical components will fail.
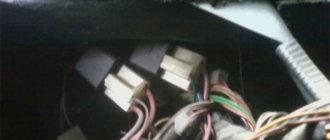
- Disconnect the electrical wiring from the solenoid relay.
- Unscrew the bolts that secure the starter to the car engine and remove the part.
Only after this can we proceed to diagnostics, removal, repair or replacement of the unit of interest to us. The first check is performed without preliminary disassembly. To do it:
- Current is supplied from the positive terminal of the battery to the contacts of the solenoid relay.
- Using a wire, the body of the part (ground) is bridged with the negative terminal of the battery.
When everything is in order, the electric motor will begin to rotate and the bendix will move forward. When the voltage supply is interrupted, the electric motor stops working and the clutch returns to its original position. But there may be other options:
- The electric motor works, the bendix extends, but does not return back.
- The Bendix extends, but the electric motor does not turn on.
- The relay clicks or does not work at all. Bendix is motionless. The starter doesn't turn over.
But these are all symptoms, and it is necessary to identify the causes of the malfunction. To find them, you need to dismantle the relay by unscrewing the bolts securing it to the cover and carefully disconnecting the rod from the plug.
In some cases, this can be done only by removing the entire front cover.
Checking the starter solenoid relay. Video:
Repair of starter retractor relay
First, we suggest watching a video instruction on how to replace the solenoid relay yourself, and then we will tell you how to repair it.
Depending on the manufacturer, starters are equipped with a collapsible or non-demountable solenoid relay. To fix a problem with a non-separable element, you just need to buy a new part. All that remains is to unscrew the two mounting bolts, remove the faulty relay and install a new one in its place (see the video above).
In the case of a detachable solenoid relay, you can try to repair it. The repair is as follows:
- Unscrew the screws securing the housing cover.
- Sometimes it is necessary to additionally solder the ends of the winding.
- By removing the cover, you have access to finding a possible problem - these are power contacts, which may be worn out or burnt out: in the first case, replacing the contacts will help,
- in the second case, the problem can be solved with the help of sanding paper.
And lastly, we recommend watching a video that shows how you can start a motor with a non-working starter solenoid relay.
DIY starter repair
It is known that a car cannot drive without a starter. It seems like a simple electric motor, but you can’t do without it. You can start a piston unit with a failed “starting” unit only from a pusher, but only for a trip to a car service specialist.
The reasons for the breakdown of such a critical mechanism are quite obvious. Most diseases can be cured if you repair the starter yourself. We list below the main sources of malfunctions:
- natural wear and tear of electric motor elements;
- water ingress while washing the car engine;
- improper operation of the unit, for example, long periods of operation of the electric motor after starting the engine;
- short circuits.
Do-it-yourself partial repair of the starter usually saves you from all this. That is, it is not at all necessary to buy a new unit entirely. Next, we will look at which specific elements fail, and how to repair the starter with your own hands.
Let us first note that according to the symptoms when turning the ignition key, it is necessary to distinguish between the types of malfunctions of the starting electric motor. If, for example, after turning the key you hear a clicking or crackling noise, then the problem is in the retractor cylinder. The latter can be completely replaced.
How to deal with the VAZ unit
First, let's look at how to repair the starter with your own hands on VAZ cars. First, let's take the very first of the cars in this line.
To repair a VAZ 2101 with your own hands, we will use the tools listed below:
- set of wrenches;
- flathead and Phillips screwdrivers;
- sandpaper;
- heads.
So, let's start work by opening the hood.
- Disconnect the terminals from the battery.
- We dismantle the air filter housing with the filter element.
- Unscrew the three nuts securing the electric motor to the motor.
- We disconnect the wires after taking photographs of the connections.
- We remove the defective device.
- Perhaps the so-called “pants” - the exhaust pipe - will interfere with this, then you will have to unscrew the four bolts and “lower the pants”.
- We separate the retractor cylinder from the dismantled element by disconnecting the wire and unscrewing three screws. We inspect it and, if necessary, replace it completely.
- After unscrewing the bolts, remove the motor casing.
- After unscrewing the two bolts, remove the cover.
- Separate the windings from the brush holder plates and remove the insulating tube.
- Separate the cover from the collector side.
- Use a screwdriver to remove the motor brushes. We measure them and replace them if necessary.
- We disassemble the drive of the defective assembly unit. To do this, undo the cotter pin, then remove the drive lever, disengage the drive from the clutch, and then remove it.
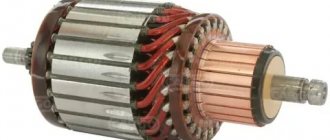
- We inspect the windings of the electric motor.
- If necessary, we press it out, and then replace the bushings of the assembly.
- We clean elements with soot or plaque. We replace failed parts with new spare parts.
- We carry out assembly and installation in the opposite direction.
Note that do-it-yourself starter repair for a VAZ 2106 is carried out according to similar instructions.
Also find out where the fuel filter is located on the Hyundai Solaris and the structure of the fuel pump.
If we discuss the problem that interests us regarding front-wheel drive VAZs, then it is enough to simply consider what differences there are from the given instructions. The tools used here are the same.
However, for example, when repairing a VAZ 2109 starter yourself, you do not need to disconnect the exhaust pipe during removal from the car. Further manipulations are carried out exactly as described above.
Naturally, repairing a similar VAZ 2108 starter with your own hands is done according to a similar scenario. When repairing a VAZ 2110 starter with your own hands, it is easier to immediately remove the solenoid relay while dismantling the unit from the car by unscrewing the corresponding nuts.
However, in case of repairing the starter of a VAZ 2115 with your own hands, the electric motor can be dismantled immediately along with the retractor cylinder.
By the way, it is not necessary to replace this completely assembled cylinder if it breaks. You can also repair the starter retractor relay yourself. To do this, you need to disassemble it, inspect the retractor winding, return spring, and replace failed parts. As for domestic cars, UAZ repairs can be performed according to the given instructions from VAZ.
How are things going with other popular cars?
Now let’s touch on two more truly popular cars. Let's talk about sorting through the starting element on Oka, as well as Nexia.
To repair the starter at Oka with our own hands, we will need:
- set of wrenches;
- screwdrivers.
We start by dismantling the unit; it is located under the thermostat of the cooling system.
- In this car, the starting device is attached to only two points; to remove it, you need to unscrew the bolt on one side and the nut on the other. But first we disconnect the wires, both from the battery, from the retractor cylinder and from the connecting block.
- We unscrew the two nuts, and then remove the traction relay.
- Unscrew and remove the cover casing from the collector side.
- We dismantle the brush springs, locking, and adjusting washers.
- Separate the cover from the body where the collector is.
- We remove the brushes, then measure them; when they are worn out, they need to be replaced.
- Having unfastened the cotter pin, we dismantle the lever axis.
- Remove the cover from the drive side.
- We remove the drive lever, then take out the anchor.
- We inspect the windings of the electric motor.
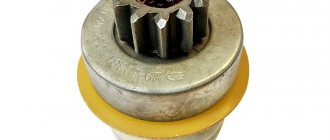
- We dismantle the drive coupling and inspect its condition. This clutch is also called bendix. In case of any defects in the clutch, it is easy to repair the Bendix of any starter with your own hands. You just need to replace the broken elements.
- We take out the bendix spring and replace it if necessary.
These are some simple manipulations.
It must be said that in such a small car, such as the Tavria, the mounting of our treasured electric motor is also made at two points, and its design is similar. Therefore, Tavria does its own repairs in the same way.
Well, with Oka and Tavria it’s somehow easier, but if the starting unit of another people’s car breaks down, will it be more difficult? Let's see. To repair the starter of a Daewoo Nexia with your own hands, you need to prepare:
- set of wrenches;
- screwdrivers.
- To dismantle the unit from the car - here, like all rather large cars, there are three fastenings - unscrew the nuts and disconnect the wires. You need to know that a “ground” wire is attached to the upper bolt that secures the electric motor to the piston unit.
- We immediately check the drive gear; it should only rotate unidirectionally.
- We disassemble and sort out the assembly in the same way as in previous cases.
- We also disconnect the solenoid relay.
- We remove the cover from the collector side, as well as from the drive side.
- We dismantle and then, if necessary, replace the brushes.
- We take out the anchor and study the windings.
- If necessary, we press it out, and then replace the bushings of the assembly.
- We do the assembly in reverse order.
This is interesting: DIY VAZ 2110 starter repair
Apparently, there are few difficulties here.
The same can be said about repairing a starter, for example, an Audi 80 with your own hands. There you need to act, practically repeating the above points.
Price and necessity of the procedure
However, not everyone decides to repair the starter with their own hands. For some, turning to a car service center may seem like a much more convenient option. For such car enthusiasts, we have compiled a table with prices for the described operation.
Diagnostics and repair
Checking the system
Before checking the solenoid relay, you need to test the starter itself. This check will allow you to understand what exactly is not working in the system. Insert the key into the ignition and turn it.
Next you will need to open the hood and get to the starter. You must make sure that this is the case. To do this, bridge the two contacts. They are made in the form of two copper bolts. These structural elements are attached to the rear of the solenoid relay (on the body). If, after the manipulations you have performed, the mechanism rotates, then the problem is in the solenoid relay.
In some cars, reaching the starter is very difficult, and sometimes even impossible. In this case, you will have to partially disassemble the system and dismantle the device itself.
After removing the starter, place it on the ground. Place the battery nearby. Connect the leads of the two devices. In this case, the battery ground is connected to the starter ground.
When the wires are connected, the starter solenoid relay will operate. At first there will be a rather loud click. If the mechanism operates too slowly, be sure to check the contacts. This situation may be caused by the fact that they are burnt.
What kind of damage can happen?
Usually the whole problem lies in burnt contacts or their sticking; other faults include:
- coil burnout,
- mechanical damage,
- natural wear and tear of parts.
Relay clicks and starter inactivity
When the engine does not start, but there is still some life left in the system that starts it, the situation is not hopeless. In this case, there may be several reasons for the problem:
- discharged battery;
- lack of good contact or faulty wiring;
- damaged ignition switch;
- a failed starter (voltage does not reach the brushes or the starter bendix slips);
- not working solenoid relay.
Each of them provides for a certain behavior of the car owner. If the problem is caused by the battery, you just need to charge it or replace it. It is sometimes very difficult to detect damage to car wiring yourself, but this can be easily done at the nearest service station. The worst thing is with the starter itself - it needs to be removed and diagnosed.
The ground is connected to the device body, and the positive terminal is connected to the stud behind the relay. During normal rotation of the device, the cause must be sought in the solenoid relay; in case of complete inactivity, the cause must be found in the relay itself.
When repairing a starter with your own hands, you must remember that there is constant increased wear on the brushes, bendix and retractor relay. Therefore, for its trouble-free operation, these components are subject to periodic monitoring and timely replacement.
This video describes how to repair a Bosch starter at home:
Selecting a new solenoid relay
Previously, the easiest way to select a new traction relay was in offline stores. Today, searching in online stores has greatly simplified and become easier. When selecting a new solenoid relay, keep the following in mind:
- The relay that you find in electronic catalogs does not always correspond to the starter. You should first look for an original relay for the starter installed in your car, and only then select analogues of this relay if it seems too expensive to you;
- Specify the geometry of the relay you will order. This is where offline stores turn out to be more reliable - you can take the old relay with you and compare it with the one you found;
- It is worth purchasing 2 pairs of copper nuts and washers in advance, which are best used to secure the new part. A supply of such “trifles” will sooner or later turn out to be extremely useful.
Dismantling
There should be no problems with the dismantling process. The main thing here is to remove the starter, since the required relay is held on it. Therefore, dismantling is carried out as an assembly.
- Turn on the handbrake, disconnect the battery by removing the negative terminal from it.
- A wire with a large cross-section goes from the battery to the contact of the relay. It can be turned off by unscrewing it using a 13 key.
- Remove the thin winding power wire from the solenoid relay.
- Using the same 13mm wrench, unscrew the three mounting nuts holding the starter to the clutch block.
- You can remove the device through the bottom or top. If you chose the top, then you need to slightly rotate the starter around its axis and remove it.
- The lower output is more difficult, since here you need to remove the crankcase protection. But if parallel work is carried out that requires similar manipulations, problems will not arise.
Repair
Next, you have a choice to make: replace the entire relay or try to repair it.
Only a relay that has a collapsible design can be fully repaired. It is not uncommon for cars to have a relay with a non-separable body. Repairs there are also possible, but only partial.
- Unscrew the pair of bolts that hold the relay on the starter, disconnect the core shackle from the upper end of the drive lever;
- Install a new solenoid relay in its place, thereby completing the replacement.
But if you want to save money or just like to tinker with your car, you can try to bring a damaged relay back to life. To do this, we offer you detailed instructions.
Disassembled element
If this measure does not help, we will disassemble the case and repair it.
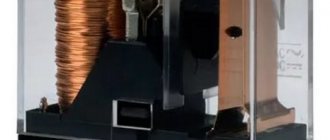
- The relay consists of a housing with a winding inside, a core with a return spring and contacts.
- The spring disconnects the starter rotor gears from the Bendix ring when the power to the relay winding is turned off.
- The back cover of the relay is fixed with screws to the body. Therefore, the first thing we do is remove this cover by unscrewing the corresponding fasteners.
- Both contact bolts have a nut, which you also unscrew.
- You will see washers under the nuts. Do not lose them so that you can return them to their place during reassembly.
- Unsolder both terminals of the winding using a soldering iron. Then remove the cover.
- If you find traces of carbon on the contacts, they can be removed with a small file.
- There is a rubber O-ring under the cover. Check it for elasticity and integrity. If the ring is damaged or worn, replace it with a new one.
- Remove the contact plate along with the rod.
- Use a flathead screwdriver to remove the return spring.
- If the spring is deformed or stretched too much, it will need to be replaced. Otherwise, a worn spring will not be able to guarantee the desired contact. As a result, the relay does not work properly.
- Disassemble the contact plate. To do this, you need to remove the retaining ring that insulates the washer. After this, the plate will fall out on its own due to the pressure created by the spring.
- Remove the contact bolts from the cover. Clean the surfaces of their contacts. Often, due to burning of the contact surfaces, the solenoid relay stops working normally.
Contact bolts
- If the carbon deposits are too strong and cannot be removed with simple sandpaper, do not rush to buy new bolts. Just rotate them 180 degrees. So they will touch on the other side, where there is no carbon deposits.
- The relay windings are located in a non-separable housing. If they are damaged, you will have no choice but to completely change the relay.
- Replace all damaged and worn elements of the switching relay, and then put everything back into the housing. Reinstall the solenoid relay and check if the ignition returns to normal.
If the relay has a non-separable housing, many recommend replacing it. But if you wish, you can even repair such a unit. To do this, you need to flare the housing with pliers, then unsolder the contacts and remove the cover. Next, follow the instructions given above.
The last stage of replacement or repair is checking the winding resistance.
If the unit is working properly, the multimeter in ohmmeter mode will show you the following data.
Malfunctions
Troubleshooting a traction relay is not that difficult. It should be noted that its operation is accompanied by a click - this is the result of the armature being retracted and the gear being engaged.
When you turn the key, this click is clearly audible. Thus, the absence of a click may indicate a break in the coils, lack of power, or the armature being stuck in one position.
If, when you turn the ignition key, a click is heard, but the starter itself does not start or starts but spins very slowly, this may indicate that the contact plates are burning.
Continued operation of the starter after starting the power plant will be accompanied by a characteristic buzzing sound.
It is possible that the armature is stuck in the retracted position and cannot return back, so it keeps the bendix gear engaged and continues to close the contact plates.
Basic starter relay faults
Like any other part, the starter relay may experience technical problems with its operation. They may appear as follows. The most obvious cause of the malfunction is that the starter simply does not engage and thus the engine does not start. The opposite problem is that the starter does not stop working after the engine starts. This also indicates a problem in the mechanism. Also, often the starter does not have enough revolutions to spin the flywheel and thus turn it on. Another cause for concern is the absence of a click when the ignition key is activated, which signals that the armature has been pulled into the housing and the gear is engaged with the flywheel. If it is not there, then the mechanism did not work. However, there are times when the click is triggered, but the starter device still does not work. The problem most likely lies in burnout of contact pairs. There can be many reasons for the above problems. First of all, obvious wear of parts that prevent the starter from working correctly may catch your eye. In this case, the solution to the problem is to replace parts. Contact pairs or windings may also burn out, as mentioned above. To troubleshoot, as in the first case, a complete replacement of parts is necessary. In addition, the anchor may move into the hull with some delay and difficulty.
First of all, the problem with the engine not working may be due to damaged wiring. Therefore, the check should begin with it. If it is in perfect working order, you should check the starter relay. There is a high probability that it simply does not work. First of all, you need to check whether a click is heard when you turn on the ignition key. Its absence indicates that the starter relay mechanism itself does not work. In this case, it is necessary to completely replace the device.
We recommend: Engine lubrication system. General structure and principle of operation
If a click is heard, but the engine does not start, you should check the functionality of the contact pairs. To do this, use a screwdriver to remove the terminal and connect it to the starter terminal. In this case, current must flow and if the motor fires, then the contact pairs are not damaged, and the problem lies in other parts.
A complete check of the starter relay also includes a voltage check, since a lack of energy causes the flywheel to not rotate sufficiently, and thus the engine cannot be started. In this case, you will need a special multimeter. One probe must be connected to the positive terminal, and the other to ground. Then you should turn the ignition key and look at the multimeter readings. If they are below the available standard, it means there is not enough voltage to start the engine. All these procedures can be carried out without removing the starter from the car, which makes the work easier. However, if a complete inspection of the relay with its removal is required, you should remember the safety rules. The torque is quite strong, so it is best to place the device on the ground at a safe distance. Parts must also be disassembled with caution, as incorrect inspection can cause serious injury.
Typical faults
During operation, the starter is subjected to severe overloads due to the fact that it is located in the lower part of the engine. Dust is constantly hovering here, dirt, oil and other technical fluids get in. Considering that the relay forms a single device together with the starter, it experiences no less overload. It happens that the cold cranking current reaches 500 A or more, which quickly destroys contacts and connections.
As a rule, the traction relay deteriorates due to burnt contacts or their sticking, but there are other, more complex problems:
- damage, short circuit of internal coils;
- contact burnout;
- plug failure;
- sticking of the rod or rotor;
- spring deformation.
As for the obvious signs of a faulty relay:
- the starter buzzes and does not stop after starting the engine;
- after activating the ignition, a click is clearly audible;
- The starter spins in vain, the engine does not start.
| Malfunctions | Symptoms |
| Relay coil fault | the starter stops working |
| Destruction of contact zones of nickels | problem with the starter working “every other time” |
| Broken fork | the solenoid relay will click, but the starter motor may not start |
| Rod and armature sticking, spring breakage | unstable operation of the starter, possible jamming of the bendix at the time of starting and engine damage |
Types of solenoid relays and their manufacturers
Let's briefly touch on the solenoid relays used on VAZ cars. They are divided into four types:
- for non-geared starters of VAZ 2101-2107 (“Classic” models);
- for non-geared starters of VAZ 2108-21099 models;
- for VAZ gear starters of all models;
- for AZD starter gearboxes (used in VAZ 2108-21099, 2113-2115 models).
In addition, as mentioned above, they are divided into collapsible and non-collapsible. Older models are collapsible. New and old are interchangeable.
For VAZ cars, solenoid relays are produced by the following companies:
- Plant named after A.O. Tarasov (ZiT), Samara, Russian Federation. Relays and starters are produced under the KATEK and KZATE trademarks.
- BATE. Borisov Automotive and Tractor Electrical Equipment Plant (Borisov, Belarus).
- Kedr Company (Chelyabinsk, Russian Federation);
- Dynamo AD, Bulgaria;
- “Iskra” A Belarusian-Slovenian enterprise whose production facilities are located in the city of Grodno (Belarus).
When choosing a particular manufacturer, it is necessary to take into account that the highest quality and most common brands are “KATEK” and “KZATE”. Also remember that if an AZD starter is installed on your car, then “native” relays manufactured at the same enterprise are suitable for them. That is, they are not compatible with products from other factories.
The ability to start the engine by turning the ignition key from inside the car and without much physical effort can easily be considered one of the most significant achievements of designers in terms of improving the consumer qualities of a car. However, sometimes it happens that you cannot start the car with an electric starter. The reasons for such an unpleasant event are varied, but the list of the most likely among them includes a malfunction of the solenoid relay. A savvy car enthusiast is able to quickly localize and diagnose such a breakdown on his own, after which he can carry out repairs and restore the vehicle to normal operation without contacting a service center and with minimal financial costs. An assistant will be required to perform some of the checks.
How to repair the starter relay
Firstly, do not rush and remove the entire starter. To begin with, you can try to clean all the wires and contact groups one by one from rust and oxides. If after this simple procedure the problem remains, then you need to remove the starter. After removing the starter, you need to disconnect the starter solenoid relay. As a rule, this procedure is individual for each type of starter, so it is not possible to describe a single algorithm.
Depending on the manufacturer, the starter relay may have 2,3 or 4 contacts. If after disassembly you notice a break or sealed/burnt wires, then their correct location can be found in the technical data sheet of your starter. Be sure to solder all wires according to the diagram from the manufacturer. The functionality of the solenoid relay can be checked by connecting the working winding to the battery. If the relay is working, then you should hear 1 click, which will reliably close the contacts powering the starter motor. After fixing the problem, assemble the starter and try to start it from the battery or using a charger. Remember that when connecting a jump starter to a battery, it will consume a lot of energy and do not be alarmed if you see a lot of sparks.
Only after all thorough checks can you install the starter in its place.