The starter is responsible for starting the car engine and if it refuses to work, then starting the car becomes quite difficult. As a rule, it does not fail instantly, but gradually, and by paying attention to its behavior, the fault can be determined based on its symptoms. If this could not be done, then you will have to check the starter, either with improvised means or using a multimeter.
A quick check of the retractor relay or starter motor can be done without removing it from the car or by removing it from under the hood. For such a test you will only need a charged battery and a pair of power wires. And to check the armature, brushes or starter winding, you will have to disassemble it and run it with a multitester.
How to test the starter with a battery
Let's start diagnostics of engine starting with the first question that many car owners ask - how to check the starter on the battery and what will such a test show?
This manipulation makes it possible to determine the correct functioning of the starter, since when it is on the engine, apart from clicks (if they are heard, of course), little can be said about the operation of the device. Therefore, by closing the terminals with leads on the starter retractor and the starter housing, you can determine whether there is a malfunction in the retractor relay or the starter itself by seeing whether the relay operates and whether the starter motor turns.
Checking if the starter turns
Checking the starter in 3 simple steps
To test the starter for its ability to extend the gear and turn (as it should work when installed on the car), you can use the battery.
For the test, you need to securely fix the part, connect the “-” terminal to the body , and the “+” terminal to the upper terminal of the relay and its switching contact . During proper operation, the bendix should move out and the gear motor should rotate .
Let’s look at how to check each component of the engine starting device separately, clearly and in more detail.
Verification Guide
The device can be checked without removing it from the car. Removal is carried out in case of serious damage. No special knowledge is required for diagnosis. The device is checked in several stages. The most important thing is to check with thick wires; it won’t work on thin ones.
Stages
Checking the starter assembly. To do this, you need to remove the device from the car and clamp it in a vice, securely, but not too tightly, so as not to break it. Then you need to close the contact bolts located on the back side using a metal object or a piece of wire. If the starter is working, it will start spinning. In this case, the cause of the malfunction may be in the traction relay.
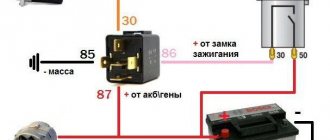
Checking the operation of the traction relay. To do this you need to use wires with low resistance. One wire needs to connect the positive terminal on the battery and the relay to ground, and the second wire must connect the negative terminal on the battery and the starter housing. If the relay is working properly, a characteristic click will sound and the armature will push out the gear (video author - altevaa TV)
Checking the anchor. To do this, you need to apply 12 V voltage directly bypassing the traction relay. We check with a test light. The armature is connected to the power supply, and the device body is connected to the light bulb. If the light bulb lights up or sparks, it means that the armature has a breakdown and needs to be replaced.
The tester should measure the resistance between the rotor housing and the windings; it should be several million Ohms. If the insulation resistance is from 0 to 2 ohms, the armature is faulty and requires replacement. Checking the inter-turn short circuit is done using a special stand for testing generators.
Checking the device on the stand
Checking the brushes is done using a 12 V light bulb, which is connected to the brush holder and the body of the device. A glowing light indicates a brush malfunction. In this case, they need to be replaced. The winding is also checked with a light bulb, only the winding and the housing are connected.
Call the electrical network. Using a tester, you can ring an electrical circuit to find breaks. To ring the electrical network, you must turn on the ignition.
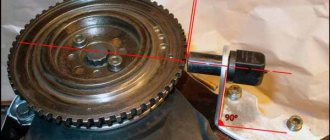
Checking the Bendix. To check, you will need a soft gasket to protect the part from damage. The Bendix sprocket must be clamped in a vice and the clutch turned in one direction and the other. If the part is working properly, the coupling will only turn in one direction. If it turns in the other direction, this indicates that it is faulty and needs to be replaced. The teeth may be worn out, then the bendix just needs to be replaced.
Gouges in Bendix teeth
A visual inspection can reveal the following faults:
- winding breaks;
- insulation violation;
- wear of the collector plates;
- surface defects of the commutator and armature in the form of burrs, scratches, grooves, etc.
Small defects can be eliminated by sanding with fine-grained sandpaper. If as a result of these actions the anchor has decreased in diameter, spacers are installed. The same applies to the collector. If the parts are very worn, it is better to replace them. Replacement is required if the interturn insulation is faulty, brushes and bearings are worn out.
By learning to check the device that starts the engine with your own hands, you can save on visiting a service station.
If you don’t know how to check the starter without removing it from the car, diagnostics can be done at service stations that are equipped with a special stand for diagnosing generators.
Sorry, there are no surveys available at this time.
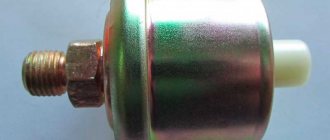
How to check the solenoid relay
To check the starter solenoid relay, you need to connect the positive battery terminal to it , and the negative terminal to the device body . When the relay is working properly, the Bendix gear will move out with a characteristic click.
Checking the Solenoid Relay Using a Battery
Checking the retractor starter
The gear may not extend due to:
- burnt retractor contacts;
- jammed anchor;
- burnout of the starter winding or relay.
Checking the starter windings for short circuits and open circuits
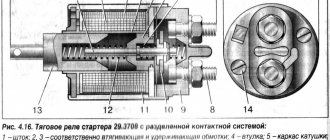
Let's check the starter windings 29.3708 of VAZ 2108, 2109, 21099 for short circuits and open circuits.
The reason for such a check may be a complete failure of the starter to work (the starter does not turn, but the traction relay is activated). The check will have to be carried out with the starter removed from the engine, since access to the terminals of its windings is necessary.
Tools and devices required for testing
— Keys for removing the starter from the engine
— Megohmmeter or multimeter (autotester) with megohmmeter mode (with a measurement limit of 1000 kOhm)
Preparatory work
— Remove the starter from the car engine
Checking the starter windings of VAZ 2108, 2109, 21099 cars
— Checking the starter stator windings for short circuits
We attach one multimeter probe to the starter housing, and with the other we touch the three terminals of the stator windings in turn. If there is no short circuit, the resistance tends to infinity with each touch. If any of the windings is shorted to the housing, the multimeter will show the presence of a certain resistance on its display.
Checking the starter stator windings for short circuits - one probe on the housing, with the other we touch the three terminals of the windings in turn
— Checking the starter stator windings for an open circuit
We connect the multimeter probes one by one to the terminals of the windings. In the event of a “break”, the resistance tends to infinity (no current passes through the windings). If there is no “break”, the multimeter will show some small value.
How to check starter brushes
Brushes can be checked in several ways, the simplest of which is checking with a 12 volt light bulb . To do this, connect one terminal of the light bulb to the brush holder, and the other to the body; if it lights up , then the brushes need to be replaced , since there are breakdowns in the protection.
Checking starter brushes for short circuit to ground
The second way to check the brushes - with a multimeter - can be done on a disassembled starter. The task will be to check for a short to ground (should not short). To check, the resistance between the main plate and the brush holder is measured with an ohmmeter - the resistance should tend to infinity .
Also, when dismantling the brush assembly, be sure to carry out a visual inspection of the brushes, commutator, bushings, windings and armature. After all, when the bushings are worn out, there may be a drop in current during startup and unstable operation of the motor, and a damaged or burnt commutator will simply “eat” the brushes . Broken bushings, in addition to contributing to armature misalignment and uneven wear of brushes, increase the risk of an interturn winding short circuit.
Removing the starter
Before you remove the starter and how to repair it, you need to take into account that this task is quite labor-intensive. However, removing the starter and disassembling it is a prerequisite for troubleshooting.
How to remove the starter yourself:
- Before removing the starter, you need to disconnect the battery from the car's on-board power supply. Any repair work on the generator and other electrical devices is carried out with the on-board network disconnected.
- If you do not know how to remove the car starter, then after the on-board network is de-energized, you need to unscrew the nuts on the relay terminals of the unit, as well as on its body. If we take into account the different specifics of vehicle assembly, the starter can be mounted on different clamps. But usually a 13mm socket is required to dismantle the mechanism.
- After this, you need to disconnect the power wiring and move it away.
- If there is protection on the motor, it must be removed.
- After this, the nuts securing the device to the block are unscrewed. Having done this, the mechanism itself can be removed.
Checking and repairing the starter
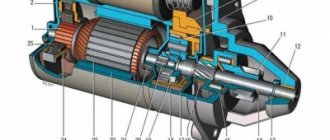
Before disassembling, we recommend studying the structure and operating principle of a car starter. Also, when making repairs, it is important to understand the operating principle and diagnostic methods of the solenoid relay and starter bendex.
As stated above, a mechanism can break down for various reasons. Therefore, repairs to the car starter must be carried out in accordance with the diagnostic results. Before you repair the starter, you need to stock up on all the necessary tools and a repair kit. A starter repair kit can be purchased at any automotive store. If you don’t know how to disassemble the starter, try using the car’s service manual, but usually there’s nothing complicated about it.
Starter relay
First of all, car starter repair includes relay diagnostics. When voltage is applied to the positive terminal of the winding, a click should be heard - that sound will indicate that the relay is working, and the bendix of the assembly should move. The connected ohmmeter screen will show the contact closure. If this does not happen, then repairing the car starter comes down to unscrewing the bolts and replacing the relay.
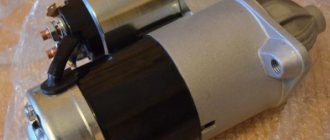
New solenoid relay for cars
Starter brushes
Repair of truck starters or for passenger cars can come down to replacing the brushes. Replacing the starter brushes is carried out by dismantling the back cover, and even if the brush assembly is not worn out, experts still advise changing it. Disassembling the starter will show that the brushes are located at the rear of the motor, and if one of them breaks, this will lead to the inoperability of the unit as a whole. To dismantle it is necessary to unscrew the terminals and remove the springs.
Starter stator
Overhauling the starter includes checking the stator; using an ohmmeter, it is necessary to diagnose it for breakdown, and the obtained indicators must be at least 10 kOhm. If the readings obtained are different, then repair of starters of foreign or domestic cars consists of replacing the stator. In some cases, if the car uses a gear mechanism, it may be necessary to replace the starter assembly, since the design features of such a device do not allow it to be repaired. Learn more about diagnostics and repair of the unit from the video (the author of the video is the Exin Plus channel).
Starter rotor
You can repair the starter by replacing the rotor; to get to it, you will need to unscrew the studs that secure the two parts of the electric motor. Having done this, you can completely dismantle the assembly by first removing the retaining ring with the washer. Before replacing the rotor, you need to take the time to check the windings; if there are traces of soot on them, you need to replace the armature. Also check the commutator - there may be a small coating on it, but sometimes a large layer of it makes it impossible to start the mechanism. Do-it-yourself starter repair in this case will involve cleaning the collector using sandpaper.
Next, the mechanical component is checked. If you miss something, it could cause a more serious problem later, so if you are not confident in your abilities, then the only thing that can help you is to replace the starter. In some cases, replacing the starter bushings will help localize the problem. This need rarely arises, but sometimes replacing the starter bushing really helps solve the problem.
Starter assembly
Assembling the starter is the final stage of repair. Before assembling the starter, the shaft, gearbox, armature and bushings must be lubricated. How can you lubricate the starter before assembling it? For this, graphite lubricant, Litol, and motor fluid can be used. Assembling and installing the starter is carried out in the reverse order; after installation, it is necessary to check the functionality of the unit.
To make sure that the repair was carried out correctly, you need to apply a minus to the mechanism body, and a plus to the winding. If, after connecting, the bendix can move back and forth, while the relay contacts close normally, this indicates that the mechanism is fully working. After applying positive voltage to the electric motor, the motor should rotate evenly, and there should be no noise or sounds. If there are no sounds, then the mechanism is put in place.
If you made any mistakes in assembling the mechanism, it is not recommended to operate the vehicle. Otherwise, you may encounter a problem somewhere along the road, and the worst thing will be if it overtakes the driver while driving outside the city on the highway. Therefore, if you doubt that everything was done correctly or that mistakes were made during the work, it would be better to consult a specialist about this. Believe me, it’s better to pay a little once, but be sure that the machine will work normally, than to save money and face higher repair costs.
How to check bendix
The operation of the Bendix starter is also quite simple to check. You need to clamp the overrunning clutch housing in a vice (through a soft spacer so as not to damage it) and try to turn it back and forth, it should not rotate in both directions. It turns - the fault lies in the overrunning clutch , because when you try to turn it in the other direction, it must stop. Also, the bendix may not engage, and the starter will turn idle if it is simply stuck or the teeth are eaten away. Damage to the gear is determined by visual inspection, but the occurrence can only be determined by completely disassembling everything and cleaning the gearbox from dirt and dried lubricant inside the mechanism.
Indicator light for checking the starter winding
Conditions for diagnostics
It is quite obvious that it is much more convenient to conduct a high-quality diagnosis of a starter malfunction if it is in front of you on the desktop, and not hanging somewhere at the bottom of the engine, in its most inaccessible place. Only when the unit is in your hands can it be fully checked for faults, subsequent maintenance and repairs.
For convenient dismantling and installation of the starter, you only need a standard set of keys and sockets. It is most convenient to dismantle and install it when the car is in the inspection pit. In this case, access to the mounting nuts that hold the starter on special studs at the bottom of the engine is easier. In addition, the presence of a hole will allow you to more carefully listen to how the starter works when starting the engine, and determine the nature of possible extraneous noise that occurs in its housing during the process of turning on the ignition.
How to check the starter winding
The starter stator winding can be checked with a flaw detector or a 220 V light bulb . The principle of such a check will be similar to checking brushes. We connect a light bulb up to 100 W in series between the winding and the stator housing. We attach one wire to the housing, the second to the winding terminal (from the beginning to one, then to the other) - it lights up, which means there is a breakdown . There is no such control - we take an ohmmeter and measure the resistance - it should be about 10 kOhm .
The starter rotor winding is checked in exactly the same way - we turn on the control unit in a 220V network and apply one terminal to the commutator plate, and the other to the core - it lights up, which means that the winding needs to be rewinded or the rotor must be completely replaced.
Checking the battery and ground bus
If voltage is applied to the starter, but it does not respond, you need to do the following.
Switch the multimeter to voltmeter mode, select the 20-100 volt scale for direct current and measure the voltage at the battery terminals. The device will show 12-13 V. This voltage is necessary to start the engine.
If the readings are lower, you need to charge the battery. When taking measurements, it is necessary to observe safety precautions, since there is metal all around, short circuits are likely. Glasses won't hurt.
Then, you should check the condition of the earth bus. If there is a sensitive ohmmeter in the multimeter, measure the resistance between the negative connectors of the battery - the car chassis, engine housing and generator. The device should show 0 Ohm everywhere.
You can do it differently. The multimeter is switched to voltmeter mode with a minimum scale and, with the ignition on, the voltages between the battery negative, the car chassis, the engine housing and the generator are measured.
Readings must be accurate to tenths of zero. If more, then you need to check the connection contacts. If necessary, strip them and tighten them tightly.
For subsequent manipulations, computer diagnostics is required. In cars with computer control, the engine may be blocked by the immobilizer. Interfering with the electrical part sometimes leads to blocking the car from starting.
How to check the starter armature
To check the starter armature, you need to apply 12V voltage from the battery directly to the starter, bypassing the relay. If it spins, then everything is fine with it , if not, then there is either a problem with it or with the brushes. It is silent, does not spin - you need to resort to disassembly for further visual diagnostics and checking with a multimeter (in ohmmeter mode).
Checking the starter armature with a battery
Checking the anchor on the PPYA
Basic anchor problems:
- breakdown of the winding to the housing (checked with a multimeter);
- wiring of collector terminals (can be seen upon detailed inspection);
- interturn short circuit of the winding (checked only with a special PPYa device).
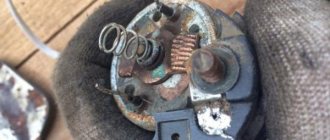
Burnt-out lamellas due to poor contact between the cockerel and the tavern
Very often, a winding short circuit can be determined by a detailed visual inspection:
- chips and other conductive particles between the commutator lamellas;
- burnt out lamellas due to contact between the winding bar and the cockerel.
Also, very often, uneven wear of the commutator leads to brush wear and starter failure. For example: protrusion of insulation in the gap between the lamellas, due to the displacement of the commutator relative to the shaft axis.
The depth between the grooves of the armature commutator must be at least 0.5 mm.
Starter malfunctions
One of the components of a car's electrical equipment is the starter. Without it, no engine starts. But, like any other node, it tends to break. In order to avoid the extreme consequences of possible malfunctions, it is worth listening every time you start up in order to notice in time the first call signs of a possible breakdown. Almost every motorist can do this on his own, so you don’t have to buy a subscription to a service center for this purpose.
There are several starter malfunctions that will make it impossible to start the engine:
1.When the starter is turned on, the armature does not rotate and the traction relay does not operate. Externally, such a breakdown can be identified by a characteristic sticking sound. The causes of such a malfunction may be, for example, a complete discharge of the battery, oxidation of the pole terminals on the battery, weak tightening of the tips on the battery, a break in the wire or its disconnection from the starter to the traction relay, jamming of the armature and an interturn short circuit.
In this case, to establish a reliable cause, you will have to completely disassemble the starter, eliminating the easiest options from the possible causes.
2. When the starter is turned on, the armature does not work or rotates heavily, provided that the retractor relay works perfectly. Common reasons may be the usual burning of the commutator or a short circuit between its plates, wear of the brushes or their freezing, wear of the armature bushings, banal battery discharge or oxidation of the contacts, a break in the stator winding, displacement of the armature plates and a break in its winding, an interturn short circuit.
3. When the starter is turned on, rotation of the armature is observed, but there is no translational rotational movement at the crankshaft. The main reasons are a breakdown of the buffer ring or drive ring of the clutch, slipping of the clutch's free play, tight movement or jamming of the starter armature.
4.After the engine starts, the starter does not turn off. This occurs due to sticking of the drive lever or traction relay, sticking of the traction relay, breakage of the ignition switch return spring, or starter misalignment. In any case, if such a problem occurs, you must immediately turn off the ignition switch and disconnect the wire that leads directly to the starter relay.
5. The appearance of various unusual noises is explained by wear of the bearing bushings, loosening of the starter, breakage of the cover, damage to the teeth of the drive itself or the flywheel crown.