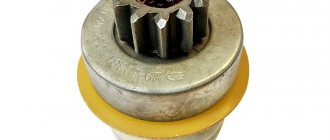
Bendix starter
The starter bendix (real name is overrunning clutch ) is a part designed to transmit torque from the starter to the car engine, as well as to protect it from the high operating speeds at which the engine operates. The starter Bendix is a reliable part, and it rarely breaks. As a rule, the cause of failure is natural wear and tear of its internal parts or springs. To identify malfunctions, let’s first understand the device and operating principle of the Bendix.
Design and principle of operation
Most overrunning clutches (we will call them the more popular word among motorists - bendix) consist of a leading race
(or outer ring), containing rollers and pressure springs, as well as
a driven race
. The leading holder has wedge channels, which on one side have a significant width. It is in them that the spring-loaded rollers rotate. In the narrow part of the channel, the rollers are locked between the driving and driven clips. As is clear from the above, the role of the springs is to drive the rollers into the narrow part of the channels.
The principle of Bendix operation is the inertial effect on the gear coupling that is part of it until it engages with the engine flywheel. While the starter is inoperative (the engine is turned off or running in constant mode), the Bendix clutch is not engaged with the flywheel crown.
Bendix works according to the following algorithm:
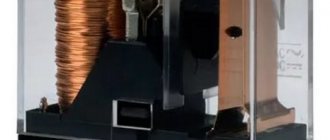
Bendix interior
- The ignition key is turned and current from the battery is supplied to the starter motor, driving its armature.
- Thanks to the helical grooves on the inside of the coupling and the rotational movement, the coupling, under its own weight, slides along the splines until it engages with the flywheel.
- Under the action of the drive gear, the driven cage with the gear begins to rotate.
- If the teeth of the clutch and the flywheel do not coincide, it rotates slightly until they are firmly engaged with each other.
- The buffer spring included in the design serves to soften the starting moment of the engine. In addition, it is needed to prevent tooth breakage from impact when the gears engage.
- When the engine starts, it begins to rotate the flywheel at a higher angular speed than the starter previously rotated. Therefore, the coupling twists in the opposite direction and slides along the splines of the armature or gearbox (in the case of using a geared bendix) and disengages with the flywheel. This saves the starter, which is not designed to operate at high speeds.
How to check starter bendix
If the starter bendix does not turn, then you can check its operation in two ways - visually
, removing it from the car, and
“by ear”
. Let's start the description with the latter, as it is simpler.
As stated above, the main function of the bendix is to engage the flywheel and spin the engine. metallic clanging sounds are heard from the place where it is located
- this is
the first sign of a Bendix malfunction
.
And so, the bendix was removed, it is necessary to inspect it. In particular, check whether it rotates only in one direction (if it turns in both, it means it needs to be replaced) and whether the teeth are eaten. Also check to see if the spring is loose. You should also remove the fork from the Bendix, check its integrity, signs of wear, and if necessary, replace it. In addition, be sure to check if there is any play on the armature shaft. If this occurs, then the bendix should be replaced.
What if he doesn't come back
In fact, Bendix ensures long and trouble-free operation of the entire assembly. And if it weren’t for him, then at the moment when you turn off the starter (that is, the car starts), it does not disengage with the engine, which is called “does not return,” then the rotating engine shaft will simply break the starter itself. Which, by the way, sometimes happens when the Bendix malfunctions in the opposite way - that is, the accelerating clutch does not slip, but, on the contrary, sticks and continues to rotate the shaft together with the electric motor. That is, the bendix does not disengage.
And now we are talking about a malfunction when the bendix slips, slips, and it turns out that it works, but its clutch power with the engine is not enough to turn it over and start it. The thing is that heavy loads wear out the teeth of the ratchet gear over time, and the part fails.
It has already been said that this part - the accelerating clutch, popularly called Bendix - functions on the principle of a ratchet mechanism. And the cause of the malfunction, when the gear teeth do not grab and slip when rotating along their axis without achieving engagement, is in the vast majority of cases the banal wear of these very teeth. Indeed, in fact, at the time of operation, these same teeth experience a serious load, since they have to overcome the force of rotation of the heavy crankshaft of the engine, compression of its cylinders, and the like.
Over time, due to such loads, either:
- ratchet gear teeth;
- or (if it is not designed with gears, but with two rings with balls, a locking mechanism that works exclusively in one direction and return springs) the rings, balls wear out, or the spring breaks.
And such a malfunction leads to the fact that when the electric motor rotates, a characteristic malfunction occurs: lack of engagement of the starter with the engine.
Possible causes of failure
As mentioned above, gear rotation is only possible in the direction of rotation of the starter armature. If rotation in the opposite direction is possible, this is an obvious malfunction, that is, the bendix must be repaired or replaced. There may be several reasons for this:
- Reduction in the diameter of the working rollers
in the cage due to natural wear. The way out is to select and purchase balls of a similar diameter. Some car enthusiasts use other metal objects, such as pieces of a drill, instead of balls. However, we still do not recommend doing it yourself, but buying balls of the required diameter. - The presence on one side of the roller of flat surfaces
formed due to natural wear. Repair recommendations are similar to the previous paragraph. - Grinding the working surfaces
of the driving or driven race in those places where they come into contact with the rollers. In this case, repair is hardly possible, since such excavation cannot be removed. That is, it is necessary to replace the bendix.
Note! It is often better to completely replace the bendix than to repair it. This is due to the fact that its individual parts wear out approximately equally. Therefore, if one part fails, the others will soon fail as well. Accordingly, the unit will have to be repaired again.
Another reason for failure is wear of the gear teeth. Since this happens for natural reasons, repair in this case is impossible. It is necessary to either replace the mentioned gear or the entire Bendix.
Since the starter not only experiences heavy loads, but also comes into contact with the external environment and is susceptible to irritants such as moisture, dust, dirt and oil, freewheeling can also occur due to deposits in its grooves and rollers. A sign of such a malfunction is the noise of the armature when the starter is started and the immobility of the crankshaft.
How to change bendix on the starter
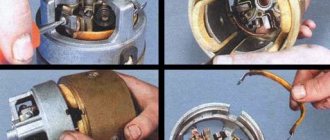
As a rule, in order to change the bendix, you need to remove the starter and disassemble it. Depending on the machine model, the procedure may have its own characteristics. We will describe the algorithm from the moment when the starter has already been removed and to replace the bendix it is necessary to disassemble its housing:
Bendix repair
- Unscrew the tightening bolts and open the housing.
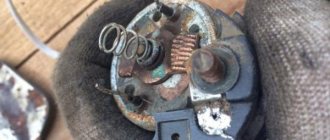
- Unscrew the bolts securing the solenoid relay, and then remove the latter. When repairing, it is advisable to clean and wash all the insides.
- Remove the bendix directly from the axle. To do this, you need to knock down the washer and pick out the restrictive ring.
- Before installing a new bendix, an axle is a must (but no frills).
- Typically, the most difficult procedure involves installing the retaining ring and washer. To solve this problem, craftsmen use different methods - they open the ring with open-end wrenches, use special clamps, sliding pliers, and so on.
- After the bendix is installed, lubricate all rubbing parts of the starter with high-temperature grease. However, do not overdo it with the amount, because excess will only interfere with the operation of the mechanism.
- Please complete before installation. To do this, use wires to “light” the car in winter. With their help, supply voltage directly from the battery. Connect the “minus” to the starter housing, and the “plus” to the control contact of the solenoid relay. If the system is working properly, you should hear a click and the bendix should move forward. If this does not happen, it is necessary to replace the retractor.
Bendix repair
Replacing the bendix on the starter
Here are some tips from experienced motorists that will help you avoid possible problems and inconveniences when repairing or replacing a Bendix:
- Before installing a new or repaired bendix, always check its operation and the drive of the unit.
- All plastic washers must be intact.
- When buying a new Bendix, it is advisable to have the old one with you in order to verify their identity. Often similar parts have minor differences that are not visually memorable.
- If you are disassembling a Bendix for the first time, it is advisable to write down the process on paper or put the individual parts in the order in which they are dismantled. Or use the manual with photographs, video instructions above, and so on.
Overrunning clutch repair
Is it possible to repair a Bendix starter with your own hands? Quite! One of the “folk” methods is as follows. Completely immerse the undisassembled starter in a suitable container of gasoline. Leave for 5-6 hours (can be left overnight). Without removing the device from the container, remove the overrunning clutch gear to better clean the grooves. Remove the starter and dry thoroughly. Sometimes this simple operation helps. But if this does not happen, the device will have to be disassembled. After removing the bendix, inspect the fork that pushes it: if the part is worn out, then you need to install another one. Check the clearance on the armature shaft: if there is play, it will not be possible to restore the mechanism - you will have to buy a new one. If there is no bumpiness, then we repair the Bendix.
The procedure begins by disassembling the housing to get to the springs and rollers. They need to be pulled out, cleaned, washed in gasoline and wiped dry. Usually these parts do not wear out and do not require replacement, but still look at the rollers more carefully: if they have lost their cylindrical shape, you will have to find normal ones (you need to replace them as a complete set). However, most often the problem lies in tarry deposits on the inside of the clip that need to be removed. Also be sure to inspect the coupling body for cracks. If any, replace the part. You also need to inspect the gear teeth: if they are worn out, you will have to look for a new one or change the entire drive. Now assemble the bendix and check by holding it in a vice: a working device will rotate in one direction. Before installation, lubricate the restored mechanism with engine oil.
Article on the topic: Immobilizer and its design
Price issue
Finally, it’s worth adding that Bendix is an inexpensive spare part. For example, a Bendix VAZ 2101 (as well as other “classic” VAZs) costs about $5...6, catalog number is DR001C3. And the price of Bendix (no. 1006209923) for VAZ 2108-2110 cars is $12...15. The cost of Bendix for FORD cars of the Focus, Fiesta and Fusion brands is about 10...11 $. (cat. no. 1006209804). For TOYOTA Avensis and Corolla cars Bendix 1006209695 - $9...12.
Thus, repairs are often impractical for Bendix. It's easier to buy a new one and simply replace it. Moreover, when repairing individual parts, there is a high probability of rapid failure of others.
A starter is an electromechanical device that starts the engine by creating primary torque of the crankshaft at the required speed to create a compression ratio to ignite the combustible mixture.
And when the starter does not work or works intermittently, starting the engine is very problematic and sometimes impossible. But before you start looking for the reasons why the starter does not turn, you need to remember that this unit works in tandem with other systems
vehicle in the common starting-charging circuit (battery-starting control mechanism-starter). Therefore, there can be both mechanical and electrical breakdowns, which have their own distinctive features.
Electrical causes of failure
When the starter does not turn the engine
or it turns slowly, with insufficient power to start, then first of all you should check the electrical circuit, starting from the battery:
- The battery must be well charged;
- The ground contacts are reliable and well secured;
- The wire from the solenoid relay terminal is intact and has good contact;
- The wire in the starter battery section is not damaged and has good contact;
- The ignition switch contact group is functioning properly.
It is worth paying attention to these malfunctions when the key is turned in the ignition switch, but the retractor does not work, and the armature does not rotate. If there is a break in the winding of the traction relay
, as well as a short circuit between the turns or shorted to ground.
Electrical problems with the starter are also indicated when the flywheel is slowly cranked.
And when there are no visible reasons, it is worth dismantling the part for inspection, because the collector may have burned out or its plates have shorted out. Although, the brushes are worn out or hanging.
Since typical starter malfunctions
This:
- Brushes that do not fit tightly to the commutator;
- The traction relay fails;
- The armature commutator is wearing out.
Malfunction of the ignition switch contact group
Power is supplied to the starter after the contact group in the ignition switch is closed. To check, simply turn on the ignition. If the indicator lamps on the panel light up when you turn the key, then it is in good working order. If not, then the ignition switch itself is faulty. In addition, the key from the “starter” position must return to the “ignition” position on its own. If this does not happen, then the ignition switch will need to be replaced.
The principle of operation of the starter and its design
If everything is in order electrically and the circuit is without damage, then it is worth dismantling the spare part for disassembly and detailed inspection in order to identify defects. But before doing this, you need to study the structure and principle of operation of a car starter.
Car starter device: 1. front cover; 2. bendix; 3. gearbox; 4. anchor; 5. stator housing assembly; 6. fork; 7. solenoid relay; 8. brush assembly; 9. brushes; 10. rear cover of the car starter.
When you turn the key and start the engine, the following processes occur:
Z
The lock contacts are closed and through the starter relay, power is supplied to the windings (traction and holding) of the solenoid relay.
M
the magnetic field in the windings forcefully pulls the armature inside the housing (compressing the return spring).
The principle of operation of the starter
Then
it begins to push the rod with the contact plate, which closes the contacts of the retractor relay, as a result of which the starter motor begins to rotate. And at the same time, the bendix moves forward from the armature, bringing its gear into engagement with the engine flywheel. Which consequently leads to the launch.
IN
the moment when the flywheel begins to rotate faster, is it not the bendix gear, the overrunning clutch
prevents the transmission of torque
and the bendix is pulled back by a lever, and thanks to the return spring returns to its position.
TO
The key in the ignition switch returns to its original position and the voltage at the control terminal disappears.
Based on the considered diagram, we can make assumptions about possible problems at the appropriate stages.
Why do you need Bendix?
The mechanical device performs the function of transmitting torque from the starter motor to the engine flywheel. How does Bendix work? After power is applied to the starter, the clutch moves out of it and engages the flywheel teeth; the latter begins to spin up and the car engine starts. Bendix has a “cunning” design: after the car engine starts, the overrunning clutch gear begins to spin in the opposite direction (due to the fact that the angular speed of the running engine is greater than that provided by the starter), then it is disconnected from the crankshaft flywheel shaft and the starter is turned off. Thanks to the presence of an overrunning clutch:
- there is no overload of the starter shaft, which increases the service life of the entire starting device;
- Damage to the flywheel teeth is prevented;
- mechanical noise is reduced.
Mechanical problems
You can talk about the presence of any mechanical malfunctions if the starter works, but the engine does not start because the crankshaft does not rotate.
Parts to be checked:
overrunning clutch lever, clutch ring, buffer spring, flywheel crown.
One of the reasons why the starter does not rotate the crankshaft
If the starter is spinning, the engine may not start if
:
The clutch is slipping, the release lever has failed or it has come off the axle, the clutch drive ring has worn out, or the buffer spring is not doing its job. When a grinding noise is heard during startup, such symptoms may indicate wear on the flywheel ring teeth. In this case, it is worth checking the gear travel adjustment and the condition of the buffer spring.
If you hear a non-typical noise when the starter is operating
, then it is worth inspecting it from the pit and engine compartment, since one of the following starter malfunctions may have occurred:
- the bearing bushings, as well as the journals on the armature shaft, are worn out;
- the starter mounting bolts have become loose;
- teeth are damaged;
- Inside the starter, the pole fastenings became loose, as a result of which the armature began to touch it.
But besides the fact that problems with the starter can occur during the startup stage, they also happen after it has been started. This is a typical situation when the starter does not turn off, but continues to turn
. And the reason for such a starter problem may be:
- Stuck drive lever or drive on the armature shaft.
- The traction relay is stuck.
- The contacts on the traction relay are stuck together.
- The ignition switch return spring or freewheel spring is worn out.
In this case, you need to quickly disconnect the starter terminal or starter relay terminal and begin to find the cause of the starter malfunction.
And if you have not yet encountered the breakdowns discussed above, but when starting the engine, the starter still begins to behave unusually, then you should take a closer look at the symptoms
, promising a quick failure:
The starter malfunction lay in the brush assembly
C,
the starter begins to turn only after several attempts to turn on the key. This symptom indicates burning of the contacts on the retractor;
P
After starting, it starts to disengage with a delay. Wear has appeared on the teeth in the Bendix gear or flywheel ring;
WITH
The tarter began to rotate with great difficulty, although the battery was charged. Such a response most likely indicates that the brushes have worn out or that the bearing has worn out.
The service life of the starter is about 70-200 thousand km and in order for it to serve your car for as long as possible, you need to periodically carry out some preventive maintenance.
In order to carry out subsequent repairs as correctly as possible, it is recommended to study the technical characteristics of a particular model. The main ones are: rated voltage and its power, current consumption and torque generated, as well as shaft rotation speed.
Owners of many cars are interested in finding out why the starter turns, but the flywheel does not engage. Unfortunately, this type of problem is still relevant today, albeit for older cars. Let's try to understand the causes of this problem.
Starting system for a modern car
ATTENTION! A completely simple way to reduce fuel consumption has been found! Don't believe me? An auto mechanic with 15 years of experience also didn’t believe it until he tried it. And now he saves 35,000 rubles a year on gasoline!
Today, motorists have a much easier time than several decades ago, when the car was started with a crank. In those days, one could only dream of starting the engine from inside the car.
Nowadays, it is enough to insert the key into the ignition or press a special button for the car to start. But problems also occur in this case, if the nodes, so to speak, “get sick.” No matter how modern a car is, over time it becomes outdated, and more and more problems arise.
One of them just implies poor engagement of the flywheel by the starter. Why does this happen? Experts, as soon as the topic comes up, mention the problem of the overrunning clutch or bendix.
Purpose of Bendix in a car
An overrunning clutch is a gear mechanism capable of transmitting anchor rotation to the engine flywheel. Thus, the engine starts.
Attention. A prerequisite for trouble-free operation of the components of the automotive system is the removal of the bendix after the engine has been successfully started.
You should know that a clutch is not just a gear, but a mechanism that also develops malfunctions.
To more fully understand the cause of the problem with the flywheel engaging, it will be useful to consider the general principle of operation of the entire starting system.
The starter is a DC electric motor. In some cases, it develops much more power than required. Thus, it becomes possible to run the internal combustion engine with maximum displacement.
In a modern starter, an important role is played by a relay - a special unit that brings the clutch into contact with the flywheel some time before the armature false start. Then only voltage is applied to the starter winding, after which it begins to rotate the crankshaft of the car engine.
The rotation of the crankshaft becomes a source of compression of the combustible mixture, followed by its ignition. As soon as this happens at the right moment, the internal combustion engine begins to function automatically.
At this very moment, the metonymic cycle of the flywheel begins to dominate the revolutions of the starter shaft (armature), and the bendix is already engaged. As soon as the driver turns off the car, the starter shaft no longer rotates, and the traction drive disengages the clutch.
It is important to understand that the bendix itself consists of 2 parts: upper and lower (HFB and LFB). The latter acts in the form of a hollow shaft having two different calibers. One of the parts of the shaft is equipped with splines that transmit rotation of the starter, and the other part contains a cage with rollers.
There is no interaction between the videos and the NCB initially. It occurs only after, when the first revolutions appear. The rollers are brought to the middle, thereby limiting the shaft. This happens in such a way that the shaft can only rotate in one direction. The rollers, thanks to their springs, do not allow them to rotate in the other direction.
Once the flywheel gains speed, it will be able to rotate the bendix. In this case, the rollers move apart, opening the stopper. The gear mechanism returns to its primary position.
Bendix often freezes in the mornings when it is cold. Experienced drivers recommend cranking the starter several times, thereby heating the bendix and enabling its operation.
Inoperability
Not the starter, but the bendix does not engage the flywheel. This is how you need to understand the problem. Let's look at the reasons why this might happen.
- If the mechanism does not lock on the starter shaft. This is often caused by the fact that over time, the rollers with springs wear out and are no longer able to provide reliable engagement.
- Hardening of the grease is also a common cause of this problem. It simply turns into a thick lump, limiting the movement of the Bendix roller-spring system. As a result of this, no engagement occurs. A common cause of grease hardening is dirt or dust getting inside the starter.
- It is also possible that the bendix teeth or flywheel ring are worn out. In this case, there will also be no engagement. If the problem is in the crown, then it is simply replaced with a new one. The same is done with Bendix, which is being updated.
Attention. In some situations, if the cause of the Bendix malfunction is contamination, thorough cleaning of the device helps. On the other hand, experts do not recommend using a repaired Bendix. It's better to install a new one right away.
It will be useful to know that some types of starters are equipped with a plastic Bendix drive. This means that such a product breaks easily, and starting the internal combustion engine becomes impossible.
It will also be important to note that the operational service life of the starting system depends on the number of engine starts performed. The more of them, the less resource the mechanism has. And most often, problems with starting, i.e., engagement of the starter and flywheel occur in passenger vehicles (buses, minibuses, taxis).
If you operate the machine correctly and follow the basic rules of proper engine starting, especially in cold weather, the service life of the device can be significantly increased. Of no small importance here, of course, is the overload of the starter and other elements of the starting system.
Video Bendix work
Sometimes owners of cars of almost any brand experience a very unpleasant phenomenon that makes people pay attention to your car - a squealing sound from the starter after starting the engine.
Let's try to understand this unpleasant situation, what can cause such an unpleasant sound and how to deal with it.
I hope that you are familiar with the principle of operation of a car starter and know what a bendix (overrunning clutch) is. In a nutshell, this is a special clutch that, after starting the engine, mechanically disconnects the starter from the engine, thereby leaving no opportunity for the flywheel to spin the starter and destroy it. The principle of operation of the overrunning clutch is the same as that of a regular bicycle - torque is transmitted to one side, and the gear rotates to idle on the other.
At the moment the engine starts, when the starter starts the engine, the bendix should “rebound”, thereby disengaging the starter and flywheel, but for various reasons it happens that the bendix lingers in the extended position and squeals when rotating at high speed. What can keep the Bendix engaged with the flywheel?
- Malfunction of the starter retractor relay, fork, that is, the Bendix drive.
- The cause of squealing can also be an excessively worn bendix.
- This also includes a fairly common malfunction - contamination, damage to the splines on which the bendix runs.
Let's talk about the last malfunction, since it caused the starter to squeal; it was enough to simply disassemble the starter and clean it. But first things first, I’ll try to show in the photo what to clean and where.
The photo shows that when I pulled the bendix out with a screwdriver, it remained in that position, although it should have jumped back. As a result, the Bendix comes out, the engine starts, it does not hide, it rotates at high speed and squeals, since it is not new. To solve the problem, I disassembled the starter:
At the same time, during the operation of the vehicle, quite often problems with starting the power plant arise precisely because of the failure of the vehicle starter. In this article we will look at the main faults of the starter, as well as why the starter does not turn off after starting the engine.
Read in this article
Repair of a collapsible solenoid relay
The manufacturer equips starters with a non-separable or collapsible retractor device. If a non-separable relay breaks down, it must be replaced, but a dismountable relay can be repaired. The described method allows you to check the solenoid relay of all VAZ models: 2101, 2102, 2103, 2104, 2105, 2106, 2107, 2108, 2109, 21099, 2110, 2111, 2112, 2113, 2114, Niva, Lada Priora, Kalina, Granta, Vesta and most foreign cars. Disassembly and repair of the relay is carried out in the following order:
- Unscrew the nuts securing the housing cover.
- If necessary, the ends of the windings are additionally soldered.
- After removing the cover, inspect the power contacts:
- If they burn, the damaged part is cleaned with sandpaper;
- When worn out, replace.
- The device is assembled in the reverse order and tested for functionality.
- The repaired relay is installed back on the starter.
Sometimes the vehicle does not want to start. And, what’s worst, this very often happens at the most inopportune and inconvenient moment. This situation is familiar to many motorists. Of course, we have to do something about it. And, if the car's electrical system is in perfect order and charged, then the problem may lie in the starter, namely in its peripheral devices. It is likely that the starter traction (retractor) relay is faulty. You can't do without repairs here, so you'll have to prepare for it. After all, it will be much easier for a trained person to overcome any difficulties, including repairing the starter solenoid relay.
How to check the starter solenoid relay?
The starter, in its essence, is very simple in its design. And, if there are instructions for this automotive component, then even the most inexperienced motorist can deal with its repair. It is important to remember that the most difficult thing is to dismantle it and then mount it back. Other work is done once or twice. But before you start repairing the starter, you need to figure out what the breakdown is and what place needs to be repaired. The first thing to do is check the battery charge, as problems can also arise from it. If you change the battery and this does not give any results, then you will have to repair the starter.
It is likely that the ignition switch or the starter switch located under the car hood on the mudguard is faulty. Their malfunction can be determined by characteristic sounds. If the starter makes absolutely no sounds, then most likely the ignition switch and starter relay are in order, and the causes of the malfunction lie in a completely different place. First, let's look at the principle of operation of the starter.
So, the starter, like its solenoid relay, works based on the principles of electromagnetism. When voltage is applied to the windings, it attracts the armature. This anchor moves the Bendix gear until it engages with the splines on the flywheel ring. In parallel with this, the contacts are closed, through which voltage is transmitted to the starter winding. After all contacts have closed, the coil of the solenoid relay stops receiving power, although the armature will continue to be held inside due to the created magnetic field. When the engine starts, the armature is pulled into place by the return spring and the bendix is released.
All described processes are completely interdependent and occur almost simultaneously. If at least one connection is broken, the car will not start. This means that you will have to look for the breakdown and try with all your might to eliminate it. Often starter breakdowns are caused by breakdowns of its retractor relay.
The most common causes of breakdowns of the car starter solenoid relay:
1.
Burnt starter winding or relay.
2.
Combustion of contact plates (popularly called nickels) inside the relay.
3.
Gradual destruction of the materials from which the device is made (including from old age).
Before you start checking the functionality of the starter solenoid relay, you should check the starter itself. To do this, you just need to turn the ignition key and listen. If the starter does not work, but some clicks are heard, this means that the starter is not working, but its solenoid relay is in order and the cause of the breakdown lies in something else.
Signs of malfunction of the car starter solenoid relay:
1.
The starter does not turn off after starting the engine and continues to rotate at a very high speed, as evidenced by the buzzing sound.
2.
After turning the key in the lock, you hear a click, which means the device is turned on, but the starter does not start.
3.
When you turn the key in the lock, you hear that the starter rotates idle, but the engine itself does not start to work.
How can you know for sure that the cause of the malfunction lies precisely in the solenoid relay?
In fact, you can accurately check the serviceability of the retractor relay even before removing the starter from the car. This is very convenient as it saves a lot of time and resources.
To check the solenoid relay, you need to do the following:
1.
Using a metal object or a piece of wire, close the contact bolts located on the back of the starter. This way the voltage will go directly to the starter windings without passing through the solenoid relay windings.
2.
If after turning the ignition key the starter starts to rotate, then it is working properly, and the breakdown really lies in the solenoid relay.
3.
If, after turning the ignition key, you hear the retractor relay clicking, but the starter itself does not work, then the relay is working properly, and the causes of the malfunction will need to be looked for elsewhere.
If you were unable to get to the contacts of the solenoid relay, you will need to dismantle it. When you check or repair any starter parts with your own hands, be extremely careful and attentive, since any incorrect movements can lead not only to breakdowns of car components, but also to injuries. Particular care should be taken when checking a dismantled relay (the rotation of the mechanisms is very strong and they can simply break out and cause injury to the motorist)
Repair of starter solenoid relay.
If you determine that the causes of starter malfunctions lie in its solenoid relay, then you will have to repair the starter solenoid relay. As practice shows, such repairs often end with a complete replacement of the solenoid relay. What is this connected with? The fact is that some manufacturers of automotive components produce retractor relays that are completely non-separable, thus trying to achieve greater reliability of this element. And, if you have a non-separable solenoid relay installed in your starter, then there is no other option but replacement.
But it also happens that the solenoid relay is disassembled. In this case, you can try to restore its functionality. As already noted, the causes of malfunction of the solenoid relay are the combustion of its contacts, short circuits in its winding, or simple wear and tear of its components. After disassembling the solenoid relay, problems with diagnosing the causes of failure should not arise, since any breakdown will be noticeable to the naked eye. But to check the serviceability of the winding, you will need an ohmmeter that is connected to the starter relay.
If the resistance value is no less than 10 ohms, then everything is in order with the winding.
And, if this indicator is lower, this indicates a short circuit in the windings and you will have to buy and install a completely new relay, since replacing the winding is extremely difficult. But to repair the starter solenoid relay, it must first be completely removed from the car.
The process of dismantling the starter solenoid relay consists of the following steps:
1.
Completely disconnect the battery from the power supply (otherwise, this may result in a short circuit and fire in all vehicle wiring).
2.
Remove the starter from the vehicle.
3.
Clean the starter from dirt and dust. This must be done carefully to prevent dirt from getting inside the unit.
4.
Unscrew the corresponding nuts from the brush assembly and remove the contact from the solenoid relay bolt.
5.
Unscrew the screws that secure the relay to ground.
6.
Remove the solenoid relay from the starter.
After the relay has been removed, it is either replaced with a new one or repaired. If you have a collapsible mechanism and you decide to repair it, then you should do the following:
1.
Unscrew the nuts on the ends of the solenoid relay and divide it into parts.
2.
Remove the old core and replace it with a new one.
3.
Reassemble all elements in reverse order.
The solenoid relay is installed back into the starter in the opposite order to removing this component. To avoid confusion, we recommend marking the terminals when removing the relay. This way there will be no issues during re-installation. It is also important to remember that before reinstallation, all contacts should be cleaned and thoroughly degreased. After installation, be sure to check all parts for functionality and make sure that the work done is correct.
(the real name is overrunning clutch
) is a part designed to transmit torque from the starter to the car engine, as well as to protect it from the high operating speeds at which the engine operates. - This is a reliable part, and it breaks quite rarely. As a rule, the cause of failure is natural wear and tear of its internal parts or springs. To identify malfunctions, let’s first understand the device and operating principle of the Bendix.
The design of a car engine starter and its operating principle
The main components of the starter:
- electric motor;
- solenoid relay;
- gear with bendix;
In a nutshell, it is installed on the engine crankshaft. When the starter is turned on, the starter gear meshes with the flywheel crown and the electric motor turns the crankshaft. After the engine starts, the starter overrunning clutch disengages the gear from the shaft when the engine speed exceeds the starter speed.
- If we take a closer look at the starter, its electric motor consists of a housing, inside of which there is a stator and a rotor rotating in two bushings.
- The brush assembly consists of three or four brushes, which are supplied with voltage from the battery. The brushes, in turn, connect to part of the rotor and supply voltage to it, causing the starter motor to rotate.
- The gear and bendix, located on the rotor shaft, moving forward and backward along it, engage with the flywheel. The solenoid relay turns the electric starter into operation.
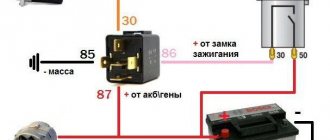
The principle of operation of the starter is as follows. The vehicle interior has an ignition switch that has several positions, including the “On” position and the “Start” position. When the key is turned in the ignition switch in the “Start” position, the current transmitted through the circuit from the battery is supplied to the starter solenoid relay.
The solenoid relay is an electromagnet with a coil and a core. The core, under the influence of the electromagnetic field, begins to move to the side, while the fork connecting the core and the bendix pushes the bendix and gear along the shaft forward to engage it with the flywheel.
The relay has two contacts, one of which is supplied with voltage from the battery, and the other is connected to the brushes of the electric motor. When the core reaches the end of the relay, with the gears already engaged with the flywheel, the copper plate located at the end of the core closes these two contacts and voltage flows to the electric motor.
As for the types of starters, there are:
- A starter with a gearbox, which consists of several gears and is mounted directly to its housing. The electric motor of such starters is highly efficient and consumes much less current when starting the engine. It is installed on cars with and on gasoline cars with more powerful engines.
- A starter without a gearbox, having high resistance to loads, ensures quick starting of the motor due to instant connection with the flywheel crown after current is applied.
In this case, starters may differ from each other, but not significantly. In most cases, their difference lies in the mechanics of automatic gear disengagement.
It usually takes a few seconds for the engine to start. But in practice, malfunctions may occur when, after starting the engine, the starter spins along with the engine, etc.
Starter related problems
The main reasons are related specifically to the starter. There are quite a few elements susceptible to malfunction:
- Solenoid relay malfunction
- Contacts burning
- Bendix malfunction
- Gear wear
- Winding short circuit
The retractor relay moves the bendix until it engages with the flywheel. When the relay gets stuck, it stops moving and this is enough for the starter not to respond. To check, it is necessary to apply voltage directly to the power contacts. If it works, then that's the reason.
Poor operation of the solenoid relay, which causes it to click, is often caused by burning of the contacts. A very large current passes through them, so if they burn out, it is necessary to disassemble the relay and clean the contacts. However, this measure is only temporary, since these contacts are treated from the factory with a special coating, which wears off over time, and cleaning the contacts will only accelerate the wear process.
Bendix may also be the cause of the problem. To check it, you also need to close the contacts on the power relay. If the bendix is working properly, the rotor will rotate together with the bendix, but here it will be necessary to check the engagement of the gear with the flywheel. In addition, it is necessary to pay attention to the condition of the gear teeth and ring gear on the flywheel.
If they are worn or partially licked off, they may be slipping and not engaging well with each other. This malfunction will manifest itself in the form of a crackling sound when starting the engine or its free rotation without engagement with the flywheel. To ensure that the Bendix is working, the starter must be removed and manually checked for ease of movement of the gear.
Another reason may be a short circuit in the winding. In this case, even when voltage is applied directly to the starter contacts, it will remain silent. Removal and disassembly can confirm a short circuit.
Starter malfunctions
First of all, it is important to remember that with numerous attempts and a long time to start the engine, the starter itself and the battery suffer. Moreover, prolonged rotation of the starter can damage the device.
Also, failure of the starter itself should not be ruled out. The starter can overheat when cranked for quite a long time, resulting in damage to the armature or rotor. With repeated attempts to start the car engine, there is a risk of damage to the splines on the coupling, which protects the starter from impacts from the teeth of a spinning flywheel.
One way or another, failure of the starter will require its repair or replacement. Among the main malfunctions of the electric starter, the following should be highlighted:
In the latter case, it is necessary to check the contacts on the solenoid relay circuit, the contact group of the ignition switch and check the starter bendix. If problems are identified, they must be corrected.
You can also check an additional relay (installed separately), which serves to protect the starter from accidental combustion of contacts in the ignition switch, which occurs during wear or prolonged starting.
Battery condition
When the battery is discharged, a characteristic sign will be clicking noises from under the hood when trying to start the engine, which is produced by the retractor relay, as well as slow rotation of the crankshaft.
This occurs because with the low voltage supplied by a dead battery, the relay cannot be fully retracted and its core is thrown back by the return spring and the starter clicks. In addition, a low battery will be indicated by dim lights from the side lights and headlights, and after turning the key, the instrument lighting will go out almost completely.
When the battery is normally charged, the voltage at its terminals should be 12-12.4 volts. The voltage is measured with a multimeter. If it is below 11 volts, then starting will be difficult, in addition, the state of charge will not be enough to provide a large starting current.
Checking the starter
First of all, without having certain skills and abilities, it is better to contact a service station, where experienced specialists will determine exactly what caused the starter to fail.
The initial check of the starter is carried out by measuring the voltage in the wire going to the control contact of the solenoid relay when turning the car's ignition key. In operating condition, the voltage should be 12 - 24 Volts (depending on the type of vehicle when testing the starter of a car or truck). The neutral position of the ignition key in the lock means that the voltage on the solenoid relay control wire should disappear.
In a similar way, performance is determined using a test lamp. When you turn the ignition key, the lamp should light up; accordingly, when you turn the key to its original position, the lamp goes out. If the contacts on the solenoid relay circuit are in order, then the problem should be looked for in the overrunning clutch bendix, which was mentioned earlier. If the overrunning clutch continues to spin after starting the engine, it is jammed on the starter shaft.
This happens when the Bendix gears wear out or the flywheel teeth wear out. This problem can only be solved by replacing the bendix or flywheel assembly. If the solenoid relay, gear and overrunning clutch (Bendix), as well as the flywheel and combustion lock are all fine, but the problem remains, then the starter must be removed for repair or replacement.
Checking the solenoid relay
It is possible to determine the functionality of the retractor without removing it from the car starter in the following way:
- Check the wiring going to the relay for a break.
- If the wiring is in good condition, the operation of the traction relay is checked. To do this, turn the ignition key and listen for the click; its absence indicates a malfunction of the relay.
- If the activation click is heard, but the starter does not rotate, a possible cause of the malfunction is burnt contact plates. To check the assumption on the relay, disconnect the terminal coming from the lock, after which, using a screwdriver, connect the terminal coming from the battery with the terminal that goes to the starter. The result will be the supply of electricity to its engine, bypassing the relay. If rotation begins, the retractor is faulty.
- Checking the voltage going to the starter will allow you to determine what the problem is - in the wiring, battery or starter. The multimeter is connected to the positive terminal of the relay, where the battery voltage is suitable, and the negative terminal of the device is connected to ground. When the ignition is turned on at this moment, the voltage should be 12 V. If the value is lower, it is enough to start the engine, but it is enough for the relay to operate.