Replacing the pump with a Daewoo Nexia (8 valves)
The water pump does not always “live” to the end of its service life. Periodically, observing a pump leak or poor antifreeze circulation, the driver decides to replace the pump long before its service life expires. The main task of the pump is to circulate coolant throughout the system. If for some reason this work is not performed, you will have to replace the failed pump with a new one.
What pumps are installed on this model?
All trim levels of the Daewoo Nexia have pumps from original production - Daewoo. These are quite simple devices, which, however, allow antifreeze to be pumped steadily and without interruption through the cooling system.
As an alternative installation option, you can use General Motors water pumps - they are somewhat cheaper, but also allow you to efficiently circulate fluid through the system.
Affordable and durable water pump from GM can be considered an analogue of the original Daewoo pump
How to replace a water pump yourself
The procedure for replacing a pump with a Daewoo Nexia (8 valves) is relatively simple. But the preparatory stage can cause difficulties, since in order to get to the water pump, you will need to disassemble almost half of the machine’s mechanisms.
The cooling water pump is located in the timing mechanism block
Preparing the car
To ensure free access to the timing belt, it is recommended to perform the following steps:
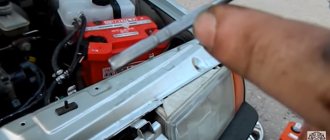
Open the hood and remove the air pipe. The pipe is closed with corrugation and secured with four clamps.
Then remove the upper part of the air filter housing. On Nexia it is secured with four latches.
The lower part of the filter housing is held on by three self-tapping screws - they need to be unscrewed in order to remove the housing itself from the machine. The air filter will prevent free access to the pump, so it is dismantled before starting work.
The preparatory stage of replacing the pump involves removing the air filter housing
Working with the timing unit
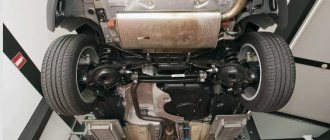
After this, you can begin the most difficult part of the work - access to the hydraulic distribution mechanism. Before removing the belts, it is recommended to place the car on a jack - raise the front part in the area of the right wheel. To make it easier, you can remove the wheel from the car: a view of the timing assembly will immediately open:
Remove the right side boot, which is secured with two nuts and two screws. Removing the boot will increase the radius of visibility of the timing belt.
After this, loosen the nut of the air conditioner tensioner roller. You will need to loosen the A/C belt and then remove it.
Remove the three power steering pulley bolts. While unscrewing, it is recommended to hold the pulley itself with your hand so that it does not change its current position.
Loosen the upper generator mounting bolt. You will need to remove the drive belt; if necessary, you can also unscrew the lower bolts.
After this, unscrew the screws securing the timing cover of the car. Remove the cover and set it aside.
Unscrew the crankshaft pulley bolt. Before unscrewing, fix the position of the crankshaft by inserting a screwdriver or a long thin bolt into the fracture.
Working with drive belts must be done with extreme caution, as there is a high risk of damaging the rubber elements.
Let's start dismantling the water pump
Only after completing all of the above steps it becomes possible to work with the pump. As soon as the timing belt is removed from the pulley, you can begin to unscrew the bolted connections of the pump itself:
Unscrew the two bolts from the bottom and the two bolts from the top that secure the pump to the cylinder block.
After this, you must drain the antifreeze - it is best to perform this procedure by unscrewing the plug from the expansion tank and radiator. However, you can simply place a container under the pump socket.
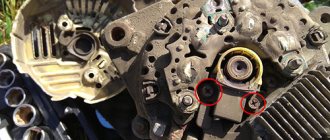
Next, unscrew the three hex bolts that connect the pump to the timing belt assembly and pull it out of the seat.
It is immediately recommended to remove any remaining rubber seal and clean the fixation area.
Before installing a new pump, wipe the seat dry, put on a new gasket, after lubricating it with sealant.
Video: replacing the pump on a Nexia 8 valves
Installing a new pump is carried out in the reverse order. However, during the installation process it is not recommended to immediately tighten the bolted connections tightly. First, the crankshaft and timing marks are set, the belts are tensioned, after which the pump can be screwed in completely.
Replacing the timing belt and pump of Daewoo Nexia with your own hands.
Replacing the timing belt and pump on an eight-valve 1.5 SOHC engine, Daewoo Nexia, Daewoo Lanos, Chevrolet Lanos, Chevrolet Lanos with your own hands.
On the vehicles listed above, it is recommended to change the timing belt every 50,000 km. mileage And the water pump (pump), as practice shows, can be changed with every second timing belt replacement, that is, every 100,000 km. mileage If in the first case, everything is in order with the pump, there are no signs of antifreeze leakage and when the engine is running, there is no noise from the pump bearing.
1. Open the hood, remove the corrugated air pipe by unscrewing the four clamps. 2. Remove the upper part of the air filter housing; it is secured with four latches. 3. Unscrew the three 10 mm screws and remove the air filter housing itself.
4. Install a jack and lift part of the car in the area of the right front wheel. We remove the wheel. 5.Remove the right side protective boot, it is secured with two nuts and two 10mm screws. 6. Using a 15 mm wrench, loosen the nut of the air conditioner belt tensioner roller. Using a 12 mm wrench, unscrew the rod until the roller rises up to remove the belt.
7. While the alternator belt is still in place, remove the three bolts of the power steering pump pulley, holding the pulley with your hand. 8. Loosen the top mounting bolt of the generator, move the generator and remove the belt. If the generator does not move, then the two lower 12 mm bolts securing the generator should be loosened.
9. Unscrew the four 10 mm bolts and remove the upper protective cover of the timing belt. 10. Unscrew the 17mm bolt of the crankshaft pulley, in order to fix it, you will need to remove the flywheel protection and hold it against the break with a large slotted screwdriver.
11. Remove the lower part of the timing belt cover; it is secured with three 10 mm bolts. 12. In order to remove the belt, you need to unscrew the two bolts securing the power steering pump and move it as far as possible.
13. We install the timing belt marks; they are clearly visible on the toothed pulleys. Shown in the photo. 14. Unscrew the 13 mm bolt securing the roller with a wrench, remove it and the belt.
15. If you are changing only one belt and roller, then the new roller must be compressed and inserted into two holes on the roller, a pin or screw of a suitable diameter. For fixation in a compressed state. We put on the belt in sequence - crankshaft toothed pulley, camshaft pulley, pump, roller.
We check that the marks match and pull the pin out of the roller. We turn the crankshaft pulley clockwise two or three turns, and look at the coincidence of the teeth on the roller. If the top tooth of the roller is in the middle of a special slot on the inside of the roller, then everything is fine. And if there are large deviations, then additional adjustment using a pump will be required.
16. To replace the pump, you will need to unscrew the camshaft pulley; it can be fixed with a long 10 mm head through the holes. Unscrew it with a 17 mm wrench. 17. Unscrew two bolts from below, two bolts from above 10 mm and move away the inner timing belt cover.
18. Before removing the pump, it is better to mark it and place the new one in the same position so that when tensioning the belt, it rotates less. 19. Don’t forget to put a container to drain the antifreeze before removing the pump; unscrew the three 5 mm hex bolts and remove the pump.
20. After all the antifreeze has drained, thoroughly clean and wipe the surface dry. We install a new o-ring on the new pump; you can lubricate it with sealant.
21. We install the pump in place, but do not tighten the bolts completely. We put the cover and pulley in place. We install the belt with the roller and begin to rotate the pump until the teeth on the roller match.
We rotate the crankshaft pulley two or three turns and check that the marks are installed correctly; if everything is correct, then we finally tighten the pump bolts. We assemble everything else in reverse order and fill in antifreeze.
The number of the non-original timing belt kit with pulley is 5530270 from Ruville. The number of the non-original pump is 65361 from Ruville.
Replacing the pump with a Daewoo Nexia (16 valves)
On 16-valve versions of Nexia, the pump service life is the same as on 8-valve versions. However, for a number of reasons, the water pump can quickly fail. Therefore, the driver will be forced to replace the pump in order to be able to drive his car.
Replacing the pump on a Daewoo Nexia is a rather complicated procedure, since it will require the ability to work with the timing belt assembly.
What pumps are installed on this 16-valve Nexia?
The 16-valve Daewoo Nexia engines have the same water pumps as the 8-valve ones. The only difference is the design of the pump, so when choosing a new product, you must indicate how many valves there are on the engine.
It is more advisable to immediately choose original Daewoo pumps, since they last as long as possible and are unpretentious in operation.
The original production water pump lasts longer and does not cause problems with engine cooling
The main malfunctions of the pump on the Daewoo Nexia (16 valves)
Nexia owners can independently identify a faulty water pump. The first signs of problems can be felt while driving:
the smell of antifreeze penetrates into the cabin;
after a long period of parking, puddles of coolant appear in the parking area;
extraneous noises and even crunching sounds while driving;
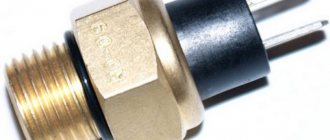
The engine temperature sensor began to show engine overheating;
The antifreeze level in the expansion tank constantly drops.
There should be no extraneous noise or odors while driving
All these signs clearly indicate the main malfunctions of the water pump - oil seal leakage or wear of the shaft bearings. In addition, quite often the impeller blades wear out due to long-term operation. In any case, the pump stops working normally and needs to be replaced as soon as possible.
Thus, owners of 8 and 16-valve versions of the Daewoo Nexia can independently replace the water pump of the cooling system. However, certain skills in working with the timing belt and generator will be required, since these are the elements that will have to be partially dismantled when changing the pump.
source
Signs of a pump malfunction
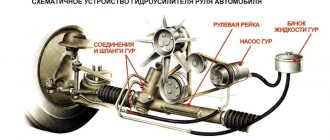
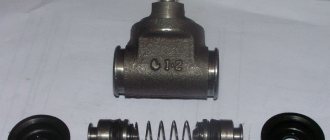
The Daewoo Nexia water pump is installed on the right side of the engine (when viewed in the direction of travel) and rotates from a timing belt drive. In terms of design and principle of operation, the part is similar to the pumps of other front-wheel drive cars and consists of the following elements:
- body cast from metal, equipped with a mating flange for fastening to the cylinder block with 3 bolts;
- a shaft with an impeller at the end, rotating inside the housing on bearings;
- drive toothed pulley;
- a seal that prevents antifreeze from spilling out through the gap between the shaft and the housing.
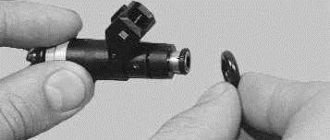
An important element of the pump, which distinguishes it from spare parts for domestic machines, is a rubber O-ring instead of a gasket on the flange. Its shape and round cross-section make it possible to reliably seal the flange joint when tightening the bolts.
The sealing element on the flange is a rubber O-ring
The weak points of the mechanism are the oil seal, bearing and seal; they wear out first. This causes the following malfunctions:
- leakage of coolant through an o-ring corroded by low-quality antifreeze;
- play in the bearing transmitted to the main shaft;
- loss of antifreeze due to a leaky oil seal;
- abrasion of the impeller blades due to large backlash and shaft misalignment;
- bearing jamming, which threatens to rupture the timing belt.
The impeller wears out due to the use of low-quality coolant or plain water
The listed problems are the same for engines with 8 and 16 valves installed on the Daewoo Nexia. Leaks are characterized by the appearance of sputum in the lower part of the engine and spots on the asphalt in places where the car is parked for a long time. At the same time, the coolant level in the expansion tank decreases.
A worn bearing assembly and a loose shaft notify the driver of a characteristic noise in the area of the gas distribution mechanism. In the final stages, the hum and rumble turns into a crackling sound, indicating the final destruction of the bearing cage. The sound is usually accompanied by a copious leak of antifreeze from under the timing case.
Since the condition of the Daewoo Nexia water pump is difficult to diagnose without disassembling the mechanism, it is recommended to carefully check the performance of the part every time you replace the belt and tension roller. A positive point: if the belt drive breaks, the pistons on these motors do not meet the valves.
In engines with 8 and 16 valves, the water pump is located on the left side of the crankshaft
How to understand that the pump is faulty
The pump in the cooling system of the Daewoo Nexia car is a simple unit in design that has high reliability during vehicle operation. There are cases when the mechanism worked with a mileage of more than 180 thousand km. However, sooner or later there comes a time when the daewoo nexia pump wears out and needs to be replaced with a working mechanism.
Experience in operating this vehicle has shown that the most vulnerable points of this unit are:
- Sealing rubber ring.
- Bearing unit.
- Gland seal.
Failure of these parts causes the following malfunctions:
- Antifreeze leaking through seals. Wear can occur both mechanically and when using low-quality coolant.
- Large bearing play.
- Overheating of the power unit due to loss of coolant.
- Accelerated wear of the pump impeller with large shaft play due to a worn bearing.
- A worn bearing can jam the pump, which leads to a break in the timing belt.
The latter malfunction can entail significant material costs, since valves, pistons, and other parts of the power unit can be damaged. These signs are the same for engines with a displacement of 1500 cm3, 1600 cm3. Malfunctions in the form of coolant leaks are easy to notice in the engine compartment, other problems are more difficult to detect. An experienced driver can easily notice a faulty bearing by the appearance of extraneous sounds, which manifest themselves as a hum, then a crackling sound. It is difficult to conduct a thorough diagnosis of the pump without disassembling it, therefore, during each maintenance of the machine when replacing the timing belt, it is necessary to check the condition of the coolant system pump.
Choosing a new pump
Throughout the history of the model, Daewoo Nexia cars were equipped with engines with 8 and 16 valves and had a displacement of 1500 and 1600 cm 3 . Despite the design differences between the engines, the pumps they use are almost identical. The dimensions of the flanges, impeller and seats with rubber rings are the same.
However, water pumps for 8V and 16V engines cannot be called interchangeable. The difference between the gas distribution mechanisms of power units lies not only in the number of gears, but also in the width of the drive belt. The 16 valve engine water pump pulley is wider than the 8V engine water pump pulley.
The product for an 8-valve engine has flats on the body that you can grab with a key.
As for the catalog numbers, which are used to select new spare parts, there is real confusion with Daewoo Nexia pumps. The fact is that different foreign and Russian brands assign their own article numbers to parts, so absolutely identical elements may differ in catalog numbers depending on the manufacturer. The marking of original spare parts from Daewoo looks like this:
- pump for the 8V power unit - 96352648 (alternative replacement - 96872704, 90325660);
- the same, 1.5 liter engine with 16 valves - 96352649 (replacement - 96990997, 96872700);
- 1.6 l 16V engine - 96352650 (analogues of other brands - 96930074, 96872702, 96182871).
Also, parts may differ in the shape of the impeller blades, which does not significantly affect the performance and performance of the pump. In some models for 16-valve power units there are additional protective plates in the form of boots.
Pumps of 16-valve engines are distinguished by a wider pulley and the presence of a protective plate
Thanks to the popularity of the Uzbek brand, many foreign and domestic companies have mastered the production of spare parts for Nexia. In addition to the Korean company Daewoo, which produces original products, the following brands offer high-quality water pumps:
It is noteworthy that Nexia pumps successfully fit other Korean cars with similar 1.5-1.6 liter engines from General Motors. Example - Chevrolet Aveo and Chevrolet Lanos.
When purchasing such popular products, beware of counterfeits. Do not purchase spare parts on the market; check the seals and markings on the packaging. One of the indicators of reliability is laser marking on the body or impeller; it is much more difficult to fake it than to copy a relief print of the logo.
Many manufacturers put black laser markings on the body
Replacement instructions for 8V motor
The procedure is performed in 3 stages:
- Selecting the location for the replacement, preparing tools and devices.
- Dismantling the gas distribution mechanism with partial emptying of the engine cooling system. Removing the old pump.
- Installing a new spare part, assembling the timing belt and starting the engine.
Although disassembling the timing assembly is a difficult and time-consuming operation, it does not require creating special conditions or using specialized equipment. You don’t even need an inspection ditch; to carry out the work, a flat area on the street or an insulated garage is enough, if we are talking about the winter period.
For disassembly, you only need to remove the front wheel; no inspection hole is needed.
If antifreeze begins to ooze from under a water pump that has served 20-30 thousand km, postpone purchasing a new spare part until disassembly. First, go through the first 2 stages, remove the element and make sure that the culprit of the leak is not the rubber sealing ring, which is much cheaper to replace than the pump assembly.
What tool will you need?
Since the tension of the timing belt on Daewoo Nexia cars is provided by the roller and the pump itself, to turn its body you will need a special key measuring 41 mm. You can get it in several ways:
- the simplest and most expensive is to buy at a car store with an eye to the future;
A 41mm wrench will be required to tension the timing belt.
Instead of a special key for 41, you can use sliding pliers
For accessories, you will need a container with a wide open top, designed for a volume of up to 10 liters. A clean plastic canister with a cut off side wall will do as such. When working indoors in winter, arrange lighting for the engine compartment using a portable lamp.
The list of other tools looks like this:
- a set of sockets and hexagons complete with a wrench and an extension;
- open-end wrenches with sizes from 10 to 19 mm;
- 2 powerful screwdrivers for flat and Phillips slots;
- assembly blade, hammer;
- pliers;
- jack with wheel wrench and wheel chocks.
To disassemble the timing belt assembly and replace the water pump, you will need a standard set of tools
To clean the disassembled mechanism and the counter flange on the cylinder block, prepare a rag, a small sharp knife and sandpaper. It is recommended to protect your hands with cloth gloves during the repair process.
Disassembly instructions
The first thing you need to do before starting work is to place the car on the site and support the rear left wheel on both sides with shoes. Next, loosen the right front wheel, lift it with a jack and remove it from the car. Please note that emptying the engine water jacket is not done at the beginning, but during the process of removing the pump, so immediately proceed to disassembly according to the instructions:
- Open the hood and use a screwdriver to loosen the 4 clamps on the air supply and crankcase ventilation pipes. Remove the hoses, unscrew the 3 bolts securing the air filter housing (10 mm wrench) and dismantle it by disconnecting the temperature sensor connector.
The air line in the form of a corrugated pipe is removed along with the adjacent pipes
The outer plastic timing cover is held on by 4 bolts
To remove the strap and move the generator, you need to unscrew 3 bolts
The air conditioner belt is tensioned using a bolt located behind the roller (bottom view)
The mark on the camshaft pulley should align with the triangular cutout on the casing
The plastic cover blocks access to the pump mount from below, so it must be unscrewed
When unscrewing the bolt, the pulley becomes jammed with a screwdriver
The rear timing cover is pulled back and tied to provide access to the pump.
It is more convenient to unscrew two pump bolts from above, and the third - from below
After removing the air filter, you will find a wiring harness running above the side member. Carefully place this “braid” on the injector receiver so that it does not interfere with the work process.
Video: how to remove a pump on an 8-valve engine
Procedure for installing a new part
If you removed the water pump due to an antifreeze leak, examine the condition of the O-ring on the old pump. Perhaps the rubber has become soggy from exposure to poor-quality coolant and the matter will be limited to replacing the seal. Check the shaft play and the tightness of the pump seal by pouring a little antifreeze from the impeller side.
Before assembly, make sure that the timing belt and tension pulley are in good technical condition so that you do not have to perform a complex of work again to replace them.
The pump is installed in the following order:
- Thoroughly clean the seat on the cylinder block where the rubber ring fits. Insert the water pump into the service opening and install the screws without fully tightening them.
The seat planes are cleaned to ensure a tight fit of the ring
Before installing the roller, you need to align the 2 holes and insert the lock
The timing belt is tensioned by turning the pump housing with pliers
After installing the pump and belt, all that remains is to mount all the covers and screw the power steering pump into place
When installing a water pump, the flanges and rubber ring must not be lubricated with sealant.
Upon completion of the assembly work, replenish the cooling system with drained antifreeze (or fill in new one) and start the engine. Make sure that extraneous sounds and leaks have disappeared and continue to operate the car safely. After 2-3 days, check the antifreeze level - you may need to top it up.
Video: how to install a new water pump
Operating regulations using the example of an 8-valve engine
The operation of replacing a faulty (8 class Daewoo Nexia) coolant pump does not present any difficulties for the driver; difficulties plague the repairman at the preparatory stage. To get to the faulty unit, you will have to dismantle many other parts, set the timing marks of the timing mechanism, and then remove the worn pump. In addition to a new coolant pump, you should purchase the required amount of antifreeze.
What tools and spare parts are needed
The following tools will be needed for this work:
- A set of wrenches (open-end, box-end).
- Heads, hexagons.
- Set of screwdrivers with a cross-shaped, slotted blade.
- Crowbar, hammer, pliers.
- Car jack.
- Stand for car body.
- Anti-recoil shoes.
- Container for drained antifreeze.
The necessary spare parts will require a new pump and antifreeze to replace in the engine cooling system.
Disassembly
The vehicle is installed at the repair site. An inspection hole, overpass, or lift are suitable. Tighten the handbrake cable and install wheel chocks under the wheels. Next, open the engine compartment hood and disconnect the battery terminals. The next step is to dismantle the air filter with all supply pipes. Install an empty container for drained antifreeze, open the tap, and wait for it to completely drain from the engine cooling system.
Next, work begins to remove the faulty coolant pump:
- Use a wheel wrench to remove the wheel bolts of the right front wheel.
- Use a car jack to lift the right side of the car, place the body on a stand, and remove the right front wheel.
- Remove the plastic mudguard from the front wheel arch.
- Next, loosen the air conditioner tensioner and remove the belt from its drive.
- Remove the power steering pulley; this should be done in such a way that it does not change its position.
- Do the same with the generator and its drive belt.
- Next, remove the protective covers of the timing mechanism drive, set installation marks on the crankshaft pulleys and camshafts.
- Loosen the tension of the timing belt, remove the crankshaft pulley, and remove the belt from the engine compartment.
Now it’s time to dismantle the pump. It is fixed with two bolts both at the bottom and at the top. Next, unscrew the hex bolts near the power steering pump and pull the pump out of the cylinder block.
Assembly
Before installing a new pump, you should thoroughly clean the installation site. Work is carried out in the reverse order of its removal. There is no need to tighten the fastening bolts too much. Before putting on the timing belt, check the position of the timing marks. Only after the timing belt has been installed in the timing drive and its tension has been adjusted can the pump mounting bolts be finally tightened.
Differences when replacing parts on a 16V engine
The design of the gas distribution mechanism on engines with 16 valves includes a second camshaft gear and a right support roller, which will have to be removed during disassembly. Otherwise, the device is identical, and the pump is located in the same place - on the left side of the timing belt, under the tension roller. Accordingly, the replacement process is performed in a similar sequence.
The differences during disassembly are the following:
- the marks on the camshaft gears are aligned with each other in a horizontal position, and not with the mark on the rear casing;
The pulleys are rotated to such a position that the marks “look” at each other
The timing belt is pulled behind the unscrewed power steering pump
The rear cover, which in these cars is made of metal, can be pulled out so that it does not interfere. To do this, tilt the power steering pump away from the engine as much as possible and pull the boot down (it is more difficult to reach through the top). You should ask an assistant to hold the pump housing.
Replacement process
At a car service center, replacing a water pump will cost 15-25 USD. There is no need to repair the pump. Even if this were possible, the service life of the part would be so low that after just a few weeks of active use the problem would arise again.
Water pump connection diagram.
Let's proceed directly to the replacement itself:
- Remove the battery cover and disconnect the terminal.
Remove the air filter.
Open the hood and use a screwdriver to loosen the 4 clamps on the air supply and crankcase ventilation pipes. Remove the hoses, unscrew the 3 bolts securing the air filter housing (10 mm wrench) and dismantle it by disconnecting the temperature sensor connector.
Remove the top cover of the internal combustion engine.
Remove the 4 bolts holding the rear plastic casing to the cylinder block. Two of them are located on top, 2 more are located below. Pull the left side of the casing towards you as far as it will go and tie it to the spar with a thin wire. Place a container under the pump and loosen the 3 screws securing it with a hexagon until antifreeze flows.
Remove the timing cover.
When the engine water jacket is empty, unscrew the screws completely and pull out the pump.
Remove the timing belt.
Reassemble the gas distribution mechanism in reverse order.
The design of the gas distribution mechanism on engines with 16 valves includes a second camshaft gear and a right support roller, which will have to be removed during disassembly. Otherwise, the device is identical, and the pump is located in the same place - on the left side of the timing belt, under the tension roller. Accordingly, the replacement process is performed in a similar sequence.
- We remove the remains of the old gasket.
- Install a new gasket.
- We install the pump and put everything back together in reverse order.