Greetings. Today Vic is with you and today we will talk about the Lada Kalina stove. What can we say, replacing the Lada Kalina stove is currently no longer a complex technical undertaking.
Change it as you want - cut, paste, in any way that you find on the Internet, it does not matter. After replacement, 90% of owners notice that there is no heat in the car like before.
Many people begin to remove the air from the car, change the thermostat caps, and remake the system for other Russian-made cars, but, unfortunately, nothing helps.
Everyone stops and drives around, practically freezing in their cars. And my brother and I conducted research in this area, studied how the Lada Kalina stove of the 8th family, in which the box works.
This one is simply inserted into the box and pressed on both sides with plastic and the air always passes through the radiator, always, in any case.
To keep it hot, simply open the tap; to keep it cold, close the tap. The tap is closed, the radiator is cold, air flows through the radiator, the air is cold, that’s it.
But, in the Lada Kalina, the tap is removed and another heating system is used, that is, the heat is redistributed using a damper that is located inside and when the damper is pressed against the radiator, the hot mode is turned on.
And when the damper moves away from the radiator, this is called cold mode, that is, air begins to circulate along a different path. And what did our direct research lead to?
They led to a simple, very simple, so to speak, matter. When you remove an old radiator, you have repeatedly noticed that wide foam rubber is glued along the entire width of the radiator, along its height.
However, when you buy another radiator in a store, as a rule, there is either no foam rubber, or there is a thin strip, in this case this foam rubber plays 90% of everything.
Since the valve is directly pressed against the radiator, if you do not attach or glue this foam rubber onto the sealant, air will circulate around the stove, because without foam rubber there remains about 5-6 mm on each side, and the air naturally follows the path least resistance.
That's the whole reason why you don't have heat . That is, there is also a possible reason, which yes, it plays a role, try to buy original stoves, that is, those that are sold directly in showrooms, specifically for the production of AvtoVAZ or simply VAZ auto parts.
Do not use third-party companies, because, as a rule, they save on materials, they do not twist the inside of the tubes, special plastics are inserted so that at idle speed the circulation wraps around more slowly and the stove heats up better.
Savings mean that even when you do everything right, you will still heat less, but it will be much better. That's it, the reason has been found, use it. When replacing foam, be sure to glue it in any way that is convenient for you.
But most importantly, don’t forget the foam rubber that covers the entire width and length of the stove. This video will show you everything. Bye everyone. Good luck.
Replacing the heater tap Lada Kalina
You unlocked the car and started it to drive to work. It's cold outside, we turned on the heater and noticed that coolant began to flow into the cabin. The Lada Kalina stove faucet has fallen into disrepair again. The solution that localizes the problem is to move the tap under the hood. To do this you need:
- Lengthen the drive rod.
- Replace the pipes to the heater radiator.
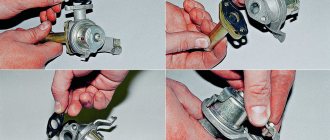
It's easier to change in the future. If the tap starts leaking again, but not into the interior. So, where is the stove tap on Kalina? It is located under the dashboard at the center console level and is easy to find. Unfortunately, it cannot be repaired, the assembly can only be replaced. And this is the only reliable option related to replacement. We recommend installing the ceramic one instead of the factory version.
The ceramic element guarantees reliability, high wear resistance, and smooth operation. When installing the faucet, it is advisable to treat the installation site with rubber sealant. It is more convenient to do it on a pit or overpass. But, if such options are not available, then you can drive one wheel onto the curb.
Possible heater malfunctions and ways to eliminate them
If the stove blows very weakly or in the current mode it basically refuses to blow air, then there may be several malfunctions, as well as solutions:
- The heating system hoses are worn out. As a rule, if antifreeze leaks or the stove does not heat, this may be due to wear and tear on the pipes. To solve this problem, it is necessary to carry out a thorough diagnosis of each of the pipes. Coolant may escape through cracks or other damage.
- The heater valve has failed. If the stove control valve is broken, this can be indicated by traces of leakage of consumables in the vehicle interior.
- There are malfunctions in the operation of the control unit. If the problem lies in the unit, then first of all you need to check the quality of its connection to the on-board network. If it is connected correctly, then most likely the problem lies there. It is better to entrust unit repair to specialists.
- Wiring faults. Perhaps the unit does not turn on the heating system due to lack of contact with the on-board network. In this case, the problem is solved by checking the circuit to find the broken section.
- The additional resistor is broken. This device is used to control the heater fan, so if the stove on Kalina does not heat, you also need to check the functionality of this element. If it doesn't work, then it will need to be changed.
- The Kalina heater regulator, located in the car's interior, does not work. If the heater only blows hot air, but does not react in any way when switching its mode from hot air to cold air, then most likely the regulator installed on the center console has failed.
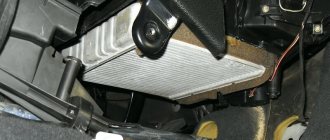
- The radiator of the heating unit is broken. This problem is considered one of the most common on domestic cars, and it is especially relevant for Kalina. You can try to repair this device or change it yourself. We will tell you more about how to shoot and how to replace the device below (author - Interesting Video channel).
When is it necessary to replace the heater valve?
Repairing the heater valve on a Lada Kalina car is required in two cases:
- The faucet “sours” or “sticks.”
- The product leaks at the joints.
No matter what caused the problem, the product should be replaced. Otherwise, the consequences will be more serious. Signs of a faulty faucet:
- There is a smell of coolant in the cabin.
- We noticed traces of coolant on the floor of the car.
- The stove was turned on, but there was no heat.
A leaking heater faucet is considered not just another nuisance that will flood the interior, but a danger to the car’s ECU. If you notice traces of liquid under your feet, immediately carry out an inspection to find the possible cause of the leak. Use additional lighting or a flashlight to quickly inspect the heater valve. In addition to the faucet, the cause of antifreeze leakage may be damage to the pipes or radiator. You now know where the stove tap on Kalina is located. If you identify the source of the leak, which turns out to be a faucet, then you need to urgently replace it.
Heater radiator for cars Kalina LRh 0118 1118-8101060 numbers | LUZAR auto parts
Heating radiators (also known as heater radiators, also known as heater radiators) are heat exchangers that use the heat generated by the engine to heat the vehicle interior. They allow you to maintain a comfortable temperature and prevent the car windows from fogging up.
For reference: different names of this node have equal rights of use. For example, “heating radiator” and “stove” come from the function of this heat exchanger, “heater radiator” and “stove radiator” - from the installation . ... more details
Heating radiators (also known as heater radiators, also known as heater radiators) are heat exchangers that use the heat generated by the engine to heat the vehicle interior. They allow you to maintain a comfortable temperature and prevent the car windows from fogging up.
For reference: different names of this node have equal rights of use. For example, “heating radiator” and “stove” come from the function of this heat exchanger, “heater radiator” and “stove radiator” - from the installation .
LUZAR manufactures hundreds of heater radiators for a wide range of cars presented on the Russian market. They can be purchased in partner stores throughout Russia or online.
Many models of heater radiators are supplied to car factories in Russia and Ukraine - both for passenger cars and for trucks and buses.
The production range of manufactured stoves is constantly increasing; New types are being developed for the most popular cars in Russia.
Powerful R&D allows us to conduct research in the field of improving heat exchangers and create new designs that provide increased performance properties of heater radiators. Main areas of research:
- use of different types of tubes
- changing the location of the tubes
- change in the “fillability” of the core
- use of turbulators-swirlers
- use of various aluminum alloys
- testing of solders with different characteristics
- improving the corrosion properties of metal
- ... and many other R&D areas.
Design of heating radiators from LUZAR
LUZAR heating radiators are available in three types:
- Tubular-plate, prefabricated, aluminum. It consists of aluminum plates through which aluminum tubes pass, inside which coolant runs. The tanks on such radiators are made of plastic. Heater radiators of this type are used for heating small-sized salons due to limited heat transfer; have the best rigidity and light weight, as well as the lowest price.
- Tubular-tape, non-assembled (brazed), aluminum. The corrugated aluminum tape in such a radiator is located between aluminum flat-oval tubes. Radiator tanks of this type can be made of either plastic or metal. The design of non-assembled (brazed) aluminum devices is the most universal, allowing the creation of heat exchangers with any specified characteristics. Aluminum stove radiators are light in weight and relatively high rigidity, as well as at optimal prices.
- Tubular-tape, non-assembled (soldered), copper-brass. The design is very close to type 2 - between the copper flat-oval tubes there are copper strips folded in the form of an “accordion”. At the same time, the tanks on such heating radiators are made of brass - in order to increase the overall rigidity of the structure. Copper heating radiators - due to the high specific heat capacity of copper - have excellent heat transfer rates. However, due to the high softness of copper, heating radiators made of this metal are forced to have a narrow tube and a large interval (step) between the tubes, which imposes serious limitations on maximum efficiency. Also, copper heater radiators have the highest cost and the lowest rigidity to torsion, fracture and internal pressure. In this regard, copper heater radiators are “outdated” and are gradually falling out of use.
Procedure for replacing the stove faucet.
Change the heater valve on a cold engine. Place a rag under your feet to absorb any spilled liquid. We will replace the stove valve without removing the dashboard. All we need is to get to the place where the heater valve is located on Kalina.
- Remove the air filter housing.
- Remove the ignition module.
- Unscrew the bolt and drain the antifreeze
- We unscrew the nut in the place where the stove pipes go into the cabin.
- Remove the upper heater pipe from the thermostat.
- Remove the lower pipe.
- Let's go to the salon.
- Disconnect the gas cable from the pedal.
- Remove the gas pedal along with the bracket.
- Unscrew the heater radiator cap.
- We bend the metal part, which is located to the left of the stove body.
- Partially unscrew one handbrake mounting bolt, and completely unscrew the other. Now you can unscrew the tunnel screws.
- Disconnect the cigarette lighter plug and the fuse box.
- We unscrew and disassemble the front console. Everything is visible and accessible, nothing is complicated.
- We remove the ashtray. In place of the emergency button there are two plugs. When you pull it out, you will see screws under them.
- Label and number all chips and wires. Then there will be no complications during assembly.
- Pull out the electronic control unit (ECU) as far as the wires will allow. Place it in a safe place, most importantly, away from the heater.
- Now you will have to unscrew all the bolts that you encounter during disassembly. Only then will it be possible to completely dismantle the front console.
- Remove the dashboard panel, move the radiator to the side, and then take out the air duct. You have reached the place where the Kalina stove tap is located.
Methods for replacing the unit
Replacing the Kalina stove fan is not the most difficult procedure. Even a novice car enthusiast can cope with it. The whole problem is that the unit is not very conveniently located. Therefore, before removing the device, you will have to tinker a little. There is an option to contact the service station. However, this repair is quite expensive. If you don’t have extra money or you want to personally change the fan, just out of “sporting interest,” then we’ll consider several options for replacing the unit.
Replacing the fan with removing the dashboard
This method is recommended by the manufacturer of the Lada Kalina. However, due to its complexity, not many car enthusiasts in the “domestic” conditions of an ordinary garage decide to change the unit using this method. If you want to try it, here is the sequence of the operation. To work, you will need a set of Phillips and flat-head screwdrivers, heads for 8, 10, 13.
- Removing the dashboard:
- separate the negative terminal of the battery;
- drain the antifreeze;
- separate the pipes;
- remove the cabin filter;
- unscrew the fastening nuts and lower the steering column to the stop;
- remove the stop signal switch from the wiring;
- snap off the plastic clips and remove the upholstery of the pillars;
- unscrew the fastening bolts and remove the front panel trim;
- disconnect and move the air ducts;
- remove the dashboard.
- Removing the fan:
- disconnect the block with wires from the electric motor;
- remove the ventilation hose;
- remove the engine;
- we change the unit.
Lada 2106 Beige Shakhina › Logbook › Installation of electric heater tap and switch from viburnum
Actually, what initially bothered me was that in the dark the heater switch button and the faucet and damper control levers were simply not visible, so at first there was an idea to organize illumination of these controls, but after a little reflection, the decision was made to replace the standard faucet with an electric one from the Gazelle, it seems . Well, I also decided to replace the switch with a Kalinovsky one plus resistance from a Chevy Niva
I started thinking about how to arrange it all in the car. How to place controls. I decided to redo the panel. To do this, the old heater control unit cover was dismantled and slightly modified. Photos are attached
Next, the antifreeze was drained and the panel was disassembled
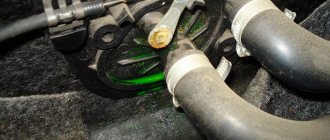
Next, the radiator was modified. Instead of a standard tap, a long tube was screwed on and cut to the length of the upper tube
A resistance is installed in the stove block
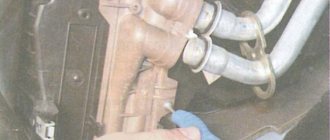
The faucet is located in the engine compartment using the necessary hose and tubes
Then everything was connected. The tap was connected according to this diagram
And the switch is on this one
Then everything was connected, assembled, checked, tested and washed))) It works perfectly and the appearance is aesthetic. Everything is illuminated and pleasing to the eye. Next photo
Recommendations
Comments 36
The thermostat from which car costs from 2110 or from 2108?
It’s worth the tenth, but I don’t have time to post it in the BZ)
I put it on all my eyes, except Chinese and grants, I even put it on 21099, the effect is stunning
Well, I don’t know how with the oversized thermos) it didn’t work for me when I bought it) I immediately installed the tenth one and I like it!)
... “By the way, this place is rotting because water and snow entering through the air intake do not completely flow out, and splashing on the body ruins it))))” ... There should be a plastic casing that prevents water from getting there if it is installed CORRECTLY. And drainage from this casing occurs through a rubber valve. And if this valve, I would even say the valve, is clean from dirt and leaves, then there will never be rust there. Moreover, rotting.
Well, I won’t argue, of course) but I have this casing and it doesn’t fit tightly to the left side of the air duct (if you stand facing the soot), that is, water gets between the air duct and the small casing.
When reinstalling, the casing must be placed BEHIND the air duct
He stood there, I also stuck him in)
It seems like ceramic taps are on sale now, maybe it was worth trying? but the usual ones, yes, they constantly leaked. Most likely because we rarely use them, it sours, sticks and then breaks down and leaks.
I see the heater radiator is original, it should be warm if it’s not clogged with pieces of sealant.
Well, I put in a ceramic one for a penny, it seems to be normal, but I don’t use it at all) and on the perch I washed the radiator, it seems to be normal), but the bad thing is that aluminum has worse heat transfer than brass, so it heats worse in the okha than in the cop.
It’s normal and the aluminum heats up. When I had a new one, my eyes were already drying out. Then, as if I didn’t keep my own thermos, I started putting others in and that’s it, the warmth was no longer the same. I got fed up with this and stupidly went and bought a new stove radiator. Kraft, it was just the one that was in stock. When I took mine off, I also wanted to wash it, but pieces of sealant flew out of it. In general, I installed a new radiator and... there was still no heat, although I rebuilt the thermos on the 10th, my hand does not tolerate the hose that goes into the cabin, but there is no heat. and now, 4 years later, I recently changed it on 12k and let’s read the reviews, it turns out that you need to install the same DAAZ that is installed from the factory. It has the densest packing of heat sink plates and it’s like a labyrinth, it’s not visible to the light in short. Here it is it really blows boiling water, it hurts my hand, my nails curl up)
and I set the ceramic faucet to 2105. But it didn’t completely shut off the antifreeze. So I sold it.
I've never heard of such things as roditors! To be honest, when I bought the thermos, I didn’t open it at all, I just installed the tenth one and it’s also not possible to hold the tube, but it only heats so-so! Well, the faucet closed normally, I just helped it close with my second hand.
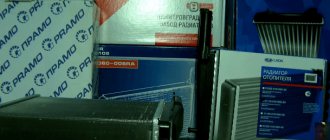
I myself flew by 700 rubles. I think I bought a new radiator, which means it will be hot. But that’s not the point. The radiator is not the same as the radiator. Just go to the store yourself, where there is a choice of 3-4 things, put them next to each other: Pramo, Luzar, Kraft, DAAZ and look at the honeycombs. Visually, in one there will be rare cracks, like in a fence). Of course, the air will fly through it and will not have time to heat up. Moreover, you look at the light and it can be seen. And in DAAZ it’s like small labyrinths, how the air winds through it. it's long, but understandable))
Well, I definitely won’t buy a new one just yet)
I've never heard of such things as roditors! To be honest, when I bought the thermos, I didn’t open it at all, I just installed the tenth one and it’s also not possible to hold the tube, but it only heats so-so! Well, the faucet closed normally, I just helped it close with my second hand.
see also
Comments 59
Very worthy! How does he manifest himself now?
Hi, is 1,2,3,4 sold separately? I mean around the button!
No, it's all one sticker
Nicely done. Respect to the author
hi, how did you cut out the heater numbers? Can you tell me more about it?
I installed a faucet today (Rikor Electronics), it started leaking at the seams (2500-3000 rpm), defective?
I don't know, I had another one. Try taking it apart and putting it on sealant.
Is the stove motor original?
Healthy, why is there an insert with numbers?
Like you, I have a SONY mafon. I want to ask, does your lid close with this flash drive?
I read almost all the comments but still don’t understand. 1. Normal valve position is open or closed. 2. As I understand it, when there is no voltage it is closed, and open when there is voltage on it. Or how ? I didn’t understand the principle of operation. I'm interested in it when it's under voltage only at the moment of switching or when it's open or closed
3. There is no adjustment on the tap, i.e. more less? or just turn it off and on?
Well done! Beautifully and neatly made. I do this too. I prepared everything, but made the control (on-off) a window lifter button and put it in the “trash can” near the scenes. I took the adapter block from the computer. Power was supplied from the carburetor idle valve. Because I don’t want to leave another consumer under voltage when the car is stationary. When I do, I'll post the report on my blog.
I almost forgot. Before installation, I disassembled the valve, spilled all the circuits and painted them with Tsapon varnish, it is heat-resistant and is specially used for circuits. I'll put it under the hood. where the entrance to the heater radiator is and place it with the valve itself facing up, where the wiring comes out of it, i.e. If the faucet leaks, then all sorts of microcircuits will remain unaffected by antifreeze or antifreeze. I read this on some forum. I put the lids on sealant. I won’t remove the old faucet from the radiator yet, because... There’s a lot of fuss, it got stuck in one position, if anything happens, at least later, but if I get there, then in the spring I’ll do it like you did with the tubes.
Diagnostics of Kalina radiator
It is very easy to identify a faulty heating radiator:
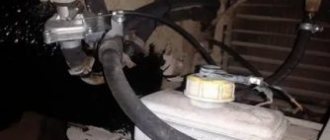
- Touch the inlet and outlet pipes. They come out from the hood side . There is a technological opening that allows you to do this. If the difference in heating between the first and second pipes is significant, then something is wrong. It is most likely clogged, so the Lada Kalina heater radiator needs to be replaced.
- Pay attention to the presence of antifreeze . If the radiator is leaking, there may be traces of oily liquid on the pipes.
Related material: Self-repair of Hyundai Solaris, timing chain replacement
Heater replacement tools
- Screwdriver Set
- A set of keys
- New radiator (preferably imported, so that it is made of stainless steel options)
- Antifreeze
- Little Bulgarian
A grinder is needed in cases where the radiator is changed without dismantling the dashboard. By the way, along with the dashboard, you will have to remove almost half of the interior yourself.
At home, only an employee of some service center who has already carried out similar repairs many times can cope with this task.
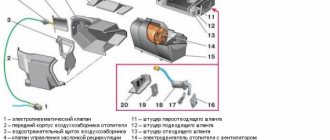
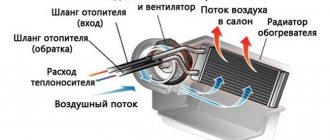
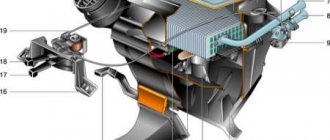
Heater device Lada Kalina
Air from the street enters the air intake through the air filter. The air is then forced into the ducts by an electric fan. The interior is heated by a heater (heater radiator), which is installed under the panel. When the engine is running, heated coolant circulates through the radiator, heating the air passing through it. The amount of air passing through the radiator and bypassing it is set by the central damper. The fan speed is adjusted, as well as the heater dampers are controlled using a control unit installed on the panel.
1 — heater fan electric motor; 2 — heater fan casing; 3 — air recirculation damper; 4— air ducts; 5 — heater casing; 6 — inlet pipe of the heater radiator; 7 — heater radiator outlet pipe.
The Lada Kalina heater dampers are controlled by a mechanical control unit. When the handles on the block are rotated, the rods are wound/unwound on a special roller inside the control unit. The rods have the following purpose:
- Recirculation flap drive rod.
- Drive rod for the heated windshield flap.
- Leg heating flap drive rod.
Thus, the Lada Kalina stove dampers are controlled mechanically without the use of automation. The only electronic part in the design is an additional resistor, which, depending on the position of the handle on the heater control unit, determines the fan rotation speed. This operating principle is very simple and reliable.
Fan replacement
The most convenient way to get to the unit is from the passenger seat, which will have to be dismantled so that you don’t have to do acrobatics inside the cabin. The chair runners are held in place by 4 13 mm nuts; unscrewing them is not difficult. Further work on replacing the fan is carried out in the following sequence:
- Remove the cabin filter and remove dirt and dust from the opening.
- Unscrew 4 screws located on the back wall of the glove compartment, and another one under the right heater grille.
- Remove the plastic cover from the stand and unscrew the 2 screws that secure the panel and the blower unit.
- Remove the blower unit, lift the plastic panel and loosen the 2 fan mounting nuts underneath it.
- Move the dashboard as far back as possible and secure it. The turbine must be removed from below, from a lying position.
Climate control Lada Kalina Lux
The system design is similar to that described above, with the exception of some details. To maintain a given temperature in the cabin, two new elements are used in the design: a temperature sensor in the cabin (built into the ceiling light) and a damper micromotor reducer. Also, the mechanical control unit has been replaced with an electronic one, with degrees of air temperature in the cabin marked on it.
The operation scheme is as follows: the control unit periodically receives a signal from the temperature sensor in the cabin and compares it with the temperature set on the unit. If the difference is too large, the control unit sends a signal to the micromotor gearbox, which already controls the heater dampers (opens or closes hot air from the heater).
List of faults in the heating circuit
If the owner of LADA Kalina suspects the presence of any deviations from the normal functioning of the heating system, then the diagnostic procedures below will be required.
- The first step is to make sure that there is a sufficient amount of antifreeze in the cooling circuit.
- Next, check the integrity of the fuse.
- We make sure that the fan speed regulator is working properly.
- A weak air flow through the deflectors indicates the need to check the condition of the filter component.
- If there is no warm flow into the cabin when the engine is warm, then there may be air pockets in the cooling system or the dampers in the air ducts are jammed.
- A faulty temperature sensor will cause only hot or, conversely, cold flow to enter the cabin.
- Among the common reasons is depressurization of the LADA Kalina cooling system. Sometimes this may be due to the loss of tightness of the heater radiator itself. At the same time, antifreeze will enter the cabin, giving itself away as a specific smell and wet decorative floor covering. In order to detect a leak in a timely manner, it is necessary to monitor the level in the expansion tank frequently.
Three ways to repair the heater radiator on a Lada Kalina
“I will never buy Kalina for myself just because of this procedure” (c) Igor09, website E1.ru
three self-tapping screws for fastening the radiator and three turnkey nuts for 10 fastening the gas pedal
To all Kalin owners! It is better to immediately remove the ECU from its normal place and place it anywhere, as far as the wires allow, but not under the stove body
Two bolts secure the cover, it has Velcro, feel free to tear it off and you will be pleasantly surprised by the number of nuts and screws underneath it