Plato personal account: login using login and password
“Platon” (short for “payment per ton”) is a system of collecting compensation for the movement of trucks on federal highways. The measure is mandatory and applies to heavy vehicles with a capacity of 12 tons or more. In simple terms, truck drivers must pay money to the treasury for damaging roads; this money goes towards repairing these roads. To make it convenient, owners of heavy trucks need a Plato personal account. We will explain in detail how to get it and why you need it in this article below.
Registration in your personal account
To register, the user will need a valid phone number and email. To start the procedure, you need to click the “Register” icon on the page lk.platon.ru
The system will prompt you to select your country of residence and type of client:
- individual
- individual entrepreneur
- legal organization
The package of documents required when filling out a personal application form will depend on the payer’s status.
By clicking the “Next” button, the user will be redirected to the “Vehicle Owner Data” section.
1) Individual When filling out a personal questionnaire, the Federal Law indicates the following information:
- last name and first name of the vehicle owner;
- TIN (indicated in the certificate of registration with the tax authorities);
- valid e-mail;
- contact number.
Upon completion of the registration procedure, an information letter will be sent to your email.
2) An individual entrepreneur also fills in his full name, contacts, and enters the current Taxpayer Identification Number (TIN) and OGRNIP.
The system requests the abbreviated name of the individual entrepreneur. If it is absent, this column can be left empty, or the surname of the vehicle owner can be indicated.
3) Legal entity The representative of the organization indicates the following data:
- form of organization;
- full name of the institution;
- abbreviated name of the legal entity;
- official e-mail of the institution;
- contact number;
- checkpoint;
- TIN;
- OGRNIP;
- Legal address of the company.
After filling out personal information, the user proceeds to specifying his location. Federal law and individual entrepreneurs choose the address at the place of registration, as well as the actual one.
Legal entities can mark that the location address coincides with the legal one, or fill out the fields manually.
The applicant also indicates the recipient's bank details, including:
- name of the recipient's bank;
- BIC of the recipient's bank;
- correspondent account;
- checking account;
- recipient's name.
If there is an official representative, the owner of the vehicle can register a Platon personal account in his name. Using the second account, the authorized person will have access to the client’s transactions and will represent his interests. This function is called “BTC Manager”. To connect it, the user indicates the name of the representative, his email and mobile number. Users who do not have trusted representatives o.
Login to your personal account Plato
To log into the Platon system, the applicant must provide a password with a sufficient level of complexity and upload scans of documents to the website:
- certificate of state registration;
- tax registration certificate.
Platon employees will check the uploaded documents for authenticity. The system user will be notified about the result of the check by email. mail.
By clicking the “Next” button, the applicant proceeds to the vehicle application form. To fill it out, the owner will need the following information:
- vehicle number (GRP);
- vehicle registration certificate;
- car make and model;
- car type;
- VIN number;
- maximum weight according to STS.
To confirm the specified information, the vehicle owner uploads scanned copies of the vehicle to the website and clicks the “Next” button. After that, by email. An email will be sent to your email address with a link to confirm your registration. If the message is not received within 5 minutes, double-check that the specified address is correct and click “Resend.”
By activating the link, the user will be redirected to Plato’s personal account and will be able to issue a route card.
To subsequently log into your personal account, the system participant must receive a message about account activation (no later than 24 hours). A new user can log into the site using a login and password, or through automatic data entry. To restore access to the account, its owner clicks the “Forgot your password?” link. After this, instructions for recovery will be sent by email.
How to register a second and subsequent car through your Plato personal account
Owners of several heavy trucks weighing more than 12 tons need to register each vehicle in the Platon system. The second and subsequent cars can be entered into the database through your personal account. For this you will need:
- log in according to the procedure provided for re-visiting your personal account;
- find the “Vehicles” section and go there;
- click on the “Register vehicle” button;
- fill in the data.
Upon completion of the procedure, the toll collection system operator (TSO) must check the information provided by the owner, after which he will send a letter confirming the registration of the vehicle in the register. The latter will only happen when the information is entered correctly. Reconciliation is carried out using scanned documents.
If the data is entered incorrectly, the user will receive a message indicating the need to re-register the vehicle.
It is important to remember that you will have to provide information only for the vehicle that could not be registered.
In addition to messages received from the operator, you can understand what stage the process is at by the status displayed in the personal account: “not verified” or “verified”.
If a response from the postal address does not arrive for a long time, the vehicle owner should take a few simple steps:
- check whether the designated letter is included in spam through the mail client settings;
- when using a corporate mailbox, make sure that the response is not filtered out by filters. This can also be done through settings;
- check if the message has been deleted from your inbox;
- exclude other factors on the part of the VTS that could affect the delivery of the letter from the specified mail.
If the indicated measures do not reveal the reason for the lack of response or the person encounters other problems, he can contact the hotline, where highly qualified specialists will help get out of the current situation. To do this, you need to call or 8 (495) 540-02-02
After completing the registration procedure, the car will appear in the general list of vehicles. If their number exceeds the permissible values provided for the window, then the user will be presented with a page-by-page list.
Schematic diagram of the UAZ Bukhanka heating system
The embodied schematic diagram of the UAZ Bukhanka heating system attracts great attention from the owners of this car when upgrading the car’s interior. After all, all car owners know that the interior of this off-road car in terms of comfort is very far from its foreign counterparts, although this model was designed from the very beginning for use by intelligence services, and what can you expect for such an inexpensive price.
Suggested options for tuning the UAZ Bukhanka interior
As already indicated, the UAZ 452 car was created to meet the high requirements of special transport for the Ministry of Emergency Situations, military and medical services. True, this fact is not at all considered a statement that the performance of this car can be considered impeccable. That is why, when tuning the interior of the Loaf, not only the heating system is modernized, but also many other parts and components.
How and what can you replace the heater tap on a UAZ Bukhanka car?
› Air system ›
23.01.2019
The loaf is distinguished by its non-standard engine location, which is actually located in the car interior between the driver and front passenger seats. It is possible that such a decision was made for reasons of the military and military original purpose of the car. Thus, the designers wanted to simplify access and possible repairs without leaving the car. Otherwise it is quite difficult to explain.
The loaf is a fairly old car, for which it is difficult to find original spare parts of good quality and in appropriate condition. Therefore, quite often the owners of such cars prefer to go a non-standard route. A striking example is the faucet of a stove or heater, when a non-original element is installed instead of a standard faucet.
Sometimes not even intended for use on cars.
The process of replacing the faucet of the UAZ Bukhanka stove.
How does he work
Structurally, heater taps are fairly simple devices on any car, not just the Bukhanka. The element is connected to the radiator of the furnace equipment using bolted connections. Special levers and cables are responsible for the control, which is displayed on the dashboard. Moving the lever allows you to open or close the valve, thereby blocking or opening the flow of coolant.
In winter, it is logical to open it, since this is how the stove begins to function and the interior becomes warm. But in summer it is completely impractical to keep the tap open, since in hot weather no one needs a working heater. The faucet is connected through hoses to the cooling system of the loaf engine. It is through them that the cooling liquid passes. If the tap is open, the coolant begins to pass through the stove radiator and heat it.
This allows you to obtain the necessary heat for the interior.
Why is replacement needed?
To begin with, it is worth focusing on the original faucet. Initially, it may seem that its modification is completely unnecessary, since the engine is already in the cabin, you can open the conditional hood without even getting up from the driver’s seat, unscrew and tighten the tap, blocking or opening the path for the coolant. But in practice, not everything is so simple.
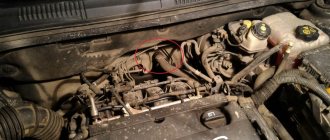
The layout of the Bukhanka is quite special, due to which the standard tap is located under a cap on the partition. Getting to it is quite problematic. The faucet also has several weak points, which manifest themselves in the form of leaks and other malfunctions. Some are engaged in replacement purely for the purpose of modernizing the entire system. Others are faced with such a need because the loaf tap has simply broken down.
In both cases, the tap needs to be replaced. In the case of faucets, 3 malfunctions can occur.
- Souring problem. Usually on the Bukhanka, as on other cars, the tap turns sour during the summer operation of the car, when no one uses this device. The tap is turned off and practically not opened again in spring, summer and autumn until cold weather sets in, since during this period the driver only needs fan blowing without heating. During this time, the valve begins to sour. If the malfunction has just begun to appear, then this can be noticed by the weak flow of hot air, even if the tap is open as much as possible. By applying extra effort to a soured faucet, it is not difficult to break it completely.
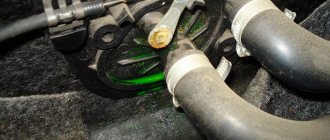
- Leakage. When the housing is depressurized, a leak begins. This can be explained by wear of the oil seals and seals. As a result, the tap cannot close completely. Because of this, the level of coolant in the tank and throughout the system begins to drop.
- Jamming. Most often it happens on cars where low-quality coolants are used, or ordinary tap water is poured in, the impurities of which clog the faucet. Malfunctions usually manifest themselves in the same way as in the case of souring. Only the reasons for the malfunctions are different. Deposits that accumulate in the damper mechanism cause jamming. Therefore, the driver cannot regulate the level of coolant entering the radiator.
Jamming and souring are considered fairly serious failures, but they are not critical, since there is no loss of cooling fluid. The opposite situation is with leakage, which is recommended to be eliminated as soon as possible after detection. If the coolant level drops to a critical level, this will negatively affect the operation of the entire cooling system of the Loaf.
Types of taps used
When choosing a new heater tap for a UAZ Bukhanka, many car owners have a large number of questions. Some people do not want to use the same faucets as previously used. The current analogues offered are cheap, but their quality is of the appropriate level. Practice clearly shows that faucets supposedly designed for Loafs do not serve long and reliably, quickly fail, and also cause a certain discomfort during operation. Therefore, folk craftsmen came onto the scene and came up with a not entirely standard approach to solving the pressing problem of the UAZ Bukhanka, which was related specifically to the stove tap.
Instead of car faucets, they use plumbing faucets. That is, ordinary durable taps that are sold in plumbing stores. Moreover, they work excellently, last a long time, have a more convenient handle for switching, do not turn sour so quickly and do not leak.
All these qualities apply to a plumbing faucet if you initially choose a quality product and also carry out the correct installation. If you are also attracted to this option, you will need a certain set of components to work.
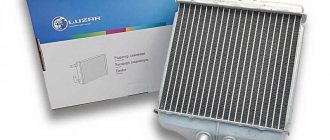
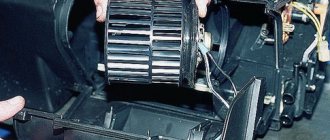
Equipment replacement
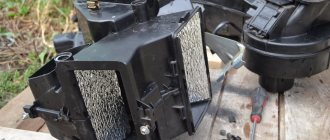
If you decide to replace the heater yourself, you should first familiarize yourself with the UAZ Bukhanka stove diagram to connect the electrical component. It is not difficult to install the equipment itself, securing it in the conventional engine compartment located inside the car. But even here you should adhere to certain rules and recommendations. The process will be considered using the example of using NAMI equipment, which has better performance and also boasts the presence of a cabin filter, which is not present in the standard Bukhanka heater.
- The first step is to drain the antifreeze from the system and also disconnect all existing wiring. To make it easier to reassemble and connect, you can write down all your steps or mark the wires, pipes and hoses;
- You need to disconnect the console from the shield, then remove the heating unit, remove the air intake flap, remove the seal and thoroughly clean all existing open recesses;
- Take measurements under the air filter, placing its housing against the surface. Next, make several mounting holes. Just don't use a drill with a diameter larger than 3.2 millimeters;
- At the installation site, apply a layer of high-quality automotive universal sealant that is resistant to moisture and sudden temperature changes. Make the layer large enough. Install the filter housing and secure it. The filter itself can already be inserted into its mounting slot;
- A new heater is being installed in the interior. It is fixed with studs, nuts and an M6 bolt. Secure everything as securely as possible;
- Then the console is installed, the entire structure is mounted on self-tapping screws;
- Then you can start connecting the control rod and fixing it;
- Connect all pipes through which antifreeze passes. For reliability, it is recommended to tighten them with clamps;
- Don’t forget about the channels that allow you to blow on the windows, avoiding them from fogging when the car is used in conditions of high humidity or precipitation. Every car should have windshield defrost. Be it a latest generation Mercedes or the good old Bukhanochka produced by UAZ;
- The installation is completed by connecting the electrical component. There is a connection diagram here that is worth considering separately.
In reality, there is nothing particularly difficult about changing the standard heating system on Bukhanka and installing more efficient and productive equipment in place of the old stove.
Electrical connection diagram
The system will not be able to operate and heat your Loaf if it does not receive power. There is a special scheme for connection. By acting consistently and carefully, you will be able to power your new stove without any outside help and enjoy the efficient operation of the heater.
- To begin, choose a location to place the mass. The black wire is responsible for ground. It is fixed on any metal surface convenient for you. It is best to do the mass on the body;
- Next comes the positive wire. When connecting it, first disconnect the minus from the battery so that the machine is not under voltage during the work;
- Plus it is recommended to enclose in a corrugated casing. Then the wire is pulled to the safety block, that is, to the block on the Loaf;
- Please note that on a car there are 4 fuses in its block. The last one, that is, the fourth one, is constantly under voltage. You should connect to any of the first three. Just make the connection from above, in front of the standard fuse in the block;
- In principle, at this point the connection of the electrical circuit can be considered complete. Be sure to first check the functionality of the furnace equipment.
We are replacing the UAZ Patriot heater tap
Every self-respecting motorist knows how important the proper functioning of a vehicle unit such as a stove is. But the inoperability of the stove is influenced by many factors, one of which is a malfunction of the heater tap.
The UAZ Patriot SUV is equipped with a special regulator in the interior heating system, which is called a tap. The main purpose of the heater valve on an SUV is to open or close the supply of hot coolant to the heater radiator, and as a result regulate the temperature of the air entering the car’s interior, depending on the temperature outside. To regulate the temperature of the air flow, the driver resorts to adjusting a special lever located on the center console.
In fact, this lever is directly connected to the stove tap, through which it opens or closes. When opened, the heater radiator heats up and heats the air passing through it and going into the cabin. When the tap is closed, the air entering the cabin does not heat up.
But you can learn about the design of the cooling system from the corresponding material on this site, and today we will pay attention to the UAZ Patriot heater valve and look at what it is, what malfunctions occur and how to replace it.
- Design features
Design features
The part discussed in the material is an element of the cooling system, the main purpose of which is the ability to regulate the supply of coolant to the heater radiator. Structurally, the crane of the UAZ Patriot SUV is the following product, shown in the photo below.
The faucet is made of a metal base and a ceramic valve, as a result of which the service life of the device is extended to several thousand hours. A cable from the control lever is connected to the steel movable plate. As a result of the tension of the cable, the product is closed and opened.
Also, these products can be made of special heat-resistant plastic, which can be found on Iveco diesel engines of the UAZ 3163 SUV. The essence of this product is to block the flow of coolant circulating in the engine cooling system. Thus, when you turn on the heater with the tap closed, a cold stream of air will come out, causing a decrease in the temperature in the cabin.
This element periodically becomes unusable, so it needs to be replaced. But first, let’s look at what problems can occur with this device.
Malfunctions
The faucet comes into contact with the liquid, and this, in turn, leads to a violation of the integrity of this device. In this case, there are three types of main malfunctions of this device:
- oxidation;
- violation of tightness;
- jamming.
It is not difficult to determine these causes of malfunctions. As soon as you notice the smell of antifreeze in the car interior, as well as the presence of liquid under the front passenger's rug, then you need to immediately check the integrity of the product. In frequent cases, it is the tap that is the main cause of fluid leakage in the cabin. It is also important to note that a leak often appears at the moment the tap is opened, when hot antifreeze begins to circulate through the heater system. In this case, the faucet cannot be repaired and must be replaced. Let's take a closer look at how to do this yourself.
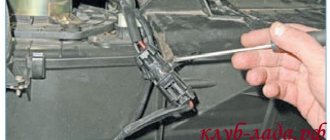
The replacement process is not very labor-intensive and can be done at home. To carry out work to replace the product, you will need to make sure that you have a ratchet wrench and a socket set to “10”. You will also need a special container to drain antifreeze or coolant from the system. So, the order of work is as follows:
- Initially, the coolant is drained from the SUV engine cooling system.
- The next step is to remove the glove boxes. You can find out how this is done from the corresponding material on the website.
- Next, the additional luggage rack and glove compartment are dismantled.
- Now you can see something like the same picture as in the photo below.
- Traces of oxidation are visible on the heater tap, which indicates its leakage and requires urgent replacement of the product. To do this, loosen the clamps of the supply hoses. After this, it is necessary to disconnect the hoses from the nozzles of the product.
- It is also necessary to remove the hoses in the engine compartment area in a similar manner, having first loosened the clamps.
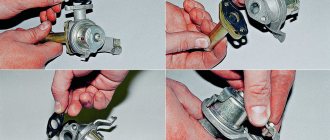
- Now you can begin to dismantle the device by unscrewing the two nuts to “10”. The nuts are located in the engine compartment area.
- By loosening the cable tension, it is necessary to remove the bracket and disengage the cable from the lever. The cable should be secured to prevent it from “moving” to the adjustment lever. After this, you can dismantle the product.
- The next step is to remove the rubber seals and replace them with new ones.
- The new product is installed in the reverse order of removal.
How to replace a heater tap
These problems can be solved quite simply: if the cable has come off, it is put back on, and if it is stretched, it is shortened. If you can clearly smell the coolant in the cabin, then you need to carry out a thorough diagnosis. First of all, you need to check all the connections, then the heater radiator itself. If everything is in order with them, then the stove tap remains. In order to get to it, you will have to remove both glove compartments. In order to replace it, you should perform the following procedures:
- drain the coolant from the cooling system;
- remove the hoses from the tap itself (draining the liquid from them into a previously prepared container);
- disconnect the pipes from the engine to the tap on the side of the engine compartment;
- unscrew the two fastening studs with a 10mm head;
- remove the cable from the control lever;
- take it out and replace it with a new one;
- assemble everything in reverse order.
The UAZ Patriot is equipped with a faucet from the VAZ 2108. That is, there will be no problems with its acquisition. After replacement, you need to pour coolant into the car’s cooling system, start the car and expel all the air from the system. To do this, you can park the car on a slight slope, and then check all connection points for fluid leaks. Check how the opening and closing mechanisms work. If necessary, adjust the cable length. This procedure is not very complicated, and you can do it even without a lot of tools, and in the end you can enjoy the work done and the heat that the stove produces. Well, the smell of coolant will disappear after a while.
Where is the stove tap on the UAZ Bukhanka
› Cars
10.04.2020
Having become the proud owner of a UAZ-3909, among other things, I was puzzled by the modification of the heater. And first of all - the faucet. It would seem - why? “The engine is in the cabin,” I opened the hood without getting up from behind the wheel, and tightened and unscrewed as necessary. There is no need to crawl out into the street. But no, it's not that simple. Due to the design features, the faucet is located under a cap on the partition and is difficult to get out. Plus a tendency to leaks, despite the “oaky” design. Plus a hot engine. Inconvenient, in a word. Need to do something.
But what? What and how to replace the standard faucet? The methods proposed by Uazbuka were rejected either for layout reasons, since they were focused on the “goat,” or for aesthetic reasons. As a result, I decided to give up installing a faucet on the cylinder head and embed it into the line closer to the heater. Of course, from a maintainability point of view, this is not the best option. But Volgas and other non-branded cars can get by without a valve on the cylinder head!
Where and what to embed? Standardly, the hoses of the front heater are laid in the air duct box, that is, almost on the street - the dirt flying into the face of the car flies there too. Therefore, the faucet cannot be placed there - it will become clogged with dirt and stop working. A protective shield is also not an option. I decided to install it inside the cabin. For some reason I didn’t want to move the supply hose inside the cabin (although it might make sense). Then you need an angle tap - take one fitting into the box and put a supply hose on it, and somehow connect the second to the radiator fitting.
Looking at many faucets in many stores has led nowhere. At one time I seriously considered the possibility of inserting an electric faucet from the big-eyed Gazelle into a hose somewhere in the engine compartment. But the high price (500 rubles!), unknown reliability and the message in the conference from Behemoth 4x4 (that this is not a faucet, but a valve) made us forget about it. I really wanted an adjustable faucet. As a result, the faucet from KamAZ was considered more or less suitable. True, at that time the problem of the faucet receded into the background, and I did not buy it.
When the need for a faucet blatantly returned, I went to the storehouse to get a KAMAZ one. And then I saw THIS. This miracle was sold as “GAZ-3110 heater tap with cable”, marking RKNU.8120020-16, cost 175 rubles. (86th km of the Moscow Ring Road, external side, 08/07/2004). Here's what it looks like:
| GAZ-3110 heater valve with a cable. Here it is already with a new mounting bracket; the old one is on the right. |
The valve type, silumin base and plastic body are tightened with M4 screws. Its original mounting bracket had to be thrown away and a new one made, which was screwed in place of the original one with two M4x30 screws and a nut. An S-shaped heater hose from BMW (735i E23 1982, connects the heater fitting and the vacuum valve), slightly cut in place, was used as a hose from the faucet to the radiator.
You can also pick up something from domestic vehicles. On the right side of the box, I marked a hole in place for the supply hose, cut it taking into account the seal, and drilled a hole in place for the fastening bolt. Instead of the standard tap, I screwed an old-style pump fitting into the cylinder head (angled 45 degrees.
) - by the way, there is a terrible shortage! The cable has not yet been attached anywhere, but opening and closing the faucet has become much more convenient, even without a passenger.
| Installed crane, right view | Front view from the box |
PS The interior heater is currently removed and is awaiting modification.
Schematic diagram of the UAZ Bukhanka heating system
The embodied schematic diagram of the UAZ Bukhanka heating system attracts great attention from the owners of this car when upgrading the car’s interior. After all, all car owners know that the interior of this off-road car in terms of comfort is very far from its foreign counterparts, although this model was designed from the very beginning for use by intelligence services, and what can you expect for such an inexpensive price.
Suggested options for tuning the UAZ Bukhanka interior
As already indicated, the UAZ 452 car was created to meet the high requirements of special transport for the Ministry of Emergency Situations, military and medical services. True, this fact is not at all considered a statement that the performance of this car can be considered impeccable. That is why, when tuning the interior of the Loaf, not only the heating system is modernized, but also many other parts and components.
First of all, when finalizing the decoration inside the UAZ Bukhanka, most car owners replace standard hard seats with more modern and soft versions, since the main seats can shake out the soul when driving, which is especially typical for off-road driving. Moreover, some craftsmen even integrate chairs with heating and electric drive, for which the existing electrical equipment connection diagram is adjusted.
At another step, attention is paid to soundproofing the interior of the UAZ 452 and fixing the components of the dashboard, but before fastening the components, the heating system of the Bukhanka is modernized, which will be discussed further. In terms of theme, the interior can be lined with leather, the dashboard can be decorated with wood inserts or wood-look details.
Often, various auxiliary accessories appear in the interior of the UAZ Bukhanka, including shelves, glove compartments and ashtrays. The steering wheel is often replaced with a modern imported version with soft leather upholstery or other material.
Of course, there are other options for modifying the interior of this car, which depends on the imagination of the car owner, but one of the main nuances of tuning the interior is still the upgraded circuit of the Bukhanka heating system, since the standard heater simply cannot cope with its immediate tasks.
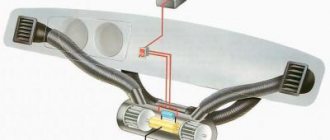
How Bukhanka's heating system can be modernized
When the schematic diagram of the UAZ Bukhanka heating system is being finalized, the following points must be taken into account.
The heating device of the heater must be located below the level of coolant present in the cooling system, so that this substance is pumped through it much more efficiently and is always present in it. To do this, it is necessary to make the cooling system closed by integrating a weather valve in the cap of the expansion tank. In this case, in the latter, the coolant level must always be higher than the installed heater.
The air needs to be aggravated by a less noisy centrifugal fan, which should be located along the air flow to the heating device. This approach will further reduce the noise parameter.
The air flow through the heating device must pass only due to the pressure generated by the fan, and not using kinetic energy. In this case, the fan nozzle should not blow directly into the radiator honeycomb, since the air will pass unevenly through the heating device.
The temperature of the discharge air should be changed by a damper that mixes cold and hot air flows, and not by a tap. When using a faucet, the temperature will greatly depend on the operating mode of the power unit, and the damper can be used to adjust the ratio of the two air flows.
The driver and passenger of the UAZ 452 will feel more comfortable when a higher temperature develops in the legs and lumbar region, and cooler air should be at face level to eliminate drowsiness. To do this, the heating system circuit must be built in such a way that hot air is forcedly supplied to the feet and glass, and cooler air must flow to the face, which can be done by additional selection of cold air masses between the heating device and the fan, and also using an adjustable mixing damper air flows.
One of the options for upgrading the Bukhanka heating system is usually the following sequence of actions, which consists in integrating a pair of snails onto an ordinary stove body:
Conclusion
Concluding our discussion of our topic, let us recall that if you invest specific funds and effort into the Loaf, you can get a jeep that is quite convenient for movement. At the same time, the schematic diagram of the UAZ Bukhanka heating system must be modernized, since the base heater is unlikely to live up to its name in the cold season.
Read more:
Tuning UAZ “Loaf” with your own hands
Source