Heater device
1 – side deflector; 2 – side air duct; 3 – air duct for heating the windshield; 4 – central deflectors; 5 – air duct damper cable; 6 – air duct damper; 7 – stove radiator; 8 – radiator seal; 9 – radiator casing; 10 – radiator outlet pipe; 11 – radiator inlet pipe; 12 – stove tap; 13 – air distribution cover; 14 – electric fan casing; 15 – fan impeller; 16 – fan electric motor; 17 – stove tap cable; 18 – windshield heating damper cable; 19 – bracket for heater control levers; 20 – air duct damper control lever; 21 – control lever for the windshield heating flap; 22 – lever for controlling the stove tap.
Heater resistor Niva 21214
The scheme for implementing this idea is as follows:
— I refused the second speed of the Heater Fan altogether, I don’t need it;
— the wires on the Fan Button are swapped so that the first speed is now turned on from position “2” of the above switch; — power from position “1” passes through 2 additional resistances, identical to the existing one, and thus another even lower speed appears, which makes the Fan run quieter. Next, remove the Heater Fan Shroud:
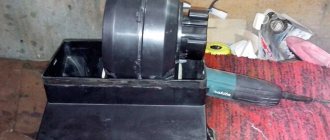
Carefully lay out everything in front of us so that it is convenient to work:
Selecting the location for installing the Resistance:
All! All that remains is to connect everything according to the following diagram:
We put everything back together in reverse order and rejoice at the work done. By the way, it is not necessary to install exactly 2 resistances! I just figured out one thing at first - it didn’t seem like enough - I needed more. So it’s a matter of taste and color.
See and listen to the result on the Video:
On the weekend I spent a little time on the Nivas: 1. The right front seat, which would not recline forward due to the fact that the internal latch cable had come loose from its mounting inside the back of the seat, was repaired. 2. The seat belt mechanism on the passenger side was repaired, which was constantly “biting” - I tightened the spring and used a drill to deepen the seat of the ball, the belt locking mechanism when the reel body is tilted (a rectangular body with a tab and a ball). But since in the field the seat belt reel is installed with an inclination forward, after weighing all the pros and cons, I decided to replace the mechanism so that the belt is not locked when the reel body is tilted.
I don’t see any point in describing the process of this repair, since the descriptions on the drive are already through the roof.
But what I wanted to focus on was how I reduced the noise of the interior heater fan with minimal investment. I solved this issue by installing additional resistance (1.5 Ohm resistor) on the supply (+) wire running from the fuse box to the heater fan rotation speed switch. Thus, reducing the air flow speed by half. As a result, the noise emitted by the air flow as it passes through the air ducts from the heater fan has decreased significantly. At the second speed the noise became the same as it was before at the first, and at the first speed the noise practically disappeared. Let me make a reservation right away that before the modification I never used the second speed of rotation of the heater fan, since the noise caused the neighbors to run away, there was no need for it. At first speed, the windshield thaws faster - warmer air blows.
Used: Flat insulated female tips - 3 pcs; Flat insulated male tips - 1 piece; Copper wire with a cross section of 1/5 mm² - 1 m; Heater resistor (heater resistance) 2101-07 - 1 pc.
An additional resistor for the interior heater fan of the VAZ 2121 and Niva 2131 is necessary to change the operating modes of the electric motor, namely its speed. Its removal and replacement is carried out in case of breakdown, mechanical damage when dismantling the casing, as well as for replacement in order to set different resistance values in the motor power supply circuit. To carry out repair work, prepare a standard set of tools and perform the following sequence of actions:
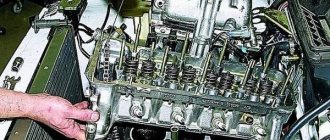
- First of all, we dismantle the interior heater fan casing.
- Disconnect the ends of the electrical wires from the resistor terminals.
- Next, from the outside of the casing, use a small flat screwdriver to pry up two spring clips holding the resistor, and then remove it from the inside.
- Make any necessary repairs or replacements. Carry out installation in reverse order.
Heater diagram
1 – damper; 2 – electric fan casing; 3 – fan electric motor; 4 – impeller; 5 – heater radiator; 6 – radiator inlet pipe; 7 – radiator outlet pipe; 8 – radiator casing; 9 – air duct damper; 10 – air duct box; 11 – air duct for heating the windshield; 12 – central deflector damper; 13 – central deflector; 14 – crane control lever; 15 – control lever for the windshield heating flap; 16 – air duct damper control lever; 17 – control lever bracket; 18 – windshield heating flap; 19 – windshield heating damper cable.
How does the Niva Chevrolet heater fan work?
Like any automobile electric motor, the heater fan on the Chevrolet Niva is a DC commutator motor with the ability to stepwise adjust the speed. A motor with catalog number 2123-8118020 with a removable impeller on bushings is installed on the conveyor ; however, there is an alternative to it on floating bearings from the Luzar company with catalog number lFh-01211 ; there is a similar bearing motor from the Boutler company.
The stock engine can reach a peak of 3000 rpm , while the analogs spin up to a maximum of 2750 rpm . The maximum current consumption for the Luzarov motor is 25 A , for the native one - about 18 A.
Heater motor luzar lfh-01211 12V/14A.
The difference is significant, since the heater motor circuit is protected by fuse F18 rated 25 A.
Additional resistor
The operation of the electric motor in four modes is ensured by an additional resistor , which often causes various malfunctions. Its catalog number is 2111.8101012 or 2123-8118022-01 .
Additional resistor 2123-8118022-01.
At the first speed, the engine should consume no more than 5.1A , at the second and third 9 and 14A, respectively. At the maximum, fourth rotation speed , the voltage is supplied bypassing the resistor. Actually, all possible culprits for the malfunction of the air supply to the cabin are indicated; it’s time to name the symptoms of the malfunction.
The Niva with fuel injection has today almost completely replaced the carburetor models of the family. With the transition to a new injection system, the manufacturer tried to minimize the inconvenience for the car owner and not radically change the location of the mounting blocks, as well as their filling with protective elements. Traditionally, there are two of them in the cabin. Another one, in the back, is responsible for controlling the engine.
Heating and ventilation system components
The heater fan (ME-255) supplies air to the passenger compartment through air ducts. Its rotation speed is controlled by a three-position switch on the panel.
An additional resistor is designed to reduce the fan rotation speed (intermediate rotation speeds).
The heater radiator is installed in the passenger compartment under the panel in a plastic case and serves to transfer heat to the interior.
The heater valve is installed at the inlet of the heater radiator and serves to regulate the flow of antifreeze that passes through it.
The damper control levers serve to distribute air flows that are directed into the cabin, as well as to control the heater tap.
The design of the heater has a number of disadvantages, for example, strong fan noise, as well as its low performance. We'll talk about this and other problems in the improvements section.
Keywords: stove 4x4 | 4x4 air ducts
Found an error? Select it and press Ctrl+Enter..
Source
View topic - Stove, doesn't heat well - Auto site
Depending on the situation, you either carefully return the part to its place and it continues to perform its traction function, or you need to purchase a new one and replace it; poor filter performance due to clogging.
The stove does not heat, what to do the main reasons. Just something complicated
Recommendations for normal and long-term operation of the heating-cooling system in a Chevrolet Niva: Algorithm of actions If the heater on a Chevrolet Niva blows cold air, we strongly recommend that you listen to all external manifestations of the problem.
But for the last 3 months the stove has practically stopped heating. It blows weakly. Engine heating is about 90 degrees,...
To avoid problems with the heating and ventilation system, preventive maintenance should be carried out systematically. It might simply get jammed. What types of bumper protection exist for Niva Chevrolet Of course, problems with the stove are not the most critical troubles or breakdowns, but your comfort and the comfort of your passengers depends on your health, mood and, naturally, performance.
An excessively dirty radiator can also act as an obstacle to proper heating of the interior. You will have to remove it and install a new one, which you, of course, will need to buy.
Chevrolet Niva heater damper repair
Becker knew that as soon as the door closed behind Megan, she would disappear forever. He tried to call her again, but his tongue refused to obey him. The girl had almost reached the door.
Technical details of the procedure
The efficiency of the new heating system on Niva will be determined not by the cost of the purchased parts, but by their quality. To operate, you will need the following elements: a car resistor, a figure-eight heater and a “snail”. It is a mistake to believe that only “original” spare parts are suitable for repairing a heating device. The main requirement is technical compatibility.
If in doubt, a drawing of the heating system will provide clarity. The further procedure is as follows:
- Cut a new mounting hole. This is done carefully, because the reliability of the heating system’s operation depends on the quality of the preparatory process. It is recommended to place the engine as low as possible in the air duct, otherwise the device will rest against the hood. This should not be allowed to happen, otherwise the stove fan will not last long.
The heating system of a new model is checked by test switching on. It is recommended to switch modes smoothly. The device must remain on each of them for at least 5-7 minutes. The driver’s task is to make sure that the operation of the system is not accompanied by extraneous noise and vibration.