Detonation that occurs during engine operation not only creates vibration that disrupts the operating comfort of the Chevrolet Niva, but also has a destructive effect on the engine. It gradually damages the elements of the cylinder-piston group and brings closer the need for a complete repair of the power plant.
To combat detonation, an electronic control unit is used, which receives information about the operation of the engine with DD. Depending on the data obtained, the ignition timing and the composition of the air-fuel mixture are adjusted.
Sensor cost
The knock sensor has extremely low maintainability. Usually, when it fails, it requires replacement with a new DD. The original General Motors sensor has part number 21120-3855020-02-0. Its price is 450-550 rubles. If there is a need to change the DD, then you can purchase an analogue. The table below presents the best alternative options for a branded product.
Table - Good analogues of the original Chevrolet Niva knock sensor
| Manufacturer | vendor code | Approximate cost, ruble |
| Bosch | 0 261 231 046 | 850-1000 |
| Fenox | SD10100O7 | 500-850 |
| Lada | 21120-3855020 | 190-250 |
| AvtoVAZ | 211203855020020 | 300-350 |
| EPS | 1.957.001 | 400-500 |
Replacing the rear brake wheel cylinder
If during operation there are traces of brake fluid leakage on the brake drum and the inside of the wheel, replace the working cylinder.
Repairing the working cylinder often does not lead to positive results, and this requires special tools. Therefore, it is recommended to replace the cylinder assembly.
You will need: a 10mm wrench and a special wrench for the brake pipe nuts.
1. Engage first gear and install support blocks under the front wheels.
2. Remove the corresponding wheel.
3. Clean the brake pipe mounting area and the brake cylinder mounting bolts on the back side of the brake shield from dirt. To make it easier to unscrew the cylinder mounting bolts and the brake pipe mounting nut, apply WD-40 to the threaded connections.
4. Remove the brake drum.
5. Raise the parking brake lever until the upper ends of the shoes come out of the piston grooves.
6. Unscrew the nut securing the brake pipe to the working cylinder and...
7. ...plug the hole in the tube, for example with the cap of the air release valve
Unscrew the two bolts securing the working cylinder, holding it on the other side, and remove the working cylinder
After long-term use, the brake pipe nut “grows together” with the pipe into one piece, and when you try to unscrew the nut, the pipe twists and breaks.
In this case, just move the tube nut a little, then unscrew the cylinder mounting bolts and disconnect it from the tube, unscrewing the cylinder from its nut.
After disconnecting the cylinder from the tube, the mobility of the freed nut can be restored by moistening it with brake fluid and turning the nut with a wrench alternately in both directions.
10. Install the slave cylinder in the reverse order of removal.
11. Bleed the brake system (only the working cylinder on the wheel being replaced is allowed).
12. Be sure to install the protective cap on the air release valve.
Problems with engine detonation on a Chevrolet Niva car
The problem of detonation is also familiar to the Chevrolet Niva. Coming from an SUV family, the Niva has the peculiarity of frequent trips not only off-road, but also in hills and mountainous areas. Therefore, when climbing at low speed and in high gear, you sometimes hear the sound of a metallic clatter. This phenomenon can lead to the following types of problems:
- Engine failure resulting from the action of a destructive force on the cylinder head and crank mechanism;
- Burnout of the cylinder head gasket (cylinder head), which occurs when the temperature rises to critical values during detonation. Often the first one to become unusable and requires immediate replacement;
- Piston burnout. Corrosion of the piston crown appears and with frequent exposure to this phenomenon, it leads to burnout.
Therefore, it is necessary to control the operation of the engine when moving up at low speeds and in high gear. Detonation can contribute to the failure of the cylinder block, pistons and crankshaft of a Chevrolet Niva, which can only be corrected by replacing them with new ones, which will be practically very expensive.
The true reasons for the occurrence of this phenomenon on the Chevrolet Niva
All cars are susceptible to this phenomenon. The main reasons that lead to this effect are:
- Circumstances under which the Chevrolet Niva is operated. This is exactly the case when climbing a steep hill at a speed below 40 km/h and in fourth gear;
- Quality of the fuel mixture. If the octane number is low, then detonation is guaranteed. A high number ensures detonation resistance;
- Design characteristics of the motor. These include: the condition of the spark plugs and their location, the shape of the combustion chamber, the compression ratio and the shape of the piston.
What methods of protection are provided in Shnivy against detonation?
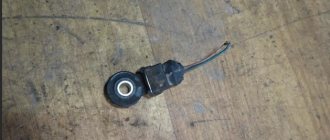
Chevrolet Niva is equipped with a knock sensor. It is designed to protect the motor from this effect, as well as to display the process of its occurrence in the form of a light alarm. The sensor is a sensitive element made of piezoceramic material. On the Chevrolet Niva it is located in the area of the cylinder block. The operating principle of the sensor is as follows:
- When the phenomenon of engine detonation appears, the amplitude of its vibrations increases;
- The built-in controller on the instrument panel corrects the ignition timing, which helps to dampen the phenomenon;
- The signal to the controller is supplied by a sensor, which generates an incoming voltage signal that occurs under certain engine vibration parameters;
- The controller is also capable of displaying a sensor malfunction in the form of a light alarm on the instrument panel. The alarm is represented by the inscription “CHEK ENGINE”, familiar to all drivers, which is highlighted in red.
How to replace a faulty knock sensor on a Niva Chevrolet
From time to time, malfunctions occur on any car. One of the causes of malfunctions that cause problems may be the occurrence of detonation. This can be seen by the engine running for a long time after the ignition has been turned off. It usually occurs due to explosive ignition of fuel in the cylinders. It appears gradually, you can notice it when going uphill at low speed when the gear is in high gear. This effect is classified as glow ignition and does not indicate malfunction of the engine.
There is a general principle of operation of an internal combustion engine:
- The fuel-air mixture enters the cylinder and is ignited by a spark from the glow plugs at the moment when the piston remains a few degrees before reaching top dead center. Complete combustion occurs at the moment when the piston reaches the top point, creating maximum pressure.
- If a detonation effect occurs, then ignition occurs much earlier, when the piston is still in the middle of the compression stroke. Therefore, during combustion, a force acts on it in the opposite direction, reducing engine power and leading to increased wear of parts.
How does detonation occur in a Chevrolet Niva car?
Like any car equipped with an internal combustion engine, the Chevrolet Niva may experience problems with detonation over time. And considering that it is mainly used to overcome obstacles and drive off-road, the risks increase several times. Therefore, it is important to listen to the operation of the engine under load and, if a metallic clatter appears, visit diagnostics, so as not to develop a number of problems over time:
- destruction of the cylinder head and crank mechanism
- burnout of the cylinder head gasket. This is due to the fact that during detonation the operating temperature of the engine increases significantly.
- piston burnout. occurs as a result of corrosion of the piston day.
Therefore, when moving up at low speeds and in a selected high gear, it is necessary to control the operation of the engine. If you give an increased load and contribute to the occurrence of detonation, you can ultimately damage a large number of car components, which will lead to the need for expensive major repairs.
How to avoid engine knocking:
- When going uphill at a high incline, select a lower gear or one that will allow the engine to operate between 2500 and 3500 rpm.
- Do not use fuel with an octane rating lower than that recommended by the car manufacturer.
- Check the condition of the spark plugs in a timely manner. During scheduled maintenance, monitor the condition of the spark plug wells and check the compression in the piston.
How is the car’s built-in protection against detonation implemented?
In order to monitor engine operation, a knock sensor is installed in the Chevrolet Niva. When problems occur, it sends a signal to the dashboard, where an alarm light sensor appears.
The sensor design itself is a particularly sensitive piezoceramic element, which is located in close proximity to the cylinders. It reacts to the occurrence of increased vibrations that appear as a result of engine malfunctions. After which the ECU begins to send a signal to correct the ignition timing.
In this case, the signal received by the controller produces an additional light signal on the instrument panel in the form of the CHEK ENGINE icon.
How to replace a faulty knock sensor on a Chevrolet Niva
If an indication of errors in engine operation appears on the instrument panel, this does not mean that the problem lies precisely in a faulty sensor. But if corresponding problems also arise when driving, then its urgent replacement is necessary. It should be done in accordance with the table.
After installation, you need to check the continuity of the circuit with a tester. To do this you need to follow a few simple steps:
· Switch the multimeter to DC voltage measurement mode
Connect the connectors to the sensor output
· tap the sensor with a small hammer. In this case, the voltage should change.
· If the voltage does not change, then the sensor is most likely faulty
The cost of a knock sensor on a Niva is 500-600 rubles, so you shouldn’t delay replacing it so as not to spend much more on engine repairs.
Source: https://expertniva.ru/dvigatel/kak-zamenit-neispravnyj-datchik-detonatsii-na-niva-shevrole.html
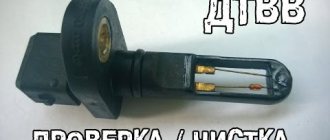
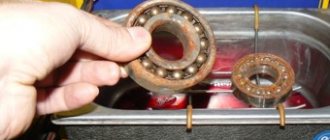
Checking the sensor for functionality
Checking the knock sensor is quite simple. To do this, you need to know the nominal resistance of the working sensor for a specific engine model. After this, the sensor is removed from the cylinder block and its resistance is measured using a multimeter. In case of any deviation from the norm, the sensor must be replaced. Its price is in the range of 1200-1500 rubles, depending on the car model.
You can also check the sensor status more accurately. To do this, you must also remove it from the engine. The multimeter is switched to the 200 mV measurement mode, the probes of the device are connected to the sensor ground and the signal terminal, respectively. After this, holding the sensor in your palm, you need to shake it or lightly hit it on a hard surface. As a result of vibration, a voltage in the range of 15-30 mV will be generated depending on the sensor model.
When installing a new sensor, the nominal tightening torque must be observed, which affects the accuracy of the device readings. Good luck with your diagnostics and smooth roads!
The knock sensor, like other devices installed in the car, tends to periodically fail
This can be caused by various reasons, and often a minor breakdown can be accompanied by a complete failure of such an important component as the engine
Among the most popular reasons for failure of the knock sensor are:
- wire break;
- insulation damage;
- breakage of the shielding braid;
- problems in the operation of the sensor itself;
- breakdowns in the software or hardware of the internal combustion engine control unit.
Checking the knock sensor will allow you to diagnose the malfunction. This is carried out using special measuring instruments or through visual inspection of the device.
So, for example, if there is a suspicion that a short circuit has occurred during the operation of the sensor, you will need to turn off the ignition and disconnect the device from the electronic control unit (ECU). Only after this will it be possible to begin checking the structure using an ohmmeter.
Sometimes the functionality of the wiring connected to the sensor is checked using a voltmeter. This is done with the ignition on. The device measures the indicators between the socket contacts and ground.
It is recommended to check the sensor itself using a multimeter. To do this, during testing, you should create artificial vibration by knocking on the device body. If the device data does not change, it means the element has failed.
If the first signs of malfunction of the DD appear, then before making a decision on replacement, it is necessary to check the performance of the meter
First of all, you should pay attention to whether there is an error on the on-board computer screen. If the DD produces too high or low a signal level, this is detected electronically and the driver receives an alert
You can accurately check the serviceability of the DD only on a stand. All other methods only indirectly indicate the performance of the device.
First of all, it is important to check the resistance between the contacts. In normal condition it should be about 5 MOhm
Any significant deviation indicates a malfunction of the meter.
Another test method is to measure voltage. To do this you should:
Remove the sensor. Connect a multimeter or voltmeter to the terminals. Using a small metal object, such as pliers or a bolt, tap the working torus of the meter. Check the information on the device. If there are no voltage surges, then the sensor is unsuitable for further use.
It is important to take into account that even if there are voltage surges, this is not a reason to consider the DD to be fully operational. The ECU operates in a narrow range of amplitudes and frequencies, the correspondence of which cannot be detected with a multimeter or voltmeter.
In order to independently change the knock sensor on a Chevrolet Niva, you must follow the instructions below.
Disconnect the terminal block.
Move the connector to the side so that it does not interfere with further dismantling.
- Using a 13mm wrench, unscrew the DD fastening bolt.
- Remove the sensor.
- Install a new sensor.
- Connect the connector.
Detonation effect
On a Chevrolet Niva, a knock sensor error can be read using a special diagnostic scanner.
If there is an on-board computer, an error code will be displayed on it:
- 0327 - excessively low signal level from the knock sensor. Most likely, there is a break in the circuits connecting the sensor to the control unit.
- 0328 - signal level too high. The cause of this error may be a malfunction of the device itself.
The Chevrolet Niva is a very specific car, as it is designed for driving in conditions where there is practically no road. Therefore, any problems with it can simply be fatal. The risk of stopping in the middle of the forest increases several times.
Methods for checking a knock sensor
If the first signs of malfunction of the DD appear, then before making a decision on replacement, it is necessary to check the performance of the meter
First of all, you should pay attention to whether there is an error on the on-board computer screen. If the DD produces too high or low a signal level, this is detected electronically and the driver receives an alert
You can accurately check the serviceability of the DD only on a stand. All other methods only indirectly indicate the performance of the device.
First of all, it is important to check the resistance between the contacts. In normal condition it should be about 5 MOhm
Any significant deviation indicates a malfunction of the meter.
Another test method is to measure voltage. To do this you should:
Remove the sensor. Connect a multimeter or voltmeter to the terminals. Using a small metal object, such as pliers or a bolt, tap the working torus of the meter. Check the information on the device. If there are no voltage surges, then the sensor is unsuitable for further use.
It is important to take into account that even if there are voltage surges, this is not a reason to consider the DD to be fully operational. The ECU operates in a narrow range of amplitudes and frequencies, the correspondence of which cannot be detected with a multimeter or voltmeter.
In order to independently change the knock sensor on a Chevrolet Niva, you must follow the instructions below.
Disconnect the terminal block.
Move the connector to the side so that it does not interfere with further dismantling.
- Using a 13mm wrench, unscrew the DD fastening bolt.
- Remove the sensor.
- Install a new sensor.
- Connect the connector.
Engine operation is often accompanied by various types of failures. One of these failures is detonation, which involves prolonged engine operation when the ignition is turned off. From the technical side, this occurs as a result of explosive ignition of the combustible mixture in the engine cylinders.
Drivers encounter this phenomenon when driving uphill in a car at low speed and in high gear, resulting in a glow effect. This phenomenon is abnormal and does not bring any benefit.
The internal combustion engine operates according to the following principle:
- When a combustible mixture enters the cylinder, it ignites when the piston is several degrees below top dead center. Complete combustion of the mixture is completed when the piston reaches the top point. This is how the normal operation of any internal combustion engine is carried out.
- The phenomenon of detonation occurs when the piston reaches the middle of the compression stroke. At this moment, the piston receives a counterforce, resulting in reduced engine power.
Engine operating principle
Detonation very often occurs when going uphill. In this case, the car is moving slowly, and the speed is increased. But do not worry, since this phenomenon is called glow ignition, and it does not indicate that the engine is not working properly.
Any internal combustion engine works according to the following principles:
- A mixture of gasoline and air is supplied to the combustion chamber of the cylinders, where it is ignited by a spark on the spark plug. Moreover, the piston should be literally a few millimeters from top dead center. As soon as the piston reaches the top position, the greatest pressure is generated in the cylinder. At this moment, the entire air-fuel mixture will completely burn.
- During normal operation of the knock sensor on the Chevrolet Niva, signs of this phenomenon will not appear. This device will help get rid of the manifestation of detonation. And it appears when the mixture begins to ignite much earlier than it should. This usually happens halfway to top dead center. And when the air-fuel mixture burns, a force is exerted on the upper part of the piston, which pushes it in the opposite direction. At the same time, the engine power is reduced, and significantly, and its parts wear out.
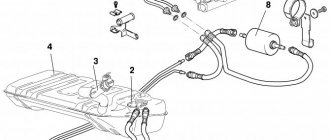
Location of fuse and relay blocks Lada 4×4
1 — engine control system fuse box; 2 — windshield wiper relay; 3 — fuse blocks; 4 — relay block of the engine control system.
The transmission of an accurate signal from the measuring element to the ECU is very important. You can only get it directly from the cylinder block. Based on this, it becomes clear why the Chevrolet Niva knock sensor is located where the greatest mechanical shock occurs: right at the source.
Fastening is carried out using a bolt. The connection to the ECU is made through a wire protected by a corrugated tube.
The DTOZH is located in the coolant outlet line. It is inserted into the front pipe of the water jacket.
To see where the outside air temperature sensor is located, you need to look under the front bumper. The meter is located behind the lower right corner of the license plate. Without removing the bumper, the sensor can be seen through the hole located near it.
Knock protection
The engine management system contains a knock sensor - it allows you to determine the presence of knocks, as well as evaluate their strength. If detonation suddenly appears and the sensor is faulty, the electronic engine control unit will generate an error signal. On the contrary, when the sensor is working properly, it will begin to produce a signal.
The design of the device is based on a piezoelectric element, which generates energy under the influence of impacts. And after that, the electronic control unit processes the signal and analyzes its level. After this, it sends a signal to change the ignition timing.
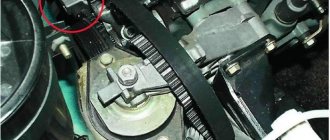
How to remove and replace the crankshaft position sensor on a Chevrolet Niva
To synchronize the position of the shaft with the electronic unit, the design of the Niva Chevrolet car is equipped with a crankshaft position sensor.
This device is located not far from the drive disk, and is located on the timing cover of the mechanism drive itself.
This disc is a wheel with fifty-eight teeth, and to create a certain impulse between the TDC (top dead center) and the ECU, a couple of teeth are specially removed.
Due to the fact that the crankshaft rotates, the drive disk rotates. The position of the ECU shaft is determined due to the fact that during the rotation of the disk at the sensor, magnetic fields change, thereby forming an alternating current pulse.
Sensor device
The structure of this element is the simplest, it consists of:
- Nylon frame
- This frame is wrapped in copper wires
- Has a steel core
- Insulation is provided by enamel, the base of the sealant is a compound resin
They come in different types, namely:
- The stroke sensor also distributes the ignition.
- Magnetic
- Optic
Symptoms of a problem
Sooner or later, the sensor becomes unusable, this leads to problems starting the Chevrolet Niva car, and sometimes even to the inability to stop the car while moving. The fuel supply and ignition timing depend on the position of the sensor.
- If while driving you notice a decrease in the dynamics of the car, this will indicate that this element is not corrected,
- This malfunction can also be indicated if the Check light comes on.
- In addition, a faulty sensor can be determined by the generator and timing drive.
- The revolutions go up and down and it all happens without your participation.
First of all, the position of the sensor is checked; the reason for checking may be the slightest resource cost. Also, using diagnostics, you can simply determine whether the device is fixed or not. Diagnostics means removing the product and reinstalling it; it will be in good working order if its values are approximately from 550 to 750 Ohms.
Removal, installation and inspection
Also, the first sign that it has failed is the occurrence of detonation under heavy loads on the engine itself, instability of idle speed, and a decrease in engine power. The state of the node can be understood in several ways. You just need to have the necessary equipment. If the necessary devices are available, we proceed to removing the element.
To remove it and check it, you need to do the following procedure:
- We remove the block with all the wires from it
- Unscrew the screw that secures the crankshaft sensor itself and remove it
- We check with a tester whether it is working or not
- We install the new element in place in the reverse order of removal.
By external signs you can determine the condition of the pads, the DPKV housing and whether the contacts are damaged. If no visual defects are detected, then we proceed to the inspection itself. It is carried out by means of ringing, and as mentioned above, the winding resistance should not exceed 759 Ohms, and not less than 550.
To summarize, we can conclude that this unit is the main one in the electronics, which is responsible for controlling the engine, since if it fails, then starting the engine will be impossible, so it is best to always carry it with you to insure yourself against such unpleasant consequences spare part.
If you do diagnostics and subsequent replacement, it will not take you much time and effort. The main thing is to adhere to clear rules for installation and dismantling. To extend the service life of all important elements of the Chevrolet Niva engine, timely and proper care should be carried out, not only for this device, but also for other parts.
Replacing the sensor
The procedure for replacing the knock sensor on a Chevrolet Niva is quite simple. You need to adhere to the following sequence:
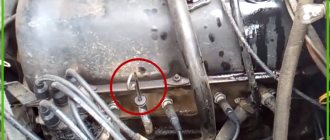
- Find the location of the element on the engine block. And it is located in the middle part of the block; a wire made of a corrugated tube is connected to it.
- Prepare your tools. A 13mm wrench and a screwdriver will be enough.
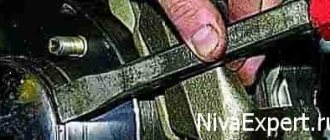
- For convenience, you need to unscrew the bolt securing the front tube strut in the gun. After carrying out the necessary manipulations, this spacer must be moved to the side.
- Press the latch to disconnect the block from the sensor.
- Using a 13mm wrench, unscrew the bolt that secures the sensor to the engine block.
- Install the new element in reverse order.
It is advisable to check the integrity of the electrical wiring before installing a new sensor to ensure that it is working correctly. Depending on where the knock sensor on the Chevrolet Niva is purchased, its price may vary between 450-650 rubles.
Engine operation is often accompanied by various types of failures. One of these failures is detonation, which involves prolonged engine operation when the ignition is turned off. From the technical side, this occurs as a result of explosive ignition of the combustible mixture in the engine cylinders.
1. When a combustible mixture enters the cylinder, it ignites when the piston does not reach top dead center by several degrees. Complete combustion of the mixture is completed when the piston reaches the top point. This is how the normal operation of any internal combustion engine is carried out. 2. The phenomenon of detonation occurs when the piston reaches the middle of the compression stroke. At this moment, the piston receives a counterforce, resulting in reduced engine power.
Problems with engine detonation on a Chevrolet Niva car
If a malfunction is detected in the operation of the knock sensor, the owner of the Niva-21214 must begin repairing or replacing the device. You can perform the procedure yourself by deciding where the sensor is located and preparing the necessary tools before starting work. These include:
- screwdriver;
- wrench;
- 13 mm head.
You will also need to stock up on a new knock sensor.
The procedure for replacing the DD is as follows:
- The car owner places the vehicle in a convenient position for work.
- Turns off the engine and disconnects the terminals from the battery. This is necessary for the safety of further work.
- After this, you will need to remove the wire from the sensor and unscrew the bolt that secures it to the engine. The procedure is performed using previously prepared instruments.
Once this is done, you can replace the old knock sensor with a new one. It will also need to be secured with a bolt (no need to tighten it too much) and a terminal attached.
The final step involves reassembling the car structure in reverse order.
After the procedure for replacing the knock sensor is completed, the owner of the Niva-21214 will need to start the engine several times to check the functionality of the sensor and the entire car as a whole.
First of all, you should pay attention to the symptoms of breakdown that were indicated above. Naturally they shouldn't exist
Based on this, we can conclude that the process described above is not complicated, and to replace the sensor it is not at all necessary to contact a service station. However, in order to protect yourself from possible malfunctions, you should regularly diagnose and maintain all components of the car.
It is advisable to check the integrity of the electrical wiring before installing a new sensor to ensure that it is working correctly. Depending on where the knock sensor on the Chevrolet Niva is purchased, its price may vary between 450-650 rubles.
How to check the knock sensor
- An equal replacement for a working sensor.
- Testing the electronic unit with the engine running.
- Using a multitester.
The sensor design is quite reliable and simple, so there is no urgent need for its constant maintenance and monitoring, except for manufacturing defects or obvious signs of breakdown.
Symptoms of a problem
- Increased fuel consumption.
- Poor pickup.
- The “Check” indicator on the dashboard lights up.
- Frequent detonation sound.
- High smokiness of exhaust gases.
- Reduced engine power.
The main sign of a knock sensor failure is the error indicator on the dashboard coming on. The serviceability of this sensor or its failure is determined by the electronic unit, and if there is no signal of the required shape and size, the computer switches to the mode of testing the sensor failure factor. If this setting does not produce results, then the electronic system enriches the fuel mixture and at the same time reduces the ignition timing.
A similar procedure is due to the need to prevent failure of the gas distribution mechanism and subsequent destruction of the elements of the piston group.
A faulty knock sensor is not able to stop the engine, so many drivers often have a question about what this sensor can affect, and whether it is needed at all if the performance of the power unit is maintained.
Its breakdown makes the functioning of the car engine less than optimal. To create increased efficiency and efficiency of the car engine, its main mode is selected in the range of the least enrichment of the fuel mixture. At the highest ignition angle. These most favorable conditions are close to the regime of appearance and development of fuel combustion with detonation.
By controlling detonation, it is possible to get as close as possible to the limit beyond which optimal fuel combustion switches to the detonation mode, with rapid subsequent engine failure. The most economical fuel mixture is one that burns with little sign of detonation. Reading the detonation phenomenon by the sensor makes it possible to accurately adjust the composition of the combustible mixture.
According to the principle of operation, this sensor is similar to a simple piezoelectric microphone, which is adjusted to a certain frequency of sound, which is characteristic only of detonation. There are many parts in a running motor that create a sound of a certain natural frequency. To prevent false alarms of the sensor due to extraneous sounds, its sensitive element, the sensor, is tuned to a detonation sound wave.
Detonation is characterized by a sound with a frequency of 25 to 75 hertz. Other sounds can indicate malfunctions of the engine liners, pistons and fingers.
Strong metallic sounds that appear at the first symptoms of detonation of the fuel mixture, passing through the metal engine block, reach the piezocrystal built into the housing and force it to vibrate in resonance and generate a weak electrical signal at the terminals.
The operation of the knock sensor is to receive a signal of a certain frequency and magnitude from the electronic unit. At the same time, he leaves it unchanged and proves its performance. When the piezoelectric crystal is triggered, the frequency and magnitude of the signal increase, which allows the microcomputer to adjust the characteristics of the engine. In this case, the signal strength at the sensor terminals directly depends on the strength of sound vibrations.
There are two main types of knock sensors based on their design:
- Wideband sensors.
- Resonant type of sensor.
The first type of device accepts several basic signal frequencies. Using them, it creates a certain magnitude and frequency of the signal for the electronic unit. The second type is tuned to another specific frequency, and produces a signal only when a resonance occurs or coincides with sound waves created by the phenomenon of detonation during the combustion of the fuel mixture.
Symptoms of a problem
Visually, it is quite difficult to determine a sensor failure, but if the sensor fails, it entails several standard symptoms that will undoubtedly affect the operation of the engine.
- Loss of dynamics and power. The loss of engine power will be noticeably felt when driving a vehicle with passengers or cargo. When the engine is under load, it will stop developing its former power, and every kilometer will be difficult for the car.
- Increased fuel consumption. Due to incorrect adjustment of the ignition timing, fuel consumption begins to increase.
- Black smoke from the exhaust pipe. This problem occurs due to an excess of fuel in the combustion chamber, which does not have time to burn out completely and burns out in the exhaust manifold, forming black smoke. It should be noted that black smoke can also form for other reasons.
- Increased vibrations of the internal combustion engine. Vibrations occur due to uncontrolled detonations and improper combustion of fuel during engine operation.
If the knock sensor malfunctions, the “CheckEngine” lamp on the instrument panel lights up.
Description of the knock sensor
Now let's talk about the knock sensor. Let's start with the location and purpose of the controller.
Location, purpose and device
The DD in the Four is one of the main elements that determine the correct operation of the power unit. The main design element of the knock sensor is the piezo mechanism. When a load is applied to the knock sensor, the device generates an electrical pulse that is sent to the control module. The block detects the occurrence of detonation in engine operation, according to which it changes the ignition timing.
As for the location, in the VAZ 2114 the DD is located on the engine cylinder block, between cylinders numbered 2 and 3. If your car is equipped with an 8-valve engine, then you will immediately see the controller when you open the hood. As for 16-valve internal combustion engines, in this case it will be more difficult to find the sensor, since the view is blocked by the cylinder head.
Possible malfunctions and ways to eliminate them
What signs can be used to identify problems with the detonation controller:
- a significant drop in power, which is especially evident during acceleration;
- a Check icon appeared on the instrument panel;
- when you sharply press the gas pedal, detonation may be heard - a metallic knock, as experts say - “fingers” knocking;
- In some cases, the engine may overheat.
Controller failure is usually caused by regular use of low-quality fuel.
Instructions for diagnosing and replacing the controller
The diagnostic procedure can be carried out either using a tester or using an ohmmeter. When using a tester, the device itself will need to be connected to the connector for testing and diagnostics of performance. If you only have an ohmmeter, then you will need to measure the voltage between the controller contacts.
How to check the functionality of the DD:
- First, the measuring limit of 200 mV is set on the voltmeter.
- Then it is necessary to connect the probes of the diagnostic device to the contacts of the regulator.
- After this, try lightly tapping the controller body with a screwdriver or other similar tool. When you tap on the case, the voltage value on the tester display should increase to 20-40 mV, in this case it all depends on the force of the blow. If there are no changes as a result of the impact, then you need to change the DD to a new one (the author of the video is Alexander Dmitriev).
To perform the replacement you will need to do the following:
- Prepare standard plumbing tools - wrenches and screwdrivers; you will also need sandpaper or a steel brush. Turn off the power unit and turn off the ignition, and then open the hood.
- Then you will need to find the DD, press the latch and disconnect the wiring connector from the knock regulator.
- Using a wrench of the appropriate size, you need to unscrew the nut with the stud (if your car has a two-pin DD). If a resonant type controller is installed on the engine, then you need to remove the piezo element.
- After this, the contacts on the connectors will need to be cleaned with sandpaper or a wire brush - remove all dirt and oxidation. If this is not done, problems may arise in signal transmission - the pulse will not be accurate. When the cleaning is complete, install a new one instead of the old one.
Description and nuances of replacing sensors (speed and others) on a VAZ 21214
Elements such as the VAZ 21214 speed sensor can be replaced without much difficulty. It seems possible to quickly change this and other system parameter determinants and regulators with your own hands. You will learn how to do this from our article.
Characteristics and features of replacing regulators
On products of the domestic automotive industry such as UAZ and Niva, various sensors are needed to transmit information to the dashboard. Also, some of them perform additional functions. And each has its own characteristics of dismantling and installation.
Detonation
The phenomenon of detonation is the explosive combustion of fuel in an engine due to glow ignition. SUVs like the Niva suffer from this problem quite often.
A piezoceramic element is installed in the area of the cylinder block - this is the knock sensor. Its function is to transmit a signal to the controller, which will automatically adjust the ignition timing. Thanks to this, the phenomenon will be eliminated. Also, thanks to the sensor, the controller provides a light indication of an emergency situation on the instrument panel.
The Niva knock sensor can be removed using only a screwdriver and a 13mm wrench. Remove the block by pressing the lock, then unscrew the bolt with a wrench.
Camshaft
This part is required to determine the angular position of the timing mechanism in accordance with the crankshaft. Information from it enters the engine control system. It is used to regulate fuel injection and ignition.
Experts recommend changing this part every 100 thousand km or 5 years. This is due to the fact that it is subject to constant temperature changes, which negatively affects the operation of the sensor. Unfortunately, it is quite difficult to independently determine its malfunction; this requires an oscilloscope and other equipment.
Speeds
The Niva 21214 has an electronic, also known as cableless, speed sensor. Its main function is to transmit information about the vehicle speed to the speedometer. You will find this parameter finder on the gearbox, on the rear transfer case cover.
To replace it, you will need to get to the car from below, using a hole or other method.
- Squeeze out the plastic clip and remove the terminal with wires.
- Then use a wrench to unscrew the device. If it doesn't come off, there's no need to pull. The problem is corrosion; WD-40 solvent will help to cope with it; you need to apply it to the connection and wait.
- Install the new part in the reverse order.
Idle move
The idle speed sensor, also known as the regulator (IAC), is located on the throttle valve.
- A block with wires is connected to it, which is removed by releasing the latch. Then you need to unscrew the two bolts using a Phillips screwdriver.
- Then you can simply pull out the sensor.
- When installing, perform the same steps in reverse order.
Fuel level
This sensor is required to display information about how much gas you have left. In some cases, it becomes unusable and needs to be replaced.
First, you'll need to remove the floor mats and rear seat to gain access to the hatch where the gas tank is hidden. The hatch is a sheet secured with 12 screws. Unscrew them and remove the hatch completely by lifting it up and sliding it forward.
Now you can see the gas tank and fuel pump. Remove the connector from the latter by placing a rag under the draining gasoline. It is better to dismantle by draining 5-7 liters from the tank if it is full.
The sensor is installed in a recess at the top of the gas tank. Disconnect the wire block by pressing the plug, and then remove the sensor itself. Install in reverse order.
DTOZH
This sensor is used to determine the coolant temperature. Also, it is its readings that are used automatically to turn on the fan. Thus, the DTOZH and the fan switching sensor are one and the same thing on Niva cars. But on other machines these may be two different parts.
You will find it on the cylinder block. To remove, first drain the coolant. Then, disconnect the wire. The sensor itself is unscrewed with a spanner set to “21”. When installing a new regulator, lubricate its threads with sealant and perform all steps in reverse order.
Engine control system VAZ-21214
Connection diagram of the VAZ-21214 engine management system with central fuel injection under US-83 toxicity standards with controller 21214-1411010 (EFI-4 type) on VAZ-21214 vehicles: 1 - “CHECK ENGINE” control lamp; 2 — instrument cluster (fragments); 3 — electric fans of the engine cooling system*;
4 — electric heater of the intake pipe; 5 — air temperature sensor; 6 — absolute pressure sensor; 7 — coolant temperature sensor; 8 — block connected to the throttle position sensor; 9 — central fuel injection unit; 10 — block connected to the idle speed regulator;
11 — block connected to the nozzle; 12 — diagnostic block; 13 - controller; 14 — knock sensor; 15 — speed sensor; 16 — oxygen concentration sensor; 17 - adsorber; 18 — battery; 19 - main relay; 20 — fuse block of the engine control system; 21 — relay for turning on the electric fuel pump;
22 — relay for turning on the electric fan*; 23 — relay for turning on the electric heater of the inlet pipe; 24 — electric heater protection fuse; 25 — starter activation relay; 26 — ignition relay; 27 — main car fuse box (fragment); 28 — spark plugs; 29 — tachometer; 30 — electric fuel pump with fuel level sensor;
Also interesting: Chevrolet Niva central locking diagram: what to do if the lock from the key does not work, where the control unit and relay are located
31 — ignition module; 32 — crankshaft position sensor; 33 - courtesy light switch, located on the driver's door pillar; 34 — control unit of the automobile anti-theft system**; 35 — status indicator of the car anti-theft system**; A - wire going to plug “50” of the ignition switch;
The order of conditional numbering of plugs in the blocks: a - controller; b — control unit of the automobile anti-theft system; c — indicator of the state of the automobile anti-theft system; g — speed sensor; d — central fuel injection unit; e — electric fuel pump and oxygen concentration sensor; g — ignition module; h - absolute pressure sensor.
Connection diagram of the VAZ-21214 engine control system with distributed fuel injection under Euro-2 toxicity standards with controller 2123-1411020-10 (type MP 7.
0) on VAZ-21214 cars: 1 - warning lamp of the engine control system; 2 — instrument cluster (fragments); 3 — electric fans of the engine cooling system; 4 — courtesy light switch, located on the driver’s door pillar; 5 — status indicator of the car anti-theft system;
6 — control unit of the automobile anti-theft system; 7-coolant temperature sensor; 8 — air flow sensor; 9 — throttle assembly; 10 — block connected to the throttle position sensor; 11 — block connected to the idle speed regulator; 12 - controller; 13 — oxygen concentration sensor;
14 — knock sensor; 15 — crankshaft position sensor; 16 — speed sensor; 17 - adsorber; 18 — battery; 19 - main relay; 20 — diagnostic block; 21 — fuse block of the engine control system; 22 — relay for turning on the electric fuel pump; 23 — relay for turning on electric fans;
24 — main car fuse box (fragment); 25 — block connected to the additional wiring harness*; 26 — ignition module; 27 - tachometer; 28 — electric fuel pump with fuel level sensor; 29 — nozzles; 30 — spark plugs; A - rear wiring harness wire connected to switch 4;
The order of conditional numbering of plugs in the blocks: a - controller; b — control unit of the automobile anti-theft system; in - air flow sensor; g — speed sensor; d — indicator of the state of the automobile anti-theft system; e — electric fuel pump and oxygen concentration sensor; g - throttle pipe; h — ignition module.
Read news about the new Niva
- Clutch adjustment on Niva 21214 - Online reference book to help the car owner - looking for and fixing faults
- How to eliminate vibration of the VAZ-21213 transfer case
- Fuses and relays (location and purpose of fuses and relays) Niva Chevrolet "
- Mud tires for Niva 4x4: radius 15 and 16 - which one is better to install "
- Liquids used and filling volumes Niva VAZ 21213, 21214, 2131 lada 4×4
- Wheel stud M12x1.25x41 2121, 21213, 2131, 21214, 2123 rear
- Niva Chevrolet transfer case: device, connection diagram and how to use?
- How is a CV joint replaced on a Chevrolet Niva?