Lada Niva/VAZ-21214 operation, maintenance and repair manual
The VAZ-2121 Niva all-terrain vehicle, produced since 1977, after modernization in 1994, received the designation VAZ-21213, VAZ-21214 “Lada Niva 4X4”. In 2009, another modernization was carried out in Tolyatti, after which the car began to be called: VAZ-21214 “LADA 4X4”. During the modernization process, 250 new components and parts appeared in the car. Externally updated: the car features new headlights with sections for side lights and turn indicators and larger exterior mirrors. The interior has a new instrument cluster and two warning lamps (differential locking and heated tailgate glass) on the instrument panel. Major changes: the design of the main units was affected.
The model 21214 engine with a displacement of 1.7 liters received a distributed phased fuel injection system, as well as an exhaust gas emissions reduction system with a catalytic converter and a fuel vapor recovery system, ensuring compliance with Euro-3 environmental standards. The engine is designed to use gasoline with an octane rating of at least 95. The use of a clutch mechanism manufactured by Valeo from a Chevrolet Niva car made it possible to reduce the force on the clutch pedal. A clutch drive is also installed: from a Chevrolet Niva.
When assembling the transfer case, cardboard gaskets are excluded and silicone sealant is used instead. In the transfer case crankcase ventilation system, the breather was replaced with an open tube, which eliminated the possibility of excess pressure in the box crankcase. The requirements have increased: for imbalance and geometric manufacturing accuracy: cardan shafts, which has reduced noise and vibration and increased the service life of cardan shafts.
The brake system is equipped with a new vacuum booster and an aluminum brake master cylinder, unified with similar components of the Lada Kalina car, as a result it was possible to reduce the force on the brake pedal. Power steering was installed on the car. The front suspension has new lower arms with larger silent blocks and steering knuckles: from the Chevrolet Niva. We increased the diameter of the lower arm axis and installed new ball joints with a forged body. In the rear suspension, the shock absorbers are installed closer to the vertical and the kinematics have changed due to the installation of the lower rods at an angle to the longitudinal axis of the car, this has made it possible to reduce the transverse and angular movements of the rear axle, reduce the yaw of the car when moving over bumps and reduce the steering effect of the rear axle. In addition, new shock absorbers were installed in the front and rear suspensions. As a result of all the changes, the car has become easier to handle and has better road holding both on asphalt and off-road. Isofix system fastenings have appeared in the rear seat, which allows you to install two child seats in the car at once.
Device
The internal combustion engine was specially designed for the Niva and, in theory, refers to motors designed for cars with rear-wheel drive, installed in cars along its longitudinal axis. The design of the crankshaft is similar to that installed on the VAZ-2103 and has crank radii equal to forty millimeters.
To reduce vibrations, the shaft is designed with additional counterweights and journal diameters increased by 0.02 mm to reduce the gap between the liners and the journal, so that the oil layer is created at an optimal thickness and the dynamics of the shaft are improved. The upgraded shaft can be installed on the 2103 modification engine.
This engine has a new design of pistons with an oval recess in the bottom. The piston pin, 67 mm long, is fixed using retaining rings. The hole for the pin is shifted relative to the piston axis by 1.2 mm. Each piston weighs 347 grams, and to avoid imbalance, all four pistons are brought to the same weight.
The design of the connecting rods has also changed slightly - its length has become 136 mm, the diameter for the connecting rod journal is 47.8 mm, and for the piston pin - 22 mm. New bolts were installed in the connecting rod cover to increase the reliability and accuracy of assembly.
The cylinder head is similar in design to its predecessor (21011), but is not a copy. It is made lower by 1.8 mm, and its height is 111 mm, the combustion chamber has a volume of 30 cm3, dimensions 52×81 mm. The head was equipped with an updated camshaft with a modified shape of the pushers to increase the opening phase of the intake valves. In general, the valve mechanism is taken from the 2101 engine.
The timing drive is carried out using a chain with a damper and a tensioner with an enlarged shoe.
On carburetor engines, contactless ignition was installed, with a switch, distributor and ignition coil.
Replacing the water pump
The process of replacing the pump on a VAZ 2121 car of various modifications consists of the following steps.
- Purchasing a new pump.
- Preparation of tools and workplace.
- Disassembling the unit and dismantling the old pump.
- Installing a new pump and checking its functionality.
The specified sequence of work may change. If you are not completely sure that the pump will fail (perhaps the antifreeze is leaking due to wear on the gasket), you should buy a new pump only after dismantling and diagnosing the old one.
Pump selection
In addition to the standard product from AvtoVAZ, the following pumps are installed on the VAZ 2121 car:
- TZA;
- Fenox;
- Hepu;
- Luzar.
To cool the engine of an all-wheel drive vehicle, the new impeller is more efficient
The listed brands offer pumps with plastic and cast iron impellers. Despite the prejudice of car enthusiasts towards plastic products, it is better to choose plastic - the material is durable, lightweight and does not corrode. You should pay attention to the dimensions of the impeller so as not to buy a fake or an old-style product, the efficiency of which is much lower.
When purchasing, carefully study the packaging and trademarks made on the elements of the unit by casting, embossing or laser engraving. The paper seal sealing the lid of the package must contain a barcode and part number 2123–1307011–75.
The original pump can be identified by the manufacturer's marks on the body
On VAZ 21213-21214 cars you can install a pump with catalog number 2107-1307011-75 from classic VAZ models. However, the standard Niva pump has a reinforced design, so such a pump will last noticeably less, and it can only be installed in extreme cases.
If the impeller breaks or otherwise damages the housing, it will also have to be replaced. Pumps are available for sale as individual pumps or as a set with a housing. The pumps for carburetor and injection engine options are absolutely identical.
Video: choosing a water pump for VAZ 2121
Required Tools
If there is a metal engine protection installed under the bottom of the car that blocks access to the lower bolt of the generator, it will have to be removed. This will require an inspection hole or overpass. Otherwise, you can reach the bolt without a hole - thanks to the high ground clearance of the car.
To remove the alternator belt, you need to loosen the nut that secures it.
To replace the VAZ 2121 pump you will need:
- flat and Phillips screwdrivers;
- mount with a spade-shaped end;
- standard sets of spanner wrenches and sockets with a wrench equipped with a ratchet;
- a short hose and a container for draining antifreeze (a basin or a plastic canister with a cut off side);
- rags, gloves;
- high temperature sealant;
- liter container with antifreeze antifreeze.
To replace the pump you will need a standard set of tools, protective gloves and a liter canister of antifreeze
When draining antifreeze from the system, some of the liquid will spill. Therefore, you should purchase a liter coolant container in advance for topping up.
Work order
If access to the lower bolt of the generator is blocked by the engine protection, it must be removed on an overpass or inspection pit. Then you should loosen the nut on the generator mounting bolt without unscrewing it completely. In addition, on the VAZ 21214 injection model, you need to dismantle the air duct connecting the receiver to the plastic air filter box.
On the VAZ 21214 injection model, the air duct connecting the receiver to the plastic air filter box is dismantled
Antifreeze drain
The coolant is drained in the following order.
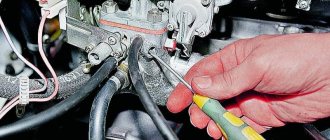
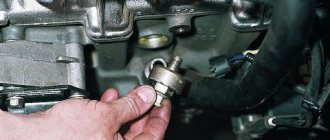
- Place a container under the vehicle opposite the drain plug in the form of a bolt located on the left side of the cylinder block next to the oil pressure sensor.
To drain the antifreeze from the cylinder block, unscrew the bolt plug.
The cap on the upper left side of the radiator opens, and antifreeze flows faster
To remove the pump, you should not empty the entire system - drain the antifreeze from the block, expansion tank and radiator, unless you plan to replace the fluid with a new one. It is important to lower its level in the water jacket of the motor below the height where the pump is located.
Dismantling the pump
The procedure for dismantling the pump is the same for all modifications of the Niva.
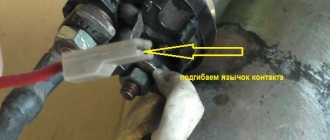
- With the belt tense, use a 13mm wrench to loosen the three bolts securing the pump pulley.
- Using a 17mm wrench, loosen the nut on the tension bracket and move the generator housing to the right, towards the crankshaft. A loose generator drive belt can be easily removed from the pulleys.
After unscrewing the fixing nut, the weakened generator belt can be easily removed from the pulleys
Three bolts are unscrewed and the pulley is easily removed
To remove the water pump, unscrew the four mounting nuts
On VAZ 2121 models with power steering (power steering), another belt drive is installed in front of the generator belt, rotating the hydraulic pump shaft. This belt does not interfere with replacing the pump; it does not need to be removed.
The belt drive of the hydraulic pump will not interfere with changing the pump on a VAZ 21214
Use a rag to remove traces of antifreeze from the engine and body. Use a short knife or sandpaper to clean the housing mounting flange.
Installing a new pump
The new water pump is installed in the reverse order. In this case, a number of important points should be taken into account.
- Apply high temperature sealant to the flanges of the part and housing before installation. Insert the pump so that the belt tension adjusting bracket is on the right (in the direction of travel).
The pump is installed so that the pin for attaching the generator bracket is on the right (in the direction of travel)
On a carburetor engine, the tube is connected to the exhaust manifold, on an injection engine - to the throttle valve
One liter of antifreeze purchased in advance will be enough to compensate for losses when draining the coolant. Don't forget to tighten the nut on the bottom bolt of the generator and install the air duct on the injection version. Start the engine, warm it up to 90°C and wait until the cooling fan turns on. This is proof that there are no air pockets in the system.
Video: replacing the pump
Do-it-yourself removal and repair of the Niva 2121 camshaft - step-by-step instructions
In order to remove and replace the camshaft on a Niva 2121, you must perform the following procedure:
- Prepare the necessary tool Preparation for replacement consisting of: wrenches; torque wrench; chisels; socket heads for 10, 13 and 17.
- At the first stage of work on removing the shaft, the following actions are performed: Removing the negative terminal from the Niva 21213 car battery (2121 and any other domestic modification of this car); Removing the cylinder head cover; Install the camshaft in a position where the mark on its sprocket coincides with the corresponding protrusion on the bearing housing. And the mark on the pulley is with the protruding part of the shaft drive. Using a chisel to bend the blades around the lock washer of the bolt securing the sprocket.
- Next Unscrew the sprocket bolt of the part being removed (key “17”) and remove it from the hole;
- Dismantling the timing chain tensioner;
- Removing the camshaft sprocket (recommended tie a chain to it – this will ensure that there is no skipping;
- Uniformly unscrew (using a 13mm wrench) all the nuts securing the shaft bearing housing and remove it from the cylinder head studs along with the camshaft.
- Unscrewing, using a 10mm socket wrench, the fastenings of the thrust flange to the bearing housing;
- Removing the flange and then the camshaft.
- If it is necessary to replace the valve levers, these parts are also removed immediately after dismantling the shaft . To do this you should:
- Move the presser spring legs to the side;
- Remove the lever;
- Remove the spring.
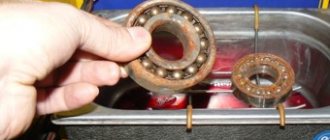
- At the same stage, diagnostics of the condition is performed. If there are noticeable damages (cams are worn by 0.5 mm or more, scratches, grooves and nicks are visible on the surface), indicating the impossibility of repair, proceed to the process of installing a new part. The camshaft, which can be repaired, is brought back into working condition. If the question about the need to replace the camshaft of any Niva model (including 2131 and more modern versions) receives a positive answer, you should purchase a new part. As a rule, they are sold complete with cases. It is worth noting that installing a new shaft requires replacing its rockers and hydraulic compensators, which increases the cost of repairs by approximately one and a half times.
- Before installing the shaft inside the bearing box, lubricate the working surfaces of the journals and cams with engine oil. Now you should install the camshaft so that its pin is located exactly opposite a certain reference point - the upper hole of the thrust flange. The part is fixed and the fasteners are tightened, adhering to certain rules: the nuts must be tightened, trying to maintain a force of 19 Nm;
• twisting is carried out in a certain sequence, which can be seen in the diagram: - Now unfasten the wire that secured the timing chain to the sprocket (leaving marks for ease of installation), and install both of these parts on the shaft. Having unscrewed the fastening bolt, bend the petals of the lock washer. And as a final stage:
- installing a tensioner for the timing chain (observing the marks made);
- returning previously removed parts to their place in the reverse sequence;
- adjustment thermal gaps old or newly installed valves.
- The result of the replacement is a new camshaft installed on your Niva 21214, 2121 or 2131, which can last at least another 100 thousand km - without the appearance of knocking and most other problems with the engine. At the same time, funds are saved that could have been spent on paying for repair services, and relatively little time is spent.
vote
Article rating