Types and types of heater radiators for the VAZ 2110 stove
Note from the author of the article: Not paying attention to radiator problems ultimately leads to repairs. You will be lucky if you manage to repair the unit. If not, then the only solution is to replace the heater radiator with a VAZ 2110.
Sooner or later, the heater radiator becomes unusable, becomes clogged, or becomes corroded. Every car enthusiast wants the car interior to be warm in winter , so it is important to choose the right heater radiator for the VAZ 2110 .
There are two types of VAZ 2110 heater radiators on the market
- Copper
- Aluminum
Let's find out which one is better to choose.
How to remove the stove
Removing the stove on new VAZ-2110 models
First of all, drain the old antifreeze. To do this, the pressure in the system is released by opening the expansion cap. Next, we find the ignition control unit: the drain plug is hidden behind it; Unscrew it and wait for the liquid to be completely removed from the device.
The radiator is held on by 4 fasteners - a screw under the front glass, two bolts on the side of the intake manifold. There is also a nut next to the cabin air filter - it also needs to be removed. The driver has the opportunity to remove the radiator almost freely. But it will be so easy only for owners of restyled tens (VAZ-21103).
We also recommend reading our expert’s article, which talks about the features of tuning the VAZ-2110.
Removing the stove on old VAZ-2110 models
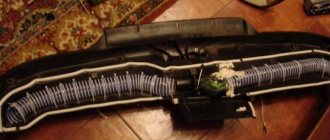
With the “old ladies” 1996-2001. everything is more complicated. The driver will have to remove the wipers, as well as the washer fluid supply line. Also superfluous will be a decorative trim under the forehead, a heater housing, a cabin air filter, a fan, and flexible heat supply hoses. AvtoVAZ engineers clearly did not want anyone to repair the stove themselves. Only by removing all the described parts will the car owner gain access to the interior heater radiator.
Fast way
The angry “vazovods” turned out to be no slouch and figured out how to remove the stove on a pre-restyling VAZ-2110. You will also have to work hard, but still less than with the standard algorithm.
Let us explain how to remove the stove on a VAZ-2110 in the simplest way:
- After draining the antifreeze and disconnecting all the pipes, we dismantle the expansion tank.
- The frill overlay will also get in the way, so we remove it.
- And now the highlight of the program: remove the brake pedal along with the vacuum booster.
- The repairman has a wonderful view of the radiator, and now nothing will prevent him from removing it after removing the fasteners.
We recommend: How to choose tires for a car?
Use this “life hack” if you don’t want to spend several hours with repairs.
Which radiator should I choose, aluminum or copper?
The VAZ 2110 after 2008 was equipped with aluminum radiators, which have a number of pros and cons. However, some car owners complain about cold interiors and foggy windows. Advantages of an aluminum radiator:
- They have a higher density compared to copper
- The width of the radiator channels is larger, which means more heat transfer
Minuses :
- If a leak occurs, it is not repairable
- Heats up quite quickly, but also cools down quickly
Initially, domestic cars were equipped with copper radiators. However, later, as we wrote above, they were replaced with aluminum ones.
Now it is quite difficult to find a high-quality copper radiator, since some manufacturers use impurities instead of pure copper.
Advantages of copper radiators VAZ 2110:
- Among the obvious advantages is its heat dissipation of 389.6 W/(m. deg), it is significantly higher than that of aluminum
- A copper radiator takes a long time to heat up, but also takes a long time to cool down.
- If it leaks, it can be repaired.
- The copper radiator can be soldered.
Minuses:
- This type of radiator has fewer fins and thin channels that can become clogged.
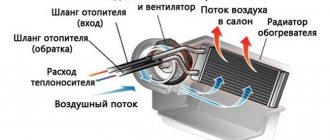
Diagnostics of the heating system of VAZ 2110
If the function of the temperature regulator is malfunctioning, two most common reasons can be noted:
- incorrect operation of the control unit,
- damper malfunction.
If the temperature controller malfunctions, the first thing you need to do is pay attention to the condition of the temperature sensor. The temperature analyzer is located next to the lampshade located on the ceiling.
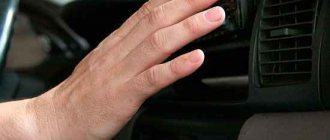
You can check the functionality of the temperature analyzer as follows: you need to turn the temperature knob several times and tactilely analyze the temperature of the air flow.
If the air flow temperature changes only when the regulator is in the extreme position, the analyzer must be replaced. If, however, the temperature of the air flow changes according to the position of the regulator, the sensor is functioning properly and the cause of the breakdown is the incorrect operation of the control unit.
In order to check the function of the VAZ 2110 heater, it is necessary to move the damper located in the engine compartment. Next, it is necessary to visually diagnose the tightness of the radiator. If the check shows a violation of the heater seal, it is necessary to replace it with a new one. Replacing the heater involves dismantling and completely disassembling the VAZ 2110 stove. If you have a new heater, you can replace it yourself.
What do you need for work?
First of all, you will need a new heater radiator. The choice is presented in a fairly wide range, so decide for yourself here.
As for tools and materials, be sure to check the condition of the system pipes. It is possible that they are also damaged, so they will have to be replaced.
Buy a set of clamps. In general, you will need three of them, but it is better to take a reserve just in case. Moreover, this “just in case” happens to every second person who changes a stove radiator with their own hands.
Tools include a short Phillips screwdriver and tweezers . The latter will help you install the latches.
Article on the topic: Methods for checking ignition coils on a Priora
Replacing an old-style VAZ 2110 radiator - step-by-step instructions
To remove the cooling radiator from an old-style VAZ 2110 with your own hands, you must perform the following sequence of actions:
- Drain the coolant through the bottom plug;
- Remove the battery as it is in the way;
- On the injection VAZ 2110, it is also necessary to remove the air filter;
- The upper mount to the frame must be disassembled, simultaneously releasing the fan;
- Remove the electric fan;
- Remove two hoses - for steam supply/discharge;
- Tilt the radiator towards the engine and remove.
That is, removal is quite simple. Now, if the radiator leaks slightly, but is not severely damaged by corrosion, you can repair it. Otherwise, replace it. When choosing a new radiator for a VAZ 2110, be sure to take into account the model of the previously installed one so that the new one fits perfectly.
Removing the heater radiator
Your first priority is to get rid of the antifreeze. It is better to drain the coolant into a clean container if you filled it recently and it is in good condition. This will allow you to refill it later.
- Relieve pressure by opening the expansion tank cap. Just let the car cool down before doing this.
- Next, behind the ignition module, find the plug that needs to be unscrewed.
- You should have about 4 liters of coolant coming out of the hole. Therefore, prepare a container of appropriate size.
- Or you can drain through the expansion tank. Although this option is not particularly convenient.
After draining the coolant, you can begin further dismantling the radiator. But here the procedure depends on what kind of unit we are dealing with - a new or old model.
Let's consider both options separately.
Old stove
The radiator is removed from the engine compartment. This is done as follows:
- Remove the rubber frill seal;
- Under the brake master cylinder, locate the fasteners that hold the frill in place. Unscrew it;
- Now remove the screws that hold the right side of the frill in place. There should be four of them in total;
- Disconnect the two small clamps on the frill. They hold wires and hoses;
- The positive terminal and negative wire are disconnected from the fan;
- Move the left side of the frill forward a little, but you don’t need to remove it completely. All you need to do is unscrew a couple of fasteners;
- Remove the wind cover;
- If there is a coolant level sensor terminal, disconnect it;
- Remove the steam exhaust hose from the expansion tank.
Removing thermal insulation
Next, you need to remove some elements one by one. Proceed strictly in the specified sequence.
- Windshield washer hose.
- Wipers.
- Windshield trim. Heater housing clamps.
- Front part of the heater with fan.
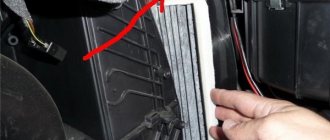
- Cabin filter.
- The second part of the case is the fan.
- All hoses (steam outlet, return and supply).
- Radiator housing.
If your existing radiator is made of copper, the presence of a leak does not indicate a mandatory replacement. It can be soldered. Only this question is better to entrust to a specialist. Even if you pay more money, the decision will be competent and correct
So we figured out how to remove the heater radiator on an old-style VAZ 2110. When installing a new unit or a repaired old one, make sure that the pedal of the plastic housing from the fan fits into the groove. If this is not done, the gearbox will not be able to change the position of the damper. Consequently, there will be no heat inside the cabin.
In addition, it is better to replace this plastic pedal with an aluminum one. Not expensive, easy, but reliable and durable.
New stove
If you are dealing with a new type of stove, there are some nuances regarding fixing the heater to the body.
To remove the unit, you will need to dismantle several elements. Namely:
- There are screws at the bottom of the windshield, the middle one can be unscrewed;
- Also unscrewed is a pair of nuts that you will find slightly above the intake manifold;
- The nut located to the left of the filter must be removed;
- If there is a reservoir with washer fluid for the rear window, then it and the air filter are removed.
We recommend: How to properly clean sheepskin car seat covers?
The new generation heater is distinguished by the fact that the design is detachable. This is quite easy to do to be able to replace the heater radiator.
How to quickly replace the heater radiator of a VAZ 2110 through the brake
It is not for nothing that they say that progress is driven by our laziness, which has been demonstrated more than once, and continues to be demonstrated by folk craftsmen. There is another way that allows you to repair or replace the radiator without removing the entire heater.
It will only take about an hour. We follow this algorithm:
- We drain the antifreeze through the pipe for heating the remote control;
- Disconnect all pipes and remove the expansion tank;
- Let's disassemble the frill;
- We remove the brake pedal together with the VUT and gain access to the radiator;
- We take out the old radiator and replace it with a new one.
We put everything back in place in reverse order. Don’t forget to fill up with antifreeze, and it is also advisable to change the cabin filter. That, in fact, is the entire replacement of the VAZ 2110 heater radiator, carried out “through the brakes”.
Remember: it doesn’t matter whether you install a DAAZ or a copper radiator, in order for it to work, you need to be very meticulous in approaching each stage of the work.
How to remove and replace the heater radiator on a VAZ-2112 (old model)?
A leak of cooling fluid in the cabin is a direct prerequisite for the need to change the heating radiator, since it is already out of order.
Note that models older than 2003 have an old-style stove installed. However, towards the end of this year, the cars were already equipped with a new heater. Accordingly, they have some structural differences, and therefore are removed and installed differently.
Replacing the radiator on the VAZ-2112 stove:
- We free the system from antifreeze by draining it through the hole in the power unit block or through the expansion tank. If you choose the second option, you must remove the ignition module. Next, remove the lid from the tank, and then uncork the drain plug. If there is no sediment in the coolant, that is, it is in a clean state, it can be reused.
- It is necessary to remove the hood seal, which is located next to the frill.
- The screw fixing the frill should be unscrewed, and then the screws securing its upper part should be unscrewed.
- Loosen the clamps and remove all wires and hoses from the frill.
- Disconnect the vehicle's power supply by removing the terminals from the power source.
- On the left side of the frill there are two screws that must be unscrewed to remove the element. There is no need to remove it.
- Remove the front cover.
- You will need to remove the terminal (if any) from the liquid level control sensor in the system, as well as the steam removal hose from the expansion tank.
- Remove the hose from the front windshield washer.
- After unscrewing the four screws, you need to remove the windshield wipers with the windshield trim.
- The stove fan is dismantled, as well as the mounting brackets for its housing.
- The mounting screws are removed from the protective casings of the air filter and fan.
- It is necessary to remove the front heater blower housing and the cabin filter housing.
- The rear part of the fan shroud is removed.
- The steam outlet line and the antifreeze supply hose must be disconnected, having first loosened their fastenings.
- The heater core can now be removed.
We recommend: Restoring the panel after airbag deployment
Before installing a new radiator, it is necessary to clean its seat in the stove body. When assembling the heater in reverse order, it is very important to control the tightness of all connections and the correct location of the parts. Otherwise, the heater may simply not function, and then the entire described sequence of work will have to be done again.