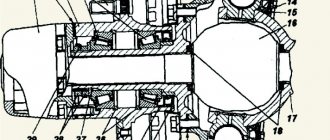
Let's continue. Those who are unlucky with air conditioning need to remove a lot. For those who don’t have one, there’s relatively little to shoot. We remove the steering wheel. You can read how to remove the steering wheel itself here. Be sure to mark how the steering wheel was positioned, otherwise it will fit crookedly. Removing under the steering mount:
There are similar nuts on the right
At the same time, we remove the fuse panel and disconnect the connections in the wiring. Wiring on the right:
Next, unscrew the bolts to the fan (photo with the panel already removed, it’s clearer.)
And disconnect the wires from the fan, the third connector did not fit into the photo. You can see him anyway.
Now you need to disconnect the additional connectors. Photo of how the steering column part is assembled and an incomprehensible element. Disconnect the wiring from the element.
Next, disconnect the wiring from the air conditioner. On right
Next, unscrew the panel fastening on the left and right, two bolts each; there is also a hook in this place so that the panel does not immediately come off.
We go into the interior and from the glove compartment unscrew the climate control mount to the frame
There is also a mount under the steering wheel, but I couldn’t take a photo.
In the middle of the panel in the legs we also unscrew the bolts
After this, you need to unscrew the fastenings of the air ducts that blow into the feet of the driver and passenger.
Next, I wrapped the air ducts so that everything went to the legs.
Mileage: 42000 km
UAZ Patriot 2013, 114 l. With. — tuning
Cars for sale
UAZ Patriot, 2013
UAZ Patriot, 2014
UAZ Patriot, 2015
UAZ Patriot, 2013
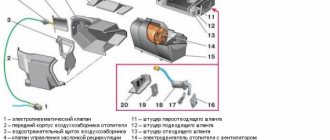
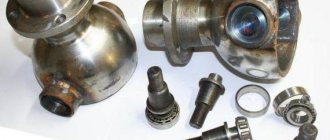
Internal heating system design
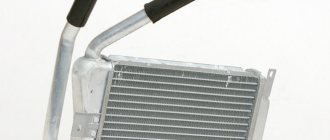
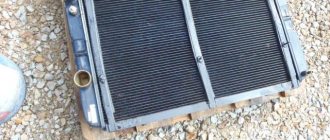
The heater of the UAZ-3163 “Patriot” is made in the form of a radiator, but smaller in size than the engine cooling radiator. The heater radiator is located under the dashboard (from the car dashboard) at the front. It consists of many aluminum plates with circulating antifreeze or antifreeze at high temperatures. On top, above the heater radiator, is a cooling system in the form of a fan. There is also a special damper that regulates the supply of warm and cold air.
Design of the internal heating system: 1 - heater housing; 2 - driver's foot heating pipe; 3, 19, 21 - self-tapping screws; 4 - clamps; 5 - driver’s foot heating nozzle; 6 - lower damper drive rod; 7 - lower damper control lever; 8 - heater valve control rod; 9 - rod of the upper damper drive; 10 -lever] control of the upper damper; II - heater mounting brackets; 12 - rod fastening bracket; 13 - heater tap control lever; 14 - heater valve; 15 - gear motor for recirculation damper drive; 16 - left air duct mounting bracket; 17 - air intake; 18 - air intake mounting brackets; 20 - right air duct; 22 - left air duct; 23 - heater control panel; 24 - front passenger foot heating nozzle; 25 - fastening bracket
Next, let's move on to the description of the step-by-step replacement of the heater radiator (stove) on the UAZ-3163 “Patriot”. First of all, you need to diagnose the breakdown or malfunction.
It (from auto diagnostics) consists of determining the causes of problems in heating operation and consists of the following possible options:
- Large difference between the temperature of the heat supply and heat removal pipes;
- The heating system does not supply heat to the vehicle interior;
- Antifreeze is observed leaking from the heater radiator (the heat circuit is leaking).
If the above is observed, then you should not postpone repairs until later. Especially with the upcoming seasonal cold spell. As soon as problems or malfunctions are noticed in the operation of the car’s heating system, it is necessary to urgently replace the radiator of the car’s stove (heater).
see also
Comments 22
Greetings! Thanks for the detailed instructions... And how the fan with the box and the air conditioning unit are attached to the body (engine shield). Or I’ll ask this question but in a different way: is it possible to move the torpedo towards you by 2 - 3 cm without unscrewing the fan and air conditioning unit from the panel itself.
I don’t remember how they are attached, but I think moving them 2-3 cm away is no problem, the main thing is not to forget about the condensate drain hose.
Read more: Permission to use gas equipment
Thanks, I figured it out! They are attached only to the torpedo frame. They are not attached to the engine shield...
thanks for the link, the other day I started removing the front panel (dashboard), unscrewed everything that is shown, but I can’t remove everything smoothly, it feels like something is holding in the middle and I still can’t figure out how to remove the air pipes going to the feet of the passengers with the panel assembled, has anyone encountered this, please tell me
The pipes are bolted to the panel. They are not immediately visible.
Good afternoon To be honest, I just can’t figure it out from the photos =) I just want to remove the panel as little as possible to fix the heater dampers (it’s stuck) and I’ll put a noise on it where I can. what I figured out: 1) unscrewed the tidy 2) removed the steering wheel 3) removed the glove compartment 4) removed the central part (where the dashboard is)
Question about the further process. I don't want to touch the wiring or the air conditioning especially. Will I be able to remove the panel by simply unscrewing 4 bolts on the tanks and 2 from the engine compartment?
All wiring on the sides with latches is easy to remove and install and difficult to confuse. You also need to unscrew the bolts near the base of the panel, where the gearbox levers are. You need to disconnect the connectors from all sensors. There are pictures. and unscrew the climate control system from the panel, everything seems to be in the photos =)
Good day. Please tell me what these two bolts are in this photo ha.d-cd.net/a4ad374s-960.jpg above the pipes near the windshield?
This is a holder for the air conditioner pipes, the holder is located under the hood.
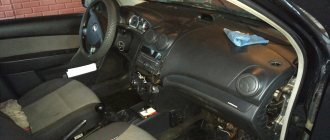
The instrument panel of the UAZ Patriot is removed in case of work to replace the heater radiator (stove), or when carrying out body work or when replacing the instrument panel. Let’s say right away that the procedure for removing the UAZ Patriot instrument panel is very labor-intensive, as it will require additional dismantling:
– glove boxes; – electrical installation unit; – removing the steering column.
Later in our article we will talk in more detail about this removal procedure.
The instrument panel of the UAZ Patriot consists of an instrument panel, a load-bearing tubular frame, an air duct system, an instrument panel panel with an instrument cluster and control buttons, an instrument panel console overlay, an instrument panel overlay, and side plugs.
The instrument panel is reinforced with a steel frame, has an energy-absorbing layer of polyurethane foam and is lined on the outside with a decorative film.
It is attached to a power tubular frame. The remaining parts of the instrument panel are made of plastic.
To remove the instrument panel, you must first remove the plastic parts from it.
We prepare the car for work, open the hood and disconnect the negative terminal of the battery.
We unscrew the three fastening screws on the right side and three screws on the left side and remove the side trims of the instrument panel (Fig. 1).
Unscrew the bolt securing the hood lock drive lever on the left side.
We unscrew one screw on the left side of the fastening of the left trim to the instrument panel and two screws on the right side (Fig. 3).
Disconnect the block from the lighting control module (Fig. 4), and remove the left trim.
We unscrew the screws securing the lampshade, holding the nut with a wrench to prevent it from turning, and remove the lampshade for the pedal lighting (Fig. 5).
Remove the switch handles of the heating and ventilation control unit (Fig. 6).
We unscrew three screws and remove the control unit trim (Fig. 7).
We take out the ashtray and box for small items (Fig. 8).
Unscrew the four screws and remove the lower instrument panel panel (Fig. 9).
We unscrew the six screws and lower the control unit down (Fig. 10).
We remove the radio or storage box from the mounting hole (Fig. 11).
We put our hand into the mounting hole and disconnect the wire blocks from the hazard warning switch and the heated rear window switch (Fig. 12).
Press the spring clip and remove the cup holder from the center console trim (Fig. 13).
We unscrew the two screws securing the center console trim and remove the trim (Fig. 14)
Removing glove boxes - article “How to replace the heater tap of a UAZ Patriot.”
We unscrew the bolt securing the lower panel under the steering column (Fig. 15).
Unscrew the two central bolts (Fig. 16).
We unscrew the lower bolt on the left side under the lower glove box (Fig. 17).
Unscrew two screws 1 under the glove boxes and bolt 2 (Fig. 18).
We turn out the two screws securing the bottom panel to the amplifier from the side (Fig. 19).
We unscrew the two bolts from the inside securing the handrail to the bottom panel to the amplifier (Fig. 20).
Removing the handrail
Remove the bottom panel (Fig. 22).
We disconnect the wire blocks on the right side of the floor tunnel lining (Fig. 23).
Removing the mounting block
On one of the blocks of the mounting block, we disconnect the terminals; before removing the terminal, you need to mark its location in the block.
We bend the terminal retainer with a thin awl and remove the terminal from the block (Fig. 24).
Removing the steering column
Use a screwdriver to pry up the decorative plugs securing the windshield blower duct trim and remove them (Fig. 25).
We unscrew the five screws securing the decorative trim of the windshield blower duct and remove it (Fig. 26).
We unscrew the two bolts securing the instrument panel amplifier to the body on the left side and two bolts on the right side (Fig. 27).
Remove the instrument panel.
We install the instrument panel in the reverse order.
Malfunctions of the UAZ Patriot instrument cluster
The devices and the panel as a whole do not often cause problems for owners, because they are quite reliable and can last the entire life of the car. But there are times when the dashboard on a UAZ Patriot stops functioning.
Most appliances don't work
In this case, the lighting in the cabin and outside does not turn on, the indicators and warning lights do not light up, and the pointer arrows do not move on the instruments. The engine may not be able to start at all. There are two reasons for this malfunction.
- The main panel (microcircuit) is out of order,
- There are serious problems with the electronic control unit (sensor data is not displayed on the instrument panel).
To troubleshoot a problem, you must have the skills and knowledge to repair electrical equipment and electronics. And if they are not there, it is better to turn to specialists, preferably highly qualified ones.
The backlight does not light up
To control it in UAZ Patriot cars, a special regulator is used, which is structurally a rheostat. To ensure maximum brightness of the backlight of the shield, you should move the slider to the very top. The backlight may not work most often due to a failed fuse F. But even in this case, before changing it, you need to eliminate the cause of the burnout.
The second common factor in regulator failure: oxidation often forms on the rheostat contacts, causing no voltage to flow. Sometimes part of the backlight or several bulbs may not work. In this case, the lighting sources burned out. To eliminate such malfunctions, you should completely remove the shield and replace the burnt out elements.
Sensors don't work
Often a malfunction may occur with instrument readings (speedometer, tachometer, etc.), namely their absence. If all the sensors on the panel do not work at once, the reason may be a malfunction of the electronics (ECU). If one of the pointers does not work, you should look for the reason in the desired node. For example, the coolant temperature gauge does not work. The sensor that measures and transmits current temperature data to the dashboard should be checked for functionality.
If the devices do not work, and all the indicators meanwhile work properly, then such situations are called “freezing” of the devices, caused by a low battery charge level. This picture is observed when starting the engine; usually these attempts are unsuccessful. In such cases, the on-board computer cannot detect failures and errors, and therefore is not able to find the cause of the problem. The problem can be solved simply: just turn off the power to the vehicle's on-board network.
This can be done in several accessible ways
| Actions | results |
| The simplest is to remove the negative terminal of the battery for one or two minutes. | This will reset the readings and reset the ECU with the dashboard board. |
| Another method of de-energizing is somewhat inconvenient. You need to open the mounting block. | It is located next to the battery. Then you need to pull out the 5 Amp fuse, it is responsible for supplying voltage to the instrument cluster. Then you need to put the fuse in place. |
| The third method is even more difficult. You need to disconnect the terminal blocks from the instrument board. | But for this it is necessary to dismantle it, which greatly complicates the process. |
If, when switching the ignition key to the first position and then after starting the engine, only the warning lamp indicators light up (sensors and two small screens do not work), and de-energizing the system by removing the negative terminal of the battery does not help either - in this case, testing should be carried out to determine the operability of the electronic fees. This is not difficult to do. You need to turn off the ignition, press and hold the odometer reset button, turn on the ignition and release the button.
When the board is in good condition, the dashboard test will start, the essence of which is that all the arrows will begin the path from the start to the end mark and back. This should be repeated three times. If during the test one or more arrows are stationary or move with a freeze, there is obviously a problem with the circuit board.
In any case, eliminating problems with the instrument panel on a UAZ Patriot will require knowledge of electrical engineering and skills in working with electrical equipment.
The causes of malfunctions may be
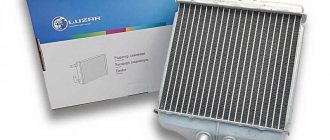
- The heater (heater) radiator duct is clogged (over time, the pipes tend to become clogged);
- The radiator has worn out (over time, metals are depleted, this occurs due to dynamic changes in temperatures, atmospheric pressure and corrosion of metals).
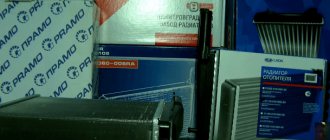
Small clarification. Replacing the radiator of the heating system of the UAZ-3163 “Patriot” can be done in two ways: you can dismantle the panel (dashboard) or without dismantling the instrument panel. Service station specialists, for example, use the first option, as they are well versed in all the nuances and subtleties of the dashboard. The second method is usually used by everyone else.
Features of the instrument cluster
The dashboard of any car, not only the UAZ Patriot, is a box made of plastic with an electronic board, the indicators of which display data from all available control and measurement sensors. The housing is made removable, as there is often a need for repair work. Dismantling the UAZ Patriot panel is not the most difficult procedure, which allows you to use different tuning options.
UAZ Patriot SUVs are equipped with one of the most high-tech dashboards that are equipped with cars from the Ulyanovsk Automobile Plant. In appearance and functionality, it can compete with similar crossover products from popular foreign brands.
The standard equipment of the shield includes the following elements.
- Control unit and settings for lighting devices.
- Switch from low to high beam and control of turn signals.
- Windshield wiper speed switch.
- Speedometer (measuring current speed) and tachometer (measuring crankshaft speed).
- Indicator for time, fuel, coolant temperature, etc.
- Sound signal.
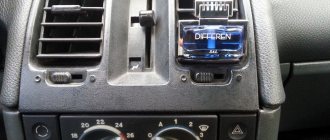
- Air conditioning system.
- Alarm.
The instrument cluster of the UAZ Patriot has a number of signaling icons, each of which has its own purpose. The designation and indicator scheme is as follows.
- Coolant temperature gauge.
- Performance of spark plugs.
- Alarm for low engine oil pressure.
- Alarm about the presence of any errors in the operation of the power plant.
- Coolant overheating.
- Crankshaft speed (tachometer).
- Left turn arrow and hazard warning lights.
- Unclosed door indicator.
- Low battery indicator.
- A lamp indicating problems with the brake system.
- Indicator of the functioning of the anti-lock braking system (ABS).
- Parking brake alarm.
- All-wheel drive connection indicator (front axle).
- Right turn signal and hazard warning lights.
- A device for measuring car speed (speedometer).
- Rear PTF operation indicator (fog lights).
- Head light indicator lamp
- Front fog lights on.
- Indicator of too low fuel level in the tank.
- Signaling for high beam headlights.
- Fuel level.
- Current mileage reset button.
- Total mileage indication.
- Voltage in the UAZ Patriot on-board network, current time indicator.
- Switching display.
Thanks to these lamps and indicators, the driver can quickly assess the condition and performance of the car, noticing any deviations in time. All readings are easy to read, and even a beginner can easily understand the purpose of the elements.
Bottom line
Do not forget that we check the correct operation of the internal heating system before assembling the instrument panel (dashboard). If, after the work has been done and the car’s heating system has started, in addition to the feeling of warmth inside the car, there are no drips or characteristic sounds of improper operation, then everything has been done correctly and successfully!
Important clarification. It is possible to replace the radiator of the UAZ-3163 “Patriot” stove with or without air conditioning only if it is copper or brass. Attempts to solder an aluminum radiator housing will most likely not lead to the desired result.