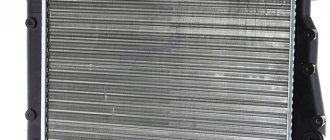
In a liquid cooling system, heat from the engine is transferred to the air through a radiator. The more powerful the power unit and the more intense the operating mode, the more heat is generated that must be removed. The UAZ Patriot radiator provides cooling of the antifreeze coming from the engine and the air conditioner condenser.
Replacing the coolant - UAZ 3909, 2.4 l., 1994 on DRIVE2
As soon as I had a free day off, I immediately rushed to replace the coolant. It broke faster due to the fact that there was water in the cooling system, and the temperature at night at that time began to drop to -3.
I stocked up on what I needed in advance.
Don't buy this set. Because it's gross. Gaskets are slightly thicker than a sheet of paper
But the faucet was never useful. I managed to pull off the old one.
By the way, the operation failed on the first day. The valve of the engine block did not open, the thermostat cover did not want to be removed. But the second day was much more productive.
Having filled and drained the water twice, I added antifreeze. By the way, why is it not mentioned anywhere (in the literature) that the radiator of the second stove is located above the main radiator. And in order to drain the coolant from it, you need to air it out. I couldn’t smoke for more than half an hour, why when I drain it only 10 liters comes out, and not the required 15 liters.
Only after airing one of the heater hoses did I drain the water from it
I struggled with the water pump thermostat cover for a long time. Well, I didn’t want to act. He knocked, squeezed, pressed, cut the gasket. An hour later I finally pulled it off. And there…
The edge of the thermostat plate is bent.
Installed a new thermostat. And then I had to disassemble it, because... That shitty paper gasket leaked. Sealant is our answer.
So that's how it worked.
The overpass is long, and only 5 meters are suitable for work for one car. How so. They come, pour the waste either onto the floor or into a canister and immediately throw it away. When leaving, I stuffed all my empty eggplants with waste, 8 bags of garbage, and took them with me.
PS: However, it’s either a problem or something I don’t understand. I drove the car from the previous owner (
100 km) - the radiator itself was 2/3 covered with cardboard, on the highway the temperature remained 80 degrees. Now, after replacing the thermostat - the radiator is 1/3 closed, I drove 20 km to the parking lot - the temperature did not rise above 60. Although the block is noticeably hot, both stoves (connected in parallel) heat up. Why is that?
Design features and purpose of the Patriot radiator
Such an indispensable device as the cooling radiator in the SUV we are considering is designed to cool the liquid coming directly from the engine. Thanks to the presence in the device of a popular SUV in our country, a radiator and a specialized coolant, the “engine” is cooled efficiently and in a timely manner and does not overheat. When the critical temperature of the power unit is reached, so to speak, it is likely to jam, therefore, it is important to monitor the data from the sensor located on the dashboard while driving.
The device we are considering is a specialized container in which the liquid constantly circulating from the engine is cooled. To make everything more clear and visual, in the photo below you can see what the design of the radiator installed on a UAZ Paptriot looks like.
The liquid in use cools quickly enough, thanks to the design features of the radiator. However, in order to cool it, the presence of a radiator alone will not be enough. A fan is needed to help cool antifreeze, or, more commonly, antifreeze. A modern UAZ Patriot is necessarily equipped with a fan, the drive of which occurs thanks to a fan or a device in the system such as a special viscous coupling. In general, on SUVs of Euro-2 and -3 standards, the design of the device is identical. They differ only in some structural elements. For example, on later-released Patriots, the radiator unit has an easily removable fitting that allows antifreeze to drain into a specialized expansion tank. The first models of the domestic UAZ Patriot also have a fitting in their equipment, but it is already made of plastic and is entirely soldered into the design of the device we have designated.
UAZ Patriot air conditioner
Air temperature sensor UAZ Patriot
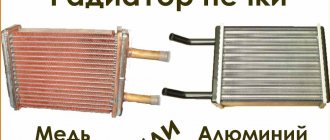
How does such a complex heat exchange occur in a cooling system? First of all, it is carried out due to the fact that the radiator design has rather ribbed specialized bases made of an alloy of copper and a metal such as aluminum. It is thanks to this technological design that heat transfer from antifreeze occurs many times faster, and it cools down. Many radiators are made from certain aluminum alloys, but are equipped with copper and even brass finned bases. Copper devices have the following advantages:
- If minor damage occurs, you can solder it yourself.
- In such heat exchangers the rate of cooling produced is much higher.
- Long service life, which is 2-3 times longer than the life cycle of brass and aluminum radiator devices.
Aluminum itself corrodes extremely quickly. Brass is many times heavier and has a fairly low thermal conductivity.
VESKO-TRANS.RU
AutoNews / Reviews / Tests
How to Drain Antifreeze UAZ Bukhanka
Before removing the radiator or checking the Patriot cooling system, you must drain the antifreeze. Of course, antifreeze will spill out, but it’s unlikely that anyone will like a wet engine compartment and a huge puddle under the car. According to the manufacturer's recommendations, antifreeze must be replaced every 60,000 kilometers or every 2 years. UAZ also advises motorists to drink the liquid they provide. But, unfortunately, the quality of antifreeze sometimes leaves much to be desired, so you should periodically check it for loss of its properties. A change in color will indicate the need for an urgent replacement of the coolant, since in this case it not only loses its properties, but also becomes quite aggressive. Many car enthusiasts recommend replacing the antifreeze filled at the UAZ Patriot factory with the best antifreeze that meets European standards immediately after purchasing the car. This replacement will ensure longer operation of the cooling system, thanks to the content of special additives in the antifreeze.
How to remove the stove on a UAZ 469 with your own hands
Download
To ensure that operating a car in the winter does not cause discomfort, first of all, a working heater must be installed in the car. Car owners of domestic UAZ vehicles are often faced with the problem of the heater not working, resulting in the need to replace it. In this article we will tell you how to select a UAZ Bukhanka stove and how to replace this device with your own hands.
Design:
The heater includes the following elements:
- Radiator.
- Fan.
- Special device for air distribution.
There are two main operating modes:
- When fresh air comes in.
- When recirculating flows.
The second mode implies increased temperature in the cabin. To do this, you need to close the air intake and then open the damper. In the first mode, the actions are performed in the reverse order.
A special unit controls the entire system. A tap is used for adjustment. A new design based on increased flow circulation and the use of fluid in the radiator allows the interior to warm up faster.
It is important to remember about glass blowing . Otherwise, this will lead to icing or fogging. The driver and passengers will feel discomfort.
If moisture gets in, it is removed through the air intake. A docking device is used here.
Interior radiator (heater - stove) UAZ Patriot (removal and replacement)
The interior heater of the UAZ Patriot, popularly often called a stove, basically fails because of the “sand” when the thunder strikes. Like a proverb. This is so, because in the summer the driver often does not think about how efficiently the heater - the stove - gives off heat, unless of course it is leaking. As a result, it turns out that the heater is faulty only during the winter, cold period.
When making a conclusion about malfunctions of the interior radiator (stove), we can say that there are two of them - typical. The first is when the radiator is leaking. Mainly on gaskets installed between plastic cans and the aluminum radiator housing. The second option is when the stove gets clogged. Both options are repairable. So, in particular, the leak site can be filled with glue, and if clogged, the stove can be washed. To do this, use detergents, cleaning agents and a pump, which circulates liquid through the stove. In any case, after such repairs, no one will give you a guarantee of long-term and problem-free operation. As a result, sometimes it’s easier to replace the interior radiator with a new one to be sure that it will not fail in the near future. We will talk about removing and replacing the interior radiator (stove) of the UAZ Patriot in our article.
Installation of coolant drain valves instead of plugs. — UAZ 3962, 2.7 l., 2014 on DRIVE2
To work with the cooling system, you first need to drain the coolant. The manufacturer of the faucets does not install them, but installs plugs. For convenient work, we install coolant drain faucets (coolant).
To visually determine the position of the faucet, use a file to make a cut on the faucet, as in the photo.
After the engine has cooled down, unscrew the cap from the radiator and install a tap in this place.
Now we can drain the coolant from the radiator.
Open the tap and drain.
Pour into a container.
On the ZMZ 409 block, the drain plug is located under the manifold on the left side.
After unscrewing the plug, tighten the faucet with the hose
If necessary, we can drain the coolant by opening the tap.
Plugs from the radiator and block in the photo.
For the convenience of draining the coolant, put the hoses on the faucets in advance, as in the first photo. After installing the faucets, we can secure the hoses with clamps.
The next time you need to work on the cooling system, you can now drain the coolant without unnecessary losses. I will be glad if this is useful to someone.
Mileage: 33000 km
Replace the radiator on a UAZ Patriot
Necessary tools: wrenches 10, 12, 14. Flat screwdriver, rag (it is better to prepare it in advance so as not to get dirty hands). The radiator grille remains in place; it does not need to be removed. So, the sequence of actions:
Once in place, the radiator is placed in the reverse order. In some cases, the radiator grille must be removed for convenience. There's nothing complicated about it, just tighten a few bolts. By the way, if your Patriot has a winch installed, the grille may interfere with the control of the cable winding on the reel, in which case it may make work difficult. This grill will be convenient when servicing your car.
Removal and installation of radiator UAZ Hunter 31516
- Repair manuals
- Repair manual for UAZ 31519 (Hunter) 2003.
- Removing and installing the radiator
You will need: keys “10”, “14”, a screwdriver with a flat and Phillips blades.
1. Disconnect the wire from the negative terminal of the battery.
2. Drain the cooling system (see “Replacing the coolant” ).
| 3. Remove two screws from the top... | 4. ...two screws from the bottom... |
5. ...and remove the radiator trim panel extension. Similarly, remove the right radiator trim panel extension.
6. Remove the four oil cooler mounting bolts and move it to the side.
| 7. Disconnect the wires from the coolant overheat warning light sensor. | 8. Loosen the clamp securing the steam exhaust hose... |
| 9. ...and remove the hose. | 10. Loosen the clamp securing the radiator supply hose... |
| 11. ...remove the hose from the radiator pipe. | 12. Loosen the clamp securing the radiator outlet hose. |
13. Remove the four bolts securing the fan casing and remove the casing.
14. Remove the bolts on both sides of the radiator mounting rods.
| Note From below, the radiator is attached to the frame brackets with bolts through rubber pads. |
| 15. Remove the fixing wire... | 16. ...and remove the bolt. Remove the second bolt in the same way. |
17. Remove the radiator from the engine compartment.
18. Rinse the outside of the radiator with a stream of water and dry. If the radiator is cracked, replace it.
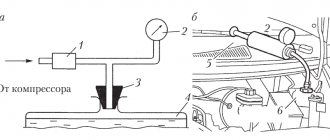
19. Check the tightness of the radiator by plugging the radiator pipes, except for one, to which connect the compressed air hose. Place the radiator in a bath of water and apply air at a pressure of 1 atm for about 30 s. Air bubbles will appear in damaged areas. In this case, replace the radiator.
20. Inspect the radiator mounting pads. If they are torn, cracked or the rubber has lost its elasticity, replace the cushions.
21. Install the radiator in the reverse order of removal.
↓ Comments ↓
1. Car structure
1.0 Car structure 1.1 General information about the car 1.2 Passport data 1.3 Car keys 1.4 Instrument panel and controls 1.5 Heating and interior ventilation 1.6 Doors 1.7. Seats 1.8 Rear view mirrors 1.9 Interior lighting
2. Recommendations for use
2.0 Recommendations for use 2.1. Safety rules and recommendations 2.2 Recommendations for traffic safety 2.3. What you need to have in your car 2.4 Operating the car during the warranty period 2.5 Running in the car 2.6. Preparing the car for departure 2.7 Refueling the car 2.8 Using a jack 2.9 Towing the car
3. Problems along the way
3.0 Malfunctions along the way 3.1. The engine does not start 3.2 Malfunctions of the fuel injection system 3.3. Interruptions in engine operation 3.4. The car moves jerkily 3.5 The car accelerates poorly 3.6 The engine stalled while driving 3.7. Oil pressure dropped to 3.8. Engine overheating 3.9. The battery does not recharge 3.11. Extraneous knocking noises appeared 3.12. Problems with brakes 3.13. Wheel puncture
4. Maintenance
4.0 Maintenance 4.1. General provisions 4.2. Daily Maintenance (EO) 4.3. First maintenance (TO-1) 4.4. Second technical maintenance (TO-2) 4.5. Features of the first technical maintenance (TO-1) of cars with a diesel engine 4.6. Features of the second technical service (TO-2) for cars with a diesel engine
5. Engine
5.0 Engine 5.1 Design features 5.2 Possible engine malfunctions, their causes and solutions 5.3 Helpful tips 5.4 Checking compression in the cylinders 5.5 Removing and installing engine mudguards 5.6. Replacing the suspension supports of the power unit 5.7 Replacing the generator and water pump drive belt 5.8 Installing the piston of the first cylinder to the TDC position of the compression stroke 5.9 Replacing chains and gears of the gas distribution mechanism 5.13. Replacing engine seal parts 5.14. Engine cylinder head 5.16. Engine repair 5.17. Engine lubrication system 5.18. Engine cooling system 5.19. Exhaust system 5.20. Power system 5.21. Fuel vapor recovery system 5.22. Diesel engine design features
6. Transmission
6.0 Transmission 6.1. Clutch 6.2. Gearbox 6.3. Transfer case 6.4. Cardan transmission 6.5. Front axle 6.6. Rear axle
7. Chassis
7.0 Chassis 7.1. Front suspension 7.2. Rear suspension
8. Steering
8.0 Steering 8.1 Design features 8.2 Possible steering malfunctions, their causes and solutions 8.3. Steering column 8.4. Steering linkage 8.5. Steering gear
9. Brake system
9.0 Brake system 9.1 Design features 9.2 Possible malfunctions of the brake system, their causes and solutions 9.3 Bleeding the brake system hydraulic drive 9.4 Checking and adjusting the free play of the brake pedal 9.5. Main brake cylinder 9.6 Replacing the vacuum brake booster 9.7. Replacement of hoses and pipelines of the hydraulic brake drive 9.8. Front wheel brakes 9.9. Brake mechanisms of the rear wheels 9.10. Brake force regulator in the hydraulic drive of the rear brakes 9.11. Parking brake
10. Electrical equipment
10.0 Electrical equipment 10.1 Design features 10.2. Battery 10.3. Mounting blocks 10.4. Generator 10.5. Starter 10.6. Ignition switch (lock) 10.7. Electronic petrol engine control system (fuel injection system) 10.8. Ignition system of injection engines 10.9. Electronic diesel engine control system (fuel injection system) 10.10. Lighting, light and sound signaling 10.11. Windshield cleaner 10.12. Windshield washer reservoir 10.13. Tailgate glass cleaner 10.14. Tailgate glass washer reservoir 10.15. Electric motor of the heating and ventilation system fan 10.16. Cigarette lighter 10.17. Instrument cluster 10.18. Speedometer 10.19. Replacing sensors and switches
11. Body
11.0 Body 11.1 Design features 11.2. Removing and installing bumpers 11.3. Removing and installing wheel arch liners and mud flaps 11.4 Removing and installing front fenders 11.5 Removing and installing radiator trim 11.6 Removing and installing radiator trim 11.7 Removing and installing engine compartment mud flaps 11.8 Removing and installing floor hatch covers 11.9 Removing and installing the battery shelf 11.10. Hood 11.11. Side doors 11.12. Tailgate 11.14. Wind window 11.15. Hatch covers for filling pipes of fuel tanks 11.16. Seats 11.17. Mirrors 11.18. Interior fittings 11.19. Instrument panel 11.20. Heater 11.21. Body care
12. Tips for a novice auto mechanic
12.0 Tips for a novice auto mechanic 12.1. Safety precautions during repair work 12.2. Tools 12.3 Before you start 12.4. Restoring threaded connections 12.5 Tips for body repair
13. Purchase of spare parts
13.0 Purchasing spare parts 13.1 Engine oil 13.2 Greases 13.3 Coolants 13.4 Brake fluid 13.5 Fuel filter 13.6 Air filter 13.7 Engine lubrication system oil filter
14. A trip to the service station
14.0 A trip to the service station
15. Winter operation of the car
15.0 Winter operation of a car 15.1 How to prepare a car for winter 15.2 Recommendations for starting the engine in severe frost 15.3 What is useful to buy for winter 15.4 Useful winter tips
16. Preparation for technical inspection
16.0 Preparation for technical inspection 16.1 Recommendations 16.2 List of malfunctions and conditions under which the operation of vehicles is prohibited 16.3 Changes to state standards regulating the maximum permissible content of harmful substances in the exhaust gases of vehicles
17. Applications
17.0 Appendices 17.1 Appendix 1. Tightening torques for threaded connections 17.2 Appendix 2. Temperature range of application of motor oils 17.3 Appendix 3. Fuels and lubricants and operating fluids 17.4 Appendix 4. Lamps used on vehicles 17.5 Appendix 5. Special tools and accessories
18. Electrical diagrams
18.0 Electrical diagrams 18.1 Diagram 1. Connections of the engine control system mod. ZMZ-5143.10 18.2 Diagram 2. Connections of the engine control system mod. ZMZ-409 (Euro-2) 18.3 Diagram 3. Connections of the engine control system mod. ZMZ-409 (Euro-0) 18.4 Scheme 4. Electrical equipment of cars mod. 31519-095, 31519-195 18.5 Scheme 5. Electrical equipment of cars mod. 315195-025, 315195-125 18.6 Scheme 6. Electrical equipment of cars mod. 315195-023, 315195-123
Setup and update
UAZ Bukhanka is often tuned. We are talking about changing the body or for purely specific interests. Hunting, fishing, etc., or for practical purposes: you can increase the technical parameters, strengthen the UAZ loaf. Improvements may include, in particular, achieving increased comfort and maximum capacity in the country. During the modernization process, work goes both directly to the body and to the chassis.
The body is lifted by installing 50 mm steel racks. Expansion calibration is also performed. Front and rear power bumpers were installed and a winch was added to the front bumper.
There is also a roof rack with a spare tire and a ladder. It is mandatory to install Plaza gas shock absorbers, protect steering rods, and install a new protected fuel tank.
The lift must also include the following procedures: the normal steering wheel must be removed and replaced with a "deluxe" model, and the interior must be properly treated with anti-corrosion agent.
There are three ways to take the elevator:
Coolant replacement
We install the car on a lift or inspection ditch
Removing the front engine mudguard
Open the heater tap
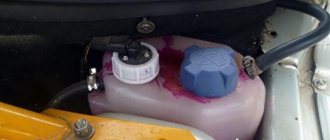
Unscrew and remove the radiator and expansion tank caps
We put a hose of a suitable size on the radiator tap pipe, and, opening the tap, drain the liquid into a container with a volume of at least 14 liters
We put the hose on the cylinder block tap pipe and also drain the liquid from the block
Using a 10mm socket, unscrew the nut of the clamp securing the expansion tank
Having removed the corrugated air intake hose from the radiator casing pipe, lift the tank to completely drain the liquid from its hose
Close all taps and install the expansion tank in place.
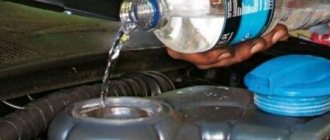
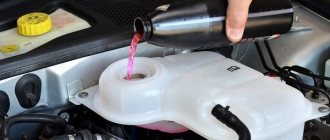
Fill the system with new coolant.
We fill the cooling system through the radiator, and then replace the filler plug.
Fill the liquid into the expansion tank to a level 3–4 cm above the “min” mark.
Reinstall the expansion tank plug.
After starting the engine and letting it run for 2-3 minutes, add fluid to the expansion tank, bringing its level to normal
Source
Thermostat
The element takes pride of place in the cooling of the power plant. The purpose of the product is to ensure circulation of the cooler, switching the movement between a small and large circle of circulation. To ensure that the processes on a cold engine are not disrupted and the engine quickly warms up to operating condition, the thermostat moves to the closed position. After heating the liquid in a small circle to 80°C, the mechanism opens, creating circulation through the radiator.
The thermostat is equipped with a solid filler and is placed in the motor housing. Operating a power plant without a mechanism can result in engine failure. The liquid will circulate in a small circle, without cooling in the heat exchanger, which will ultimately lead to overheating and jamming of the motor.
Read more: VV wires VAZ 2107 injector
Working diagram of the thermostat:
Tools required during radiator removal process
When problems arise with the heating system, drivers ask the question: “How to remove the heater radiator?” Before the dismantling process, you must prepare the following tools:
- set of wrenches;
- a Phillips screwdriver, preferably a short one;
- tweezers, with which you can easily remove and install latches;
- Clamps will not be superfluous; you need to prepare at least 5 pieces.
Most of the work on dismantling the heater radiator with your own hands should be done on the top of the engine compartment, as well as from inside the car itself. In this case, neither a hole nor a jack will be needed. But you need to take into account that access to the engine compartment is extremely difficult.
Radiator problems
If all of the above does not help, or there are leaks in the cabin with a persistent smell of coolant, replacing the heater core will help. This procedure is labor-intensive and will require you to have experience in such work, since you can replace the heater radiator only by removing the middle console and glove compartments on the passenger side. And the heater-air conditioner unit is considered non-separable, but who stops?
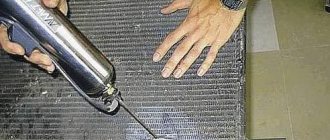
There is another option with flushing the radiator; it will not help eliminate the leak, but it is quite possible to remove minor blockages. To do this you need:
- drain the coolant;
- disconnect the inlet and outlet pipes from the radiator and drain the remaining coolant into a previously prepared container;
- Next, we put the coolant supply hose back on, put a piece of the hose on the “return” and put it in a container with flushing liquid, and immerse the liquid intake hose into the cooling system there;
- we fill the entire cooling system by flushing, thoroughly removing all the air from the system;
- We start the engine and watch how our system is cleaned.
This method is ineffective for severe blockages; the dirt becomes so clogged that flushing passes by, washing out only minor parts.
To remove the radiator from the heater block, the entire block must be removed since the radiator is built into it. Let's start:
- It is better to remove the terminal from the battery so as not to burn anything;
- Removing the front passenger seat is not necessary, but will greatly facilitate further work;
- drain the coolant into a clean container, the volume of liquid in the system is approximately 10 liters;
- unscrew and remove the lower part of the panel, do the same with the middle part and the armrest;
- Next comes the disassembly of the air duct connections: from the fans to the heater-air conditioner unit;
- then we carefully pick out the radiator itself, taking into account that we will then need to seal this place;
- we buy a UAZ Patriot heater radiator, which one is better - it’s up to you, you can take a Delphi, or pick up something from a VAZ, the main thing is that it fits in size (645*438), and insert it in place of the old one;
- Next, you need to assemble and glue everything. Epoxy resin together with fiberglass is best suited for this, but other adhesives that are not affected by elevated temperatures can be used. It is necessary to glue everything properly, otherwise there will be an air leak and there will be no effective heating;
- It is advisable to replace all rubber pipes with silicone ones, and apply sealant at the joints. Check the drainage hole and tube; they should not be clogged and the drainage should flow smoothly without stagnation. It is necessary to replace the rings on the iron pipes, which are attached directly to the radiator itself, everything - now the stove is like new;
- then, without assembling the panel, fill in the coolant, attach the terminals, and start the car. Carefully, preferably with additional lighting, check all connections and eliminate all leaks, if any;
- We assemble the panel in the reverse order and install the seat in place.
Now you know the details of the procedure, and before removing the heater radiator on the UAZ “Patriot” 3163, you should decide whether to do this yourself or entrust this procedure to professionals. We talked about how to do this in a “garage” environment without having a lot of tools. But do not neglect a coolant leak; this can lead to engine overheating and failure.
Source: remam.ru
Disadvantages of the system
The standard system has only one plus - it works. The owners cannot say that it is impeccably reliable. It's all about the quality of spare parts. But all the other advantages that this system has can be safely written off as disadvantages. The 402nd motor has a too low-speed fan - its number of revolutions is strictly limited by the pump. To have enough of them, you need a large radiator. In winter, you have to close this radiator to prevent the engine from freezing. There are also problems with the operation of the heater. Without additional artificial pumping of antifreeze, there is no need to wait for heat.
All these problems can be solved by modernizing the cooling system 402 of the UAZ “Loaf” engine (replacing the radiator with a multi-section one, installing a second stove, and so on). Many owners modify it, increasing its efficiency.
So, we found out how the cooling system of the UAZ “Loaf” with the engine of the 409th and 402nd models works. The device is very simple, but the reliability of the system leaves much to be desired, as the owners say.
Removing the heater motor without removing the UAZ Bukhanka stove
We cut out strips of vibroplast, stick it on the sides of the new radiator, to place it more tightly in the heater body, and to prevent cold air from blowing in addition to the radiator:. Thanks to the vibroplast on the sides of the radiator, it does not dangle there, but sits tightly. And it is also possible that in summer the heater body will not heat up so much from the radiator. Now, as a sealant of the heater housing to the car body, and at the same time to prevent cold air from blowing past the radiator, we glue the ends of the heater housing and radiator with vibroplast: We lubricate the heater fasteners, namely the studs, with lithol, and also replace the old rusty nuts with new ones: We screw the radiator pipes into place, the lower one to the valve on the cylinder head, the upper one to the additional pump:.
Dear readers! Our articles talk about typical ways to resolve legal issues, but each case is unique.
If you want to find out how to solve your particular problem, please use the online consultant form on the right or call the numbers provided on the website. It's fast and free!
WATCH THE VIDEO ON THE TOPIC: Heater heater electric motor